
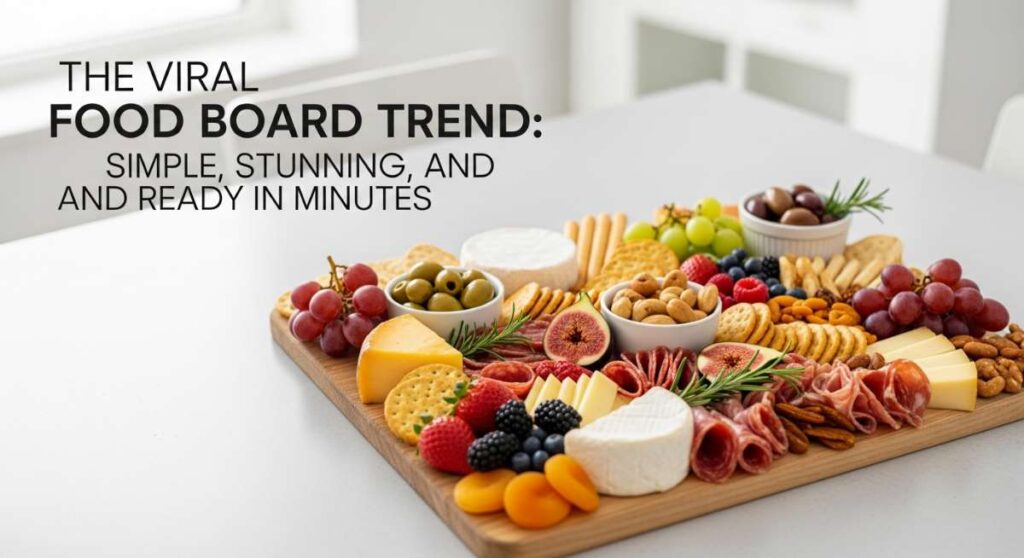
The Viral Food Board Trend: Simple, Stunning, and Ready in Minutes
There is something truly magical about a table filled with food that looks like a work of art but took only minutes to assemble. We’ve all seen those viral food boards across our feeds—the kind that make you stop scrolling and instantly hit save. Whether you are celebrating a major milestone like graduation or just embracing the fleeting, tart glory of rhubarb season, the food board trend is all about accessibility and visual storytelling. It’s about taking simple ingredients and presenting them in a way that feels intentional and full of heart.
Hosting shouldn’t feel like a chore, and that is why I am so obsessed with this approach. By focusing on a few key elements—like a perfectly baked scone or a beautifully decorated cookie—you can create a spread that feels incredibly high-end without the high-stress kitchen marathon. Today, we are diving into the ultimate guide for your spring and summer celebrations, blending the elegance of graduation festivities with the rustic, comforting vibes of homemade rhubarb treats.
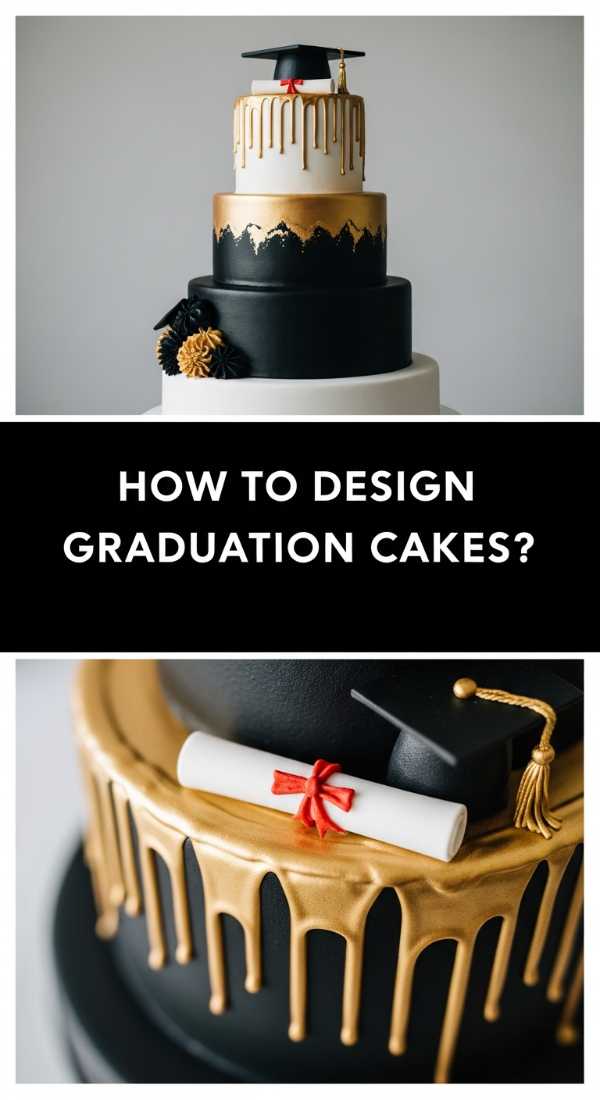
How to design graduation cakes?
Why we love this
Designing a graduation cake is all about capturing the bittersweet transition from one chapter to the next. We love this process because it allows for a balance of sophisticated minimalism and celebratory flair. Imagine a silky smooth buttercream finish that catches the light, topped with a custom acrylic topper or a hand-piped mortarboard. The contrast between a classic vanilla bean sponge and a modern, sleek design makes the centerpiece of your party feel both timeless and trendy, providing that perfect ‘Instagrammable’ moment for the guest of honor.
Ingredients
- Two 8-inch round sponge cakes
- 4 cups vanilla Swiss meringue buttercream
- Black fondant for the graduation cap
- Gold luster dust
- Edible gold leaf
- Simple syrup for moistening layers
How to make it
- Begin by leveling your chilled cake layers using a serrated knife to ensure a perfectly flat surface for stacking. Apply a small dollop of buttercream to your cake board to act as glue.
- Place the first layer down and soak it lightly with simple syrup using a pastry brush, which ensures the cake remains moist throughout the event. Spread an even 1/2 inch layer of buttercream over the top.
- Stack the second layer and apply a thin ‘crumb coat’ of frosting over the entire cake. This traps any loose crumbs. Chill the cake in the refrigerator for at least 30 minutes until the frosting is firm to the touch.
- Apply the final thick layer of buttercream. Use a metal bench scraper held at a 90-degree angle to the cake, spinning the turntable slowly to create a perfectly smooth, sharp-edged finish.
- Roll out your black fondant to 1/4 inch thickness. Cut a square for the top of the cap and a thick strip to form the base. Let these dry slightly before assembling with a dab of water.
- Place the fondant cap on the center of the cake and use a fine-tip brush to apply gold luster dust (mixed with a drop of lemon extract) to the tassel or the cake edges for a luxurious, celebratory shimmer.
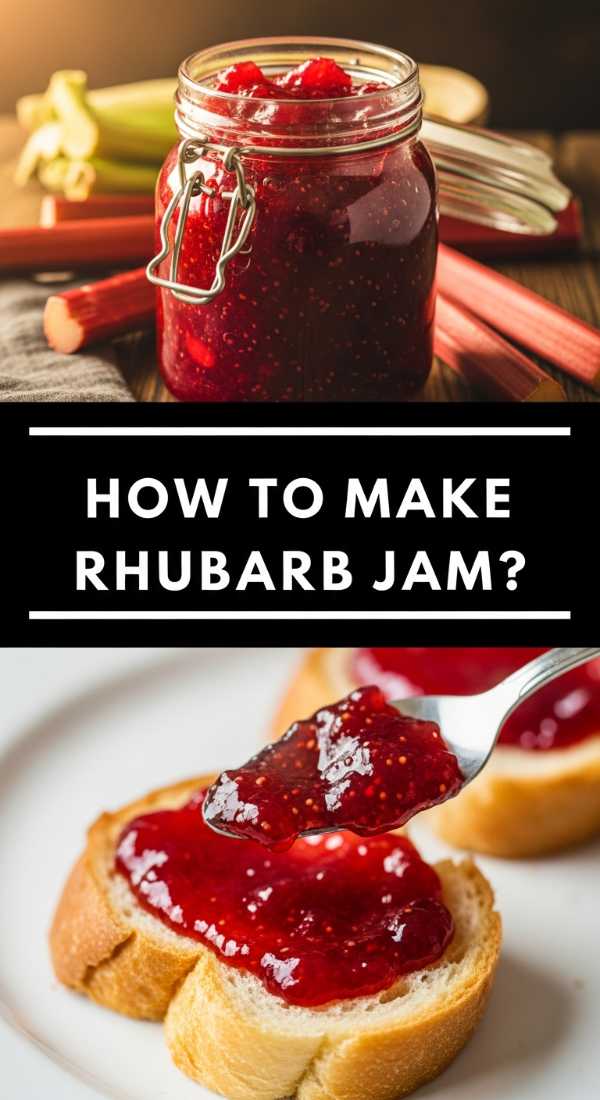
How to make rhubarb jam?
Why we love this
Rhubarb jam is like capturing springtime in a glass jar. The vibrant, jewel-toned pink hue is absolutely stunning on any food board, and the flavor profile is a masterclass in balance—tart, tangy, and just sweet enough to make your taste buds dance. When it’s simmering on the stove, the aroma is nostalgic and bright, filling the kitchen with a scent that feels like a warm hug. It is the perfect accompaniment to sharp cheeses or buttery scones, adding a sophisticated punch of acidity to your spread.
Ingredients
- 4 cups fresh rhubarb, chopped into 1/2 inch pieces
- 1 1/2 cups granulated sugar
- 1 tablespoon lemon juice
- 1 teaspoon lemon zest
- 1/4 teaspoon pure vanilla bean paste
How to make it
- In a large, heavy-bottomed non-reactive saucepan, combine the chopped rhubarb and sugar. Let this mixture sit for about 30 minutes; this process, called maceration, draws out the natural juices and creates a syrup.
- Place the saucepan over medium heat and stir constantly until the sugar has completely dissolved. Add the lemon juice and zest, which provide necessary pectin and acidity to help the jam set.
- Increase the heat to medium-high to bring the mixture to a rolling boil. Stir frequently to prevent the bottom from scorching. You will see the rhubarb begin to break down into thick, fibrous strands.
- Cook for approximately 10-15 minutes. To check the set, place a small spoonful of jam on a chilled plate and put it in the freezer for one minute. If it wrinkles when pushed with your finger, it’s ready.
- Remove from heat and stir in the vanilla bean paste for a subtle depth of flavor. Pour the hot jam into sterilized glass jars, leaving 1/4 inch of headspace, and allow to cool completely before sealing.
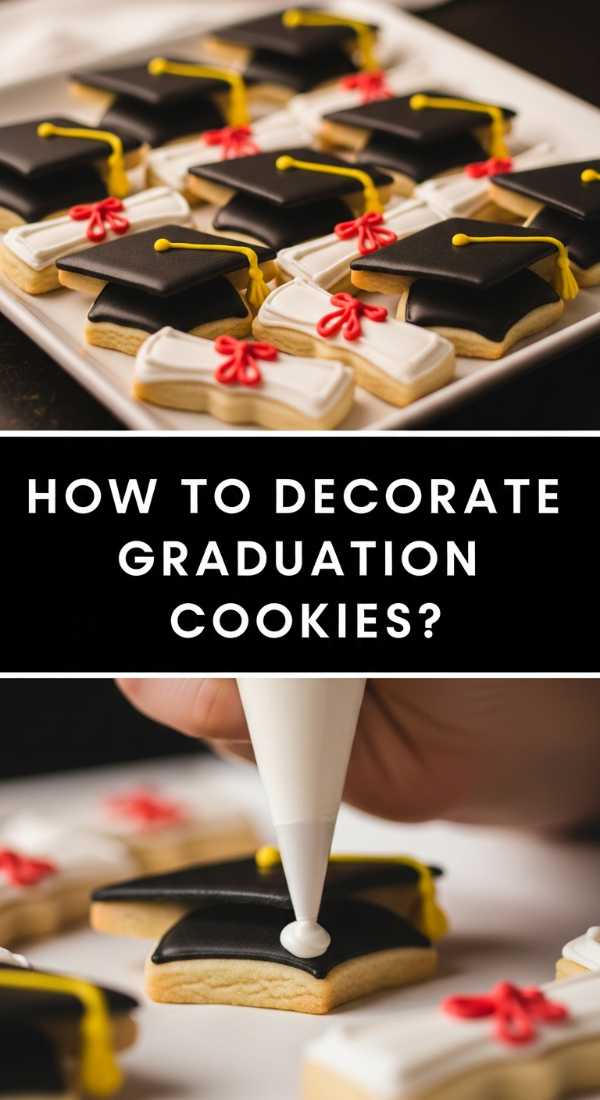
How to decorate graduation cookies?
Why we love this
There is nothing quite as satisfying as a perfectly flooded sugar cookie. We love decorating graduation cookies because they serve as edible party favors that can be customized to any school color. The smooth, matte finish of the royal icing paired with crisp, clean lines creates a professional look that guests always assume was store-bought. The crunch of the icing against a soft, buttery cookie base provides a sensory delight that makes these treats the first thing to disappear from the board.
Ingredients
- Batch of baked sugar cookies (diploma and cap shapes)
- Royal icing in stiff and flood consistencies
- Gel food coloring (school colors)
- Fine-tip piping bags
- Scribe tool or toothpick
How to make it
- Separate your royal icing into bowls and tint them with gel colors. Prepare two bags for each color: one with ‘stiff’ consistency for outlining and one with ‘flood’ consistency (thinned with drops of water) for filling.
- Start by piping a thin border around the edge of the cookie using the stiff icing. This creates a dam that prevents the thinner icing from spilling over the sides.
- Immediately fill the center with the flood icing. Use a scribe tool or toothpick to move the icing into the corners and pop any small air bubbles that appear on the surface.
- For a ‘diploma’ look, use a white flood base and let it dry for 2 hours. Once firm, pipe a thin red or blue line across the middle to represent the ribbon, adding a small bow detail.
- If adding text like ‘Class of 2024,’ wait at least 4 hours for the base to crust over completely. Use a steady hand and a very small round piping tip with stiff icing to write the letters.
- Allow the cookies to dry undisturbed for at least 12 hours (overnight is best) to ensure the icing is hard enough for stacking and won’t smudge.
How to bake rhubarb pie?
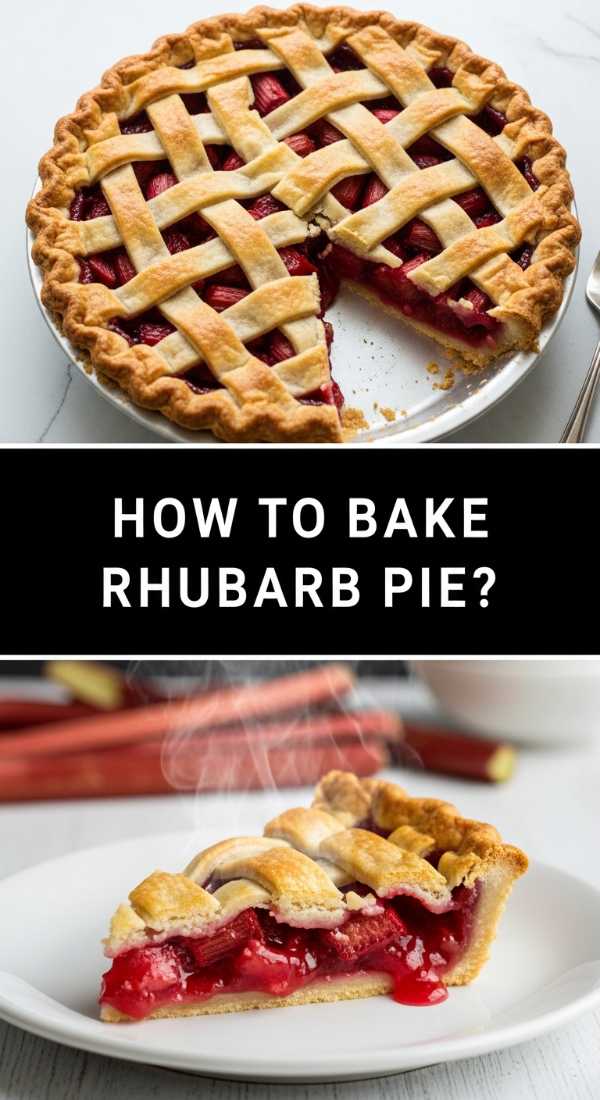
Why we love this
Rhubarb pie is the quintessential early summer dessert. Its beauty lies in the contrast between the flaky, golden-brown crust and the molten, ruby-red interior. Every bite offers a texture that is both crisp and gooey, while the natural sharpness of the rhubarb is mellowed by the buttery pastry. It’s a rustic, soulful dish that reminds us of garden parties and sun-drenched afternoons, making it a show-stopping addition to a food board when served in mini-slices or tartlets.
Ingredients
- Double pie crust (homemade or store-bought)
- 5 cups rhubarb, sliced into 1/2 inch pieces
- 1 1/4 cups sugar
- 1/4 cup cornstarch
- 1 tablespoon butter, cubed
- 1 egg (for egg wash)
- Coarse sparkling sugar for topping
How to make it
- Preheat your oven to 400°F (200°C). Roll out the bottom crust on a lightly floured surface and fit it into a 9-inch pie plate, leaving an inch of overhang.
- In a large bowl, toss the sliced rhubarb with the sugar and cornstarch. Ensure every piece is coated; the cornstarch is vital for thickening the juices so the pie isn’t runny.
- Pour the filling into the prepared crust and dot the top with the small cubes of butter. This adds a richness to the sauce as it bakes.
- Roll out the second crust. You can do a full top with steam vents or create a lattice pattern for a more decorative look. Fold the top crust under the bottom crust overhang and crimp the edges tightly to seal.
- Brush the top of the pastry with a beaten egg wash and sprinkle generously with coarse sparkling sugar. This creates a professional, golden-brown sheen and a sweet crunch.
- Bake for 45-50 minutes. If the edges brown too quickly, cover them with foil. The pie is done when the crust is deep golden and the filling is bubbling thick and slow through the vents. Allow it to cool for at least 4 hours to set properly before slicing.
How to frost graduation cupcakes?
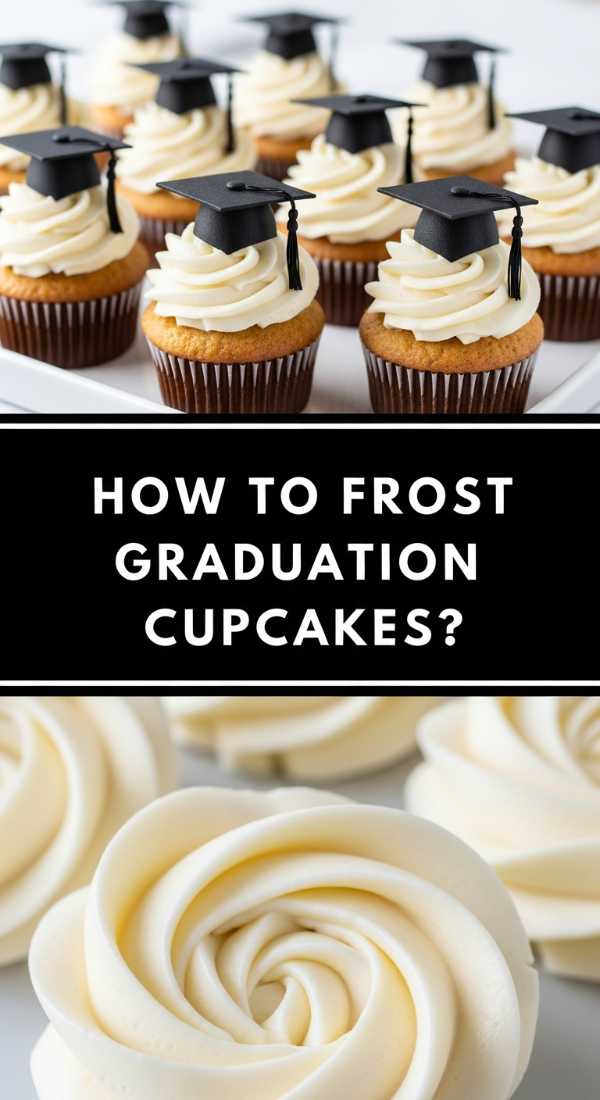
Why we love this
Cupcakes are the ultimate grab-and-go party food, and frosting them for a graduation theme turns them into miniature celebratory trophies. We love the versatility of a high-swirl piping technique; it adds height and drama to your food board. The velvet-smooth texture of the frosting combined with a themed chocolate cap on top creates a multi-layered dessert experience that is as fun to look at as it is to eat. It’s an easy way to bring a burst of color and sweetness to your graduation spread.
Ingredients
- 12 baked cupcakes
- 3 cups stiff vanilla buttercream
- Ghirardelli chocolate squares (for the cap)
- Chocolate chips or M&Ms
- Sour belt candy or fruit leather (for the tassel)
- Large open-star piping tip (like Wilton 1M)
How to make it
- Fit a large piping bag with an open-star tip and fill it with buttercream. Ensure there are no air pockets in the bag by squeezing a bit of frosting back into the bowl first.
- Hold the bag vertically over the center of the cupcake. Starting from the outside edge, pipe a continuous circle moving inward and upward to create a tall, classic bakery-style swirl.
- To make the ‘graduation cap’ topper, place a chocolate chip or M&M upside down in the center of the frosting swirl to act as a platform.
- Place a chocolate square (like a Ghirardelli square) on top of the chip. The frosting will act as glue to hold it in place.
- Cut a thin strip of sour belt or fruit leather to act as the tassel. Use a tiny dot of leftover frosting to stick the tassel to the top of the chocolate square.
- Chill the cupcakes for 15 minutes to set the frosting and the ‘caps’ so they remain stable while being moved onto your display board.
How to brew coffee drinks?

Why we love this
No food board is complete without a beverage pairing, and artisanal coffee drinks bring a cozy, café-vibe to your home. We love the ritual of brewing—the rich, earthy aroma of freshly ground beans and the visual beauty of milk swirling into dark espresso. Whether it’s a cold brew with a sweet cream foam or a hot latte with a hint of vanilla, coffee provides the perfect bitter counterpoint to the sweet rhubarb treats and sugary graduation cookies on your board.
Ingredients
- Freshly roasted coffee beans
- Filtered water
- Whole milk or oat milk
- Vanilla or simple syrup
- Ice (for cold versions)
- Cinnamon or cocoa powder for dusting
How to make it
- For a classic latte, start by finely grinding your beans. Use an espresso machine or an Aeropress to brew a concentrated 2-ounce shot of coffee into a clear glass.
- If making a hot drink, steam your milk to about 150°F (65°C) using a steam wand or a hand-held frother until it is silky with micro-foam. For cold drinks, use a frother on cold milk to create a thick ‘cold foam.’
- Pour the syrup of your choice into the espresso and stir gently. If making a layered iced drink, fill the glass with ice cubes before adding the milk.
- Slowly pour the frothed milk over the coffee. If done carefully, the milk will marble through the dark espresso, creating a beautiful aesthetic.
- Top with an extra dollop of foam and a light dusting of cinnamon or cocoa powder to enhance the aroma as the guest takes their first sip.
- Serve immediately alongside your food board, ideally in small glass carafes or mugs that match your party’s color scheme.
How to make rhubarb crumble?
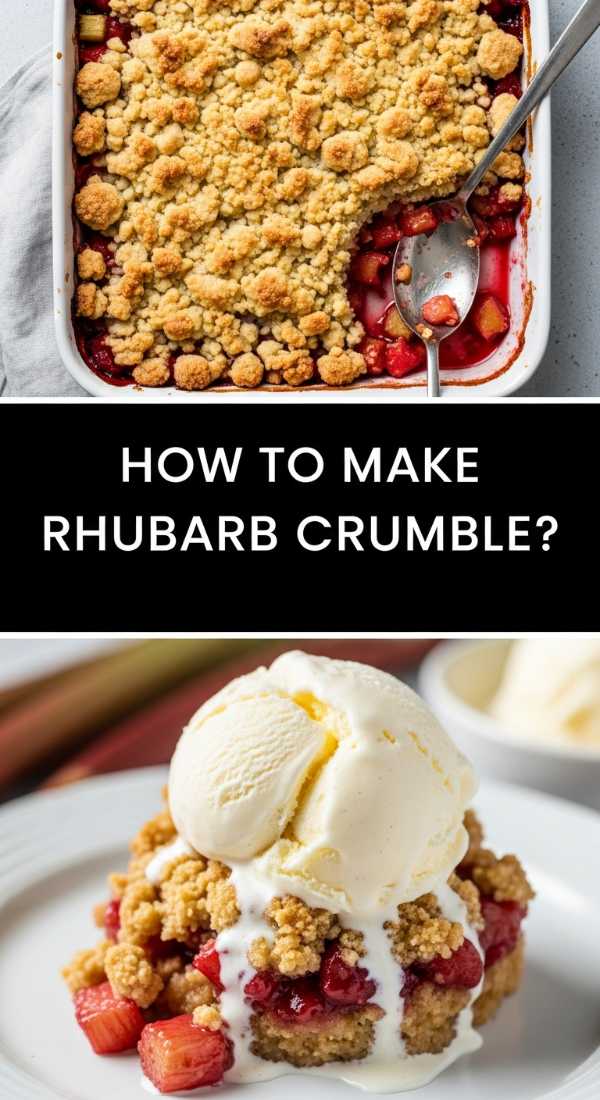
Why we love this
The rhubarb crumble is the ultimate ‘low effort, high reward’ dish. We love it for the incredible contrast in textures: the soft, jammy, tart rhubarb base hiding beneath a heavy, buttery, crunch-filled oat topping. It’s warm, inviting, and looks beautifully rustic when served in individual ramekins on a large wooden board. The way the pink juices bubble up around the golden edges is a visual cue of the delicious, home-cooked comfort that awaits your guests.
Ingredients
- 6 cups chopped rhubarb
- 3/4 cup sugar
- 1 cup all-purpose flour
- 1 cup rolled oats
- 1 cup brown sugar, packed
- 1/2 cup cold unsalted butter, cubed
- 1 teaspoon cinnamon
How to make it
- Preheat your oven to 375°F (190°C). In a large bowl, toss the rhubarb with the 3/4 cup of granulated sugar and spread it evenly into a 9×9 inch baking dish or individual ramekins.
- In a separate bowl, combine the flour, rolled oats, brown sugar, and cinnamon. Stir to ensure the spices are evenly distributed throughout the dry ingredients.
- Add the cold, cubed butter to the dry mixture. Use a pastry cutter or your fingertips to work the butter into the flour until the mixture resembles coarse crumbs with some pea-sized chunks of butter remaining.
- Sprinkle the crumble topping evenly over the rhubarb. Do not press it down; you want it to remain loose so the heat can circulate and create a crisp texture.
- Bake for 35-40 minutes. You are looking for a deep golden-brown color on the topping and for the rhubarb juices to be thick and bubbling vigorously at the edges.
- Let the crumble rest for at least 15 minutes before serving. This allows the fruit base to thicken slightly so it isn’t too liquid when scooped onto plates.
How to build graduation boards?
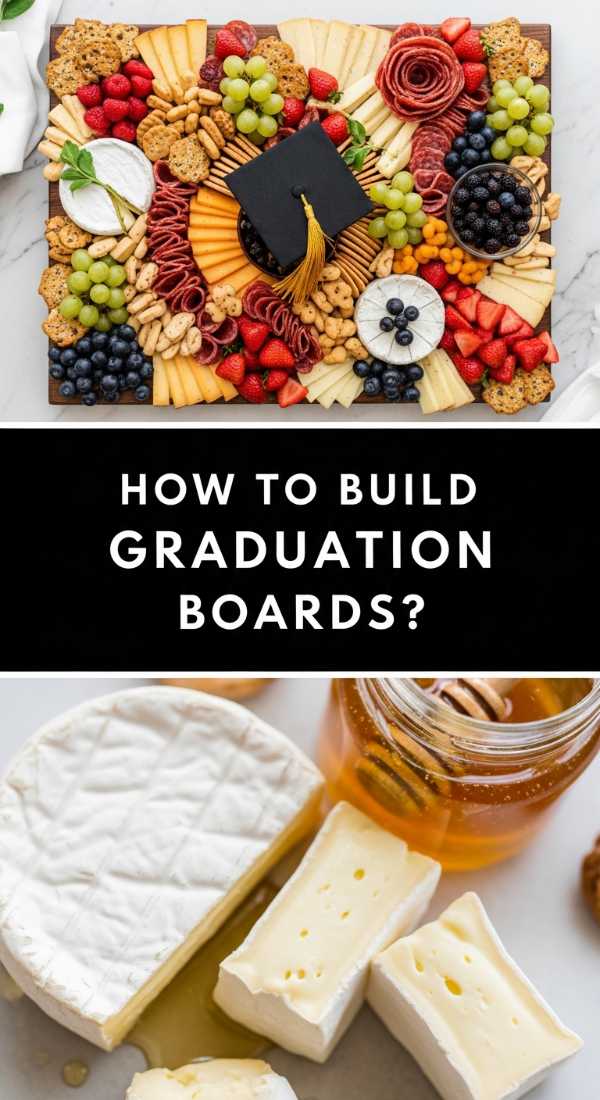
Why we love this
Building a graduation-themed board is like creating a visual map of a celebration. We love this trend because it breaks the formality of traditional dining and encourages guests to mingle and graze. By mixing sweet treats like cupcakes and cookies with savory elements or fresh fruit, you create a dynamic palette of colors and flavors. The board becomes a conversation starter, styled with ‘2024’ cutouts or school colors, making the graduate feel truly celebrated in a modern, stylish way.
Ingredients
- Large wooden or slate board
- Graduation cookies and cupcakes
- Fresh berries (strawberries, raspberries)
- Small bowls for rhubarb jam
- Assorted nuts or pretzels for salt balance
- Decorative elements (tassels, confetti)
How to make it
- Start by placing your ‘anchor’ items—these are your largest components or anything in a bowl, such as a jar of rhubarb jam or a cluster of graduation cupcakes. Place them in a triangular pattern to balance the board.
- Add your themed focal points, like the graduation-cap cookies, near the center. Group them in small clusters rather than spreading them out individually to create ‘impact zones.’
- Fill in the larger gaps with fresh fruit. Raspberries and sliced strawberries work beautifully here because they echo the pink tones of the rhubarb elements elsewhere on the board.
- Use smaller items like yogurt-covered pretzels or almonds to fill the tiny ‘micro-gaps’ between the larger treats. This makes the board look lush, abundant, and professionally styled.
- Incorporate your graduation theme by tucking a clean, new tassel under a bowl or sprinkling a few pieces of oversized star confetti in the empty spaces.
- Finish by adding small serving spoons for the jam and napkins that match the school colors. Step back and check for color balance, moving items if one side looks too ‘heavy’ with a single color.
How to bake rhubarb scones?
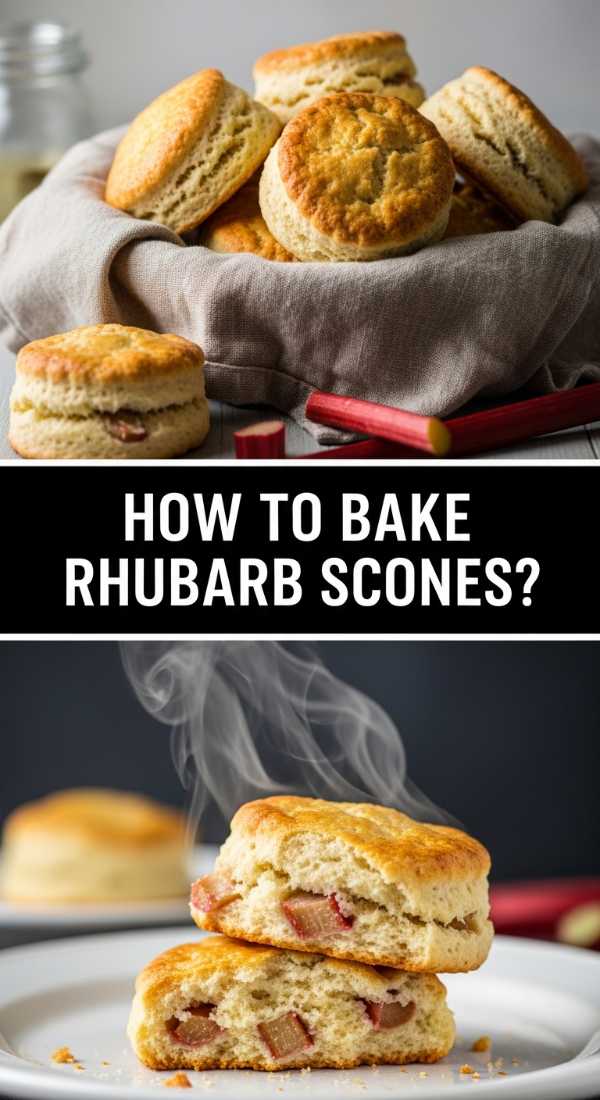
Why we love this
Rhubarb scones are the height of sophisticated brunch fare. We love the way the tart pockets of fruit burst during baking, bleeding a beautiful pink hue into the tender, cream-based crumb. The exterior gets a lovely crusty texture, while the inside remains soft and pillowy. When served warm with a dollop of clotted cream or the rhubarb jam we made earlier, these scones offer a refined, English-garden-party feel that elevates any food board from simple to spectacular.
Ingredients
- 3 cups all-purpose flour
- 1/2 cup sugar
- 1 tablespoon baking powder
- 1/2 cup cold butter, grated
- 1 1/2 cups fresh rhubarb, finely diced
- 1 cup heavy cream (plus extra for brushing)
- 1 teaspoon vanilla extract
How to make it
- Whisk together the flour, sugar, and baking powder in a large bowl. Grating your cold butter with a cheese grate into the flour is a pro-tip that ensures even distribution and a flakier texture.
- Gently fold the finely diced rhubarb into the dry ingredients. Dicing it small ensures that every bite has fruit without making the dough too wet or heavy.
- Create a well in the center and pour in the heavy cream and vanilla. Use a fork to mix until a shaggy dough forms. Do not overmix, or the scones will be tough rather than tender.
- Turn the dough out onto a lightly floured surface and gently pat it into a 1-inch thick circle. Cut into 8 wedges using a sharp knife or a bench scraper.
- Place the wedges on a parchment-lined baking sheet. Brush the tops with a little extra heavy cream and sprinkle with a bit of granulated sugar for a crunchy finish.
- Bake at 400°F (200°C) for 18-22 minutes until the tops are golden brown and the scones feel firm. Let them cool slightly on a wire rack before serving so the centers can finish setting.
How to ice sugar cookies?

Why we love this
Icing sugar cookies is an art form that brings a meditative, creative joy to the kitchen. We love the transformation of a plain, beige biscuit into a vibrant, glossy masterpiece. The technique of ‘flooding’ allows for a perfectly smooth surface that looks like porcelain. It’s the details that count here—the way the icing catches the light and the satisfying ‘snap’ when you bite into the dried surface. It is the ultimate way to customize your food board to any specific celebration or color palette.
Ingredients
- Baked and cooled sugar cookies
- Royal icing (powdered sugar, meringue powder, water)
- Gel food colors
- Squeeze bottles or piping bags
- Toothpicks
How to make it
- Prepare your royal icing to ’15-second consistency.’ This means when you run a knife through the icing, the line disappears in exactly 15 seconds. This is the gold standard for easy flooding and smooth finishes.
- Outline the edge of the cookie first with a steady, slow motion. Keep the tip of the bag slightly above the cookie, letting the icing ‘fall’ onto the surface for a straighter line.
- Fill the inside of the outline immediately. Use a squeeze bottle for faster coverage. Use a toothpick in a circular motion to spread the icing to the edges and fill any gaps.
- Gently shake the cookie back and forth on the counter to help the icing settle into a perfectly flat, glass-like layer.
- If you want to add a ‘wet-on-wet’ design (like dots or stripes), add the second color immediately while the base is still wet. For ‘wet-on-dry’ (3D details), wait at least 2 hours.
- Let the cookies dry in a cool, dry place for 12-24 hours. A small fan nearby can help increase the shine and speed up the drying process, ensuring the icing doesn’t develop a dull finish.
Conclusion
Creating a viral-worthy food board is less about professional culinary skills and more about the love and intention you put into the presentation. By blending the tart, seasonal joy of rhubarb with the celebratory milestones of graduation, you create a spread that is as meaningful as it is delicious. Remember to play with heights, textures, and colors, and most importantly, enjoy the process of making something beautiful for the people you love. Happy hosting!