
There is something truly magical about this time of year, isn’t there? The air smells like blooming lilacs, the evenings are stretching longer, and our social calendars are filling up with the joyful chaos of graduation parties and early summer garden gatherings. I found myself scrolling through my feed last night and realized that we are all craving the same thing: connection without the stress. That is exactly how the ‘Viral Simple Food Board’ trend was born—it’s about taking those nostalgic, seasonal flavors like tart rhubarb and sweet mulberries and presenting them in a way that feels like a warm hug for your guests.
I remember my own graduation party; I was so stressed about every little detail that I barely tasted the cake! This year, I’m doing things differently, and I want you to join me. Whether you are celebrating a high school senior or just the fact that the sun is finally out, these recipes and styling tips are designed to be approachable yet stunning. We are going to build a board that combines the zesty brightness of lemon pesto with the deep, jammy comfort of homemade rhubarb pie, creating a centerpiece that your friends won’t stop talking about.
How to design graduation cakes?

Why we love this
A graduation cake is more than just a dessert; it is a sugary tribute to years of hard work and late-night study sessions. We love a minimalist design because it allows the elegance of the occasion to shine through without feeling cluttered or dated. Imagine a silky, smooth buttercream finish that catches the light, topped with a few sprigs of fresh greenery or delicate edible gold leaf that shimmers under the party lights. The aroma of a high-quality vanilla bean sponge wafting through the room creates an instant sense of celebration and accomplishment for everyone involved.
Ingredients
- 3 tiers of pre-baked vanilla or chocolate sponge cake
- 4 cups of Swiss meringue buttercream
- Edible gold leaf or metallic sprinkles
- Fresh eucalyptus or rosemary sprigs for garnish
- Acrylic cake topper with the graduation year
How to make it
- Start by leveling your cake layers using a serrated knife or a cake leveler to ensure they are perfectly flat, which prevents the cake from leaning.
- Apply a thin ‘crumb coat’ of buttercream over the entire surface of the stacked layers and chill in the refrigerator for at least 30 minutes until firm to the touch.
- Apply a generous second layer of buttercream, using a large offset spatula to spread it evenly and a bench scraper held at a 45-degree angle to create perfectly smooth, sharp sides.
- Carefully apply small flecks of edible gold leaf using a dry paintbrush or tweezers, focusing on one side of the cake to create a modern, asymmetrical ‘cascade’ effect.
- Finish by placing your sprigs of greenery and the cake topper slightly off-center to give the design a contemporary, professional look.
How to make rhubarb jam?
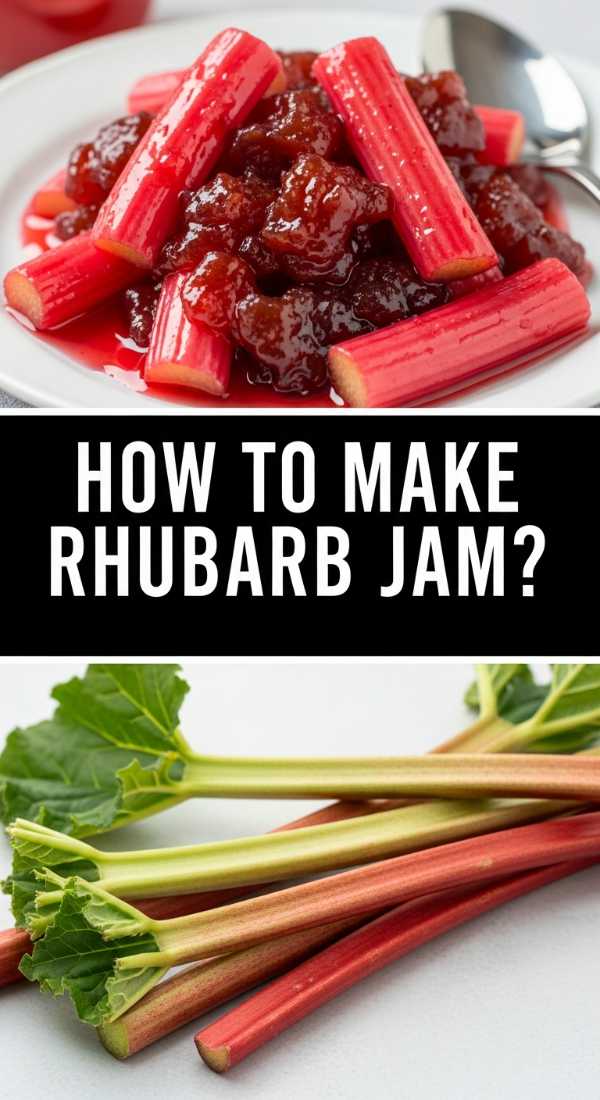
Why we love this
Rhubarb jam is the quintessential taste of spring captured in a glass jar, offering a brilliant balance of puckering tartness and sugary warmth. When you simmer these ruby-red stalks, the kitchen fills with a bright, floral aroma that feels incredibly nostalgic and comforting. The texture is thick and luscious, with soft bits of fruit that melt on your tongue, making it the perfect companion for a warm scone or a piece of sourdough toast. It adds a vibrant pop of pink to your food board that looks just as good as it tastes.
Ingredients
- 2 lbs of fresh rhubarb, chopped into 1-inch pieces
- 3 cups of granulated sugar
- 1/4 cup of fresh lemon juice
- 1 teaspoon of pure vanilla bean paste
- A pinch of sea salt
How to make it
- Combine the chopped rhubarb, sugar, and lemon juice in a large, heavy-bottomed pot and let it sit for about 30 minutes until the rhubarb begins to release its natural juices.
- Place the pot over medium heat and stir constantly until the sugar has completely dissolved and the mixture begins to simmer softly.
- Increase the heat slightly to maintain a rolling boil, stirring frequently to prevent the bottom from scorching, and cook for about 15-20 minutes until the mixture thickens.
- Test for doneness by placing a small spoonful of jam on a chilled plate; if it wrinkles when you push it with your finger, it is ready to be removed from the heat.
- Stir in the vanilla bean paste and salt, then carefully ladle the hot jam into sterilized jars, leaving a quarter-inch of headspace at the top before sealing.
How to style graduation cupcakes?
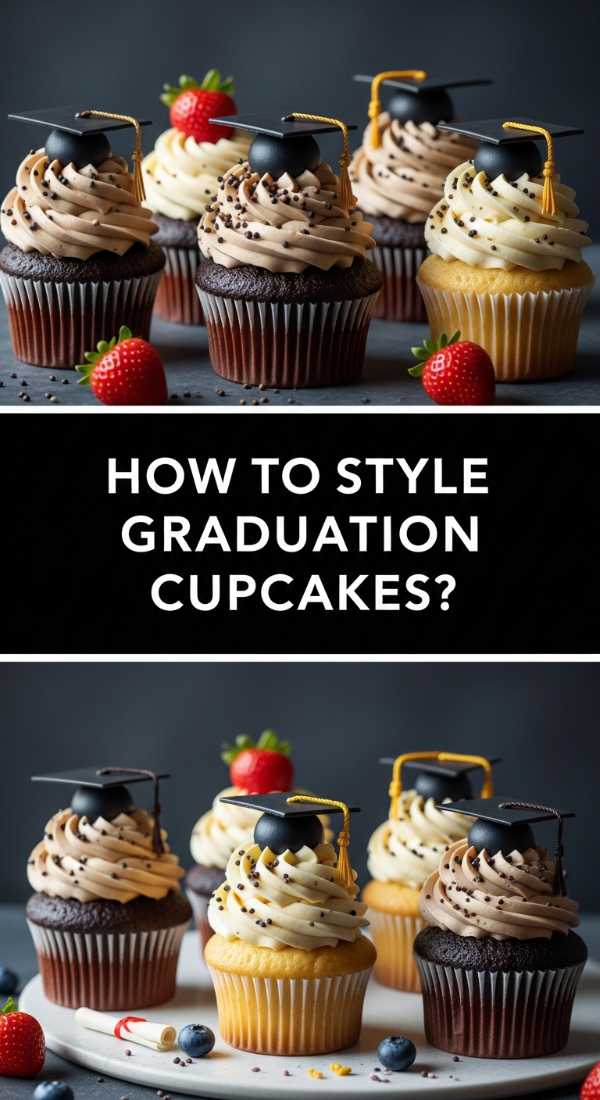
Why we love this
Cupcakes are the ultimate party food because they are perfectly portioned and easy for guests to grab while they mingle. Styling them for a graduation means playing with height and theme to create a cohesive look that feels sophisticated rather than juvenile. We love using a monochromatic color palette—think deep navy or classic black and white—to make the ‘mortarboard’ decorations pop against the velvety frosting. The contrast between the soft, airy cake and the structured chocolate decorations provides a satisfying crunch that makes every bite an experience.
Ingredients
- 12 baked chocolate cupcakes in foil liners
- 2 cups of stiff chocolate ganache or dark frosting
- 12 square chocolate pieces (like Ghirardelli squares)
- 12 miniature Reese’s cups or chocolate truffles
- Sour candy strips or fruit leather for tassels
How to make it
- Frost each cupcake with a high swirl of chocolate ganache using a large open-star piping tip, ensuring the frosting is stable enough to support the ‘cap.’
- Place a miniature Reese’s cup upside down in the center of the frosting swirl to act as the base of the graduation cap.
- Add a tiny dot of melted chocolate to the top of the Reese’s cup and press a square chocolate piece firmly onto it to create the flat top of the mortarboard.
- Cut a thin strip of sour candy or fruit leather and use another dab of melted chocolate to attach it from the center of the square to the side, mimicking a tassel.
- Place a tiny round sprinkle or a dot of icing in the very center of the square to hide the end of the tassel and complete the professional look.
How to bake rhubarb pie?
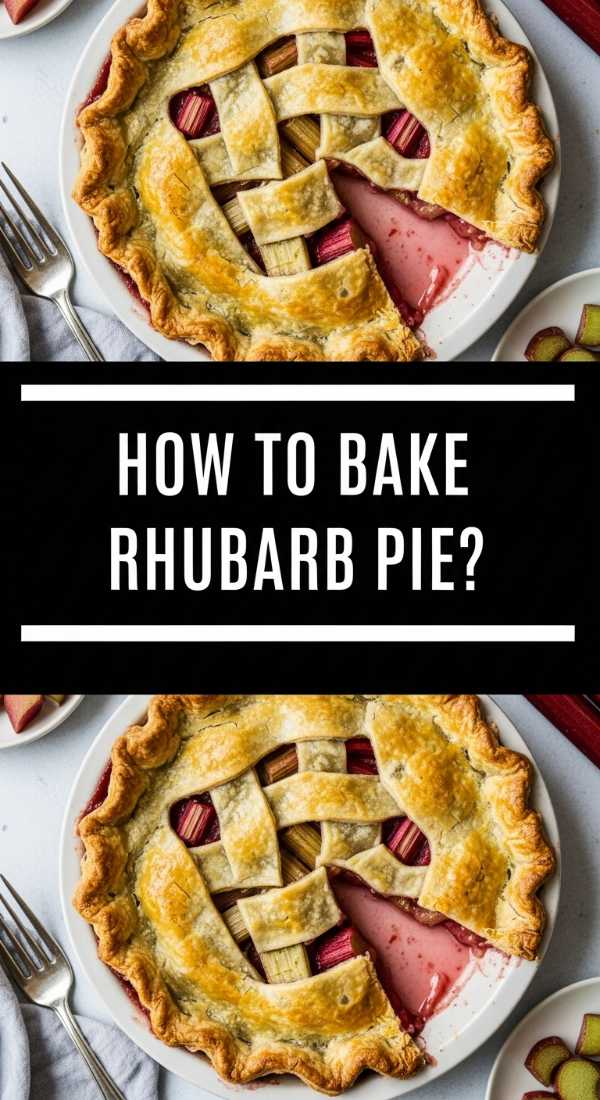
Why we love this
There is nothing quite like the smell of a rhubarb pie browning in the oven; it is a scent that practically defines the transition from spring to summer. The buttery, flaky crust shatters upon impact, revealing a bubbling, magenta filling that is both intensely sharp and deeply sweet. Eating a slice of this pie feels like a celebration of the season, especially when the warm fruit filling meets a cold scoop of melting vanilla bean ice cream. It’s a rustic, beautiful addition to any gathering that encourages people to slow down and savor the moment.
Ingredients
- Double pie crust (homemade or store-bought)
- 5 cups of sliced rhubarb (1/2 inch thick)
- 1 1/4 cups of granulated sugar
- 1/4 cup of cornstarch
- 1 tablespoon of cold butter, cubed
- 1 egg (for egg wash)
How to make it
- Preheat your oven to 400°F (200°C) and roll out half of your pie dough on a floured surface, fitting it into a 9-inch pie plate.
- In a large bowl, toss the rhubarb with sugar and cornstarch until every piece is evenly coated, then pour the mixture into the prepared bottom crust.
- Dot the top of the rhubarb filling with the small cubes of butter to add a rich, silky mouthfeel to the finished sauce.
- Roll out the second half of the dough and cut into strips to create a lattice top, weaving them over and under each other for a classic, professional look.
- Brush the top of the lattice with a beaten egg wash, sprinkle with coarse sugar, and bake for 45-50 minutes until the crust is golden brown and the filling is bubbling thick juices.
How to decorate graduation cookies?
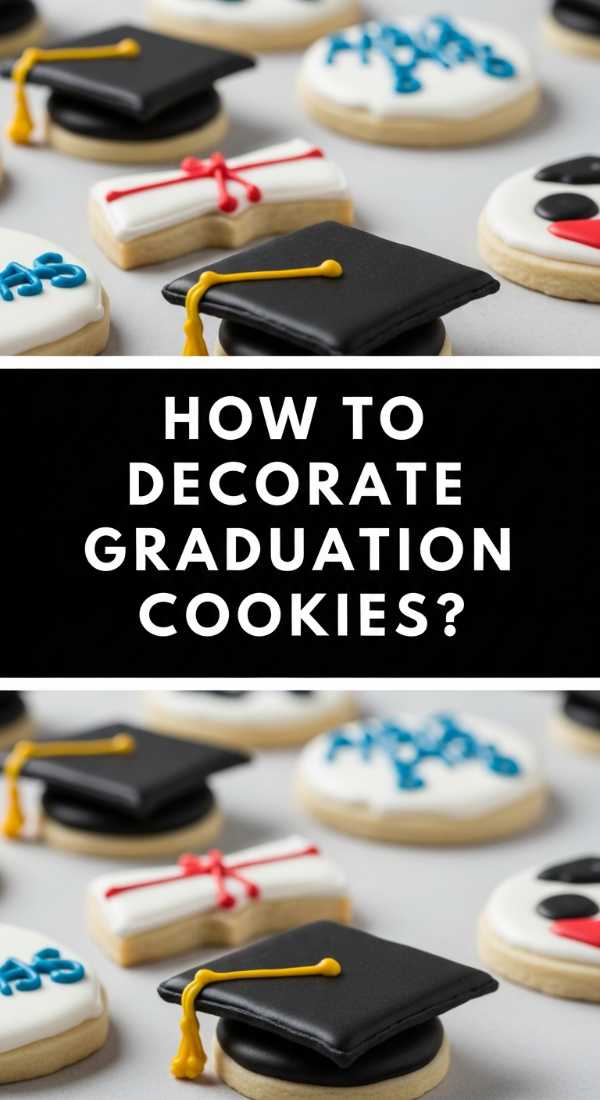
Why we love this
Decorated sugar cookies are like tiny edible canvases, and they are the perfect way to add a personalized touch to your viral food board. We love the smooth, matte finish of royal icing and how it allows for crisp, clean lines that can spell out names, dates, or school mottos. There is a meditative quality to the process of ‘flooding’ a cookie, watching the icing settle into a perfect, glassy surface that smells faintly of almond and citrus. These cookies are always the first thing guests reach for because they look almost too good to eat.
Ingredients
- Batch of firm sugar cookies cut into shapes (diplomas, caps, stars)
- Royal icing in white, black, and school colors
- Fine-tip piping bags
- Scribe tool or toothpick
- Edible silver or gold luster dust
How to make it
- Outline your cooled cookies with a stiff consistency of royal icing using a small round piping tip, creating a ‘border’ that will hold the thinner icing inside.
- Thin out your remaining icing with a few drops of water until it reaches a ‘flood’ consistency (it should disappear into itself within 10 seconds of being stirred).
- Fill the center of the outlined cookie with the flood icing, using a scribe tool or toothpick to pop bubbles and push the icing into the corners for a seamless finish.
- Allow the base layer to dry completely for at least 6-8 hours before using a stiff icing to pipe details like diploma ribbons or ‘Class of 2024’ lettering.
- Mix a small amount of luster dust with vodka or lemon extract to create a paint, then use a fine brush to add metallic accents to the tassels or borders.
How to brew fun coffee?
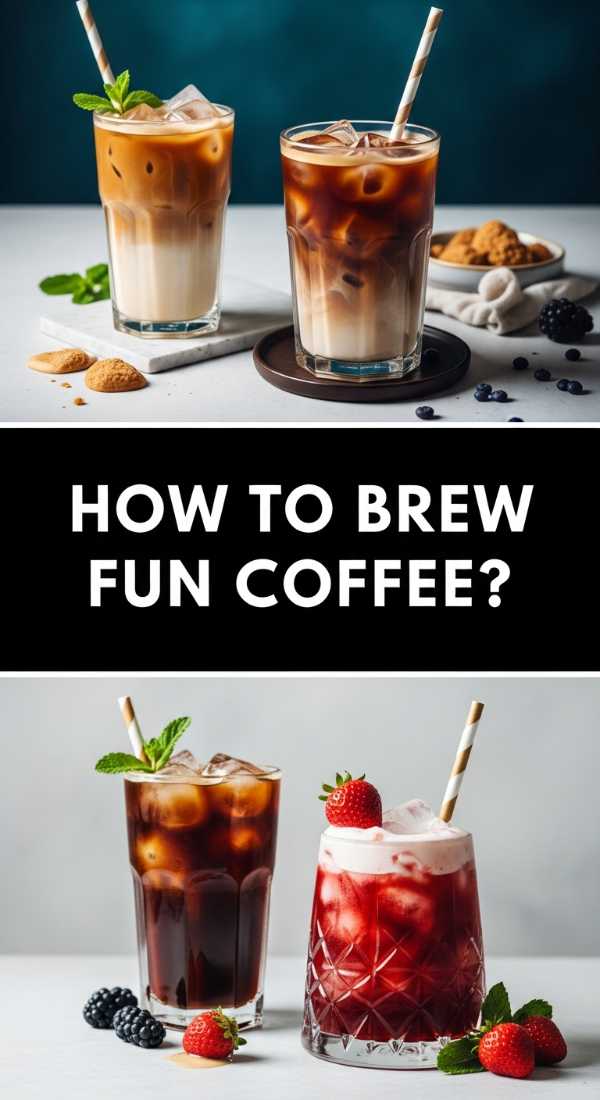
Why we love this
When the party stretches into the afternoon, a ‘fun coffee’ station is exactly what guests need to keep the energy high. We love this because it transforms a daily ritual into an indulgent treat, using textures like cold foam and flavors like salted caramel or lavender. The visual of dark, rich espresso marbling into creamy white milk is mesmerizing, and the aroma of freshly ground beans provides a sophisticated backbone to the sweet treats on the board. It’s a refreshing, caffeinated pick-me-up that feels like a boutique cafe experience right in your home.
Ingredients
- 2 shots of strong espresso or cold brew concentrate
- 1 tablespoon of flavored syrup (vanilla, lavender, or mocha)
- 1/2 cup of whole milk or oat milk
- Handheld milk frother
- Ice cubes (coffee-flavored ice cubes work best!)
How to make it
- Start by filling a tall glass with ice cubes; for a viral look, use oversized clear cubes or sphere molds that melt slowly.
- Pour your chosen flavored syrup into the bottom of the glass, followed by the cold brew or espresso, and stir gently to combine the base flavors.
- In a separate small pitcher, use a handheld frother to whisk cold milk for about 30-45 seconds until it doubles in volume and becomes a thick, velvety foam.
- Carefully pour the frothed milk over the back of a spoon into the glass to create beautiful, distinct layers between the dark coffee and the white foam.
- Top with a dusting of cocoa powder or a drizzle of caramel, and serve immediately with a glass straw for that perfect aesthetic touch.
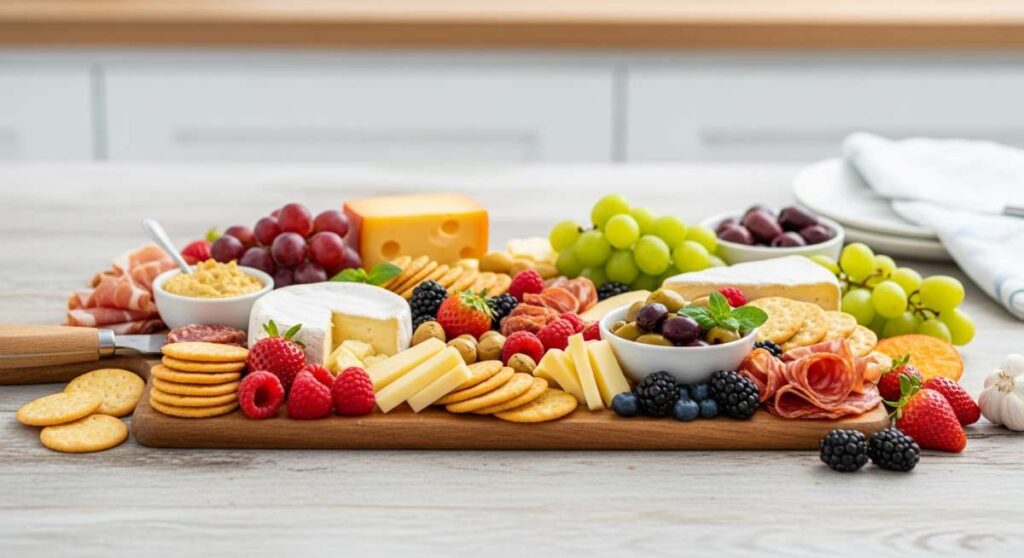
How to build graduation boards?
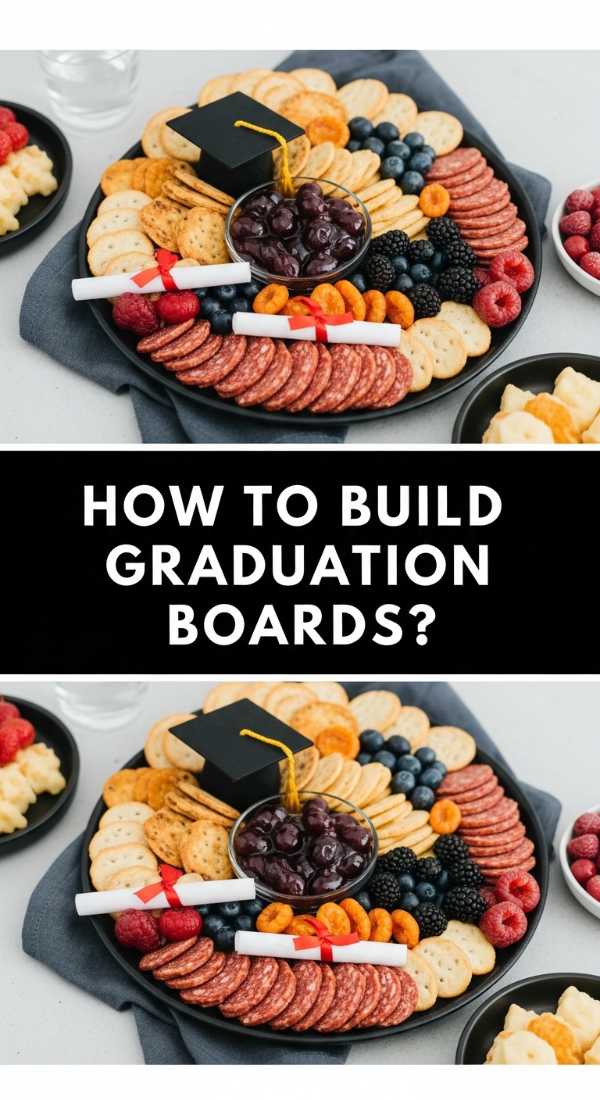
Why we love this
The beauty of a graduation board lies in its abundance; it’s a visual representation of a full and bright future. We love this concept because it breaks the traditional rules of catering, mixing sweet and savory elements in a way that encourages grazing and conversation. Imagine clusters of grapes nestled next to rolled ‘diploma’ sandwiches and bowls of vibrant rhubarb jam. The variety of colors, from the deep greens of fresh herbs to the bright yellows of lemon pesto, makes the board look like a work of art that is as functional as it is beautiful.
Ingredients
- Large wooden board or slate platter
- Assorted cheeses (brie, sharp cheddar, goat cheese)
- Selection of crackers and sliced baguette
- Miniature graduation-themed treats (cookies, cupcakes)
- Fresh fruits (grapes, berries, sliced apples)
- Small bowls for dips and jams
How to make it
- Begin by placing your ‘anchor’ items—the small bowls of rhubarb jam and lemon pesto—in different areas of the board to create balance.
- Add your larger cheeses, cutting some into wedges and leaving others whole to create varying heights and textures across the surface.
- Create ‘movement’ on the board by arranging crackers and baguette slices in a curving ‘river’ pattern that flows around the bowls and cheeses.
- Fill the remaining large gaps with your graduation treats, such as the styled cupcakes or cookies, keeping them in small clusters for a curated look.
- Use small fruits like mulberries or grapes and fresh herbs like mint or rosemary to fill in every tiny empty space, ensuring the board looks lush and overflowing.
How to cook rhubarb crumble?
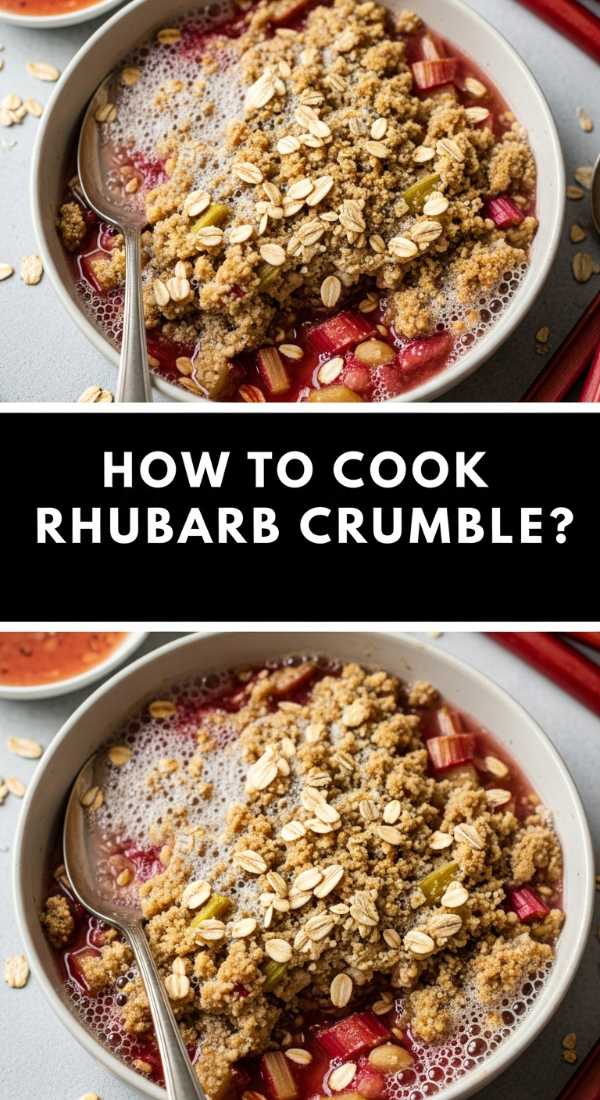
Why we love this
If a pie is the elegant cousin, the rhubarb crumble is the cozy, approachable friend that everyone wants to hang out with. We love the contrast between the soft, tart fruit bottom and the crunchy, buttery, oat-filled topping that turns deep golden brown in the oven. The way the juices bubble up around the edges, caramelizing into a sticky, sweet syrup, is absolutely irresistible. It’s the ultimate comfort food that tastes even better when eaten warm, providing a sensory experience of heat, crunch, and tang that is hard to beat.
Ingredients
- 4 cups of rhubarb, cut into 1/2-inch pieces
- 1/2 cup of granulated sugar (for the fruit)
- 1 cup of rolled oats
- 1 cup of all-purpose flour
- 1 cup of brown sugar (packed)
- 1/2 cup of cold unsalted butter, cubed
- 1 teaspoon of cinnamon
How to make it
- Preheat your oven to 375°F (190°C) and lightly grease an 8×8 inch baking dish with butter or non-stick spray.
- Toss the chopped rhubarb with the granulated sugar and spread it evenly across the bottom of the prepared baking dish.
- In a separate bowl, combine the oats, flour, brown sugar, and cinnamon, stirring until the mixture is uniform.
- Add the cold, cubed butter to the dry ingredients and use your fingers or a pastry cutter to work the butter in until the mixture resembles coarse crumbs with some pea-sized pieces remaining.
- Sprinkle the crumble topping evenly over the rhubarb and bake for 35-40 minutes until the topping is crispy and the fruit juices are thick and bubbling.
How to make lemon pesto?
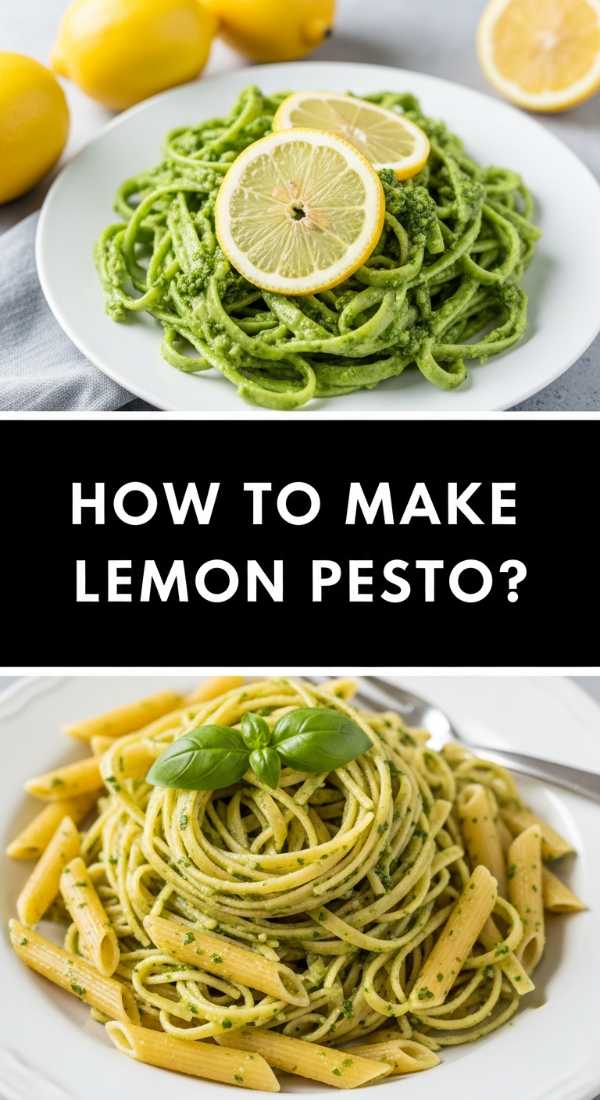
Why we love this
Lemon pesto is a sunshine-filled twist on the classic basil version, offering a bright, citrusy punch that cuts through the richness of cheeses and meats on your board. We love the vibrant, neon-green color and the way the aroma of fresh lemon zest hits you before you even take a bite. It’s incredibly versatile—silky yet textured with ground nuts and Parmesan—and it adds a layer of sophisticated flavor that makes even a simple cracker feel like a gourmet snack. It is the perfect ‘secret ingredient’ to make your viral board stand out.
Ingredients
- 2 cups of fresh basil leaves, packed
- 1/2 cup of freshly grated Parmesan cheese
- 1/3 cup of pine nuts or walnuts, lightly toasted
- 2 large cloves of garlic
- 1/2 cup of high-quality extra virgin olive oil
- Zest and juice of 1 large lemon
- Salt and pepper to taste
How to make it
- Place the toasted nuts and garlic cloves into a food processor and pulse several times until they are finely minced but not yet a paste.
- Add the fresh basil leaves, lemon zest, and lemon juice to the processor and pulse again until the greens are broken down into small bits.
- With the processor running on a low setting, slowly drizzle in the olive oil in a steady stream to emulsify the sauce and create a smooth, creamy texture.
- Add the grated Parmesan cheese and pulse just 2 or 3 more times to incorporate it without over-processing the cheese into the oil.
- Taste the pesto and season with salt and freshly ground pepper, then transfer to a small bowl and top with a thin layer of olive oil to prevent browning before serving.
How to bake mulberry recipes?

Why we love this
Mulberries are the hidden gems of the foraging world, and baking with them feels like uncovering a delicious secret. We love their deep, complex flavor—somewhere between a blackberry and a raspberry but with an earthy sweetness that is all their own. When baked into muffins or galettes, they release a stunning purple juice that stains the dough in beautiful swirls. The texture is delicate and juicy, making every bite of a mulberry treat feel like a celebration of early summer’s bounty. It adds an exotic, ‘insider’ feel to your food board that guests will find intriguing and delicious.
Ingredients
- 2 cups of fresh mulberries (stems removed)
- 2 cups of all-purpose flour
- 1/2 cup of granulated sugar
- 1 tablespoon of baking powder
- 1/2 cup of cold milk
- 1/4 cup of melted butter
- 1 large egg
How to make it
- Preheat your oven to 375°F (190°C) and prepare a muffin tin with liners or grease a small tart pan, depending on the recipe style you choose.
- Whisk together the flour, sugar, and baking powder in a large bowl, ensuring there are no lumps to keep the finished bake light and airy.
- In a separate smaller bowl, beat the egg and then stir in the milk and melted butter until well combined.
- Pour the wet ingredients into the dry ingredients and fold gently with a spatula just until moistened; be careful not to overmix, or the muffins will be tough.
- Gently fold in the fresh mulberries, taking care not to crush them too much, then portion into your pan and bake for 20-25 minutes until a toothpick comes out clean and the berries have burst into jammy pockets.
The Art of the Simple Board
As we wrap up this journey through the viral world of food boards, I hope you feel inspired to create something beautiful and delicious for your next celebration. Remember, the ‘viral’ part isn’t about being perfect; it’s about the joy of sharing something handmade and heartfelt with the people you love. Whether you’re serving a perfectly smooth graduation cake or a rustic bowl of rhubarb crumble, it’s the flavors and the effort that count. So grab your biggest wooden board, start simmering that jam, and let’s make this season one to remember. Happy hosting!