

We’ve all been there: scrolling through our TikTok For You page at 2:00 AM, mesmerized by a sun-drenched living room or a backyard oasis that looks like it belongs in a celebrity’s Malibu retreat. There’s a certain magic in those viral home transformations that makes us look at our own beige walls and wonder if we’ll ever live in a space that feels truly curated. But here is the secret that the big influencers won’t tell you—most of those ‘expensive’ looks are actually achieved with a little grit, a lot of DIY spirit, and a very modest budget.
Creating a home that feels like a sanctuary shouldn’t require a second mortgage. It’s about the tactile joy of running your hand over a freshly sanded wooden trellis, the earthy aroma of damp soil after you’ve finally mastered your front yard landscaping, and the soft, golden glow of a whimsical apartment at sunset. This guide is my love letter to everyone who wants to live in a Pinterest-perfect world without the luxury price tag.
In this post, we are diving deep into ten viral home and garden projects that will completely shift the energy of your space. Whether you’re looking to boost your curb appeal or find peace in a backyard ‘She Shed,’ I’ve broken down the essential elements and step-by-step methods to bring these TikTok-famous aesthetics to life. Let’s roll up our sleeves and start creating some magic.
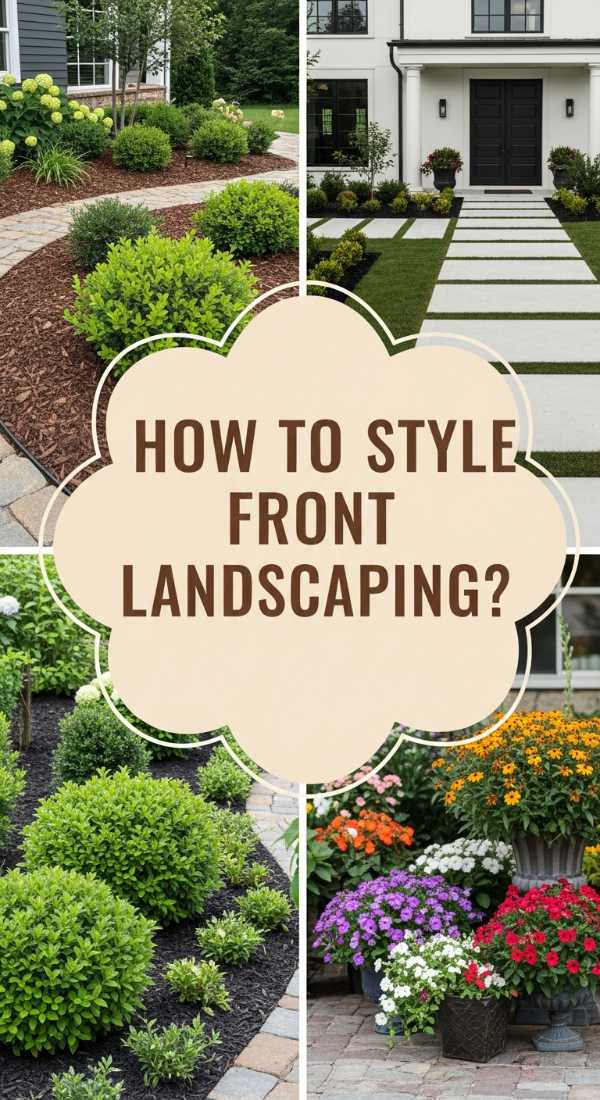
How to Design Simple Front Yard Landscaping for Instant Curb Appeal
Why we love this
There is nothing quite like the feeling of pulling into your driveway and being greeted by a symphony of textures and colors that scream ‘home.’ This project transforms a flat, boring lawn into a layered masterpiece filled with the crisp scent of cedar mulch and the gentle rustle of ornamental grasses. It’s about that satisfying visual weight of stone borders against soft, green foliage that makes your neighbors stop and stare in envy. It feels organized yet organic, providing a grounded sense of peace before you even step through the front door.
Essential Elements:
- Dark hardwood or cedar mulch for contrast.
- Natural stone or brick edging materials.
- A mix of perennial shrubs (like Boxwood) and flowering plants (like Hydrangeas).
- Solar-powered pathway lights for nighttime ambiance.
- Landscape fabric to prevent weed growth.
How to make it
- Begin by sketching a curved layout for your beds; curves feel more expensive and professional than rigid straight lines. Use a garden hose to mark the shape on the grass.
- Using a sharp spade, cut into the turf along your hose line, removing the grass and top inch of soil to create a clean ‘trench’ for your border.
- Lay down heavy-duty landscape fabric over the cleared area, securing it with staples to ensure no unwanted weeds break through your design.
- Place your largest plants first (the ‘anchors’) towards the back, ensuring they have enough room to grow to their full mature size.
- Fill in the gaps with smaller perennials, staggering them to create depth. Before planting, gently tease the roots to encourage outward growth once in the soil.
- Install your stone or brick edging along the perimeter, tapping them into place with a rubber mallet so they are level and secure.
- Spread a 3-inch layer of mulch across the entire bed. This layer should feel thick and lush; it’s the ‘visual glue’ that holds the aesthetic together.
How to Create a Productive Office Desk Setup for a Better Work Day

Why we love this
Imagine sitting down to a desk that feels like a high-end boutique hotel—smooth walnut surfaces, the soft click of a mechanical keyboard, and the calming presence of a tiny succulent. This setup isn’t just about looks; it’s about the psychological shift that happens when your environment matches your ambitions. The air feels clearer, the light from a warm monitor lamp hits your morning coffee just right, and the lack of cord clutter allows your mind to focus on the task at hand rather than the mess around you.
Essential Elements:
- A wooden desk or a clean white tabletop.
- Ergonomic chair with lumbar support.
- An oversized felt or leather desk mat.
- Monitor arm to clear up desk real estate.
- Ambient lighting (warm-toned LED strips or a designer lamp).
- Cable management boxes or clips.
How to make it
- Clear everything off your current desk and give the surface a deep clean. A fresh, dust-free start is essential for the ‘minimalist’ aesthetic.
- Position your monitor so the top third of the screen is at eye level. If you don’t have a monitor arm, use a stack of aesthetic books or a wooden riser to achieve the height.
- Place your desk mat in the center; this defines your primary work zone and adds a soft, luxurious texture to your forearms while typing.
- Route all cables through a single channel or box hidden under the desk. Use Velcro ties to bundle cords together so they don’t look like a ‘spaghetti mess.’
- Set up your ‘sensory zone’ on the non-dominant side of your desk. This should include one plant, one candle or diffuser, and a small tray for your pens and keys.
- Adjust your lighting so that it bounces off the wall behind the monitor. This reduces eye strain and creates a soft ‘halo’ effect that looks incredible in photos.
How to Build a Cheap Pool Deck for Summer Fun

Why we love this
The scent of sun-warmed wood and the splashing of cool water—there is no better way to spend a Saturday. A DIY pool deck takes an ordinary above-ground pool and turns it into a permanent-looking resort feature. It’s the perfect spot for lounging with a cold lemonade, feeling the heat of the sun on your skin while your feet rest on the smooth, sturdy planks of a deck you built with your own two hands. It turns a temporary summer fix into a lifetime of backyard memories.
Essential Elements:
- Pressure-treated 4×4 posts and 2×6 joists.
- Decking boards (pine or composite).
- Concrete deck blocks for the foundation.
- Galvanized deck screws.
- A power drill and a circular saw.
How to make it
- Measure the height of your pool and mark the ground where your support posts will sit. You want the deck to sit just under the top lip of the pool.
- Place concrete deck blocks at each corner and at 4-foot intervals. These blocks act as the ‘feet’ and prevent the wood from rotting in the soil.
- Install your 4×4 posts into the blocks, checking each one with a level to ensure they are perfectly vertical. Even a slight tilt will ruin the final look.
- Construct the outer frame using 2×6 joists, screwing them into the posts at the desired height. Use a ‘header’ board that follows the curve or straight edge of the pool.
- Add interior joists every 16 inches for structural integrity. This ensures the deck feels ‘solid’ and doesn’t bounce when walked on.
- Lay your decking boards across the frame, using a spacer (like a nail) to keep the gaps between boards consistent for drainage.
- Sand down any rough edges and apply a water-resistant stain. The ‘doneness’ cue is when the wood stops absorbing the stain and develops a rich, even sheen.
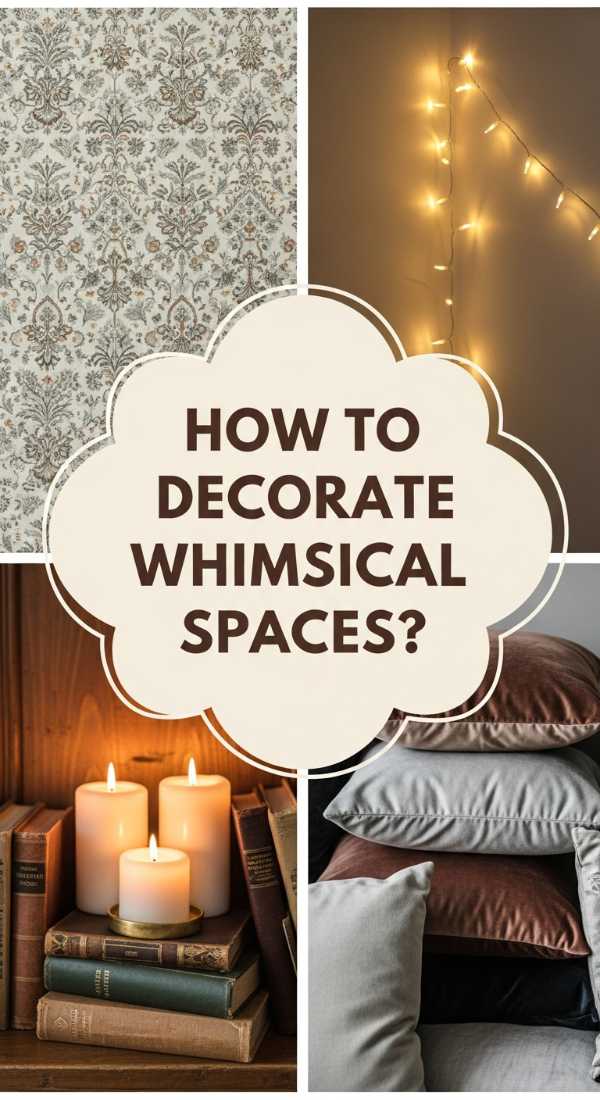
How to Style a Whimsical Apartment Aesthetic for Magic Vibes
Why we love this
Entering a whimsical apartment feels like stepping into a modern-day fairytale. It’s the soft flicker of fairy lights reflected in ornate thrifted mirrors, the velvet touch of mismatched throw pillows, and the dreamy aroma of dried lavender and eucalyptus hanging from the walls. This style is all about ‘more is more’ in the most tasteful way possible. It’s a space that prioritizes comfort and personality over rigid design rules, making every corner feel like a cozy discovery.
Essential Elements:
- Sheer curtains that catch the light.
- Hanging ivy or trailing pothos plants.
- Vintage-style gold frames and mirrors.
- Warm-toned string lights or ‘sunset’ lamps.
- Textured textiles (velvet, faux fur, lace).
How to make it
- Start with your lighting; swap out harsh overhead ‘big lights’ for floor lamps with warm bulbs and weave string lights through your bookshelves.
- Layer your textiles. Place a soft, high-pile rug over your standard flooring, then drape a lace runner over a wooden coffee table to mix textures.
- Create a ‘gallery wall’ using thrifted frames of different shapes and sizes. The key is to keep the spacing slightly irregular to enhance the whimsical, lived-in feel.
- Hang plants at varying heights using macramé hangers. This draws the eye upward and creates a ‘jungle canopy’ effect that feels immersive.
- Add ‘reflective magic’ by placing mirrors opposite windows. This bounces natural light around and makes even a tiny apartment feel like a sprawling, airy castle.
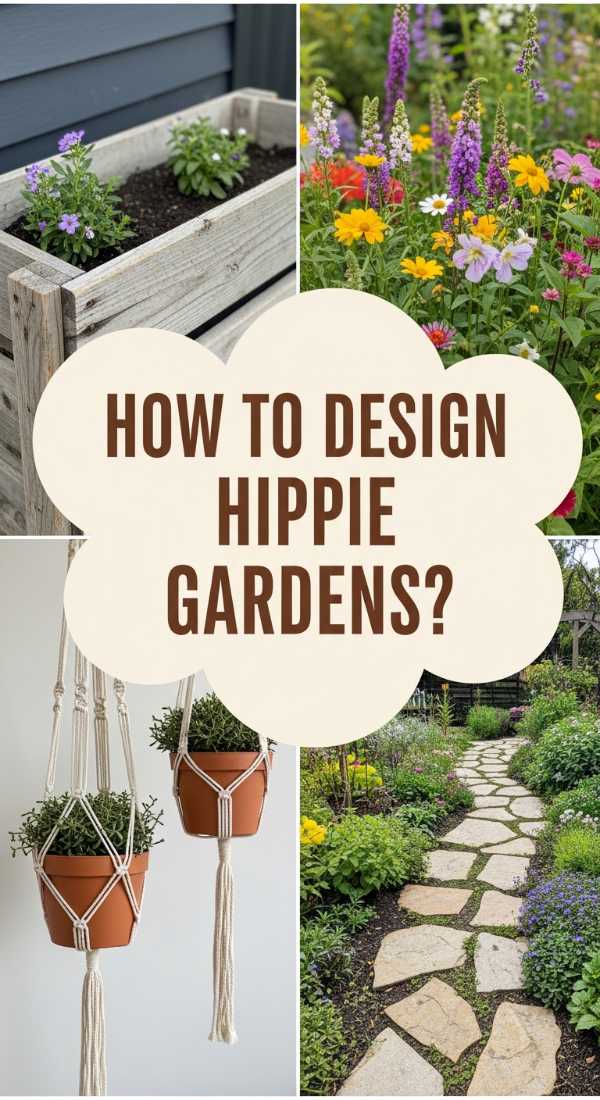
How to Grow a Hippie Garden for Boho Outdoor Living
Why we love this
A hippie garden is a wild, beautiful celebration of nature’s organized chaos. It’s the smell of damp earth mixed with spicy marigolds, the sight of bees buzzing around lavender, and the feeling of freedom that comes from a garden that doesn’t follow the rules. It’s about vibrant colors, repurposed containers, and a ‘boho’ spirit that encourages you to sit on a floor cushion and just *be*. It’s less about manicured lawns and more about a lush, buzzing ecosystem that feels alive.
Essential Elements:
- Wildflower seed mixes.
- Repurposed containers (old boots, colorful ceramic pots, wooden crates).
- Solar lanterns and Moroccan-style wind chimes.
- A focal point like a fire pit or a floor-cushion seating area.
- Native plants to attract local pollinators.
How to make it
- Identify the sunniest spot in your yard; ‘hippie’ plants like sunflowers and zinnias need at least 6-8 hours of direct light to thrive.
- Prepare the soil by tilling it lightly and adding organic compost. You want the earth to feel dark, crumbly, and nutrient-rich.
- Scatter your wildflower seeds generously across the soil. Use a ‘haphazard’ sowing technique rather than neat rows to achieve that wild, boho look.
- Lightly press the seeds into the dirt with your feet or a roller—don’t bury them too deep, as many need light to germinate.
- Incorporate your ‘found objects.’ Arrange your mismatched pots in clusters of three, varying the heights by placing some on bricks or wooden stumps.
- Install your wind chimes and lanterns. The sound and light are the ‘soul’ of the garden, creating a sensory experience that lasts into the evening.
- Water consistently but gently. You’ll know the garden is ‘done’ when the first blooms explode in a riot of uncoordinated, beautiful color.
How to Arrange Patriotic Flower Displays for a Festive Porch

Why we love this
There’s a classic, nostalgic beauty in a patriotic flower display that feels like a crisp July morning. The vibrant red of geraniums against the stark white of petunias and the deep, royal blue of lobelia creates a visual pop that is both traditional and energetic. It smells like fresh-cut grass and summer air, offering a welcoming, festive vibe to anyone who walks up your steps. It’s a way to show spirit through nature, making your porch feel like the centerpiece of the neighborhood.
Essential Elements:
- Red flowers (Geraniums, Hibiscus, or Zinnias).
- White flowers (Petunias, Bacopa, or Sweet Alyssum).
- Blue flowers (Lobelia, Salvia, or Blue Daze).
- Star-shaped accents or small flags.
- Classic navy or white ceramic planters.
How to make it
- Select your planters. For a high-end look, use identical containers on either side of the door to create symmetry.
- Use the ‘Thriller, Filler, Spiller’ method. Start with your ‘Thriller’—a tall, red center plant like a Red Salvia or Canna Lily.
- Surround the center with your ‘Filler’—white petunias that add bulk and volume. Ensure they are packed tight enough to look lush but have room to breathe.
- Add your ‘Spiller’—the blue lobelia—around the edges so it can trail down the sides of the pot like a flowing blue ribbon.
- Water the arrangement thoroughly until water drains from the bottom. This settles the air pockets around the roots.
- Place your star accents or small flags at a slight angle near the ‘Thriller’ for a professional, styled finish.
- Deadhead the spent blooms every few days. This keeps the colors ‘popping’ and prevents the white flowers from looking brown or tired.
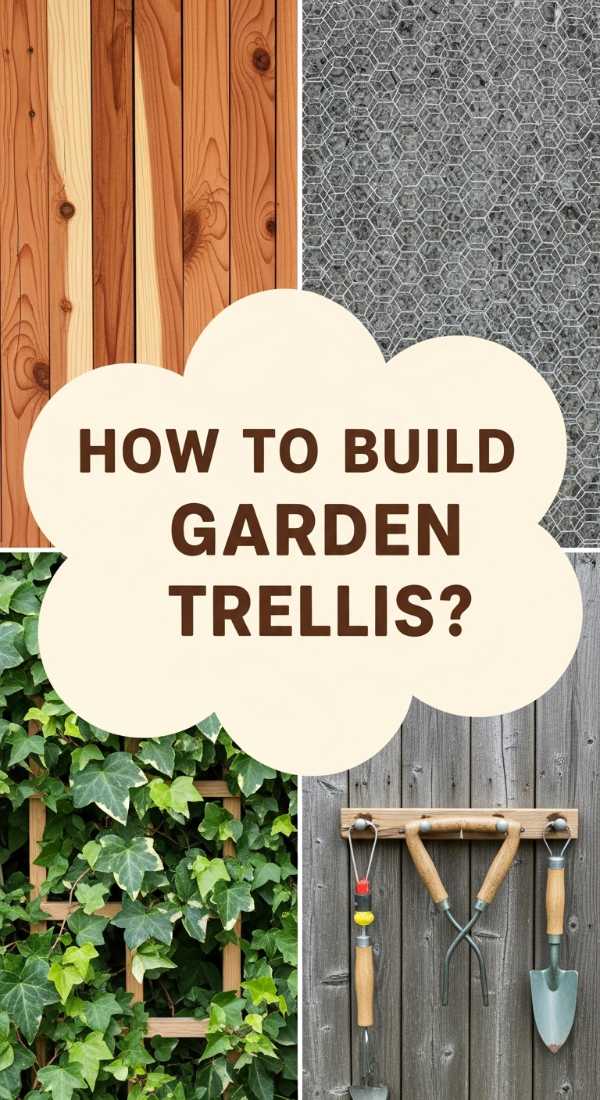
How to Construct Homemade Trellis Systems for Vertical Growth
Why we love this
Vertical gardening is the ultimate ‘space hack’ that adds a sophisticated architectural element to any yard. There is something deeply satisfying about watching a climbing rose or a grapevine slowly claim a wooden trellis, turning a flat wall into a living tapestry. The smell of jasmine climbing up a frame on a warm night is intoxicating, and the visual height adds a sense of grandeur to even the smallest patio. It’s the perfect blend of structural engineering and natural elegance.
Essential Elements:
- Cedar or bamboo stakes (rot-resistant).
- Heavy-duty twine or copper wire.
- Wood glue and galvanized nails.
- Sturdy wall anchors (if mounting to a house).
- Fast-growing climbers like Clematis or Star Jasmine.
How to make it
- Measure the area where the trellis will live. If it’s against a wall, ensure you leave a 2-inch gap for airflow to prevent mold on your siding.
- Lay your vertical ‘main’ stakes on a flat surface, spacing them 6-8 inches apart.
- Overlay your horizontal cross-pieces, creating a grid or a ‘fan’ shape depending on your aesthetic preference.
- Apply a small bead of wood glue at every intersection, then secure with a single galvanized nail or a tight wrap of copper wire.
- If using wire, use a ‘cloverleaf’ knot to ensure the structure doesn’t wobble when the heavy weight of a mature plant is added.
- Mount the trellis to your wall or sink the vertical posts 12 inches into the ground for a freestanding version.
- Gently weave the first few tendrils of your plant through the bottom rungs. Use loose twine to ‘guide’ them; they will take over the climbing duty once they feel the support.
How to Furnish Cheap She Shed Sanctuaries for Personal Peace
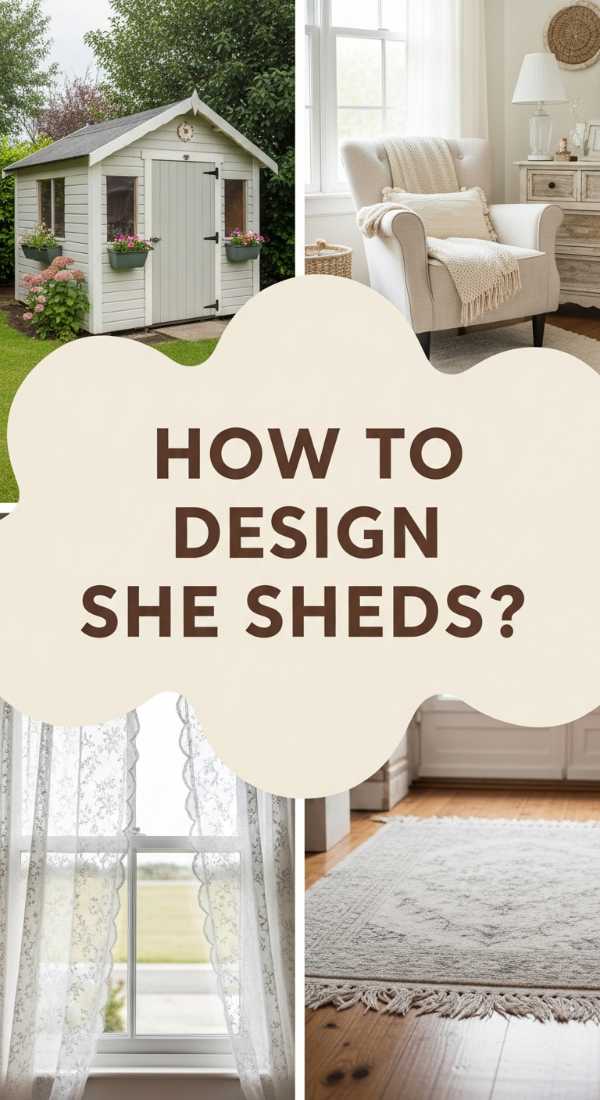
Why we love this
The ‘She Shed’ is more than just a building; it’s a mental reset. Stepping inside should feel like a deep exhale. It’s the scent of a vanilla candle, the plushness of a sheepskin rug underfoot, and the silence of a space that is entirely yours. Whether it’s for painting, reading, or just napping, a She Shed is a sanctuary of soft colors and personal treasures. It’s the ultimate way to reclaim your peace in a busy world, wrapped in a cozy, wooden shell.
Essential Elements:
- A small outdoor shed or playhouse kit.
- Light-colored paint (whites, soft sages, or blushes).
- A comfortable daybed or oversized armchair.
- Battery-powered lanterns or solar lighting.
- A small bookshelf and a side table.
How to make it
- Start with the interior walls. Paint them a light, airy color to make the small space feel significantly larger and more ‘expensive.’
- Install peel-and-stick vinyl flooring in a light wood or marble pattern. This is an affordable way to hide a basic plywood shed floor.
- Bring in your ‘anchor’ furniture piece—a small sofa or a cozy chair. Ensure it’s positioned to take advantage of the natural light from the door or window.
- Layer in the ‘softs.’ A large rug, three different textured pillows, and a chunky knit throw will instantly remove the ‘outdoor shed’ feel.
- Add a ‘scent station.’ A battery-operated diffuser or a tray for candles ensures the space always smells like a spa.
- Hang sheer curtains over the windows. They soften the sunlight and provide privacy without making the shed feel dark or cramped.
- Personalize the walls with art that makes you smile. The shed is ‘done’ when you feel an immediate drop in your heart rate the moment you step inside.
How to Install DIY Outdoor Stairs for Easier Yard Access
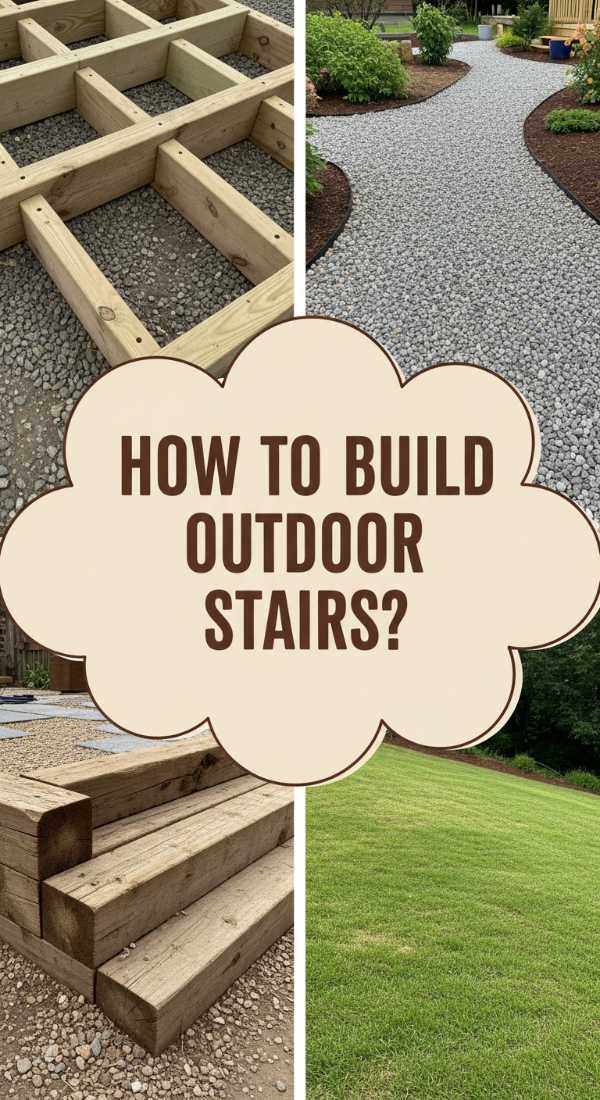
Why we love this
Stairs in a landscape add a sense of journey and purpose to your yard. These aren’t just functional; when done with timber and gravel, they have a rugged, ‘mountain retreat’ aesthetic that feels high-end. You’ll love the crunch of gravel under your boots and the way the stairs naturally lead your eye through the garden. It turns a steep, unusable hill into a walkable adventure, making your entire property feel more accessible and professionally designed.
Essential Elements:
- Pressure-treated 4×4 or 6×6 timbers.
- Rebar stakes (12-inch lengths).
- Crushed stone or pea gravel.
- Landscaping fabric.
- A heavy-duty sledgehammer and a level.
How to make it
- Determine the ‘rise and run’ of your hill. Each step should be roughly 6-7 inches high and at least 12 inches deep for a natural walking gait.
- Starting at the bottom of the hill, dig a flat ‘trench’ into the slope for your first timber frame.
- Cut your timbers to size and form a U-shaped ‘box’ for each step. Drill holes through the timbers for the rebar.
- Level the frame in all directions. This is the most critical step; if the first step is off, the whole staircase will be crooked.
- Drive the rebar stakes through the timbers and deep into the ground using the sledgehammer to lock the step in place.
- Line the inside of the timber frame with landscape fabric, then fill with 3-4 inches of crushed stone.
- Tamp the stone down firmly. The step is ‘done’ when it feels completely solid and doesn’t shift when you put your full weight on it.
How to Plan Fall Baby Shower Themes for Cozy Celebrations

Why we love this
There is a unique warmth to a fall baby shower—the smell of cinnamon sticks in hot cider, the rich oranges and deep burgundies of autumn leaves, and the ‘cozy’ energy of celebrating a new life as the world slows down. It’s a sensory feast of pashmina blankets, mini pumpkins, and rustic wooden accents. It feels intimate and grounded, trading the bright pastels of spring for a palette that feels like a warm hug. It’s a celebration that guests will remember for its ‘hygge’ atmosphere long after the pumpkins are gone.
Essential Elements:
- A ‘Cider Bar’ with cinnamon sticks and apple slices.
- Miniature pumpkins and gourds for table decor.
- Eucalyptus and dried wheat bundles.
- Cozy blankets for guest favors or seating.
- A rustic ‘Little Pumpkin’ or ‘A Sweet Forest Find’ backdrop.
How to make it
- Choose a palette based on ‘muted’ autumn tones—think terracotta, sage green, and cream rather than bright ‘Halloween’ orange.
- Create a focal point dessert table using a wooden crate as a riser. Drape it with a cheesecloth runner for a soft, ruffled texture.
- Set up the cider bar by keeping the cider in a slow cooker on low heat. Provide ‘stirrers’ made of cinnamon sticks wrapped in twine.
- Use hollowed-out pumpkins as vases for white roses and eucalyptus. The contrast of the orange skin and green leaves is stunning.
- Arrange a ‘blanket station’ near the seating area. Roll up soft throws and place them in a wicker basket with a sign that says ‘To keep you cozy.’
- For the ‘visual cue’ of a perfect party, light several unscented pillar candles of varying heights. The flicker of candlelight against the fall decor creates an instant ‘viral’ photo op.
- Incorporate an interactive element, like a ‘Build a Bouquet’ station with dried flowers, so guests leave with a piece of the autumn magic.
Conclusion
Transforming your home into a viral-worthy sanctuary doesn’t happen overnight, but as we’ve seen, it doesn’t require a professional design team either. Whether it’s the structural satisfaction of building your own outdoor stairs or the simple joy of styling a whimsical corner in your apartment, these projects are about making your space reflect your soul. Remember, the best homes aren’t the ones that cost the most—they’re the ones where every corner tells a story of creativity and care. So, grab your tools, find your inspiration, and start building your dream home, one DIY at a time.