

The Ultimate Guide to Creating a Viral Aesthetic Snacking Board
There is something undeniably magical about the moment you set a beautifully curated snacking board in the center of a table. It’s more than just food; it’s an invitation to linger, to talk, and to share. In our home, the ‘Viral Simple Food Board’ has become the centerpiece of every Friday night, transforming a simple meal into a sensory experience that looks as good on a camera roll as it tastes on the palate. The secret to a board that truly breaks the internet? It’s not just the crackers and cheese; it’s the addition of high-quality, perfectly cooked proteins that turn a snack into a feast.
Today, we are diving deep into the heart of the board: the chicken thigh. Often overlooked, this cut is the true hero of a savory aesthetic board, offering a richness and versatility that white meat simply can’t match. Whether you’re hosting a garden party or just want to treat yourself to a Pinterest-worthy solo dinner, mastering these different techniques will elevate your hosting game to a professional level. Let’s explore how to create the ultimate protein-packed grazing experience.
HOW TO BAKE CHICKEN THIGHS?

Why we love this
There is a comforting, golden-brown reliability to a perfectly baked chicken thigh that anchors any grazing board with a sense of home. As they bake, the kitchen fills with a savory, savory aroma that promises a meal that is both wholesome and indulgent. The skin transforms into a delicate, parchment-like crispness while the meat remains incredibly succulent, offering a satisfying contrast in every single bite that makes your guests reach for seconds immediately. It is the ultimate low-effort, high-reward foundation for your aesthetic platter.
Ingredients
- 4-6 bone-in, skin-on chicken thighs
- 2 tablespoons extra virgin olive oil
- 1 teaspoon sea salt
- 1/2 teaspoon cracked black pepper
- 1 teaspoon dried thyme
- 1/2 teaspoon smoked paprika
How to make it
- Preheat your oven to 400°F (200°C) and line a rimmed baking sheet with parchment paper for easy cleanup and to prevent sticking.
- Pat each chicken thigh thoroughly dry with paper towels; removing moisture is the essential secret to achieving that coveted golden skin.
- In a small bowl, whisk together the olive oil, salt, pepper, thyme, and smoked paprika until a consistent paste forms.
- Rub the oil and spice mixture over every inch of the chicken, ensuring you get under the skin and on the bottom of the thigh for maximum flavor.
- Place the thighs on the baking sheet, skin-side up, leaving at least two inches of space between each piece to allow for proper air circulation and even browning.
- Bake for 35 to 40 minutes, or until the internal temperature reaches 165°F (74°C) when tested with a meat thermometer near the bone.
- Let the chicken rest for 5 minutes before transferring to your snacking board to allow the juices to redistribute throughout the meat.
HOW TO MAKE JUICY CHICKEN?

Why we love this
Nothing ruins a beautiful food board faster than dry, stringy meat, which is why mastering the art of juiciness is a total game-changer. Imagine a piece of chicken that yields effortlessly to your fork, releasing a subtle, savory broth that keeps the meat tender and flavorful long after it has left the oven. This method focuses on moisture retention and heat management, ensuring that every slice you place on your board is glistening, plump, and undeniably mouth-watering. It’s the kind of texture that makes people stop and ask for your secret recipe.
Ingredients
- 1 lb boneless chicken thighs
- 1/2 cup chicken bone broth
- 2 tablespoons melted butter
- 1 tablespoon lemon juice
- 1 teaspoon garlic powder
- 1/2 teaspoon kosher salt
How to make it
- Start by bringing your chicken to room temperature for about 20 minutes before cooking; this prevents the fibers from seizing up when they hit the heat.
- Preheat a heavy-bottomed skillet over medium-high heat until a drop of water sizzles and evaporates instantly.
- Whisk the bone broth, melted butter, lemon juice, and spices in a measuring cup to create a quick basting liquid.
- Sear the chicken in the hot skillet for 4-5 minutes per side until a deep golden crust forms, locking in those precious natural juices.
- Reduce the heat to medium-low and pour the broth mixture into the pan, allowing it to bubble and create a steam-rich environment.
- Cover the skillet with a tight-fitting lid and cook for an additional 6-8 minutes, which gently poaches the interior of the meat.
- Remove from heat and keep covered for 5 minutes to allow the chicken to finish cooking in its own steam, ensuring ultimate moisture.
HOW TO COOK CRISPY THIGHS?

Why we love this
The audible ‘crunch’ of a perfectly crispy chicken skin is a sensory highlight that adds a sophisticated layer of texture to your snack board. It provides a rustic, artisanal feel that pairs beautifully with crunchy marcona almonds, sharp cheeses, and crisp crackers. The skin becomes almost like a savory candy—salty, brittle, and intensely flavorful—protecting the velvet-soft meat beneath. Achieving this level of crispiness turns a simple protein into the star of the show, providing a visual and tactile experience that is purely addictive.
Ingredients
- 4 skin-on chicken thighs
- 1 tablespoon cornstarch
- 1 teaspoon sea salt
- 1/2 teaspoon onion powder
- 2 tablespoons avocado oil (high smoke point)
How to make it
- The night before cooking, place the chicken thighs on a plate, uncovered, in the refrigerator to air-dry the skin for maximum crunch potential.
- Before cooking, sprinkle a very fine dusting of cornstarch mixed with salt and onion powder onto the skin side only.
- Heat the avocado oil in a cold cast-iron skillet, then place the chicken skin-side down into the cold oil before turning the heat to medium.
- As the pan heats up, the fat will render slowly, resulting in a much crispier skin than starting with a scorching hot pan.
- Use a heavy weight (like another pan or a foil-wrapped brick) to press the chicken down for the first 10 minutes, ensuring every inch of skin touches the heat.
- Flip the chicken once the skin is a deep, mahogany brown and stays firm when touched with tongs, then finish the other side for 5 minutes.
- Drain on a wire rack—never on paper towels—to prevent the steam from softening that hard-earned crispy exterior.
HOW TO SEASON CHICKEN LEGS?

Why we love this
Seasoning is where the personality of your snacking board truly shines, allowing you to bridge the gap between different flavors like spicy chutneys and creamy bries. A well-seasoned chicken leg offers a complex profile of earthy herbs and sharp spices that dance across the tongue, creating a lingering warmth that invites another bite. It’s about creating a crust of flavor that is as visually stunning—with flecks of green herbs and red peppers—as it is delicious. This approach ensures your protein isn’t just a side thought, but a deliberate part of the board’s flavor story.
Ingredients
- 6 chicken drumsticks
- 2 tablespoons olive oil
- 1 tablespoon dried oregano
- 1 teaspoon cumin
- 1 teaspoon chili powder
- 1/2 teaspoon lemon zest
- 1 teaspoon flaky sea salt
How to make it
- Place your chicken legs in a large bowl and drizzle with olive oil, tossing them thoroughly to ensure a sticky surface for the spices to cling to.
- In a separate small jar, combine the oregano, cumin, chili powder, and lemon zest, shaking it vigorously to distribute the aromatics evenly.
- Generously sprinkle the dry rub over the legs, using your hands to massage the seasoning into the crevices and under the skin near the joints.
- For the best flavor penetration, let the seasoned chicken sit at room temperature for 15-20 minutes before cooking.
- Arrange on a baking rack over a tray to ensure the heat can reach all sides of the round drumstick simultaneously.
- Bake at 425°F (220°C) for 25-30 minutes, rotating the pan halfway through to ensure an even, vibrant color across all pieces.
- Finish with a final sprinkle of flaky sea salt immediately after they come out of the oven for a professional, glistening look.
HOW TO MAKE CROCKPOT CHICKEN?

Why we love this
There is a rustic, effortless charm to slow-cooked chicken that literally melts away from the bone, making it perfect for a board where guests can shred and pile meat onto toasted baguette slices. The slow cooking process allows the meat to bathe in its own juices and aromatics for hours, resulting in a depth of flavor that is impossible to achieve through quick cooking methods. It’s the ultimate ‘set it and forget it’ protein that yields a tender, buttery texture that feels incredibly luxurious and comforting. The gentle, falling-apart consistency is the perfect foil for crunchy pickled vegetables and sharp olives.
Ingredients
- 2 lbs chicken thighs (boneless or bone-in)
- 1/2 cup chicken stock
- 4 cloves smashed garlic
- 2 sprigs fresh rosemary
- 1/2 teaspoon black pepper
- 1/4 cup white wine (optional)
How to make it
- Layer the smashed garlic cloves and rosemary sprigs at the bottom of the slow cooker to create an aromatic base for the chicken to rest on.
- Place the chicken thighs on top of the herbs in a single layer if possible, or slightly overlapping if necessary.
- Pour the chicken stock and white wine around the edges of the chicken rather than directly over them, to keep the seasoning on top of the meat.
- Set the crockpot to the ‘Low’ setting; cooking on low for a longer period results in much more tender fibers than the ‘High’ setting.
- Cook for 5 to 6 hours, or until the chicken registers at least 175°F (this higher temp is actually better for slow-cooked dark meat as it breaks down collagen).
- Carefully lift the thighs out using a slotted spoon to avoid breaking them apart prematurely before they reach the board.
- If serving shredded, use two forks to pull the meat into thick chunks and drizzle with a spoonful of the concentrated cooking liquid from the pot.
HOW TO PREPARE BONELESS THIGHS?

Why we love this
Boneless thighs are the ultimate ‘user-friendly’ protein for a snacking board, allowing your guests to enjoy hearty bites without the fuss of bones. They cook incredibly quickly and evenly, making them the perfect choice for a last-minute gathering when you need a high-impact dish in a short amount of time. Because they lay flat, they offer a large surface area for searing and caramelizing, resulting in a beautiful, dark-gold exterior that looks stunning when sliced into elegant strips. They are the versatile workhorse of the modern grazing platter.
Ingredients
- 1.5 lbs boneless, skinless chicken thighs
- 2 tablespoons grapeseed oil
- 1 teaspoon paprika
- 1/2 teaspoon garlic salt
- 1/4 teaspoon cayenne pepper
How to make it
- Unroll the boneless thighs and trim away any excessive bits of overhanging fat to create a uniform shape that will cook at the same rate.
- Lay the thighs flat and use a meat mallet to gently pound the thickest parts so the entire piece of meat is a consistent thickness.
- Season both sides generously with the paprika, garlic salt, and cayenne pepper, pressing the spices into the meat with your palms.
- Heat a wide skillet over medium heat and add the grapeseed oil, swirling to coat the entire surface of the pan.
- Lay the thighs flat into the pan, being careful not to let them curl back up; you may need to hold them down with a spatula for the first 30 seconds.
- Cook for 6 minutes on the first side without moving them to develop a deep, caramelized crust.
- Flip and cook for another 5-7 minutes, checking the center to ensure they are opaque throughout and juices run clear.
HOW TO ROAST CHICKEN THIGHS?

Why we love this
Roasting is an elevated technique that brings out the inherent sweetness of the meat while creating a sophisticated, high-end presentation for your Viral Simple Food Board. By using high heat and a combination of fats and acids, you achieve a skin that is brilliantly taut and a flavor profile that is deeply concentrated. The sight of roasted thighs nestled among roasted grapes and sprigs of thyme is the epitome of the ‘dark academia’ or ‘rustic chic’ food aesthetic. It’s a method that feels purposeful and culinary, turning a simple meal into an event.
Ingredients
- 4 bone-in chicken thighs
- 1 tablespoon balsamic vinegar
- 2 tablespoons olive oil
- 1 teaspoon honey
- Fresh thyme and rosemary sprigs
- Sea salt to taste
How to make it
- Preheat your oven to 425°F (220°C) and place a cast-iron skillet inside the oven while it preheats to get the pan screaming hot.
- Whisk together the balsamic vinegar, olive oil, and honey in a small bowl to create a glaze that will caramelize beautifully under high heat.
- Toss the chicken thighs in the glaze, ensuring every fold of the meat is coated in the dark, sweet liquid.
- Carefully remove the hot skillet from the oven and place the chicken thighs inside—they should sizzle immediately upon contact.
- Scatter the fresh herbs around the chicken; the heat of the pan will instantly release their oils, perfuming the meat as it roasts.
- Return the skillet to the oven and roast for 25-30 minutes, occasionally spooning the pan juices back over the chicken to build up a glossy lacquer.
- The chicken is done when the skin is dark and slightly tacky to the touch, and the meat pulls away easily from the bone.
HOW TO MAKE GARLIC CHICKEN?
Why we love this
There is no aroma quite as intoxicating as garlic roasting in butter, and when applied to chicken thighs, it creates a flavor profile that is universally loved. This dish brings a punchy, savory depth to your board that pairs exceptionally well with crusty sourdough and mild cheeses like havarti. The garlic mellows as it cooks, becoming sweet and spreadable, while the chicken absorbs all that pungent, buttery goodness. It’s a bold choice that ensures your food board isn’t just pretty to look at, but packs a serious punch in the flavor department.
Ingredients
- 6 chicken thighs
- 1 entire head of garlic, cloves peeled and smashed
- 4 tablespoons unsalted butter
- 1 tablespoon fresh parsley, chopped
- 1/2 teaspoon salt
How to make it
- In a small saucepan, melt the butter over low heat and add the smashed garlic cloves, letting them steep for 5-10 minutes until the butter is highly fragrant and the garlic is soft.
- Season the chicken thighs with salt, then place them in a baking dish that fits them snugly to keep the butter pooled around the meat.
- Pour the garlic-butter mixture over the chicken, making sure several cloves of garlic are tucked into the spaces between the thighs.
- Bake at 375°F (190°C) for 35 minutes, using a spoon to baste the chicken with the garlic butter every 10 minutes.
- During the last 5 minutes of cooking, turn on the broiler to lightly brown the tops of the garlic cloves and the chicken skin.
- Remove from the oven and immediately sprinkle with the fresh parsley for a vibrant pop of green and a hit of freshness.
- Serve the softened garlic cloves alongside the chicken on the board so guests can spread the ‘garlic jam’ onto their bread.
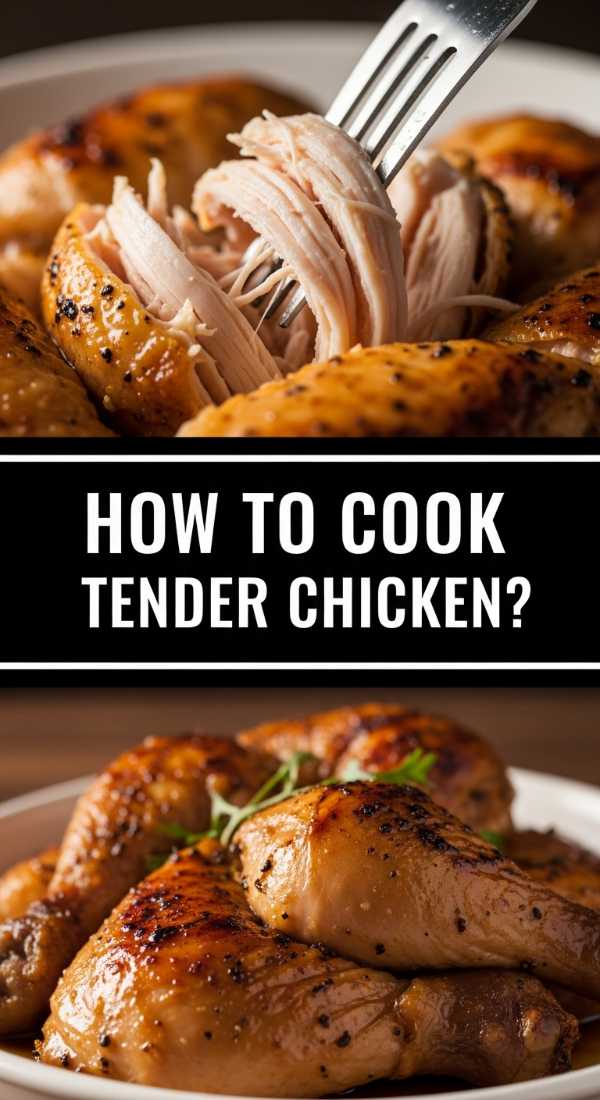
HOW TO COOK TENDER CHICKEN?

Why we love this
Tender chicken is the hallmark of a cook who understands patience and temperature control, offering a texture that is as soft as the finest brie on your board. This method focuses on gentle heat to prevent the proteins from tightening, resulting in meat that feels almost like velvet on the tongue. It provides a sophisticated, refined eating experience that allows the natural, clean flavors of the poultry to shine through without being masked by heavy char or crunch. It’s the perfect choice for a lighter, spring-inspired snacking board featuring fresh radishes and herb-flecked goat cheese.
Ingredients
- 1 lb chicken thighs
- 1 cup buttermilk (for marinating)
- 1/2 cup chicken stock (for cooking)
- 1 teaspoon salt
- 1/2 teaspoon white pepper
How to make it
- Submerge the chicken thighs in buttermilk for at least 4 hours; the lactic acid in the buttermilk gently breaks down the lean fibers for incredible tenderness.
- Rinse the chicken lightly to remove excess buttermilk and pat dry before seasoning with salt and white pepper.
- Place the chicken in a shallow pan and add just enough chicken stock to come halfway up the sides of the meat.
- Cover the pan with a piece of parchment paper cut to fit inside (a cartouche) and then a tight lid to create a gentle, enclosed steaming environment.
- Simmer on the lowest possible heat setting for 20-25 minutes, ensuring the liquid never reaches a rolling boil, which would toughen the meat.
- Check the internal temperature; as soon as it hits 165°F, remove the pan from the heat and let the chicken cool in the poaching liquid.
- This ‘carry-over’ cooling in liquid ensures the meat stays incredibly soft and plump until the moment it is served.
HOW TO MARINATE CHICKEN THIGHS?
[IMAGE_10]
Why we love this
Marinating is the ultimate ‘flavor insurance’ for your snacking board, ensuring that every single fiber of the meat is infused with bright, zesty, or spicy notes. The beauty of a marinated thigh is the way the exterior caramelizes into a complex glaze while the interior remains deeply seasoned and aromatic. It’s a technique that allows you to customize your protein to match any theme—be it a Mediterranean-inspired board with lemon and oregano or a spicy, vibrant board with soy and ginger. This preparation turns the chicken into a conversation piece, sparking joy with its multi-dimensional taste.
Ingredients
- 1.5 lbs chicken thighs
- 1/4 cup olive oil
- 2 tablespoons soy sauce
- 1 tablespoon honey
- Juice of 1 lime
- 1 tablespoon grated ginger
- 2 cloves minced garlic
How to make it
- In a large zip-top bag, combine the olive oil, soy sauce, honey, lime juice, ginger, and garlic, massaging the bag to emulsify the ingredients.
- Add the chicken thighs to the bag, squeeze out as much air as possible, and seal it tight to ensure maximum surface contact with the marinade.
- Place the bag in the refrigerator for at least 2 hours, but no more than 12 hours (the acid in the lime juice can start to ‘cook’ the meat if left too long).
- Remove the chicken from the fridge 30 minutes before cooking to take the chill off, which ensures even heat penetration.
- Wipe off excess marinade before cooking to prevent the honey and sugars from burning before the meat is cooked through.
- Grill or pan-sear the thighs over medium heat, letting the residual sugars in the marinade create a beautiful, dark-flecked char.
- Rest the meat for 10 minutes before slicing, allowing the infused flavors to set permanently into the meat fibers.
Conclusion
Creating a viral-worthy aesthetic snacking board is all about the balance of textures, colors, and, most importantly, high-quality ingredients. By mastering these chicken thigh techniques, you’ve moved beyond simple appetizers and into the realm of true culinary artistry. Whether you choose the crunch of crispy skin or the melt-in-your-mouth tenderness of a slow-cooked thigh, your board is guaranteed to be the talk of the party. Remember, the best boards are made with love, shared with friends, and of course, photographed before the first bite! Happy snacking!