
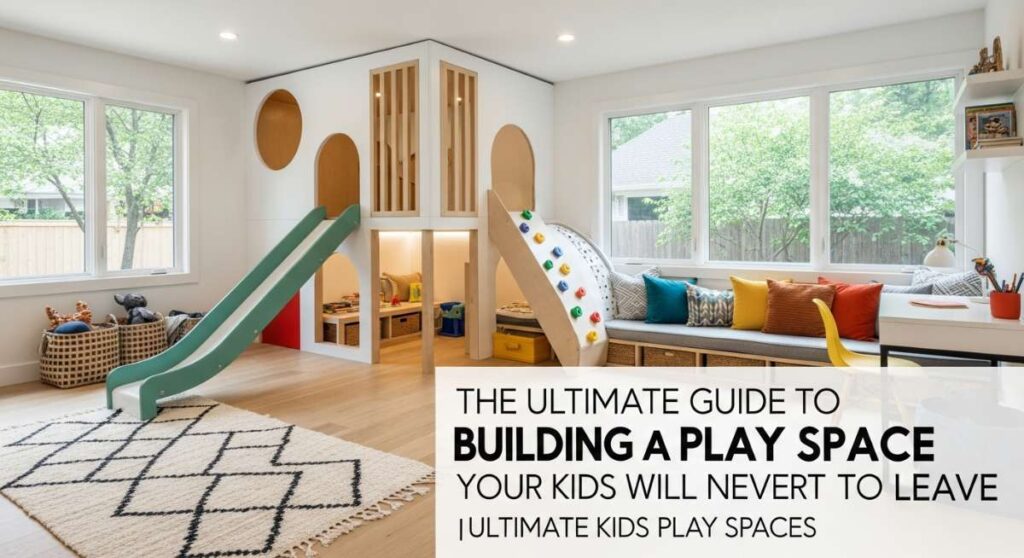
Do you remember the absolute magic of a cardboard box when you were five years old? It wasn’t just recycled paper; it was a spaceship, a castle, or a secret hideout hidden from the prying eyes of the grown-up world. As parents, we often find ourselves yearning to recapture that sense of wonder for our own children, creating a sanctuary where their imaginations can run wild and their little bodies can stay active and healthy. Building a play space isn’t just about the physical structures; it’s about the memories of sticky-fingered summer afternoons and the quiet hum of indoor play on a rainy Tuesday.
Today, I am sharing my heart and my home-tested secrets for building play spaces that transcend the ordinary plastic slide in the corner. Whether you have a sprawling backyard or a cozy apartment nook, there is a way to weave enchantment into the fabric of your daily life. We’re going to dive deep into everything from forest adventures to minimalist indoor havens, ensuring your home becomes the ultimate backdrop for a truly magical childhood. Grab a cup of coffee, and let’s start dreaming together.
How to Create Enchanting Outdoor Play Areas for Magical Childhood Memories
Why we love this
There is something inherently soul-soothing about watching your children play under the open sky, their laughter mingling with the rustle of leaves and the scent of sun-warmed cedar. This enchanted approach transforms a standard yard into a fairy-tale realm where every corner holds a secret, utilizing soft textures like weather-resistant linens and the warm, earthy glow of copper lanterns. It creates a sensory-rich environment that smells of lavender and fresh mulch, providing a safe haven where the boundaries between reality and make-believe beautifully blur into the twilight hours.
Essential Elements:
- Weather-treated cedar wood frames
- Sheer outdoor-grade linen curtains
- Solar-powered fairy lights and copper lanterns
- A plush outdoor rug in organic tones
- Potted fragrant herbs like lavender and rosemary
How to make it
- Level the Ground: Begin by selecting a 10×10 area and removing any rocks or debris. Use a leveler and a spade to ensure the ground is perfectly flat, which prevents the structure from wobbling or shifting over time.
- Construct the Frame: Using 4×4 cedar posts, build a simple A-frame or rectangular pavilion. Secure the joints with heavy-duty galvanized lag bolts to ensure the structure can withstand both weather and energetic climbing; check for stability by applying weight to each corner.
- Install the Canopy: Drape sheer linen panels over the top beams. Secure them with weather-resistant twine, allowing enough slack for the fabric to billow slightly in the breeze—this creates that soft, dreamy movement essential for an enchanting vibe.
- Layer the Flooring: Lay down a landscape fabric barrier followed by a thick layer of playground-grade cedar mulch for cushioning. Place a durable outdoor rug on top to define the central play zone and provide a soft surface for little knees.
- Final Lighting and Flora: String fairy lights along the roofline and place solar lanterns at the entrance. Surround the perimeter with heavy ceramic pots filled with herbs; ensure the soil is well-drained and the plants are positioned to catch at least 6 hours of sunlight.
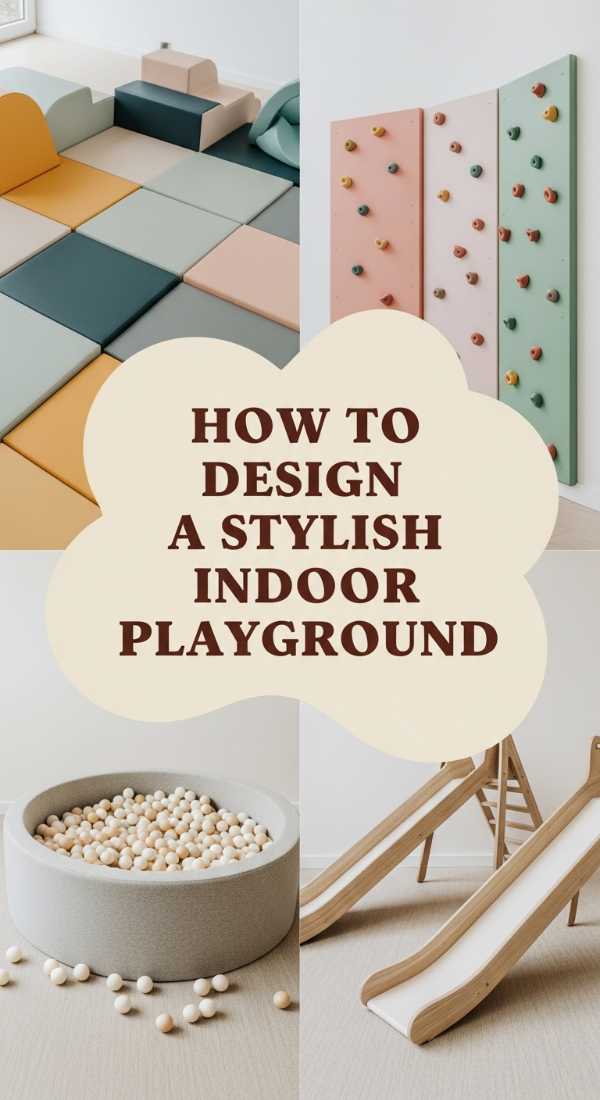
How to Design a Stylish Indoor Playground for Year-Round Active Fun
Why we love this
Gone are the days when indoor play meant primary-colored plastic taking over your living room; today’s stylish indoor playgrounds are architectural gems that complement your home’s aesthetic. We adore the clean lines of Scandinavian birch, the smooth-to-the-touch finish of sanded wood, and the way neutral-colored climbing holds look like modern art on a gallery wall. It’s about creating a space that feels calm and curated, where the only thing popping is your child’s creativity against a backdrop of sophisticated, muted tones and natural materials.
Essential Elements:
- Birch plywood climbing wall
- Professional-grade rock climbing holds in muted tones
- Swedish wall ladder
- High-density foam floor mats with a faux-leather finish
- Cotton macramé swing or pod chair
How to make it
- Wall Preparation: Identify a load-bearing wall and use a high-quality stud finder to mark the vertical supports. This is the most critical safety step, as the playground must be anchored directly into the home’s framing to support the weight of active children.
- Panel Installation: Secure 3/4-inch birch plywood panels to the studs using 3-inch wood screws. Ensure the panels are flush with each other; for a professional finish, countersink the screws and fill the holes with wood putty before sanding smooth.
- Attach the Holds: Drill holes according to your climbing hold kit’s instructions and install the T-nuts on the back of the panel before mounting it. Arrange the holds in a variety of patterns, testing the ‘reach’ to ensure they are appropriate for your child’s height and skill level.
- Anchor the Swedish Ladder: Position the ladder against the wall and secure it using heavy-duty L-brackets into the studs. Always perform a ‘pull test’ by applying twice the weight of your heaviest child to ensure there is zero movement or creaking.
- Set the Safety Zone: Lay down 2-inch thick high-density foam mats directly beneath any climbing elements. Check that the mats overlap or interlock perfectly so there are no gaps where a small foot could trip or slip through.
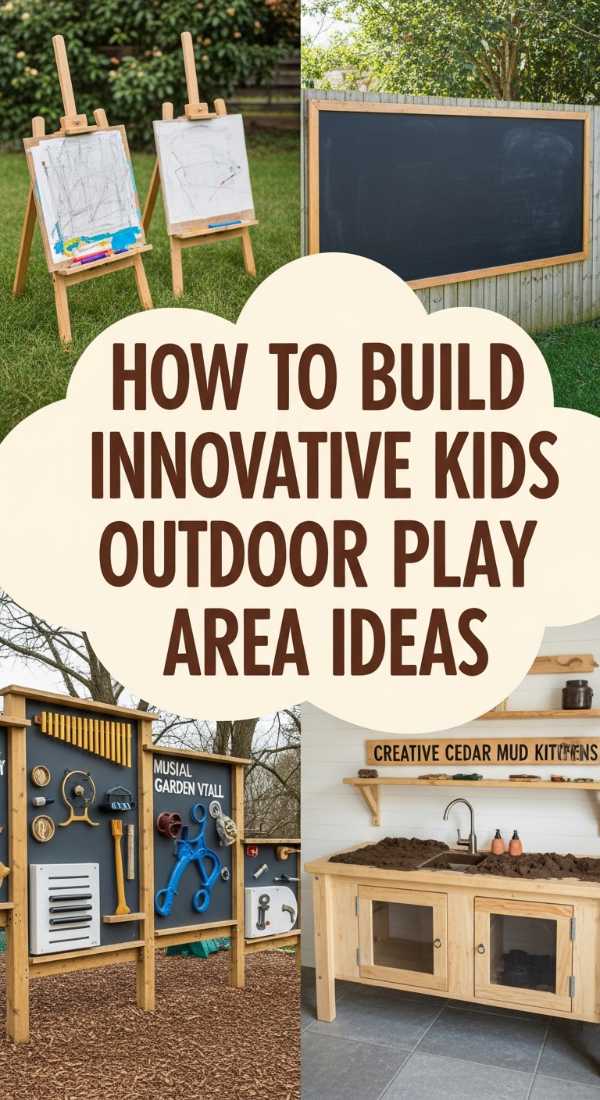
How to Build Innovative Kids Outdoor Play Area Ideas for Creative Development
![]()
Why we love this
Innovation in play isn’t about high-tech gadgets; it’s about open-ended materials that challenge a child’s problem-solving skills and ignite their artistic flair. This setup features modular building blocks made of lightweight weather-proof materials and a giant chalkboard wall that captures the imagination in real-time. We love the tactile contrast between the smooth chalk, the rough texture of natural wood blocks, and the cool touch of stainless steel mud kitchen accessories, encouraging a symphony of creative exploration that evolves every single day.
Essential Elements:
- Wall-mounted outdoor chalkboard
- Modular oversized building blocks
- Stainless steel sensory bins
- Adjustable height art easel
- Mobile storage cart for loose parts
How to make it
- Create the Chalkboard: Purchase a sheet of cement board (which is weather-resistant) and prime it with outdoor-grade chalkboard paint. Apply three thin coats, allowing 4 hours of drying time between each, then ‘season’ the surface by rubbing a piece of chalk sideways over the entire area and wiping it clean.
- Build the Sensory Station: Construct a simple wooden table frame using pressure-treated 2x4s. Cut circular openings in the tabletop to snugly fit stainless steel hotel pans; this allows for easy removal and cleaning after messy play sessions.
- Organize Loose Parts: Set up a weather-proof shelving unit or mobile cart. Stock it with ‘loose parts’ like smooth river stones, pinecones, and recycled pipes, ensuring everything is sanded down to prevent splinters and organized into clear bins for visual accessibility.
- Install the Art Zone: Mount a heavy-duty roll of butcher paper to the top of your chalkboard or a fence. Use a magnetic strip or clips at the bottom to hold the paper steady, allowing your little artist to transition from chalk to paint seamlessly.
- Define the Boundary: Use low-profile stone edging to create a dedicated zone for building blocks. This keeps the ‘construction site’ contained and prevents small pieces from being lost in the grass or mulch.
How to Transform Your Backyard Ideas for Kids into a Forest Adventure
Why we love this
There is a primitive joy in the smell of pine needles and the feeling of moss underfoot that no plastic playground can replicate. A forest adventure zone brings the wildness of the woods to your backyard, utilizing fallen logs, stepping stones, and hidden nooks to encourage risk-taking and physical agility. We love how this space ages beautifully, becoming more integrated with the landscape as the wood weathers to a silvery grey and the surrounding ferns grow lush and wild, creating a true sanctuary for little explorers.
Essential Elements:
- De-barked cedar logs for balancing
- Natural flat flagstones
- Willow wattle fencing for secret paths
- Native ferns and shade-loving groundcover
- A hollowed-out log or ‘hobbit’ tunnel
How to make it
- Map the Trail: Walk your yard and identify natural pathways. Use a garden hose to mock up a winding trail that leads through bushes or around trees, creating a sense of mystery and discovery before you even begin building.
- Install Log Balances: Source large cedar or oak logs and remove the bark to prevent rot. Dig shallow trenches (3-4 inches deep) to ‘set’ the logs into the ground, ensuring they are rock-steady and do not roll when stepped upon.
- Lay the Stone Path: Place flat flagstones along your trail, spacing them about 12 inches apart for small strides. Dig out the sod beneath each stone so they sit flush with the ground, preventing trip hazards and making it easier to mow around them.
- Plant the Undergrowth: Surround the play elements with hardy, non-toxic plants like sword ferns or creeping thyme. These plants thrive in the shade of the ‘forest’ and provide a soft, green texture that smells amazing when slightly crushed by wandering feet.
- Construct the Willow Den: Use flexible willow branches to create a living dome or tunnel. Push the thick ends of the branches 6 inches into moist soil and tie the tops together with twine; over time, the willow may even take root, creating a permanent, growing secret hideout.
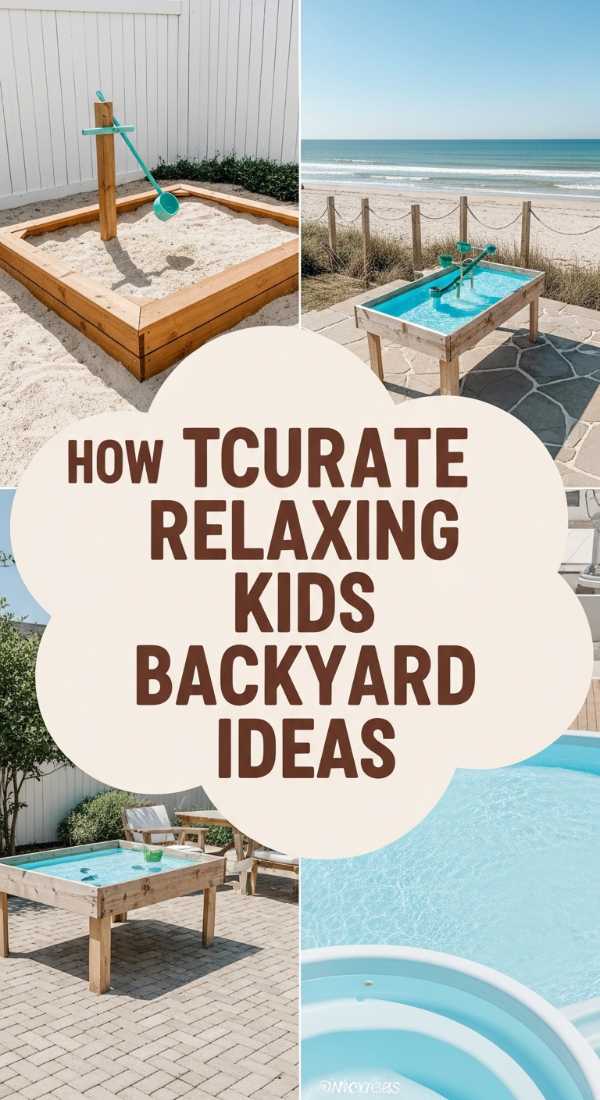
How to Curate Relaxing Kids Backyard Ideas for Summer Sensory Play
Why we love this
Summer afternoons call for a slower pace, and a sensory-focused play area is the ultimate antidote to the heat. We love the rhythmic sound of trickling water, the cool squish of kinetic sand between toes, and the vibrant colors of water-beads glistening in the sun. This space is designed to be a cooling oasis, using natural bamboo shades and soft water features to lower the temperature and the energy levels, making it the perfect spot for quiet focus and tactile exploration during the hottest parts of the day.
Essential Elements:
- Multi-level water table with pumps
- Kinetic sand station with wooden molds
- Bamboo privacy screening for shade
- Mist cooling system
- Smooth glass pebbles and water-safe toys
How to make it
- Set up the Shade: Install a bamboo screen or a large UV-rated shade sail over the designated sensory area. This is vital for summer play to ensure the surfaces (and the kids!) stay cool; ensure the sail is angled slightly to allow rainwater to run off.
- Assemble the Water Feature: Use a sturdy, UV-resistant water table or create a custom one using stacked tubs. Install a small, battery-operated fountain pump to keep the water moving, which provides a soothing auditory element and keeps the water from becoming stagnant.
- Prepare the Sand Zone: Fill a large, shallow wooden tray with high-quality kinetic or play sand. Add a set of wooden architectural molds rather than plastic ones to maintain a high-end, tactile experience that feels grounding and substantial.
- Install the Misting Line: Attach a low-pressure misting line to the perimeter of your shade structure. Connect it to a standard garden hose; the fine mist can drop the ambient temperature by up to 20 degrees, making mid-day play comfortable.
- Curate Sensory Bins: Fill smaller containers with a variety of textures—dried beans, water beads, or smooth river rocks. Rotate these weekly to keep the ‘discovery’ aspect fresh and exciting for your children.
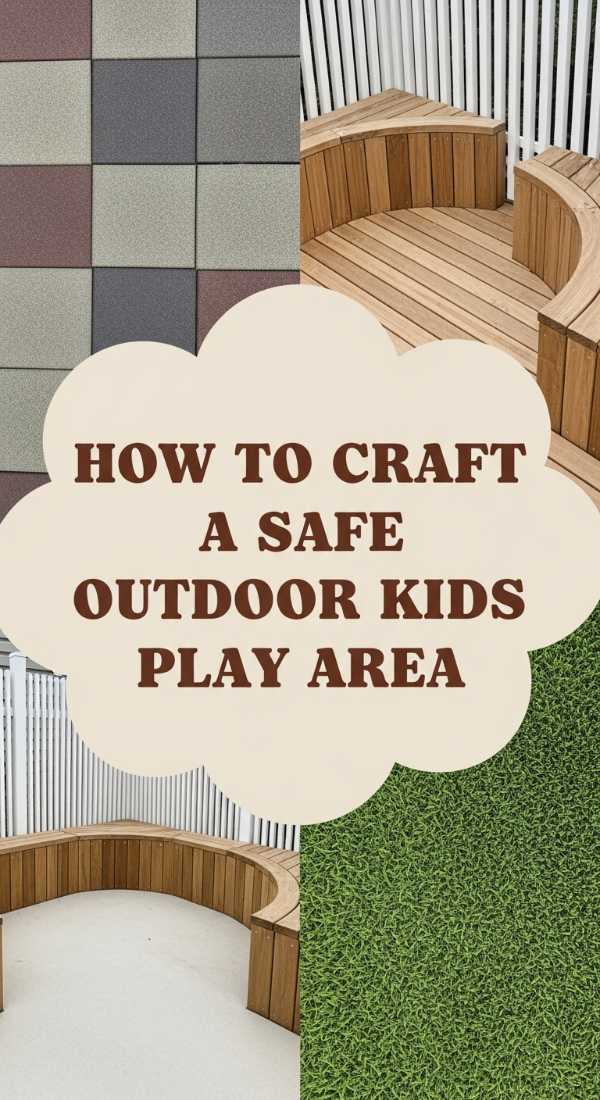
How to Craft a Safe Outdoor Kids Play Area for Peace of Mind
Why we love this
Safety doesn’t have to be clinical; in fact, the most secure play areas are often the most beautiful because they are so thoughtfully integrated. We love the peace of mind that comes from high-visibility boundaries, soft-fall surfaces that feel like walking on clouds, and the use of non-toxic, sustainable materials. It’s the feeling of being able to sit back with a book, knowing every corner has been smoothed, every bolt tightened, and every plant chosen for its safety, allowing you to truly relax while they explore.
Essential Elements:
- Rubber mulch or engineered wood fiber
- Rounded-edge timber borders
- Non-toxic, lead-free stains and paints
- Gated perimeter with child-proof latches
- First-aid kit stored in a weather-proof box
How to make it
- Excavate the Safety Zone: Dig out the area under play equipment to a depth of 9-12 inches. This depth is the industry standard for ensuring enough loose-fill material is present to absorb the impact of a fall from height.
- Install the Retaining Border: Use 4×4 timbers with pre-rounded edges to line the pit. Secure them into the ground with 12-inch rebar spikes, ensuring the spikes are driven entirely flush with the wood so no metal is exposed.
- Lay the Cushioning: Fill the excavated area with 9 inches of IPEMA-certified engineered wood fiber or rubber mulch. Periodically rake the material to ensure it hasn’t become compacted, as ‘fluffing’ the mulch maintains its shock-absorbing properties.
- Sand and Seal: Inspect all wooden structures for splinters. Use a power sander to smooth any rough spots, then apply a water-based, non-toxic sealant that is specifically labeled as safe for children’s furniture and play equipment.
- Hardware Check: Replace any standard nuts with nylon-insert lock nuts, which won’t vibrate loose over time. Cover exposed bolt heads with plastic safety caps to prevent scratches or snagging on clothing during vigorous play.
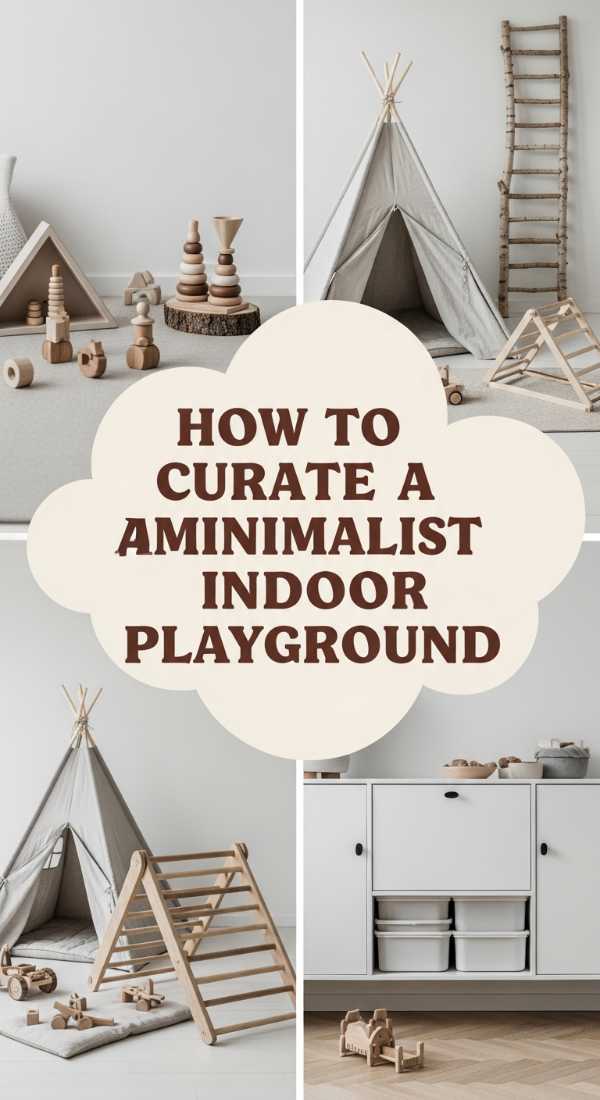
How to Curate a Minimalist Indoor Playground for a Clutter-Free Home
Why we love this
For the family that thrives on ‘less is more,’ the minimalist indoor playground is a breath of fresh air. We love the intentionality of each piece—a single, beautifully crafted balance board, a simple cotton rope swing, and hidden storage that whisks toys away in seconds. This approach prioritizes quality over quantity, using a monochrome or earth-toned palette that reduces overstimulation and creates a serene environment where a child’s inner world can take center stage without the distraction of clutter.
Essential Elements:
- Wobbel-style wooden balance board
- Ceiling-mounted cotton rope swing
- Wall-integrated storage cubbies
- Neutral-toned organic cotton floor cushions
- Foldable wooden triangle climber
How to make it
- Select a Focal Point: Choose one high-quality ‘hero’ piece, such as a wooden climbing triangle or a swing. By limiting the number of large items, you maintain the room’s sense of space and allow for more fluid movement around the play area.
- Install Ceiling Mounts: For a swing, locate a ceiling joist and install a heavy-duty eye bolt. Use a carabiner and a height-adjustable rope; always test the mount with your own weight before allowing a child to use it to ensure the joist is structurally sound.
- Implement Hidden Storage: Use ‘bench’ style seating with lift-up lids or wall-mounted cabinets that match your wall color. The goal is to have a dedicated home for every small toy so the floor remains clear when play is over.
- Choose a Muted Palette: Stick to three colors maximum—for example, natural wood, white, and sage green. This visual consistency prevents the space from feeling chaotic and helps the play area blend into the rest of your home’s decor.
- Define the ‘Soft Zone’: Place one or two large, high-quality organic cotton floor cushions in a corner. These provide a spot for reading or resting without the need for a bulky sofa or multiple smaller chairs.
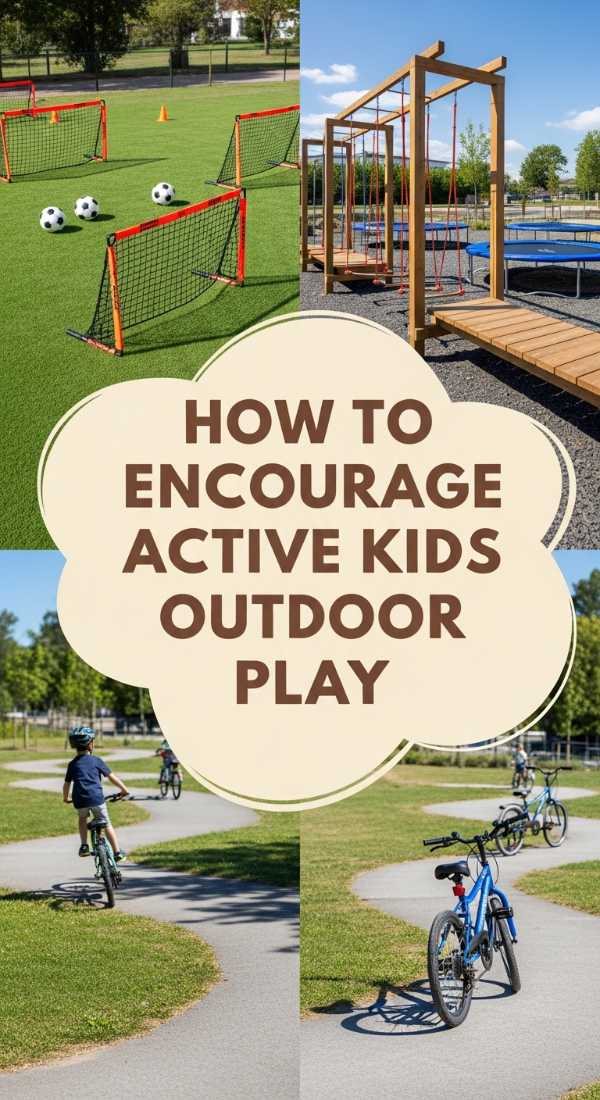
How to Encourage Active Kids Outdoor Play for Healthy Physical Growth

Why we love this
Active play is the heartbeat of a healthy childhood, and we love designing spaces that practically dare kids to move. From monkey bars that challenge upper body strength to ‘ninja’ lines that test balance, these areas are all about the thrill of achievement. We adore the sight of glowing cheeks and the sound of deep, satisfied breathing after a long session of climbing and swinging, knowing that every muscle is being strengthened and every ounce of energy is being channeled into pure, physical joy.
Essential Elements:
- Portable ‘Ninja’ slackline with hanging obstacles
- Powder-coated steel monkey bars
- Heavy-duty rubber tire swing
- In-ground trampoline with safety netting
- Adjustable basketball hoop
How to make it
- Install the Ninja Line: Find two sturdy trees at least 10 inches in diameter and 20-30 feet apart. Ratchet the slackline between them at a height where the child can just reach the obstacles; use tree protectors to prevent damage to the bark.
- Secure the Monkey Bars: If building from scratch, use 4×4 pressure-treated posts set in 2 feet of concrete. Ensure the bars are spaced 12 inches apart and are level; check the concrete’s ‘cure’ for at least 48 hours before any weight is applied.
- Set the Trampoline: For maximum safety and aesthetics, install an in-ground trampoline. This requires excavating a pit the size of the trampoline, lining it with a retaining wall, and ensuring proper drainage at the bottom to prevent water pooling.
- Mount the Swing: Use a heavy-duty swivel hanger on a crossbeam of at least 4×6 dimensions. Attach a tire swing using a plastisol-coated chain, which prevents little fingers from getting pinched in the links during high-velocity swinging.
- Mark the ‘Court’: Use outdoor spray paint or stone pavers to define a small half-court area under the basketball hoop. This encourages organized sports play and gives children a dedicated space for drills and high-energy games.
How to Decorate Dreamy Backyard Ideas for Kids for Enchanted Evening Fun

Why we love this
When the sun goes down, the backyard shouldn’t be off-limits; instead, it should transform into a luminous wonderland. We love the glow of Moroccan lanterns, the flicker of a child-safe fire pit (perfect for those gooey marshmallows!), and the comfort of an outdoor cinema screen under the stars. It’s about extending the day into the ‘magic hour’ and beyond, creating a cozy, star-lit atmosphere that feels like a private festival right in your own backyard, perfect for family bonding and late-night whispers.
Essential Elements:
- Portable projector and white canvas screen
- Smokeless fire pit with roasting sticks
- Waterproof floor poufs and blankets
- Hanging solar star-burst lights
- Battery-operated flickering candles
How to make it
- Set the Cinema: Mount a white blackout cloth or a professional projector screen against a flat wall or fence. Position a portable projector on a stable table 10-15 feet back, and connect it to a high-quality Bluetooth speaker for an immersive sound experience.
- Prepare the ‘Lounge’: Layer the ground with a waterproof tarp, followed by several outdoor rugs. Scatter waterproof floor poufs and provide a basket of thick, washable fleece blankets to keep everyone warm as the evening air cools.
- Light the Way: Hang solar-powered ‘star-burst’ lights from tree branches at varying heights. Use battery-operated candles inside lanterns along pathways to provide a safe, flicker-free glow that guides little feet without the risk of a real flame.
- Manage the Fire Pit: Choose a smokeless fire pit model to keep stinging smoke out of little eyes. Set it on a level stone patio or a heat-resistant mat, and establish a ‘no-fly zone’ circle around it using chalk or stones to keep kids at a safe distance.
- Create a Snack Station: Set up a small table with a ‘S’mores Bar’—pre-loaded sticks, chocolate, and graham crackers in covered containers. This keeps the focus on the fun and prevents constant trips back inside the house.
How to Garden with Outdoor Play Areas for Early Science Learning
[IMAGE_10]
Why we love this
There is no better classroom than a garden, where the smell of damp earth and the sight of a sprouting seed provide the ultimate science lesson. We love how this play space integrates education with dirt-under-the-fingernails fun, featuring ‘pizza gardens’ where kids grow their own toppings and magnifying stations for observing ladybugs. It’s a place that smells of tomato vines and marigolds, fostering a deep respect for nature and a sense of wonder at the tiny miracles happening in the soil every single day.
Essential Elements:
- Raised cedar garden beds at ‘kid-height’
- Child-sized ergonomic gardening tools
- Acrylic observation window in the soil
- Butterfly-friendly pollination plants
- Rain gauge and outdoor thermometer
How to make it
- Build the Beds: Construct raised beds using untreated cedar (which is naturally rot-resistant) to a height of about 12-18 inches. This makes the garden easily accessible for children to weed and harvest without needing to bend over or step into the growing area.
- Install an ‘Earth Window’: Cut a small rectangle out of the side of one garden bed and replace it with a thick sheet of clear acrylic. This allows children to see the root systems and earthworms moving through the soil, providing a literal ‘window’ into the underground world.
- Choose ‘Quick-Win’ Plants: Plant seeds that germinate quickly and are fun to harvest, such as radishes, sunflowers, and cherry tomatoes. Ensure you use organic, nutrient-rich potting soil to give the plants the best start for a successful ‘science experiment.’
- Create a Pollinator Patch: Dedicate one corner to bright flowers like zinnias and milkweed. This attracts butterflies and bees, providing a perfect opportunity to teach children about the vital role pollinators play in our food system.
- Set up the Lab: Attach a weather-proof ‘science station’ to the side of the bed, featuring a mounted rain gauge and a large outdoor thermometer. Provide a magnifying glass on a tether so kids can inspect leaves and insects up close at any time.
Conclusion
Building a play space for your children is one of the most rewarding ‘home’ projects you will ever undertake. It is an investment in their physical health, their creative spirit, and the joy of your daily family life. Whether you are building a soaring climbing wall or simply planting a row of sunflowers, remember that the most important element is the love and intention you pour into it. Your kids won’t just remember the structures; they will remember the feeling of a home that was designed with their happiness in mind. Now, go out there and start building those memories!