

Have you ever scrolled through your social feed, sighed at a perfectly curated home, and then looked at your own space feeling a little… uninspired? I’ve been there more times than I can count. We often fall into the trap of thinking that a ‘dream home’ requires a lottery win or a massive renovation budget, but I’ve discovered a secret: aesthetic living is actually a mindset rooted in the small, intentional details that make your heart skip a beat every time you walk through the door.
Today, we are diving deep into the world of viral DIYs and home aesthetics that prove you don’t need to spend a fortune to live beautifully. From the nostalgic vibes of our youth to the calming scent of a well-tended garden, these projects are about reclaiming your space and infusing it with your unique personality. Let’s turn those ‘someday’ Pinterest boards into your ‘right now’ reality with these budget-friendly upgrades that feel like a total luxury.
How to Design Dreamy Gardens with Low Maintenance Flower Bed Ideas

Why we love this
There is something inherently soul-soothing about stepping out into a garden that feels lush and intentional without demanding every second of your weekend. Imagine the soft, sweet fragrance of lavender wafting through the air as the golden hour sun hits the silvery-green foliage, creating a shimmering, ethereal glow. This approach focuses on the interplay of textures—think velvety lamb’s ear against the structural strength of ornamental grasses—giving you a high-end botanical look that practically takes care of itself while providing a serene sanctuary for your morning coffee.
Essential Elements:
- Native perennial plants (like Coneflower or Black-eyed Susans)
- High-quality cedar mulch
- Landscape fabric or thick cardboard for weed suppression
- Drought-tolerant shrubs (like Boxwood or Spirea)
- Natural stone edging
How to make it
- Begin by outlining your bed using a garden hose to create soft, organic curves rather than rigid straight lines; this creates a more natural, ‘dreamy’ aesthetic.
- Clear the area of existing grass and weeds using a sharp spade, ensuring you remove the roots to prevent regrowth.
- Lay down a layer of breathable landscape fabric or dampened cardboard to act as a natural weed barrier that eventually enriches the soil.
- Arrange your plants while still in their nursery pots; place taller ‘thriller’ plants in the back, mounding ‘fillers’ in the middle, and ‘spillers’ or groundcover near the edges for a professional layered look.
- Dig holes twice as wide as the root ball and just as deep, mixing in a bit of organic compost to give the roots a nutrient-rich start.
- Once planted, apply a generous 3-inch layer of mulch, keeping it an inch away from the stems to prevent rot, and water deeply to settle the soil.
How to Create Inspiring Spaces for Elementary Art Rooms

Why we love this
An art room should feel like a living, breathing canvas that invites every child to explore the messy, beautiful world of their own imagination. We love this because it transforms a standard room into a multisensory experience where the vibrant primary colors of paint jars pop against crisp, organized white shelving, and the smell of fresh cedar pencils fills the air. It’s about creating a space that feels safe for ‘happy accidents’ while maintaining a visual rhythm that calms the chaotic energy of a creative mind, making every art session feel like a professional studio experience.
Essential Elements:
- Clear acrylic storage bins for visible supplies
- A dedicated ‘gallery wall’ with magnetic strips
- Sturdy, easy-to-clean work tables
- Color-coded pegboards
- Adjustable task lighting
How to make it
- Zone the room by activity: create a ‘wet zone’ near the sink for painting and a ‘dry zone’ for sketching to minimize cross-contamination of materials.
- Install floor-to-ceiling shelving and use clear bins labeled with both words and icons; this empowers students to find and return supplies independently.
- Mount a heavy-duty pegboard on a main wall, painting it a neutral shade so the colorful tools like scissors and tapes become the focal point.
- Create an ‘Inspiration Station’ featuring tactile materials like clay, fabrics, and recycled items arranged in low, accessible baskets.
- Set up a drying rack system that is sturdy and positioned away from high-traffic footpaths to protect wet masterpieces.
- Finish the space with a dedicated display area using wire and clips, allowing for a rotating gallery that celebrates every student’s contribution.
How to Build a Functional DIY Grill Station Cheap

Why we love this
There is nothing quite like the sensory symphony of a backyard cookout—the smoky aroma of charred wood, the rhythmic sizzle of searing protein, and the tactile warmth of a smooth wooden countertop under your hands. Building a custom grill station elevates the humble BBQ into a professional outdoor kitchen experience without the five-figure price tag. It provides a grounded, rustic aesthetic that anchors your patio, turning the act of cooking into a centerpiece for social gathering and culinary storytelling.
Essential Elements:
- Pressure-treated 2x4s or reclaimed pallets
- Concrete pavers or heat-resistant countertop material
- Hooks for grilling utensils
- Magnetic knife strip
- Weather-proof wood stain or sealant
How to make it
- Measure your grill’s dimensions accurately, allowing for a 2-inch clearance on all sides to ensure heat dissipation and safety.
- Construct a sturdy frame using pressure-treated lumber, ensuring all joints are secured with outdoor-rated wood screws and reinforced with L-brackets.
- Add a middle shelf for storing charcoal, wood chips, or heavy cast iron pans, keeping the weight centered for stability.
- For the countertop, lay down smooth concrete pavers for a modern industrial look that is entirely fireproof and easy to scrub clean.
- Sand all wooden surfaces thoroughly to prevent splinters, then apply two coats of high-quality exterior stain in a ‘Walnut’ or ‘Charcoal’ finish for that high-end look.
- Install heavy-duty casters on the legs if you need a mobile station, or anchor it to your patio if you prefer a permanent, built-in feel.
How to Style a Serene Hot Tub Area for Relaxation

Why we love this
Transforming a basic hot tub into a private spa retreat is the ultimate way to bring vacation vibes to your backyard. We love the contrast between the cool, crisp night air and the rising steam that envelops you in a warm, watery embrace. By layering soft textiles, flickering candlelight, and lush greenery around the tub, you create a tactile sanctuary that appeals to the senses, muffling the outside world and focusing purely on the restorative rhythm of bubbling water and complete physical weightlessness.
Essential Elements:
- Weatherproof outdoor rugs
- Privacy lattice or bamboo screens
- Outdoor string lights (Edison style)
- Potted palms or oversized ferns
- Wicker towel basket
How to make it
- Define the footprint of the relaxation zone by laying down a soft, patterned outdoor rug that feels good on bare feet.
- Erect privacy screens—either vertical wooden slats or lush hedges—to create an intimate ‘room’ feeling that blocks out neighbor views.
- String warm-toned LED lights overhead in a zig-zag pattern, ensuring they are high enough to be safe from splashes but low enough to provide an amber glow.
- Place a small, sturdy side table within arm’s reach of the tub for holding refreshments, waterproof speakers, or a book.
- Incorporate tall, leafy plants in large planters at the corners of the space to soften the hard lines of the hot tub and add a tropical, secluded feel.
- Add a dedicated towel station with plush, rolled white towels and a small bench for ease of entry and exit.
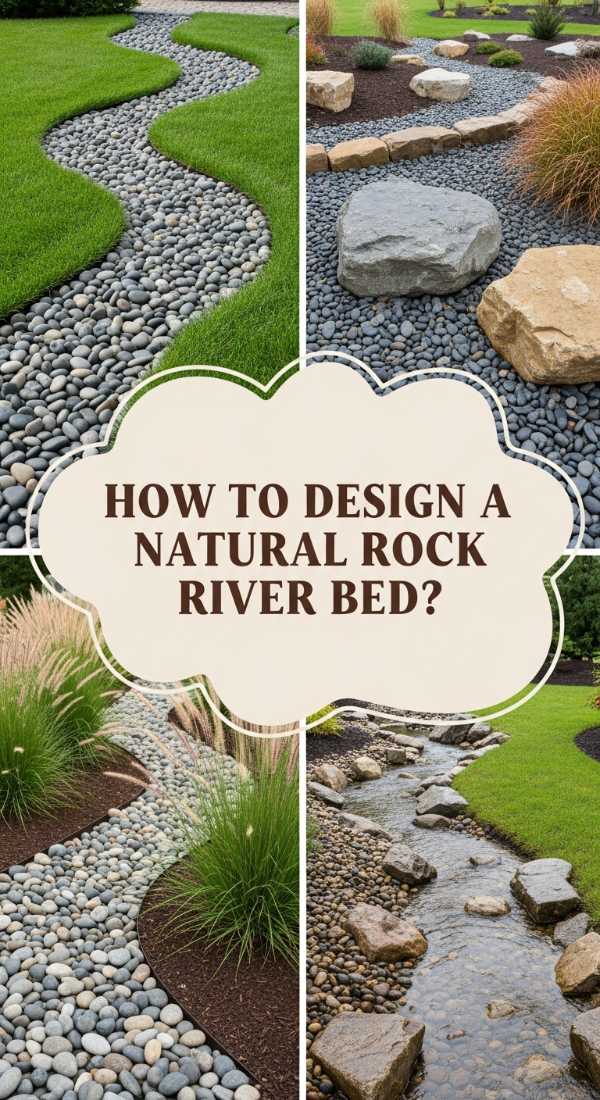
How to Master Natural Rock River Bed Landscape Design
Why we love this
A rock river bed is the perfect marriage of form and function, offering a rugged, earthy aesthetic that solves drainage issues while looking like a piece of high-end art. We love the way the different shades of grey, tan, and slate shift in color when they get wet, creating a dynamic landscape that mimics the wild beauty of a mountain stream. The cool, smooth texture of river rocks underfoot and the visual ‘flow’ they provide can guide the eye through a yard, making even small spaces feel expansive and grounded in nature.
Essential Elements:
- Various sizes of river rock (from pea gravel to large boulders)
- Heavy-duty landscape liner
- Crushed gravel base
- Drought-resistant accent plants
- Shovel and metal rake
How to make it
- Sketch a meandering path for your river bed, ensuring it follows the natural slope of your yard to assist with water runoff.
- Excavate the path to a depth of about 6 inches, slightly deeper in the center than at the edges to create a ‘trough’ shape.
- Line the entire trench with heavy-duty landscape fabric, pinning it down securely to prevent rocks from sinking into the mud over time.
- Fill the base with a thin layer of crushed gravel for stability, then begin placing your largest boulders at ‘bends’ in the river to act as natural anchors.
- Pour in your medium-sized river rocks, spreading them evenly, and finish by tucking smaller stones and pea gravel into the gaps for a realistic, graded look.
- Plant ornamental grasses or creeping thyme along the edges to ‘soften’ the rock and make the feature look as though it has been there for decades.
How to Revive Nostalgic Style with a 2000s Teen Room

Why we love this
There is a profound comfort in the maximalist, colorful energy of a 2000s-inspired bedroom—it’s a curated explosion of personality and pre-digital charm. We love the tactile nostalgia of fuzzy pillows, the iridescent shimmer of butterfly clips used as decor, and the warm, lo-fi glow of neon signs. It’s a space that doesn’t take itself too seriously, prioritizing self-expression and ‘more-is-more’ styling that makes the room feel like a cozy, vibrant time capsule designed for late-night chats and creative daydreaming.
Essential Elements:
- Inflatable or butterfly chairs
- Beaded curtains
- Collage walls (magazines and photos)
- Neon or lava lamps
- Checkerboard or fuzzy textiles
How to make it
- Start with a base of ‘Y2K’ colors—think hot pink, lime green, or icy blue—either on an accent wall or through large bedding pieces.
- Create a floor-to-ceiling collage wall using vintage magazine cutouts, polaroids, and record covers, overlapping them for a dense, textured look.
- Replace standard lighting with a mix of lava lamps and LED neon signs to create a moody, colorful ambiance that is quintessentially 2000s.
- Introduce sensory textures like faux-fur rugs, velvet cushions, and even a beaded curtain in the doorway for that satisfying ‘clack’ every time you enter.
- Incorporate tech-nostalgia by displaying an old translucent phone or a stack of CDs as decorative objects on a floating shelf.
- Finish the look with a vanity area featuring a chunky ‘bubble’ mirror and organize your accessories in colorful acrylic drawers.
How to Achieve Calm with Realistic Pantry Organization

Why we love this
A perfectly organized pantry is like a deep breath for your home. We love the visual rhythm of glass jars filled with grains and pastas, the satisfying click of airtight lids, and the earthy, wholesome aroma of dried spices and baking supplies. It’s not just about aesthetics; it’s about the peace of mind that comes from knowing exactly what you have, reducing waste, and turning the daily chore of meal prep into a streamlined, tactile experience that feels like visiting a boutique bulk-food store.
Essential Elements:
- Uniform glass or BPA-free plastic canisters
- Airtight lids with gaskets
- Uniform labels (minimalist or handwritten)
- Tiered shelf risers
- Woven baskets for bulky items
How to make it
- Empty the entire pantry and group items by category: grains, baking, snacks, canned goods, and breakfast to see the volume of each.
- Decant ‘dry’ goods like flour, sugar, and pasta into uniform glass jars; this removes visual clutter from mismatched packaging and keeps food fresher for longer.
- Apply labels at a consistent height on every jar; using a minimalist font or clean handwriting ensures the pantry looks cohesive and high-end.
- Utilize tiered risers for canned goods or spices so that you can see every item clearly without having to dig through the back of the shelf.
- Store loose snacks and oddly shaped bags in woven or wire baskets, which hides the ‘mess’ while keeping items accessible for kids or quick grabs.
- Maintain a ‘first in, first out’ system by placing newer groceries behind older ones, ensuring your beautiful pantry remains functional and fresh.
How to Brighten Paths with Dollar Tree Solar Light Ideas

Why we love this
There is something magical about a garden that comes to life as the sun sets, and doing it on a ‘Dollar Tree’ budget makes the glow even sweeter. We love the way soft, scattered light dances across the leaves and illuminates the path, creating a safe and enchanting walkway. It’s a low-stakes DIY that offers high-impact results, providing that ‘expensive’ landscape lighting look for a fraction of the cost, while making your outdoor space feel welcoming and lived-in well into the evening hours.
Essential Elements:
- Basic solar path lights
- Glass jars or decorative lanterns
- Spray paint (Metallic gold or matte black)
- Clear adhesive or epoxy
- Shepherd’s hooks
How to make it
- Elevate the ‘plastic’ look of budget solar lights by removing the stakes and spray-painting the housing a matte black or brushed brass finish.
- For a ‘lantern’ effect, glue the solar light top to the lid of a decorative glass jar; the glass will refract the light and create a much softer, more expensive-looking glow.
- Place lights at consistent intervals (about 3-4 feet apart) along your primary walkway, ensuring they are positioned to receive direct sunlight during the day.
- For added height and drama, hang your DIY solar lanterns on black shepherd’s hooks tucked into flower beds or along the fence line.
- Ensure the solar panels are cleaned regularly with a damp cloth; dust and dirt can significantly reduce their ability to charge and glow brightly.
- Group 3-4 lights together in a cluster at the base of a tree or a large rock to create a focal point ‘glow’ rather than just a linear path.
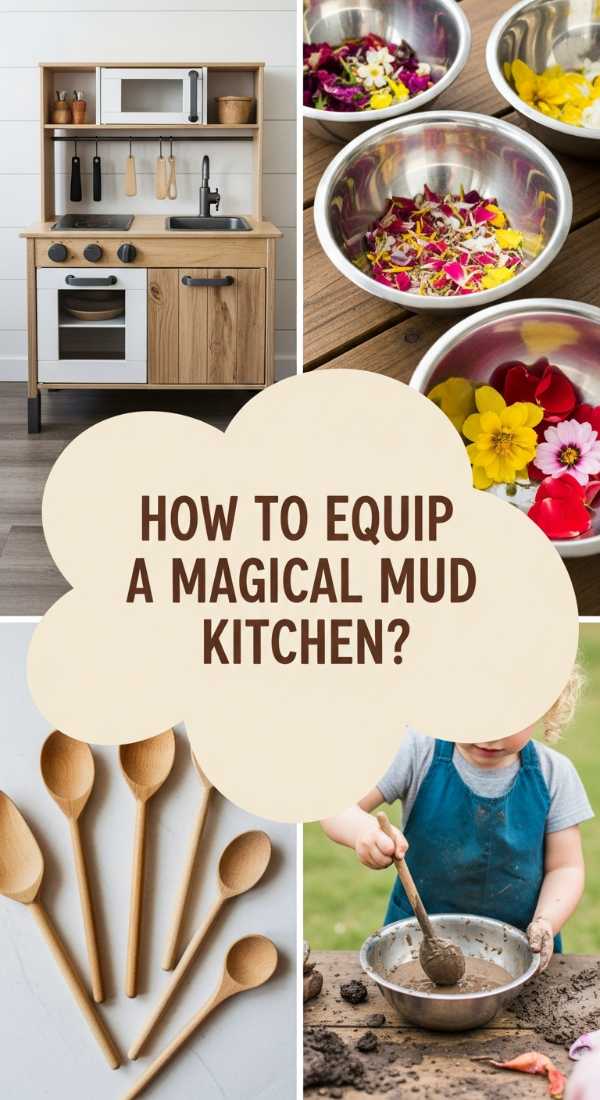
How to Encourage Sensory Play with Mud Kitchen Accessories
Why we love this
Mud kitchens are where childhood magic happens—the squelch of mud between fingers, the scent of crushed mint and damp earth, and the sheer joy of ‘baking’ a dirt pie. We love this because it encourages kids to disconnect from screens and reconnect with the tactile world. It’s a messy, wonderful space where old kitchen utensils find new life and the aesthetic is delightfully rustic, grounded in the organic textures of wood, water, and whatever ‘ingredients’ nature provides that day.
Essential Elements:
- A sturdy wooden bench or pallet table
- Stainless steel bowls and pots
- Old whisks, spoons, and ladles
- A chalkboard for the ‘menu’
- Natural elements (pinecones, petals, stones)
How to make it
- Construct or repurpose a low wooden table that is at the correct height for your child to stand and work comfortably.
- Install a small ‘sink’ by cutting a hole in the tabletop and dropping in a stainless steel mixing bowl; it’s durable, easy to clean, and looks professional.
- Mount a spice rack or small shelves above the workspace to hold jars of ‘ingredients’ like dried lavender, sand, or colored water.
- Add a row of hooks along the side of the kitchen to hang whisks, spatulas, and measuring cups, teaching organization through play.
- Incorporate a chalkboard back-splash so little chefs can write out their daily specials or practice their drawing while they ‘cook.’
- Provide a large, refillable water dispenser nearby so they can control the ‘liquids’ in their recipes, fostering independence and sensory exploration.
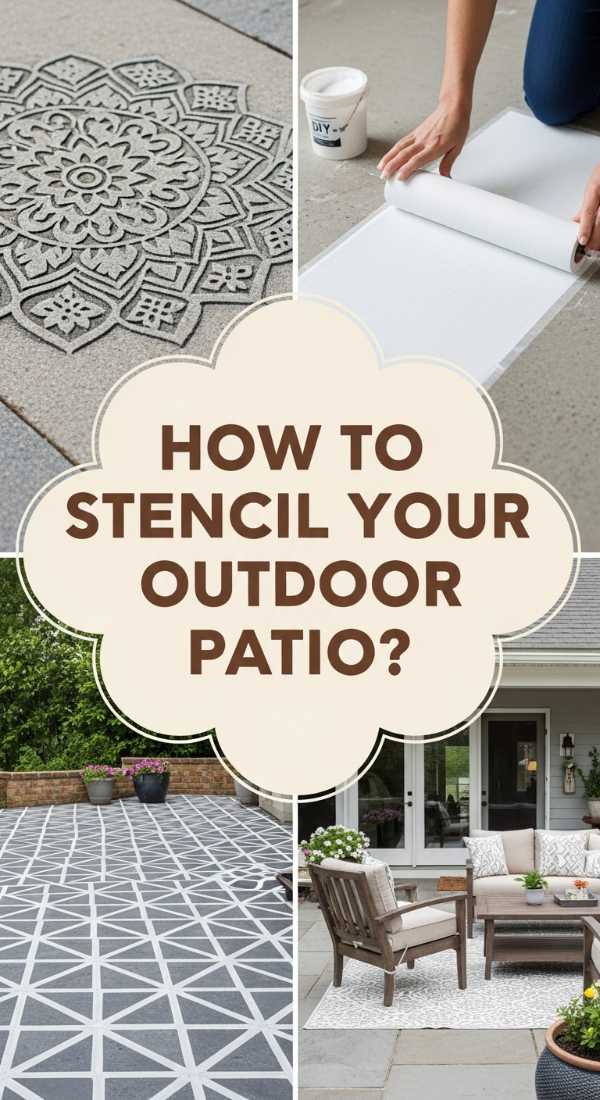
How to Elevate Surfaces with Concrete Stencil Outdoor Designs
Why we love this
This is the ultimate ‘fake it ’til you make it’ DIY for outdoor spaces. Stenciling concrete allows you to take a drab, grey patio and transform it into a Mediterranean-inspired courtyard or a modern geometric masterpiece. We love the way the matte paint feels underfoot and the incredible visual depth a pattern provides, making a basic slab of concrete look like hand-laid tile. It’s an empowering way to overhaul your outdoor aesthetic with nothing more than a stencil and a vision.
Essential Elements:
- Large-scale floor stencil
- Concrete-rated porch and patio paint (two colors)
- Stipple brush or high-density foam roller
- Painter’s tape
- Concrete sealer (clear)
How to make it
- Power wash the concrete surface thoroughly to remove all dirt, oil, and loose debris; the paint will not bond to a dirty surface.
- Apply a base coat of your chosen background color (usually the lighter shade) using a long-handle roller and let it dry for at least 24 hours.
- Position your stencil starting in the most visible corner, securing it tightly with painter’s tape to prevent the pattern from shifting.
- Use a ‘dry brush’ technique: load your roller or brush with the second color, then blot most of it off onto a paper towel before applying it to the stencil to prevent ‘bleeding.’
- Carefully lift the stencil and move it to the next section, aligning the registration marks perfectly to ensure the pattern remains straight across the entire floor.
- Once the entire area is stenciled and dry, apply two coats of clear, slip-resistant concrete sealer to protect your artwork from UV rays and foot traffic.
Conclusion
Creating an aesthetic home isn’t about following every trend or having a bottomless bank account; it’s about finding the joy in the process and making your space work for your soul. Whether you’re organizing your pantry for a moment of morning calm or painting a patio to host summer dinners, these budget-friendly upgrades prove that beauty is always within reach. Your home is your sanctuary—make it a place that inspires you every single day!