
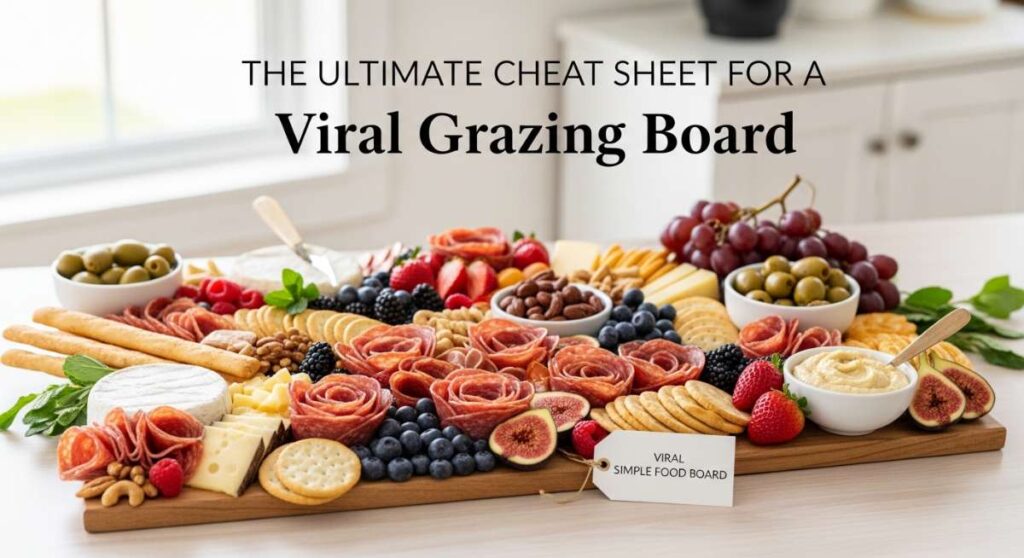
The Ultimate Cheat Sheet for a Viral Grazing Board
There is something undeniably magical about the moment you set a sprawling, colorful grazing board in the center of the table and watch your favorite people gather around. It’s more than just food; it’s an invitation to linger, to laugh, and to share in the tactile joy of picking and choosing exactly what your heart desires. In our fast-paced lives, these boards represent a return to slow, intentional connection—a beautiful mess of flavors that tells your guests, ‘Stay a while, there’s plenty for everyone.’
I remember the first time I hosted a big Friday night gathering with nothing but a curated spread. The stress of plating individual meals vanished, replaced by the rhythmic clinking of glasses and the sight of friends reaching for a smoky slice of brisket or a fudge-filled brownie. Creating a viral-worthy board isn’t about perfection; it’s about layering textures, colors, and comforting classics in a way that feels abundant and accessible. Let’s dive into the ultimate components that will make your next hosting moment absolutely unforgettable.
How to Bake Fudgy Brownies for Ultimate Comfort

Why we love this
There is nothing quite like the scent of dark cocoa wafting through the house to make a space feel like a home. These brownies are the definition of decadence, featuring a crackly, paper-thin top that yields to a center so rich and fudgy it practically melts on your tongue. The deep, bittersweet chocolate notes are perfectly balanced by a hint of vanilla and a pinch of flaky sea salt, creating a sensory experience that is both sophisticated and deeply nostalgic. Whether served warm from the oven or chilled for a denser bite, they are the ultimate anchor for any dessert-focused grazing spread.
Essential Elements:
- High-quality dark chocolate (60-70% cocoa)
- Unsalted butter, melted and browned
- Granulated and light brown sugar
- Dutch-processed cocoa powder
- Room temperature eggs
- Pure vanilla extract
- All-purpose flour
- Flaky sea salt for topping
How to make it
- Preheat your oven to 350°F (175°C) and line an 8×8 inch baking pan with parchment paper, leaving an overhang on the sides for easy removal.
- In a medium saucepan, melt the butter over medium heat, whisking constantly until it begins to foam and turn a nutty golden brown; remove immediately to prevent burning.
- In a large bowl, whisk the melted butter with both sugars vigorously for at least 2 minutes. This aeration is the secret to that coveted crinkle-top.
- Add the eggs one at a time, whisking well after each addition, then stir in the vanilla extract.
- Sift the cocoa powder and flour into the wet ingredients. Fold them in gently with a rubber spatula until just combined—over-mixing at this stage will make the brownies cakey instead of fudgy.
- Fold in chopped chocolate chunks for extra texture. Pour the batter into the prepared pan and smooth the top.
- Bake for 22-25 minutes. The edges should be set, but the center should still have a slight jiggle. A toothpick inserted should come out with moist crumbs, not liquid batter.
- Sprinkle with sea salt immediately and let cool completely in the pan to allow the structure to set before slicing into squares.
How to Assemble Street Tacos for Family Joy
Why we love this
Street tacos are the heartbeat of a lively gathering, bringing a burst of vibrant color and zingy flavor to your grazing board. We love them because they are inherently interactive; there is something so satisfying about the sizzle of seasoned meat hitting a charred corn tortilla, followed by the crunch of fresh onion and the brightness of lime. The aroma of toasted cumin and grilled protein creates an atmosphere of a summer street festival right in your dining room. Every bite is a harmonious blend of heat, acid, and savory goodness that keeps everyone coming back for more.
Essential Elements:
- Small corn tortillas
- Choice of protein (carne asada, carnitas, or seasoned jackfruit)
- Finely diced white onion
- Fresh cilantro, chopped
- Radish slices for crunch
- Lime wedges
- Crumbled cotija cheese
- Homemade salsa verde or roja
How to make it
- Marinate your protein of choice for at least 4 hours in a mixture of lime juice, garlic, cumin, and chili powder to ensure deep flavor penetration.
- Heat a heavy cast-iron skillet over high heat until it starts to smoke slightly. Sear the meat in small batches to achieve a caramelized, crispy exterior without steaming it.
- While the meat rests, toast your corn tortillas directly over a low gas flame for 30 seconds per side until they show charred spots and become pliable. Keep them warm in a clean kitchen towel.
- Finely mince the white onion and cilantro, mixing them together in a bowl—this ‘street taco mix’ is the traditional way to garnish.
- Assemble by layering two tortillas (for strength), a generous portion of meat, a sprinkle of the onion-cilantro mix, and a few slices of radish.
- Top with a crumble of cotija cheese and a drizzle of salsa. Serve immediately with plenty of lime wedges on the side for guests to squeeze over just before eating.
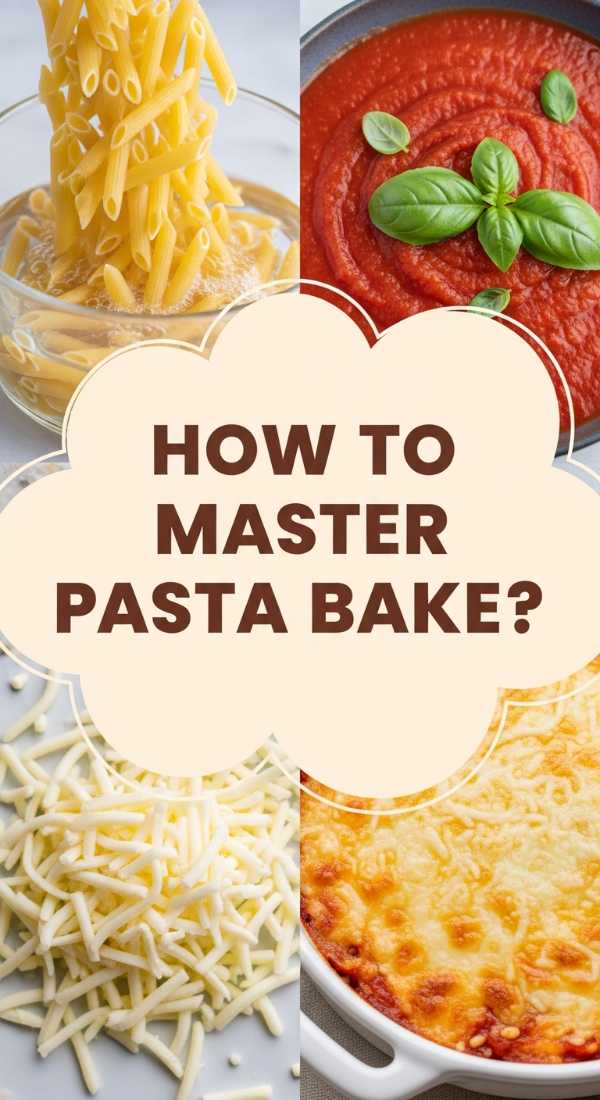
How to Master a Cheesy Pasta Bake for Busy Weeknights

Why we love this
A cheesy pasta bake is the ultimate culinary hug, a golden-crusted masterpiece that promises warmth and satisfaction with every spoonful. We love the way the bubbling mozzarella stretches as you pull a serving from the dish, and the way the sauce clings to every ridge of the pasta. The aroma of roasted garlic and bubbling cheese creates an irresistible pull toward the kitchen, making it the perfect centerpiece for a cozy, casual grazing table. It’s the kind of dish that feels like home, offering a rich, creamy texture and a savory depth that appeals to kids and adults alike.
Essential Elements:
- Rigatoni or Penne pasta
- Whole milk mozzarella, shredded
- Freshly grated Parmesan cheese
- Marinara or meat sauce
- Ricotta cheese for creaminess
- Fresh basil leaves
- Garlic, minced
- Italian seasoning and red pepper flakes
How to make it
- Preheat your oven to 375°F (190°C). Boil a large pot of salted water and cook the pasta for 2 minutes less than the package instructions (al dente); it will finish cooking in the oven.
- In a large bowl, mix the ricotta with one egg, half of the Parmesan, and a teaspoon of Italian seasoning to create a rich filling.
- In a large baking dish, spread a thin layer of marinara sauce on the bottom to prevent sticking.
- Toss the cooked pasta with the remaining sauce and the minced garlic until every piece is well-coated.
- Layer half the pasta into the dish, then dollop the ricotta mixture evenly over the surface. Sprinkle with half of the mozzarella.
- Add the remaining pasta and top generously with the rest of the mozzarella and Parmesan.
- Cover with foil and bake for 20 minutes. Remove the foil and bake for another 10-15 minutes, or until the cheese is bubbling and has developed golden-brown spots.
- Let it rest for 5 minutes before serving to allow the sauce to thicken, then garnish with fresh basil.
How to Create Glittery Slime for Creative Play

Why we love this
While not a food item, glittery slime is the viral sensation that keeps the younger guests entertained while the adults enjoy their grazing board. We love it for its mesmerizing, tactile quality—the way it stretches, folds, and shimmers under the light is therapeutic for all ages. The soft, squishy texture and the sparkle of the glitter provide a sensory playground that encourages creativity and focus. It’s a wonderful way to add a ‘fun’ station to your gathering, ensuring that the atmosphere remains playful and inclusive for the little ones who might need a break from the table.
Essential Elements:
- Clear school glue
- Liquid starch or saline solution
- Baking soda
- Fine and chunky holographic glitter
- Washable liquid food coloring
- Warm water
- Mixing bowls and spoons
How to make it
- Pour 4 ounces of clear glue into a mixing bowl. Using clear glue instead of white ensures that the glitter remains vibrant and visible.
- Add 1/2 cup of warm water to the glue and stir thoroughly until the consistency is smooth and combined.
- Mix in a few drops of your favorite liquid food coloring and a generous amount of glitter. Stir until the sparkles are evenly distributed throughout the glue mixture.
- In a separate small cup, dissolve 1/2 teaspoon of baking soda in a tablespoon of water and add it to the glue. This helps with the firming process.
- Slowly add your activator (liquid starch or saline solution) one tablespoon at a time. Stir vigorously after each addition.
- You will notice the mixture pulling away from the sides of the bowl. Once it clumps together, take it out and begin kneading it with your hands.
- Knead for at least 5 minutes. The more you work it, the less sticky and more stretchy it becomes. If it’s still too sticky, add one more drop of activator.
- Store in an airtight container when not in use to keep it from drying out.
How to Slow Cook Brisket for Sunday Dinner Perfection

Why we love this
Slow-cooked brisket is the crown jewel of any hearty grazing board, offering a depth of flavor that only time and patience can produce. We love the way the fat renders down into a succulent, melt-in-your-mouth texture, while the exterior forms a beautiful, peppery crust known as the ‘bark.’ The aroma of slow-roasting beef filled with garlic, onions, and herbs is enough to make anyone’s mouth water. It feels celebratory and grand, yet its tender consistency makes it easy for guests to fork off bite-sized portions to pair with bread or slaw.
Essential Elements:
- 5-6 lb Beef Brisket (flat or point cut)
- Dry rub (brown sugar, smoked paprika, onion powder, garlic powder)
- Beef broth or dry red wine
- Yellow onions, sliced thinly
- Worcestershire sauce
- Fresh sprigs of thyme and rosemary
- Garlic cloves, smashed
How to make it
- Pat the brisket dry with paper towels. Rub the dry seasoning mix generously over all sides of the meat, pressing it in to ensure it sticks.
- For the best flavor, sear the brisket in a large skillet over medium-high heat for 4-5 minutes per side until a dark brown crust forms.
- Place the sliced onions and smashed garlic at the bottom of a slow cooker. Lay the seared brisket on top of the vegetables.
- Pour the beef broth and Worcestershire sauce around the sides of the brisket—do not pour it directly on top, as you want to keep the rub intact.
- Add the fresh herbs on top of the meat. Cover and cook on the ‘Low’ setting for 8 to 10 hours. Do not open the lid during cooking, as the steam is vital for tenderness.
- The brisket is done when it is fork-tender and reaches an internal temperature of about 195°F to 205°F.
- Remove the meat and let it rest on a cutting board for at least 20 minutes before slicing. This allows the juices to redistribute so the meat stays moist.
- Slice against the grain into thin strips and serve with the strained cooking liquid (jus) on the side.
How to Prepare Sweet Recipes for Memorable Celebrations
Why we love this
Every viral board needs a ‘sweet’ corner to balance the savory, and these recipes are designed to spark joy and whimsy. We love sweet treats because they act as the perfect finale, offering bright bursts of fruit, creamy dips, and sugary crunches that delight the palate. Whether it’s a bowl of macerated berries or mini lemon tarts, these elements add a pop of color—vibrant reds, deep purples, and sunny yellows—that make the entire board look like a work of art. They turn a meal into a celebration, encouraging guests to indulge in a little bit of everything.
Essential Elements:
- Seasonal fresh fruits (strawberries, grapes, melon)
- Honey-sweetened whipped ricotta
- Miniature meringues
- Chocolate-covered pretzels
- Candied nuts
- Fruit preserves or lemon curd
- Shortbread cookies
How to make it
- Select fruits that are at the peak of ripeness. Wash and dry them thoroughly, as excess moisture can make other items on the board soggy.
- Prepare a simple whipped ricotta by blending 1 cup of ricotta with 2 tablespoons of honey and a teaspoon of lemon zest in a food processor until silky smooth.
- Arrange the whipped ricotta in a small, decorative bowl and place it in a corner of your grazing board.
- Create ‘fruit skewers’ for easy grabbing by threading grapes, melon balls, and berries onto small bamboo picks.
- Cluster the crunchy elements, like candied nuts and pretzels, in the gaps between the larger fruit arrangements to create a sense of abundance.
- Place the cookies and meringues near the dips so guests know they are meant for pairing.
- Finish with a light drizzle of honey over the fruit and a dusting of powdered sugar for a professional, ‘viral’ aesthetic.
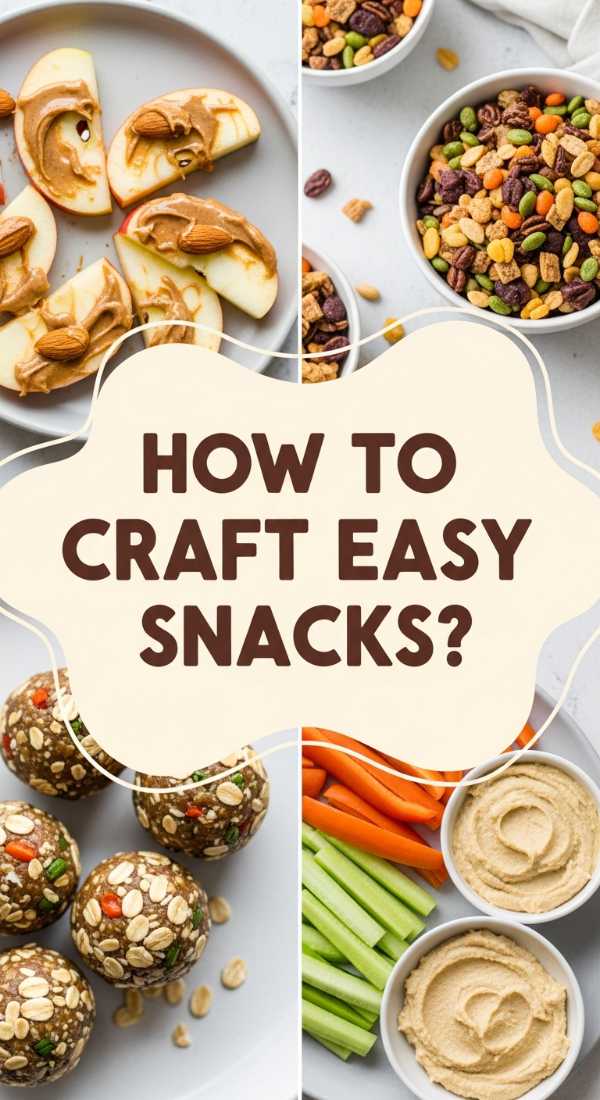
How to Craft Easy Snack Recipes for Afternoon Energy
Why we love this
When the afternoon slump hits, these easy snack recipes are the perfect pick-me-up to keep the energy high and the mood light. We love them for their versatility and the satisfying balance of salty, sweet, and crunchy textures. There is something so comforting about a well-portioned snack that doesn’t feel heavy but provides a concentrated burst of flavor. They are the ‘fillers’ of a grazing board that often become the unexpected favorites—the things people find themselves absentmindedly reaching for because they are just that addictive.
Essential Elements:
- Roasted chickpeas with sea salt
- Energy bites (oats, peanut butter, honey)
- Cucumber slices with tajin
- Popcorn tossed in truffle oil
- Hard-boiled eggs with smoked paprika
- Greek yogurt with a swirl of almond butter
How to make it
- For the roasted chickpeas: Drain and rinse a can of chickpeas, patting them very dry. Toss with olive oil and salt, then roast at 400°F (200°C) for 20-30 minutes until very crunchy.
- For energy bites: Mix 1 cup of oats, 1/2 cup of peanut butter, and 1/3 cup of honey in a bowl. Fold in mini chocolate chips. Roll into 1-inch balls and refrigerate for 30 minutes to set.
- Prepare cucumber slices by cutting them into thick rounds and sprinkling them with lime juice and tajin seasoning for a spicy, hydrating bite.
- Pop a fresh batch of popcorn and, while still hot, drizzle with a small amount of truffle oil and toss with fine sea salt and nutritional yeast for a gourmet flair.
- Halve the hard-boiled eggs and top with a tiny pinch of smoked paprika and a microgreen leaf for a visual and flavor boost.
- Arrange these snacks in small clusters or silicone muffin liners to keep them separated and organized on your board.
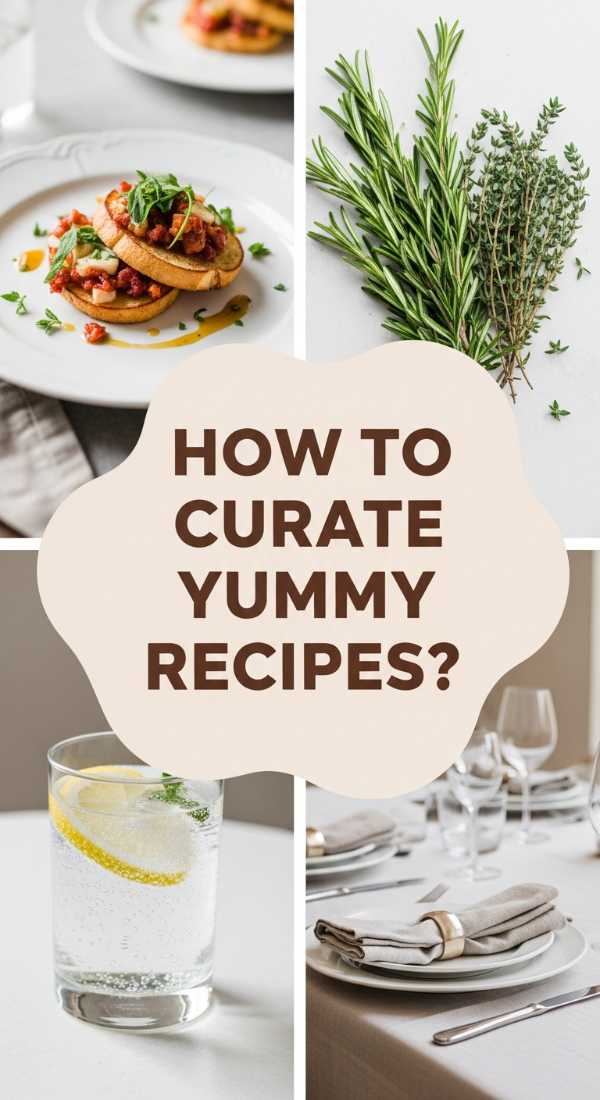
How to Curate Yummy Recipes for Effortless Hosting

Why we love this
Effortless hosting is all about smart curation, and these ‘yummy’ recipes are the secret weapons of a stress-free entertainer. We love these components because they rely on high-quality ingredients and simple assembly rather than hours over a hot stove. The result is a sophisticated spread that looks incredibly impressive but allows the host to actually spend time with their guests. The combination of savory charcuterie, creamy cheeses, and briny olives creates a complex flavor profile that feels curated and thoughtful, embodying the true spirit of a viral grazing board.
Essential Elements:
- Assorted cured meats (prosciutto, salami, capicola)
- A mix of soft and hard cheeses (Brie, aged Cheddar, Manchego)
- Marinated olives and cornichons
- Artisan crackers and sliced baguette
- Fig jam or apricot preserves
- Fresh rosemary sprigs for garnish
How to make it
- Start by placing your cheeses on the board first, as they act as the ‘anchors.’ Slice the hard cheeses into triangles and leave the soft cheeses whole with a small spreader knife.
- Create ‘meat roses’ by folding slices of salami in half and then in half again, tucking them tightly against each other to create a floral look.
- Fill small ramekins with the olives, cornichons, and jams. Place these near the cheeses they pair best with (e.g., fig jam near the Brie).
- Fan out the crackers and baguette slices in a curving ‘river’ shape across the board to lead the eye from one section to another.
- Fill any remaining small gaps with nuts or dried apricots to ensure the board looks lush and full—no bare wood should be showing.
- Tuck fresh rosemary sprigs under the edges of the meat and cheese to add a pop of green and a fresh, herbal aroma.
- Serve at room temperature; let the cheeses sit out for 30 minutes before guests arrive to allow their full flavors to develop.
How to Elevate Brownie Recipes for a Gourmet Experience

Why we love this
Elevating a standard brownie into a gourmet experience is all about the ‘extras’ that transform a simple treat into a talking point. We love this approach because it plays with contrasting textures—think crunchy nuts against silky ganache, or the sharp zing of raspberries against dark chocolate. The richness is amplified, making each square feel like it belongs in a high-end patisserie. When you add these to a grazing board, they provide a sense of luxury and indulgence that makes the entire event feel more special and curated.
Essential Elements:
- Finished fudgy brownies (from section 1)
- Salted caramel sauce
- Chopped toasted hazelnuts or walnuts
- Freeze-dried raspberries
- White chocolate for drizzling
- Edible gold leaf (optional for extra flair)
How to make it
- Start with a batch of fully cooled, sliced brownies. Using a sharp, warm knife will give you the cleanest edges for a professional look.
- Warm the salted caramel sauce slightly so it is pourable but not hot. Drizzle it in a zigzag pattern across the top of the brownies.
- Immediately sprinkle the chopped toasted nuts over the caramel so they adhere. The salt in the caramel will make the nut flavor pop.
- Melt a small amount of white chocolate in the microwave in 15-second intervals. Use a spoon or a piping bag to drizzle thin lines in the opposite direction of the caramel.
- Crush the freeze-dried raspberries between your fingers and scatter the bright red dust over the top for a tart contrast and a beautiful color.
- For a truly viral look, apply tiny flecks of edible gold leaf using tweezers for a shimmering, high-end finish.
- Place these on the board in a dedicated ‘dessert’ section, perhaps slightly separated from the savory items by a line of fresh strawberries.
How to Design a Taco Bar for Ultimate Movie Marathons
[IMAGE_10]
Why we love this
A taco bar is the ultimate movie marathon companion because it allows for continuous, customizable snacking without ever having to pause the film. We love the casual, ‘build-your-own’ nature of this setup, which accommodates everyone’s specific preferences and dietary needs. The sight of bowls filled with colorful toppings—from bright purple cabbage to neon-green guacamole—adds a festive energy to the room. It’s a fun, low-pressure way to feed a crowd, ensuring that the food is just as entertaining as whatever is playing on the screen.
Essential Elements:
- Warm taco meat and black beans
- Shredded cabbage or lettuce
- Pico de gallo and guacamole
- Pickled red onions
- Sour cream or Greek yogurt
- Pickled jalapeños
- A variety of hot sauces
- Large bowl of tortilla chips
How to make it
- Keep your proteins (meat and beans) in small slow cookers on the ‘warm’ setting to ensure they stay food-safe and delicious throughout the movie.
- Arrange all cold toppings in uniform bowls. Using matching bowls makes the ‘bar’ look organized and visually appealing for those aesthetic social media shots.
- Place the pickled red onions in the center; their bright pink hue acts as a visual focal point for the taco station.
- Put the tortilla chips in a large, accessible basket at the beginning of the line so guests can use them as a base for ‘taco nachos’ if they prefer.
- Provide small individual trays or sturdy paper plates that are easy to balance on a lap while sitting on the couch.
- Ensure there are plenty of napkins and perhaps some wet wipes nearby, as taco bars can get delightfully messy.
- Set out a ‘hot sauce flight’ ranging from mild to extra spicy, labeling each one so guests can customize their heat level.
Conclusion
Creating a viral-worthy grazing board is truly an art form that balances flavor, texture, and visual appeal. By incorporating a mix of hearty proteins, comforting bakes, and sweet indulgences, you create an experience that caters to every craving. Remember, the best boards are the ones that reflect your personality and make your guests feel completely at home. So, grab your largest platter, start layering those colors, and enjoy the beautiful, delicious chaos of a perfectly curated spread!