
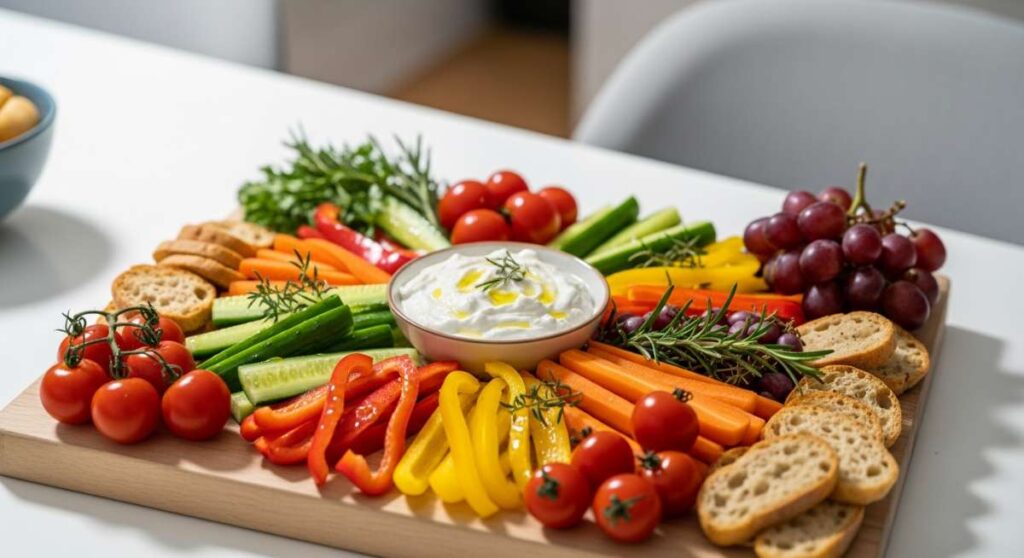
There is something magical about the way food brings us together, especially when it’s presented in a way that feels intentional and overflowing with love. Lately, my kitchen has become a laboratory for what I like to call the ‘ultimate food board hack,’ where we move beyond just crackers and cheese to create themed spreads that tell a story. Whether it’s the bittersweet celebration of a high school graduation or the tart, seasonal joy of a spring harvest, these boards are about more than just eating; they are about making memories that linger long after the last crumb is gone.
I remember sitting on my back porch last June, watching the sun dip below the horizon while we shared a board filled with miniature treats and fresh preserves. The laughter felt lighter, and the food tasted better simply because it was curated with a theme in mind. This viral trend isn’t just about aesthetics—it’s about accessibility and the joy of offering your guests a variety of textures and flavors that they can pick and choose from. Today, I’m sharing my favorite components to build the most viral-worthy boards of the season.
How to style high school graduation cakes?

Why we love this
A graduation cake serves as the majestic anchor of any celebratory food board, symbolizing the sweet transition from one chapter of life to the next. We adore the way a professionally styled cake can incorporate school colors through delicate ombré frosting or elegant gold leaf accents that shimmer under the party lights. The aroma of rich vanilla bean and the sight of a perfectly smooth finish create an immediate focal point that draws guests in. There is a profound sense of accomplishment reflected in a cake topped with a miniature mortarboard, making every slice feel like a shared victory.
Ingredients
- 2 layers of 8-inch vanilla sponge cake
- 4 cups Swiss meringue buttercream
- Gel food coloring (school colors)
- Edible gold leaf
- Miniature graduation cap topper
- Fresh floral sprigs (optional)
How to make it
- Level your chilled cake layers using a serrated knife to ensure a perfectly flat surface for stacking. Place the first layer on a cardboard cake round and apply a generous half-cup of buttercream, spreading it evenly to the edges.
- Stack the second layer upside down to give you a sharp top edge. Apply a thin ‘crumb coat’ of frosting over the entire cake to trap any loose crumbs, then chill in the refrigerator for at least 30 minutes until the frosting is firm to the touch.
- Divide your remaining buttercream into bowls to mix your school colors. Use a palette knife to apply patches of different colors around the sides of the cake.
- Using a bench scraper held at a 45-degree angle, rotate the turntable while pressing lightly against the cake to blend the colors into a seamless, sophisticated ombré effect.
- Carefully apply edible gold leaf using a dry, clean paintbrush for a touch of luxury. Place your graduation cap topper slightly off-center and garnish with florals for a modern, styled aesthetic.
How to make strawberry rhubarb pie?

Why we love this
The strawberry rhubarb pie is the undisputed queen of the spring board, offering a complex dance between the aggressive tartness of the rhubarb and the jammy, sun-drenched sweetness of peak-season strawberries. We love the contrast of the buttery, flaky crust that shatters upon impact, revealing a vibrant, ruby-red filling that smells like a warm afternoon in a country garden. It is a rustic yet refined addition that provides a heavy, satisfying weight to your spread, inviting guests to scoop out generous portions that pair perfectly with a dollop of cold cream.
Ingredients
- 2 batches of flaky pie crust dough
- 3 cups sliced rhubarb (1-inch pieces)
- 3 cups sliced fresh strawberries
- 3/4 cup granulated sugar
- 1/4 cup cornstarch
- 1 tsp vanilla extract
- 1 egg (for egg wash)
- Turbinado sugar for sprinkling
How to make it
- Roll out your bottom crust and fit it into a 9-inch pie plate. Chill it in the fridge while you prepare the filling to prevent the butter from melting, which ensures a flaky texture.
- In a large bowl, toss the rhubarb and strawberries with the sugar, cornstarch, and vanilla. Let this mixture sit for about 15 minutes; this allows the juices to release and the cornstarch to begin its thickening magic.
- Pour the fruit into the prepared crust, mounding it slightly in the center. Roll out the second piece of dough and cut it into 1-inch strips to create a lattice top, weaving them over and under for that classic viral look.
- Crimp the edges of the pie tightly to seal in the juices. Brush the lattice with a beaten egg wash and sprinkle generously with turbinado sugar for a golden, crunchy finish.
- Bake at 400°F (200°C) for 20 minutes, then reduce the heat to 375°F (190°C) and bake for another 35-45 minutes. You are looking for the crust to be deep golden brown and the fruit juices to be bubbling thickly through the lattice gaps.
How to decorate graduation cupcakes?
Why we love this
Cupcakes are the ultimate ‘hack’ for a food board because they offer individual portions that are easy to grab without the need for utensils. We love decorating these miniature canvases with clever nods to the graduate’s journey, such as ‘diploma’ scrolls made of fondant or tassels fashioned from silk-smooth frosting. The sight of a dozen uniform cupcakes, each topped with a tiny chocolate graduation cap, creates a playful and organized rhythm on the board. The fluffy cake base and the swirls of decadent frosting provide a comforting, nostalgic flavor that appeals to guests of all ages.
Ingredients
- 12 pre-baked chocolate cupcakes
- 2 cups vanilla frosting
- Ghirardelli chocolate squares
- Mini peanut butter cups
- Sour belt candies or fruit roll-ups (for tassels)
- M&Ms or small candies
How to make it
- Pipe a thick swirl of frosting onto each cooled cupcake. Ensure the frosting is stiff enough to hold the weight of the decorations; if it’s too soft, chill it for 10 minutes before piping.
- To make the ‘caps,’ unwrap a mini peanut butter cup and place it upside down on the center of the frosting swirl. This acts as the base of the graduation hat.
- Apply a small dot of melted chocolate or frosting to the top of the peanut butter cup and press a chocolate square firmly onto it. Hold for 5 seconds to ensure it sticks.
- Cut a thin strip of sour belt or fruit roll-up to act as the tassel. Use a tiny dab of frosting to attach the ‘tassel’ to the center of the chocolate square, letting it hang over the side.
- Place a single M&M or candy on top of the tassel’s starting point to mimic the button on a real graduation cap. Chill the finished cupcakes for 15 minutes to set the chocolate components.
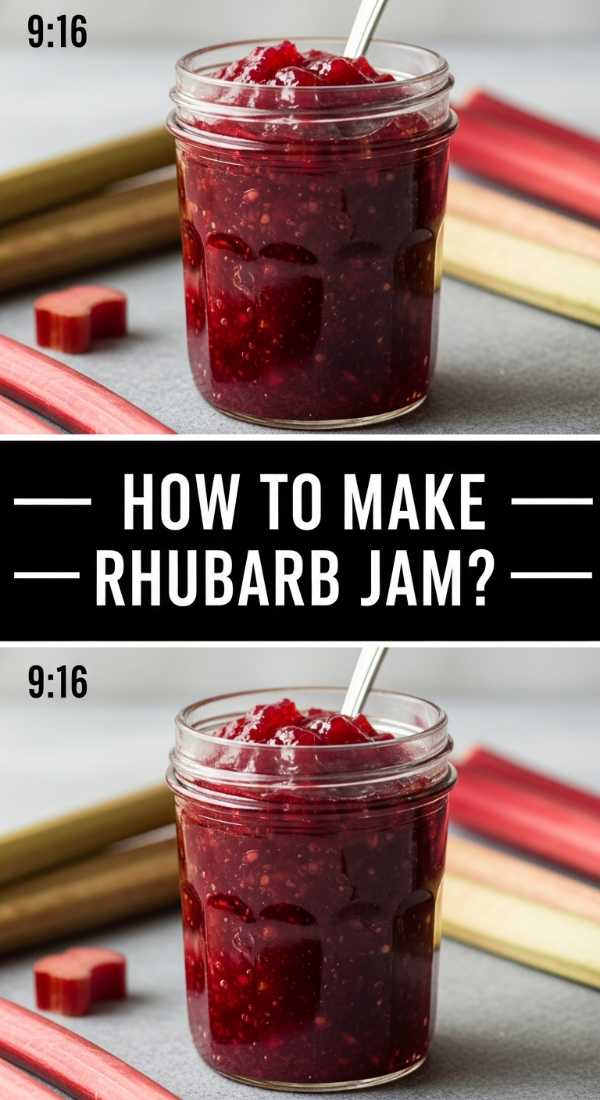
How to make homemade rhubarb jam?
Why we love this
Homemade rhubarb jam is like capturing springtime in a jar, and it adds a sophisticated, spreadable element to any food board. We love the bright, acidic punch it provides, cutting through the richness of cheeses or buttered breads with ease. The texture is thick and luscious, with softened bits of rhubarb that melt on the tongue, releasing an aroma that is both earthy and floral. It’s a vibrant pink condiment that glows on the board, offering a pop of color that is as beautiful to look at as it is delicious to eat.
Ingredients
- 4 cups chopped rhubarb
- 1 1/2 cups granulated sugar
- 2 tbsp lemon juice
- 1 tsp lemon zest
- 1/2 tsp vanilla bean paste
How to make it
- Combine the chopped rhubarb and sugar in a heavy-bottomed saucepan. Let them macerate for about 30 minutes at room temperature until the rhubarb has released its natural moisture and created a syrup.
- Add the lemon juice and zest to the pot. Place over medium heat and bring to a rolling boil, stirring frequently with a wooden spoon to prevent the sugar from scorching on the bottom.
- Lower the heat to a simmer and cook for 15 to 20 minutes. As the rhubarb breaks down, use your spoon to mash the larger pieces against the side of the pot for a smoother consistency.
- The jam is done when it reaches 220°F (105°C) or when it passes the ‘plate test’ (place a small dollop on a cold plate; if it wrinkles when pushed with a finger, it’s set).
- Stir in the vanilla bean paste at the very end to preserve its delicate flavor. Transfer to sterilized glass jars and allow to cool completely before serving on your board.
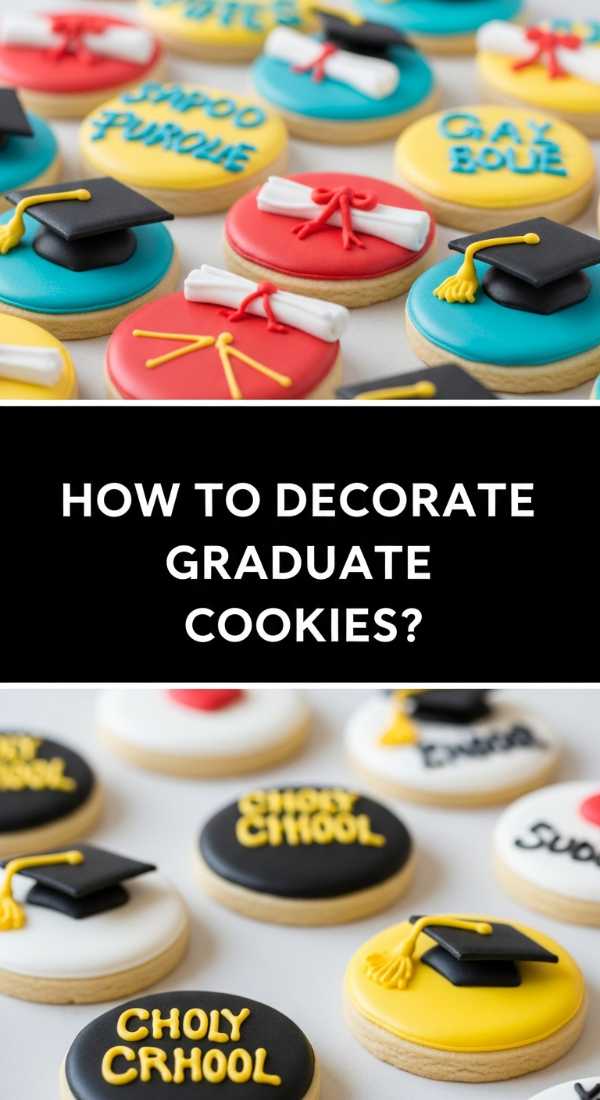
How to pipe graduation sugar cookies?
Why we love this
There is a unique satisfaction in the crisp ‘snap’ of a sugar cookie paired with the smooth, sweet crunch of royal icing. We love the precision of piped cookies, which allow you to customize your food board with the graduate’s name, their graduation year, or even tiny diplomas tied with ribbons. The process of piping is meditative, and the result is a set of edible art pieces that look almost too good to eat. These cookies add a flat, geometric element to the board that balances out the softer textures of cakes and jams.
Ingredients
- 1 batch of firm sugar cookies (cut into circles and squares)
- Royal icing (stiff and flood consistencies)
- Food coloring
- Fine-tip piping bags
- Scribe tool or toothpick
How to make it
- Outline your cooled cookies using the stiff consistency royal icing. For a graduation cap shape, outline a square and a small rectangle below it. Let the outline dry for 5 minutes.
- Fill the center of the outlined area with flood-consistency icing. Use a scribe tool or toothpick to pop any air bubbles and to gently push the icing into the corners for a perfectly smooth surface.
- Allow the base layer of icing to dry for at least 4 hours, or ideally overnight, until it is completely hard to the touch. This prevents ‘color bleeding’ when you add the details.
- Using the stiff icing again, pipe fine details like the year ‘2024’ or the graduation tassel. Hold the piping bag at a 90-degree angle and apply steady pressure for the cleanest lines.
- For a professional finish, use a luster dust mixed with a drop of vodka to paint over the piped tassels in gold or silver once the icing has set.
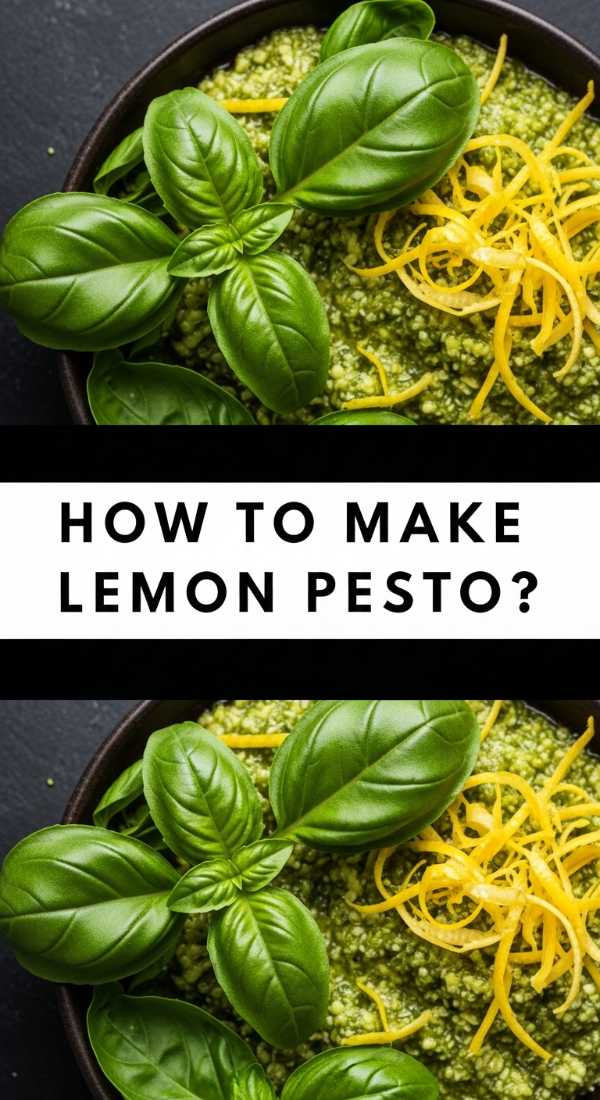
How to make zesty lemon pesto?
Why we love this
This zesty lemon pesto is the ‘secret weapon’ of a savory food board, providing a high-vibrancy flavor that awakens the palate. We love the way the bright, citrusy notes of fresh lemon zest dance with the herbaceous depth of basil and the salty richness of parmesan cheese. It’s a versatile component that smells like a summer breeze in the Mediterranean, offering a refreshing departure from traditional heavy sauces. Its vivid green color brings life to the board, making it the perfect dip for crusty bread or a dressing for skewered mozzarella pearls.
Ingredients
- 2 cups fresh basil leaves, packed
- 1/2 cup freshly grated Parmesan cheese
- 1/3 cup toasted pine nuts or walnuts
- 2 cloves garlic, minced
- Zest of 2 large lemons
- 3 tbsp fresh lemon juice
- 1/2 cup extra virgin olive oil
- Salt and black pepper to taste
How to make it
- Place the toasted pine nuts and garlic into a food processor and pulse several times until they are finely ground but not yet a paste. The texture here provides the ‘bite’ in the final pesto.
- Add the fresh basil leaves, lemon zest, and Parmesan cheese to the processor. Pulse until the basil is finely chopped and the ingredients are well incorporated.
- With the processor running on low, slowly drizzle in the extra virgin olive oil in a steady stream. This emulsification process ensures the pesto is creamy and doesn’t separate.
- Add the lemon juice and pulse one last time. Taste the pesto and season with salt and freshly cracked black pepper according to your preference.
- Transfer to a small bowl and top with a thin layer of olive oil to prevent oxidation (browning). Serve at room temperature for the best flavor profile.
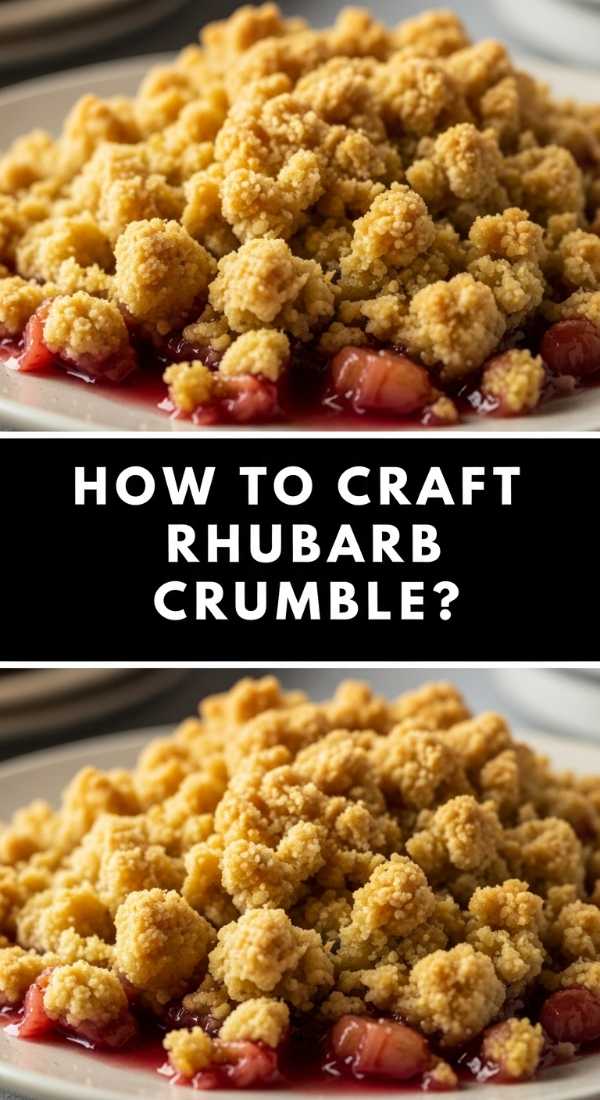
How to bake a rhubarb crumble?
Why we love this
Rhubarb crumble is the cozy, warm hug of the food board world. We love the textural interplay between the soft, bubbling fruit filling and the golden, buttery clumps of oat topping that provide a satisfying crunch. The smell of cinnamon and roasting rhubarb wafting through the air is enough to make any house feel like a home. It’s an approachable, rustic dessert that doesn’t require perfection, making it the ideal centerpiece for a relaxed, viral-style food gathering where guests can help themselves to large, messy spoonfuls.
Ingredients
- 5 cups rhubarb, cut into 1/2-inch pieces
- 3/4 cup sugar (for the fruit)
- 1 cup all-purpose flour
- 1 cup rolled oats
- 1 cup brown sugar, packed
- 1/2 cup cold unsalted butter, cubed
- 1 tsp cinnamon
- 1/4 tsp salt
How to make it
- Preheat your oven to 375°F (190°C). In a large baking dish, toss the chopped rhubarb with the granulated sugar until the pieces are evenly coated. Spread the fruit in an even layer.
- In a separate mixing bowl, combine the flour, rolled oats, brown sugar, cinnamon, and salt. Stir these dry ingredients together so the spices are evenly distributed.
- Add the cold, cubed butter to the dry mixture. Use your fingers or a pastry cutter to rub the butter into the flour until the mixture resembles coarse crumbs with some pea-sized pieces of butter remaining.
- Sprinkle the crumble topping evenly over the rhubarb. Do not press down; you want the topping to remain loose so that air can circulate, making it extra crispy.
- Bake for 35-45 minutes. The rhubarb should be tender and the juices should be thick and bubbling around the edges, while the topping should be a deep, toasted golden brown. Let it cool for 10 minutes before serving so the juices can set.
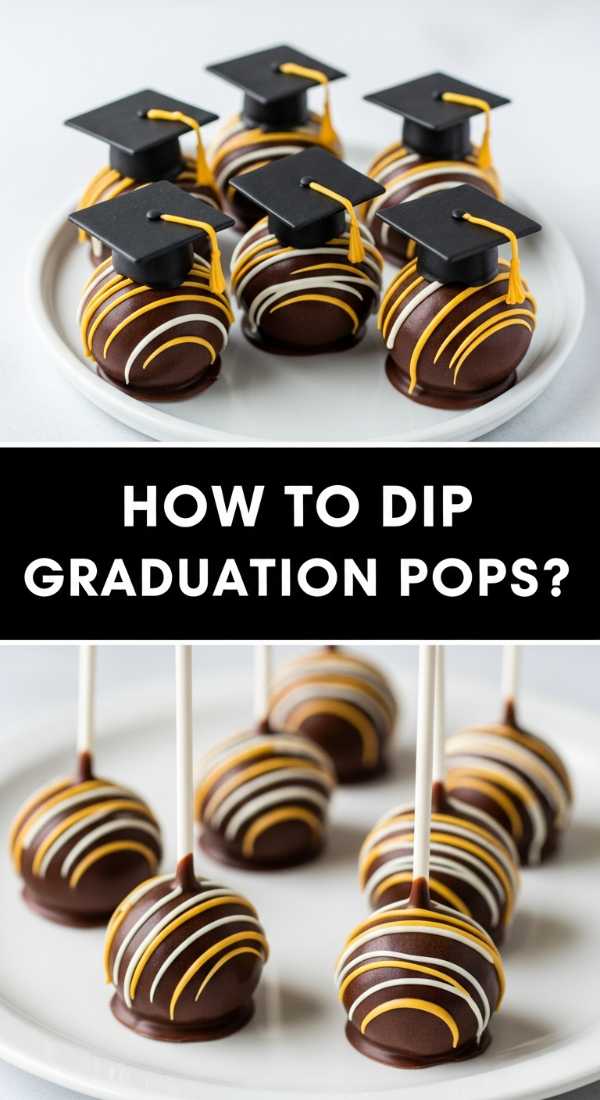
How to make graduation cake pops?
Why we love this
Cake pops are the ultimate party trick, packing all the flavor of a full cake into a single, decadent bite. We love the smooth, candy-coated shells that yield to a rich, moist cake interior, creating a luxurious mouthfeel that is incredibly addictive. Styling them for graduation adds a level of whimsy to your food board, especially when they are stood upright in a decorative base or laid out in neat rows. They are perfectly portable and mess-free, allowing guests to mingle and celebrate while enjoying a bite-sized treat that looks like a miniature work of art.
Ingredients
- 1 pre-baked 9×13 cake (any flavor)
- 1/2 cup frosting
- 12 oz candy melts (school colors)
- Lollipop sticks
- Edible glitter or sprinkles
- Floral foam or a cake pop stand
How to make it
- Crumble the baked and cooled cake into a large bowl until it looks like fine sand. Add the frosting one tablespoon at a time, mixing with your hands until the cake holds together like dough.
- Scoop out rounded tablespoons of the mixture and roll them into smooth, tight balls. Place them on a parchment-lined baking sheet and chill in the freezer for 15 minutes to firm up.
- Melt a small amount of candy melts in the microwave. Dip the tip of a lollipop stick into the melted candy, then insert it halfway into a cake ball. This acts as ‘glue’ to keep the pop on the stick.
- Submerge the entire cake ball into the melted candy melts, pulling it out in one smooth motion. Gently tap your wrist to let the excess coating drip off, creating a smooth finish.
- While the coating is still wet, sprinkle with edible glitter or school-colored sprinkles. Stand the pops upright in a block of floral foam or a stand to dry completely before placing them on your board.
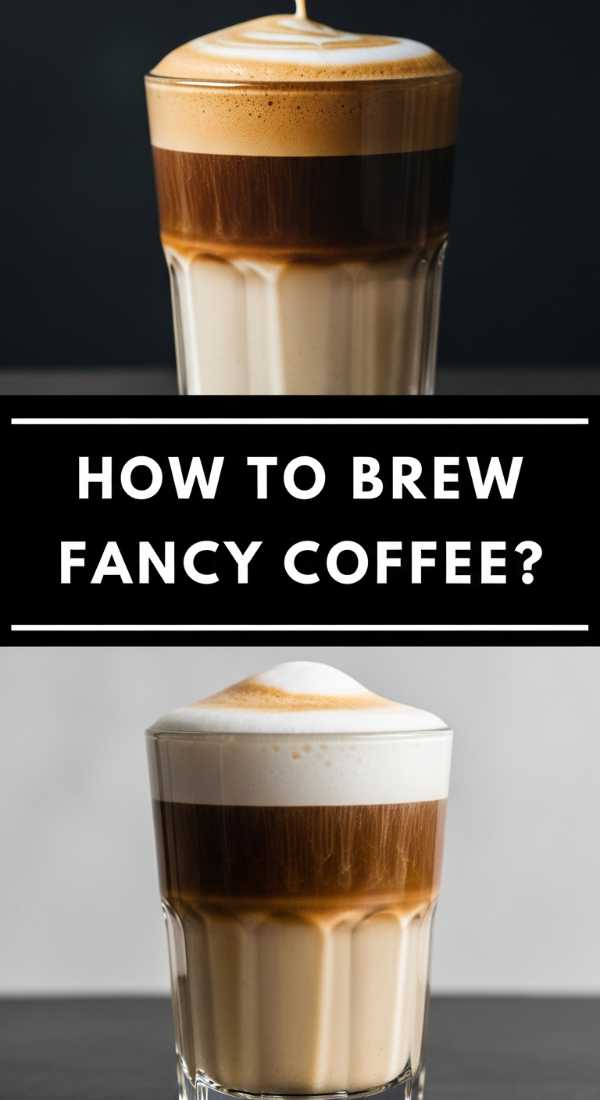
How to make fun coffee drinks?
Why we love this
No modern food board is complete without a ‘drink station’ element, and fun coffee drinks are the viral sensation that ties everything together. We love the visual appeal of layered lattes, where dark espresso meets creamy milk and a crown of velvety cold foam. The aroma of freshly ground beans provides a sophisticated backdrop to the sweetness of the board, offering a much-needed caffeine kick for a long day of celebrating. Whether it’s a salted caramel iced latte or a lavender-infused brew, these drinks add an interactive and customizable layer to your spread.
Ingredients
- 2 shots of espresso or 1/2 cup strong cold brew
- 1 cup milk of choice (oat, almond, or dairy)
- 1 tbsp flavored syrup (vanilla, caramel, or lavender)
- 1/4 cup heavy cream (for cold foam)
- Ice cubes
- Cinnamon or cocoa powder for dusting
How to make it
- Start by preparing your espresso or cold brew. If making an iced drink, fill a tall glass with large ice cubes to ensure the drink stays cold without diluting too quickly.
- Pour your flavored syrup over the ice, followed by the milk. Leave about two inches of space at the top of the glass for your coffee and foam layers.
- Slowly pour the espresso over the back of a spoon onto the milk. This technique creates a beautiful ‘layered’ look that is a staple of viral coffee aesthetic posts.
- To make the cold foam, whisk the heavy cream and a teaspoon of syrup together using a handheld frother until it is thick and airy, resembling the texture of melted ice cream.
- Spoon the cold foam over the top of the coffee and finish with a light dusting of cinnamon or cocoa powder. Serve with a reusable straw for a sustainable, stylish touch.
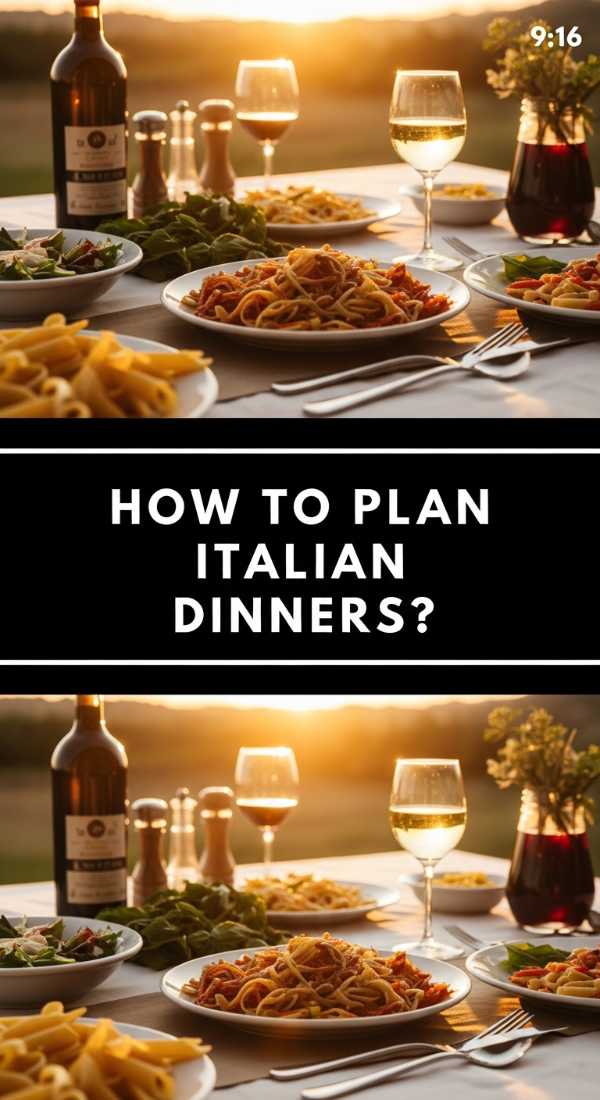
How to host an Italian dinner?
[IMAGE_10]
Why we love this
Hosting an Italian-themed dinner through the lens of a food board is the ultimate way to embrace the philosophy of ‘la dolce vita.’ We love the abundance of a board filled with thinly sliced prosciutto, creamy burrata, marinated artichokes, and sun-ripened tomatoes that smell like a Tuscan summer. It encourages a slow, communal dining experience where guests linger over their plates, sharing stories and passing around different components. The vibrant colors and bold, rustic flavors create an atmosphere of warmth and generosity that is the hallmark of any great Italian gathering.
Ingredients
- Assorted cured meats (Prosciutto, Salami, Mortadella)
- Cheeses (Burrata, Aged Provolone, Gorgonzola)
- Marinated olives and artichoke hearts
- Fresh focaccia bread, sliced
- Grapes and dried figs
- Extra virgin olive oil and balsamic glaze for drizzling
How to make it
- Select a large wooden board as your canvas. Place the ‘anchor’ items first: the cheeses. If using Burrata, place it in a small bowl in the center to contain its creamy interior once broken.
- Fold the cured meats into ‘ribbons’ or ‘roses’ to add height and texture to the board. Group them together in a flowing line that guides the eye across the spread.
- Fill small ramekins with the olives, artichokes, and a small pool of olive oil mixed with balsamic glaze. Place these strategically around the board to create balance.
- Fill the remaining gaps with slices of fresh focaccia, clusters of grapes, and dried figs. The goal is for the board to look ‘bountiful,’ with no wooden surface peeking through.
- Just before serving, sprinkle the burrata with sea salt and a crack of black pepper. Encourage guests to tear pieces of bread and build their own perfect Italian bites directly from the board.
Conclusion
Creating a viral food board is about more than just the ingredients; it’s about the art of the presentation and the joy of sharing. By combining these graduation-themed treats with the seasonal zest of rhubarb and the sophistication of an Italian spread, you are creating a multi-sensory experience that your guests will never forget. Remember, there are no rules—just follow your palate and let your creativity lead the way!