
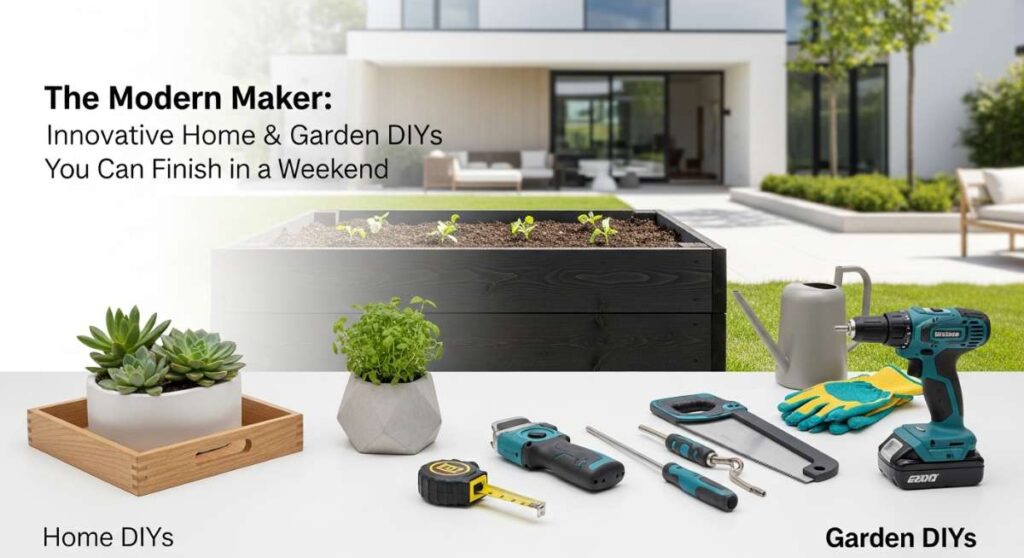
The Modern Maker: Innovative Home & Garden DIYs You Can Finish in a Weekend
There is something truly magical about the transformation that happens between a Friday afternoon and a Sunday evening. We’ve all felt that restless itch—the one that looks at a plain white wall or a patch of tired grass and sees nothing but potential. It’s about more than just ‘fixing’ things; it’s about reclaiming our spaces and infusing them with the warmth of our own hands and the scent of fresh cedar, damp soil, and sun-warmed stone.
In this guide, we are diving deep into those projects that offer maximum impact with a realistic time commitment. Whether you are craving the nostalgic glow of a retro-inspired bedroom or the crisp, organized satisfaction of a professional-grade pantry, these DIYs are designed to be approachable yet sophisticated. Let’s turn those ‘someday’ dreams into ‘this weekend’ realities, creating a home that feels as intentional as it is beautiful.
How to Remodel a Ranch Exterior for Instant Curb Appeal
Why we love this
A ranch-style home is a beautiful, sprawling canvas just waiting for a touch of modern sophistication. We love this transformation because it highlights the horizontal lines of the architecture while adding textures that feel rich and grounding. Imagine the rough-hewn grain of a new cedar porch post beneath your palm, the smooth, matte finish of updated black hardware, and the way a fresh coat of ‘greige’ paint catches the golden hour light, making your home look like the crown jewel of the neighborhood.
Essential Elements:
- Modern exterior paint (High-quality acrylic latex)
- Updated house numbers in a bold, sans-serif font
- Black or brass modern wall sconces
- Natural wood accents (cedar or pressure-treated pine)
- Power washer and high-grit sandpaper
How to make it
- Begin by power washing the entire exterior to remove decades of dust, grime, and cobwebs, ensuring a pristine surface for new finishes.
- Sand and refinish any visible wood elements, such as porch beams or shutters, using a warm cedar stain to bring out the natural, earthy textures.
- Apply a fresh coat of paint to the front door; choose a bold, contrasting color like deep navy or sage green to create a focal point.
- Swap out dated, flickering porch lights for sleek, matte black lanterns or modern LED sconces that provide a crisp, clean glow at night.
- Install oversized, modern house numbers vertically near the entrance to provide a high-end, architectural feel that is visible from the street.
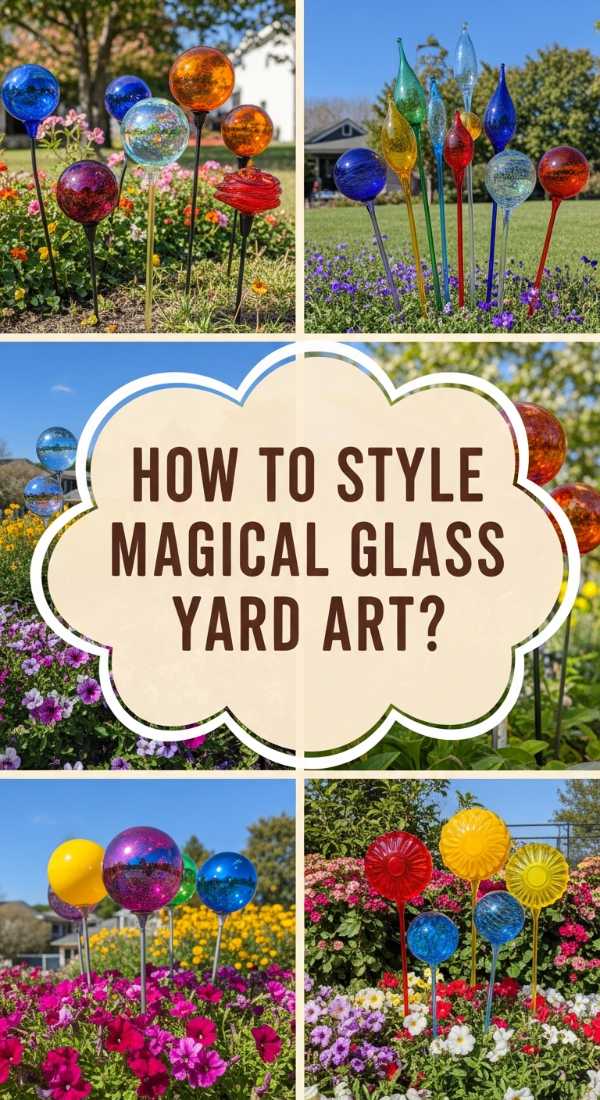
How to Style Glass Yard Art for a Whimsical Garden Vibe
Why we love this
There is a specific kind of magic that happens when sunlight hits colorful glass in a garden. We love these pieces because they act as jewelry for your flower beds, catching the light and casting dancing shadows across the mulch. The smooth, cool touch of the glass contrasts beautifully with the soft petals of your flowers, and the clink of glass against glass in a light breeze adds a subtle, musical dimension to your outdoor sanctuary that feels both artistic and deeply personal.
Essential Elements:
- Assorted vintage glass plates, bowls, and vases
- Industrial-strength waterproof adhesive (like E6000)
- Copper piping or sturdy rebar for stakes
- Glass drill bit (optional for specific mounting)
- Cleaning solvent to ensure a strong bond
How to make it
- Scour local thrift stores for colorful glass pieces, looking for interesting textures, scalloped edges, and vibrant hues that will stand out against green foliage.
- Clean every piece of glass thoroughly with a solvent to remove oils and stickers, ensuring the adhesive can form a permanent, weather-resistant bond.
- Experiment with stacking the pieces on a flat surface, placing larger plates at the base and smaller vases or bowls on top to create a floral or totemic shape.
- Apply the industrial adhesive generously between the layers, pressing firmly and allowing the structure to cure for at least 24 to 48 hours in a dry area.
- Once cured, mount your glass creation onto a copper stake or rebar firmly planted in the ground, positioning it where it will catch the maximum amount of afternoon sun.
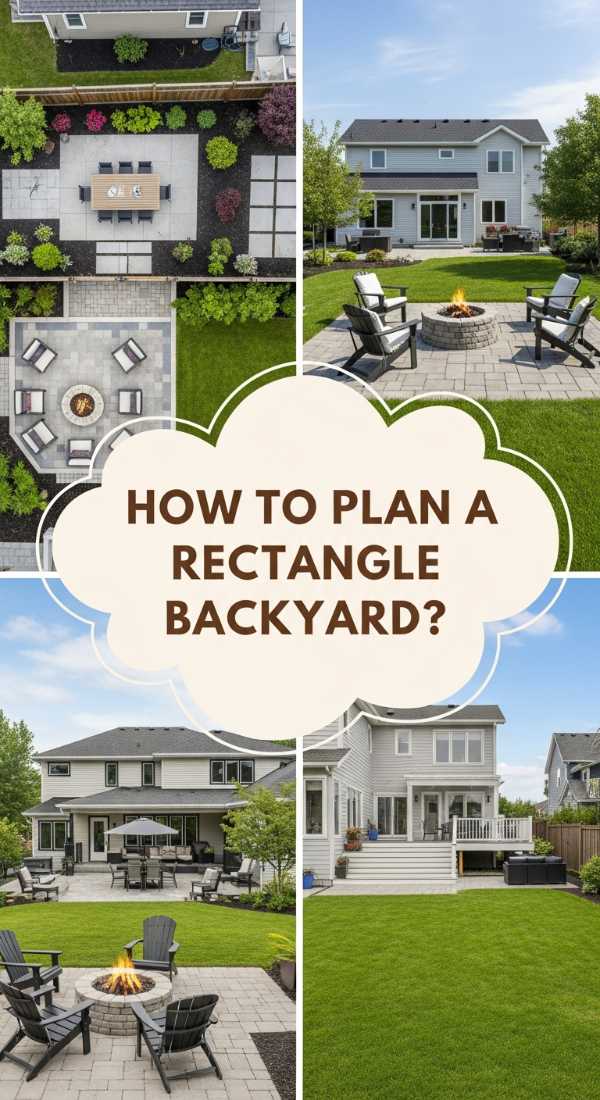
How to Plan a Rectangular Backyard Layout for Maximum Outdoor Living
Why we love this
Rectangular lots often feel like a challenge, but they are actually the ultimate blueprint for ‘zoning’ your life. We love this layout because it creates a sense of journey in your own backyard—moving from a textured stone dining area to a soft, lush grass lounge space. The smell of charcoal from the grill mingling with the fragrance of perimeter jasmine creates a multi-sensory experience that makes a standard yard feel like a high-end boutique resort, perfectly balanced and purposefully used.
Essential Elements:
- Grid paper and measuring tape
- Large format pavers or flagstone
- Outdoor rugs for zone definition
- Perimeter landscaping (shrubs or tall grasses)
- Comfortable modular seating
How to make it
- Measure the entire perimeter of your yard and plot it on grid paper, marking the exits from your house to ensure a logical flow of foot traffic.
- Divide the rectangle into three distinct ‘rooms’: a hardscaped dining area near the house, a central green space for play, and a cozy fire pit or lounge area at the far end.
- Install large format pavers in the dining zone, ensuring a level base of sand and gravel to prevent shifting and to provide a stable surface for furniture.
- Use tall ornamental grasses or privacy hedges along the long edges of the rectangle to draw the eye upward and soften the fence lines.
- Place an outdoor rug in the ‘lounge’ section to visually anchor the furniture and provide a soft texture underfoot that mimics the comfort of an indoor living room.
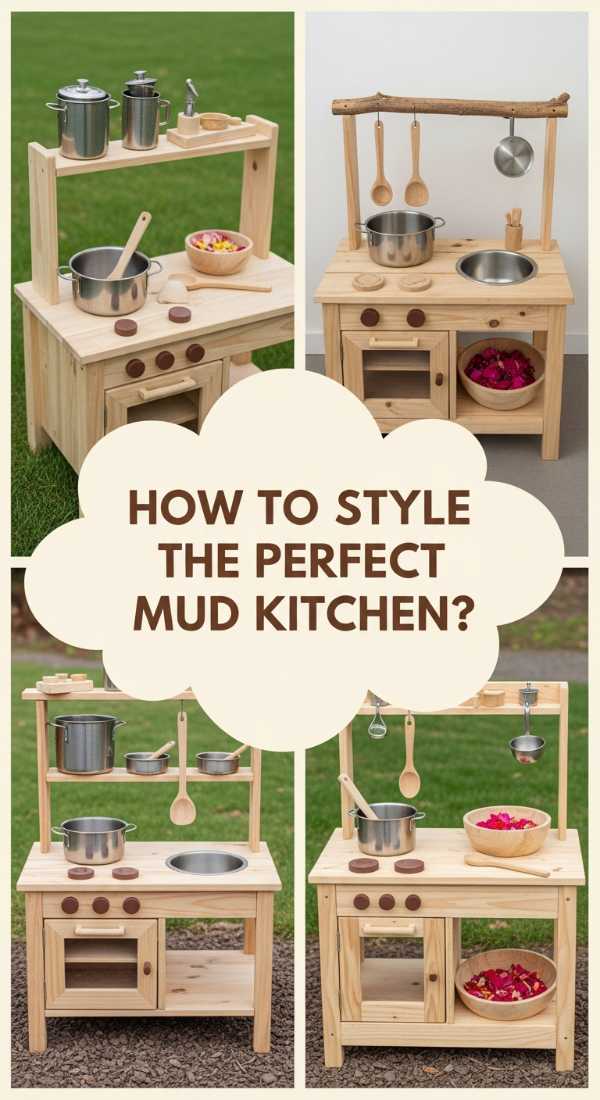
How to Curate Mud Kitchen Accessories for Endless Creative Play
Why we love this
A mud kitchen is the heart of a child’s outdoor world, where the messy beauty of nature meets the structure of imaginative play. We love the curated aesthetic of stainless steel bowls catching the light and the gritty, satisfying texture of ‘dirt soup’ being stirred with a wooden spoon. It encourages a tactile connection to the earth, filling the air with the scent of damp pine needles and the sound of joyful, concentrated clanking as little chefs master their craft.
Essential Elements:
- Stainless steel mixing bowls and colanders
- Old wooden spoons and whisks
- Chalkboard for the ‘Menu of the Day’
- Hooks for hanging utensils
- Natural elements like pinecones, stones, and dried lavender
How to make it
- Mount a series of sturdy, rust-proof hooks along the backboard of the mud kitchen to keep utensils organized and within easy reach of small hands.
- Source heavy-duty stainless steel pots and pans from thrift stores; these provide a satisfying ‘clink’ and are much more durable than plastic alternatives.
- Install a small chalkboard at eye level, allowing children to practice their writing by listing the ‘specials’ like Mud Muffins or Leaf Lasagna.
- Set up a ‘sensory station’ nearby with jars of dried petals, smooth river rocks, and sand to provide different textures for their creations.
- Add a functional water dispenser or a simple bucket with a ladle to give them control over the ‘liquid’ ingredient, fostering independence and fine motor skills.
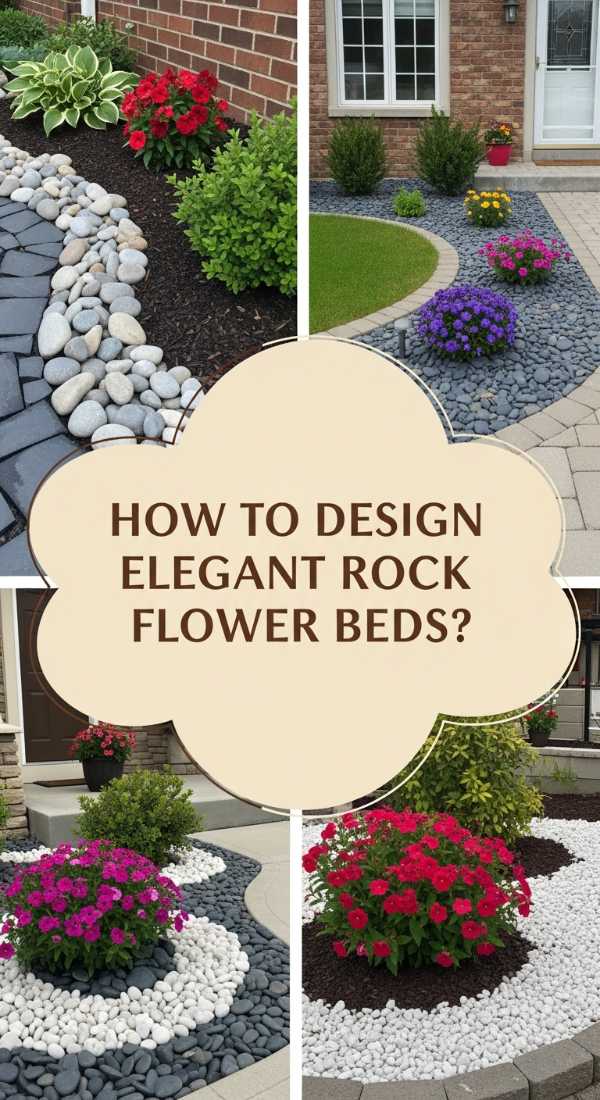
How to Design Rock Flower Beds for an Elegant Front Entrance
Why we love this
There is a timeless, architectural elegance to a rock flower bed that traditional mulch just can’t match. We love the contrast between the cool, grey tones of river rock and the vibrant, fleshy greens of succulents or the structured leaves of boxwoods. The sound of footsteps crunching nearby and the low-maintenance beauty of a garden that stays looking ‘finished’ regardless of the season makes this a win for any modern homeowner seeking a clean, polished look.
Essential Elements:
- Professional-grade weed barrier fabric
- Heavy-duty landscape edging (metal or stone)
- River rocks, lava rocks, or Mexican pebbles
- Drought-tolerant plants (Hostas, Lavender, or Yucca)
- Landscape staples
How to make it
- Clear the area of all grass and weeds, digging down about 3 inches to ensure your rocks will sit flush with the surrounding lawn.
- Install a heavy-duty metal or stone edging around the perimeter to keep the rocks contained and prevent them from migrating into the grass.
- Lay down a high-quality weed barrier fabric, overlapping the seams by at least 6 inches and securing them with landscape staples to prevent any green intruders.
- Cut ‘X’ shapes into the fabric where you wish to plant, tucking your greenery into the soil and firming them in before closing the fabric around the base.
- Spread your chosen rocks evenly across the bed, aiming for a depth of 2-3 inches to ensure full coverage and a lush, professional appearance.
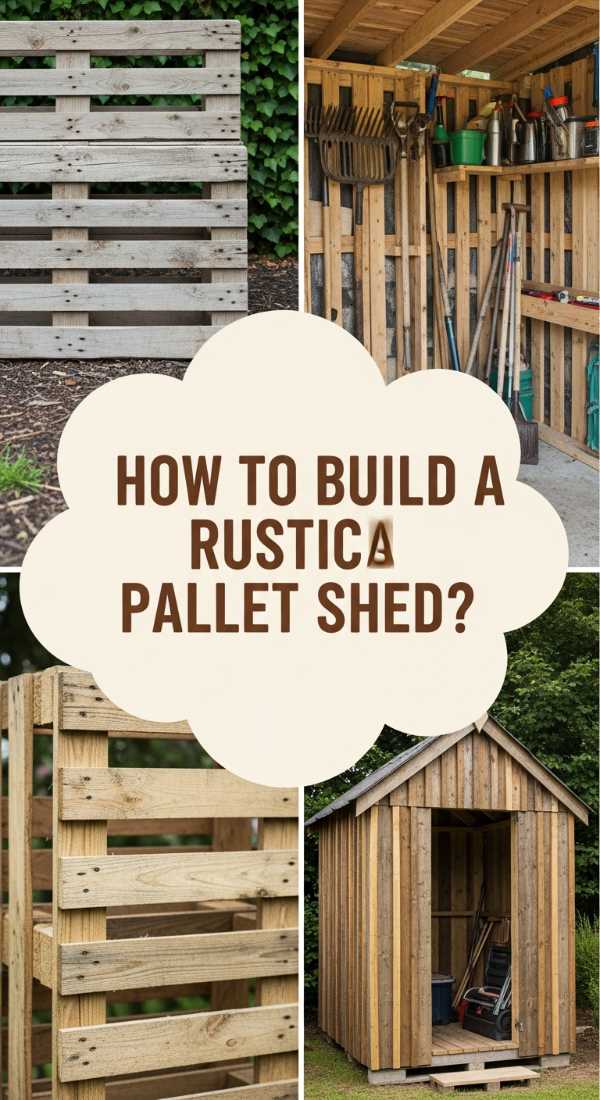
How to Build a Garden Shed from Pallets for Sustainable Backyard Storage

Why we love this
Sustainable DIY is all about seeing the hidden value in the discarded. We love this pallet shed because it has a rugged, rustic character that feels like it has always been part of the garden. The scent of aged wood, the sturdy feel of the thick slats, and the satisfaction of building a functional structure from recycled materials is incredibly rewarding. It’s a project that looks better with age, as the wood silver-weathers and climbing vines begin to claim the walls.
Essential Elements:
- 10-15 heat-treated (HT) pallets of similar size
- 3-inch deck screws and galvanized nails
- Pressure-treated 4×4 posts for the foundation
- Corrugated metal roofing sheets
- Exterior wood sealant or outdoor paint
How to make it
- Select only ‘HT’ marked pallets to ensure they are safe from chemicals, and sand any rough edges to prevent splinters during construction.
- Level the ground and set four 4×4 pressure-treated posts into the corners, securing them with quick-set concrete to create a stable, rot-resistant foundation.
- Attach the pallets to the posts using heavy-duty deck screws, effectively using the pallets as pre-assembled wall sections for a fast build.
- Install a simple slanted roof frame using 2x4s, then attach corrugated metal sheets to ensure the interior stays dry and protected from the elements.
- Apply a generous coat of weather-resistant sealant or a barn-style paint to protect the wood and give the shed a cohesive, intentional look.
How to Decorate a Nostalgic Teen Room for the Ultimate Retro Vibe

Why we love this
Stepping into a retro-themed room feels like a warm hug from the past. We love this style because it’s a tactile explosion—the fuzzy texture of a shag rug, the warm glow of a lava lamp, and the crinkle of vintage posters. It’s about creating a sanctuary that feels lived-in and soulful, where every object has a story and the atmosphere is thick with the cozy, analog charm of a pre-digital era.
Essential Elements:
- Warm-toned LED strip lighting or neon signs
- Vintage-inspired posters and vinyl record wall mounts
- Macrame wall hangings or beaded curtains
- Velvet throw pillows and chunky knit blankets
- A record player or vintage-style radio
How to make it
- Choose a color palette of mustard yellow, burnt orange, and avocado green to instantly ground the room in that iconic 70s-80s aesthetic.
- Create a ‘gallery wall’ using a mix of record covers and retro art prints, using washi tape for a casual, effortless look that doesn’t damage the walls.
- Incorporate varied textures by layering a high-pile shag rug over the floor and adding velvet cushions to the bed for a rich, sensory experience.
- Install a warm-toned neon sign or ‘sunset lamp’ to create a soft, diffused lighting scheme that feels intimate and nostalgic in the evenings.
- Set up a dedicated ‘listening station’ with a turntable and a few crates of vinyl, encouraging a slow, tactile way to enjoy music.
How to Create Low Maintenance Flower Beds for a Beautiful Stress-Free Garden
Why we love this
The best gardens are the ones that let you spend more time sipping tea and less time pulling weeds. We love this approach because it focuses on the effortless beauty of perennials that return year after year, getting fuller and more fragrant with time. The sight of bees buzzing over lavender and the rustle of ornamental grasses in the breeze provides a peaceful backdrop to your life, requiring only minimal intervention to stay looking spectacular.
Essential Elements:
- Native perennial plants (Coneflowers, Black-eyed Susans)
- Organic cedar mulch
- Soaker hoses or a simple drip irrigation kit
- Slow-release organic fertilizer
- Hand trowel and gardening gloves
How to make it
- Choose native plants that are naturally adapted to your local climate and soil, as these will require significantly less water and pest control.
- Group plants with similar water and light needs together (hydro-zoning) to ensure they all thrive without individual pampering.
- Install a soaker hose system beneath the surface, allowing you to water the roots directly and efficiently with just the turn of a knob.
- Apply a thick, 3-inch layer of shredded cedar mulch; this suppresses weeds, retains moisture, and adds a delicious, woody scent to the air.
- Add a few ‘evergreen’ structural plants like boxwoods or dwarf conifers so the garden maintains its shape and visual interest even in the dead of winter.
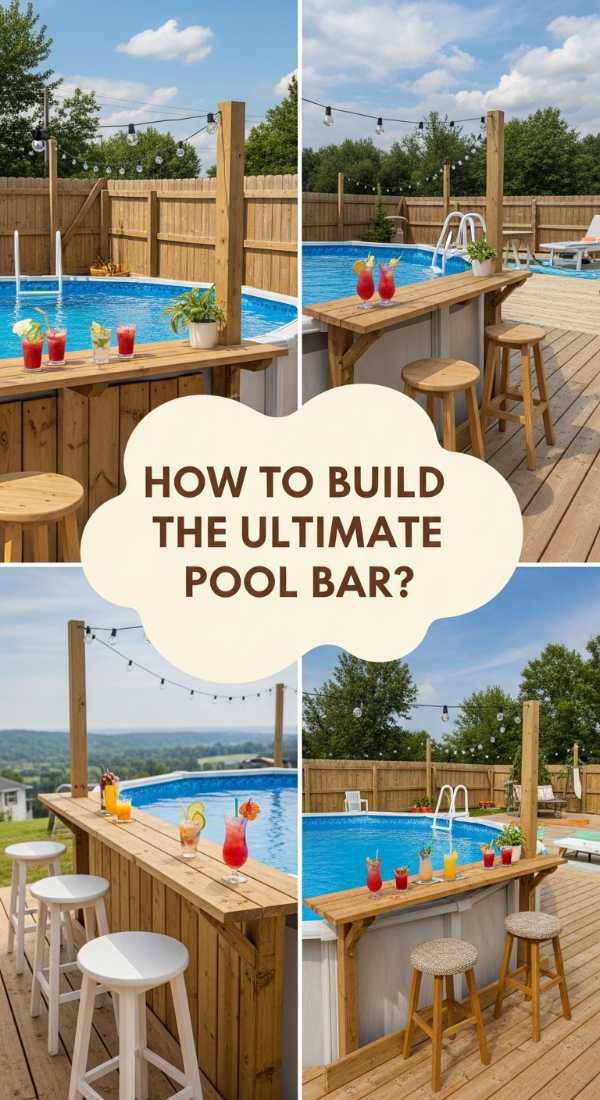
How to Construct an Above Ground Pool Bar for Summer Hosting Perfection

Why we love this
An above-ground pool bar is the ultimate ‘staycation’ upgrade. We love the way it turns a functional pool area into a social hub, where the cool splash of water meets the smooth, sanded surface of a wooden bar top. The aroma of citrus garnishes and the sound of laughter over the ice bucket make your backyard the place to be, providing a vacation-at-home vibe that makes every weekend feel like a celebration.
Essential Elements:
- Pressure-treated lumber for the frame
- Cedar planks for the bar top and siding
- Waterproof wood sealant
- Sturdy bar stools
- Outdoor-rated beverage tub or built-in ice chest
How to make it
- Build a simple rectangular frame using 2×4 pressure-treated lumber, ensuring the height matches the rim of your above-ground pool for easy access.
- Clad the exterior of the frame with cedar planks, leaving a small gap between slats for a modern, airy look that allows the wood to breathe.
- Install a wide bar top using thick cedar slabs, sanding them down until they are buttery smooth to the touch and comfortable for resting arms.
- Apply three coats of high-quality marine-grade sealant to protect the wood from constant splashes, chlorine, and intense summer sun.
- Finish by adding a built-in ice bucket or a recessed tray for snacks, ensuring everything you need for a pool day is within arm’s reach.
How to Master Realistic Pantry Organization for a Seamless Kitchen Flow
[IMAGE_10]
Why we love this
There is a profound sense of calm that comes from opening a pantry and seeing exactly what you have. We love this DIY because it’s a quiet victory for daily life. The click of airtight containers, the visual rhythm of neatly labeled jars, and the clean scent of a freshly wiped shelf make cooking feel less like a chore and more like a creative ritual. It’s about removing the friction from your morning coffee or your evening meal prep.
Essential Elements:
- Clear airtight canisters (glass or BPA-free plastic)
- Uniform baskets (wicker or wire)
- Label maker or chalk markers
- Lazy Susans for corner access
- Shelf liners with a subtle texture
How to make it
- Empty the entire pantry and discard any expired items, then wipe down every shelf with a mild cleaner to create a fresh, hygienic starting point.
- Categorize your items into groups (Baking, Snacks, Grains, Canned Goods) and measure your shelf heights to ensure your containers will fit perfectly.
- Decant ‘dry’ goods like flour, sugar, and pasta into clear, airtight canisters; this keeps food fresh longer and allows you to see when supplies are low.
- Place awkward or loose items like bags of chips or extra sponges into uniform wicker baskets to hide the visual clutter while keeping them accessible.
- Apply labels at eye level using a consistent font or style, ensuring that every family member knows exactly where things belong, maintaining the order long-term.
Creating Your Weekend Masterpiece
As the sun sets on your Sunday, take a moment to look around at the beauty you’ve cultivated. Whether it’s the way the light filters through your new glass art or the organized peace of your pantry, these projects prove that you don’t need a month-long renovation to make a meaningful change. The modern maker knows that home is a work in progress—a beautiful, tactile journey that is best taken one weekend at a time. Happy DIYing!