
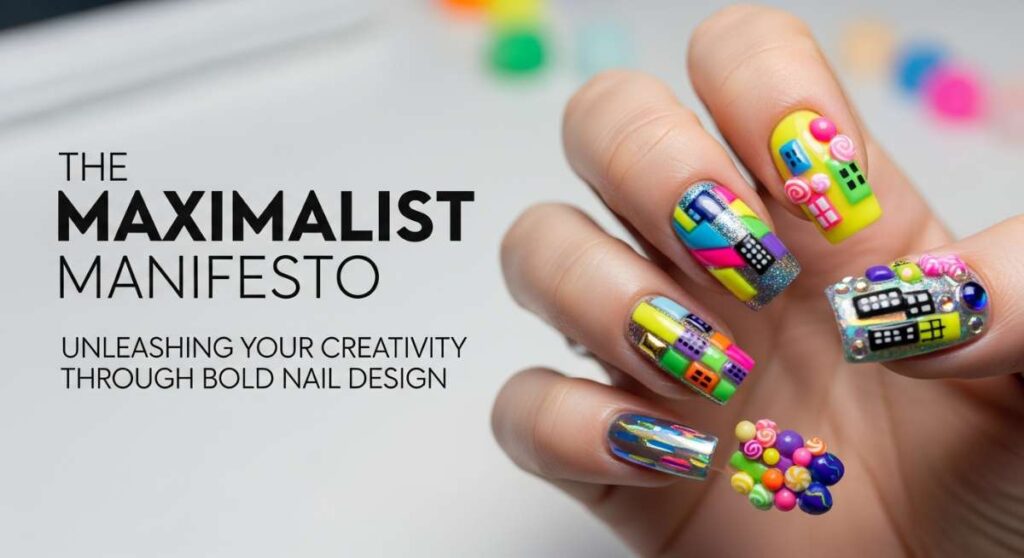
The Maximalist Manifesto: Unleashing Your Creativity Through Bold Nail Design
Hello, my beautiful loves. Come in, get cozy, and let’s chat. You know those moments when you look at your hands and they just feel like… a blank canvas waiting for a celebration? I’ve spent so much of my life trying to ‘tone it down,’ but lately, I’ve realized that my soul speaks in neon, glitter, and every shade of the rainbow. Maximalism isn’t just a style; it’s a soft, warm embrace of everything that makes you, well, you.
Today, we aren’t just doing our nails; we are painting our personal manifestos. I want you to feel the magic in every brushstroke and the joy of a hand that sparkles back at you while you’re typing or holding a warm cup of tea. Let’s dive into this world of color together, heart-first, and turn those fingertips into masterpieces.
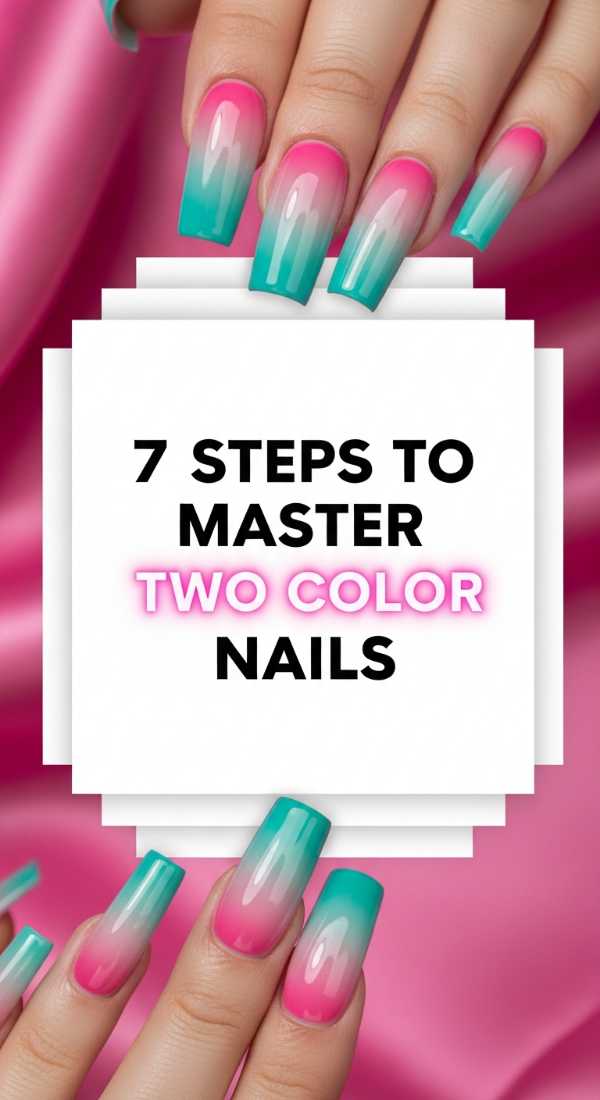
The Art of the Duo: 7 Steps to Master Two Color Nails
Why to love this recipe:
Sometimes, loves, we start small but significant. Two colors can tell a whole story—the contrast of fire and ice, or the soft blending of a sunrise. It’s the perfect entry point into maximalism where you learn how colors dance together.
Essential Ingredients:
- Two contrasting high-pigment polishes
- Fine-lining detail brush
- Nail guide tape
- Smoothing base coat
- High-gloss top coat
How to Prepare:
- Apply your smoothing base coat and let it dry completely.
- Paint two coats of your lighter shade on the entire nail.
- Wait at least 15 minutes for the base color to set.
- Place a nail guide tape diagonally across the nail.
- Paint the darker shade on one side of the tape.
- Carefully peel the tape away while the polish is still slightly tacky.
- Seal the look with a high-gloss top coat to blur the physical line.
Budget Range
- Essie Expressie ($10)
- OPI Nature Strong ($12)
- Orly Bonder Base ($15)
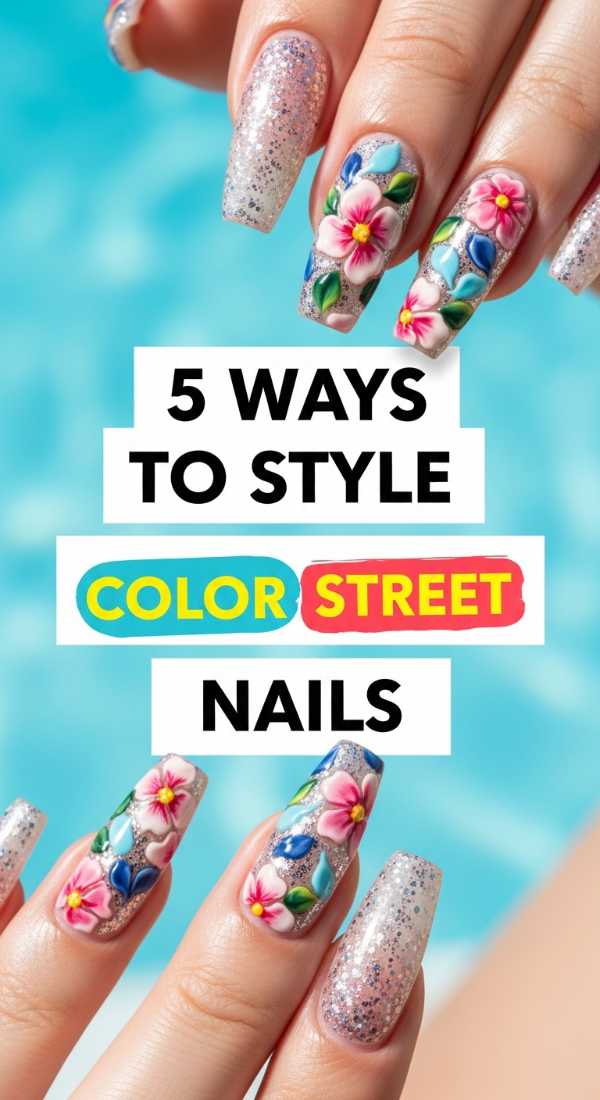
Stick and Shine: 5 Ways to Style Color Street Nails
Why to love this recipe:
For my busy loves who still want that ‘wow’ factor without the wait time, these strips are a dream come true. Styling them is like choosing the perfect outfit—it’s all about the layers and the personality you bring to the mix.
Essential Ingredients:
- Two different Color Street sets
- Glass nail file
- Cuticle pusher
- Alcohol prep pads
How to Prepare:
- Mix and match: Use a glitter strip on your ring finger and a solid on the rest.
- Negative space: Cut strips into triangles to leave part of your natural nail exposed.
- Double-up: Layer a sheer glitter strip over a solid color for extra depth.
- Reverse French: Apply a thin strip at the cuticle rather than the tip.
- The Mosaic: Cut leftover scraps into tiny squares to create a stained-glass effect.
Budget Range
- Color Street Main Sets ($11-$14)
- Bona Fide Glass Nail File ($10)
- Cuticle Oil Pen ($8)
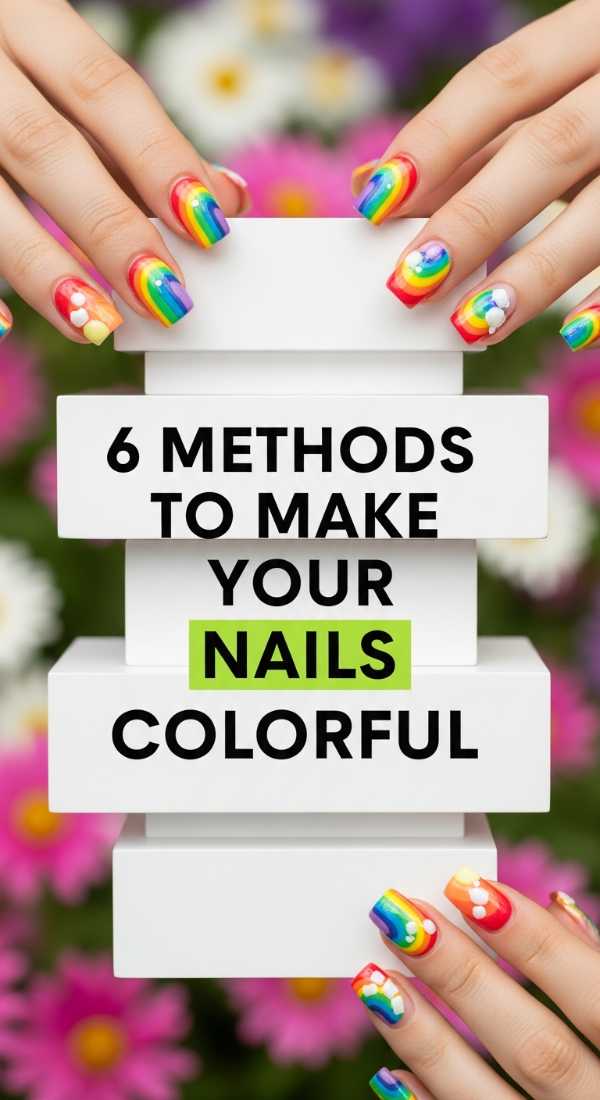
The Rainbow Palette: 6 Methods to Make Your Nails Colorful
Why to love this recipe:
This is where we let go of the rules! There are so many ways to invite color into your life. Whether you like it structured or chaotic, these methods will ensure your hands never look dull again.
Essential Ingredients:
- Cosmetic sponges
- Dotting tools
- Striper brushes
- Holographic toppers
- Water marbling bowl
How to Prepare:
- Dotting: Create clusters of colorful dots in various sizes.
- Sponging: Dab three colors onto a sponge and press onto the nail.
- Striping: Use a thin brush to paint vertical lines of every color you own.
- Water Marble: Drop polish into water, swirl, and dip your nail.
- Dry Brushing: Wipe most polish off the brush and ‘scratch’ colors across the nail.
- Stamping: Use colorful stamping gels over a neutral base.
Budget Range
- Holo Taco Rainbow Bundle ($70)
- Born Pretty Dotting Tool Set ($6)
- Distilled water for marbling ($2)
Precision Play: 4 Tricks for Perfect Multicolor Nails
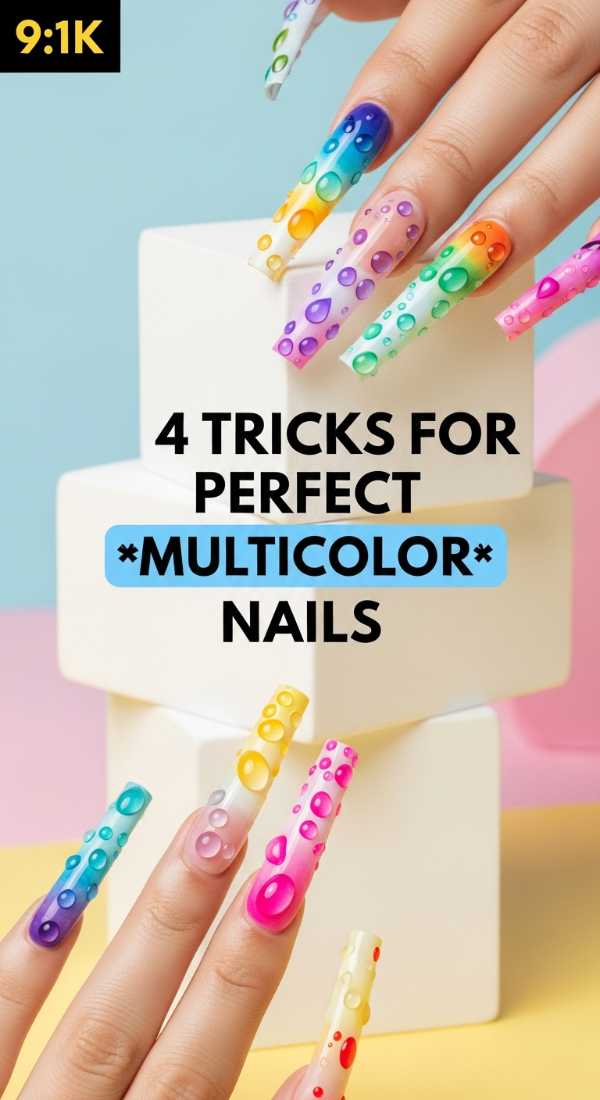
Why to love this recipe:
I know, loves, sometimes using five or six colors at once can feel messy. These tricks are my secret to keeping that maximalist energy looking clean, professional, and absolutely intentional.
Essential Ingredients:
- Pure acetone
- Cleanup brush
- Matte top coat (for better grip)
- Color wheel
How to Prepare:
- Use a color wheel to pick ‘analogous’ colors (neighbors) for a smooth transition.
- Apply very thin layers to prevent the multicolor stack from becoming too thick.
- Clean your brushes in acetone between every single color change to keep pigments pure.
- Flash-cure gel (if using) for 10 seconds between colors to ‘lock’ them in place.
Budget Range
- Gelish Mini LED Lamp ($45)
- Modelones Liner Gel Set ($20)
- Pure Acetone ($5)
Chasing the Muse: 8 Ideas to Find Colorful Nail Inspo
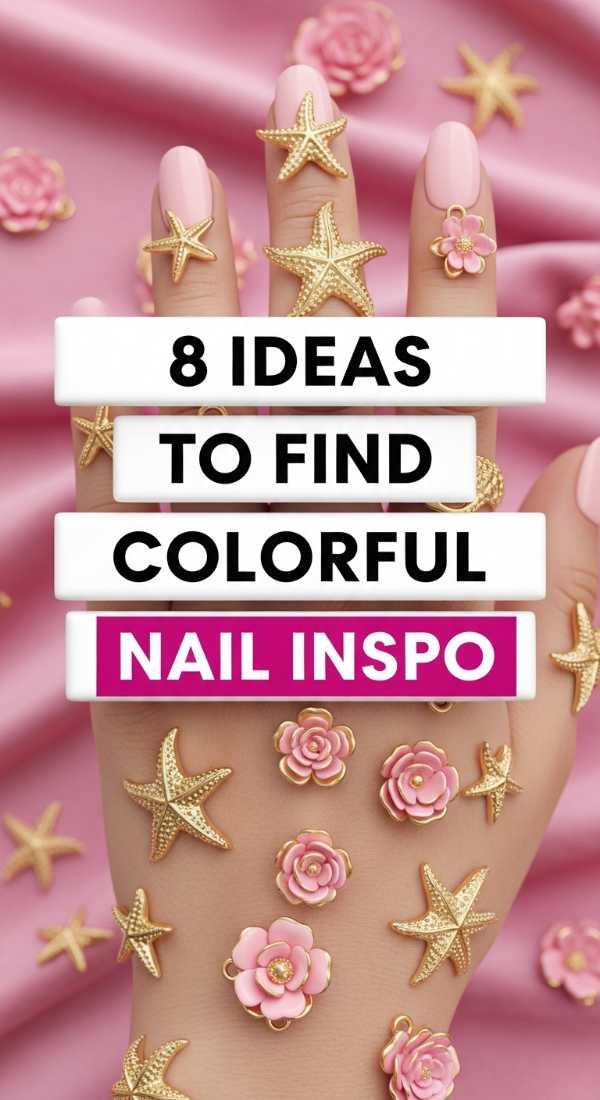
Why to love this recipe:
Creativity is like a well, loves; we have to keep filling it up. When I feel a bit stuck, I look away from my hands and toward the world. Inspiration is everywhere if you know how to look for it with an open heart.
Essential Ingredients:
- A Pinterest board
- A physical sketchbook
- High-quality camera phone
How to Prepare:
- Browse vintage wallpaper patterns from the 70s.
- Take photos of local street art and graffiti.
- Look at the produce section—those fruit colors are divine!
- Study high-fashion runway shows (Gucci is great for maximalism).
- Check out classic botanical illustrations.
- Look at stained glass windows in old buildings.
- Follow Japanese ‘Kawaii’ nail artists on Instagram.
- Look at your own jewelry collection for color pairings.
Budget Range
- Pinterest App (Free)
- Vogue Magazine Subscription ($20/year)
- Moleskine Sketchbook ($18)
Sculpted Joy: 3 Techniques for Colourful Acrylic Nails
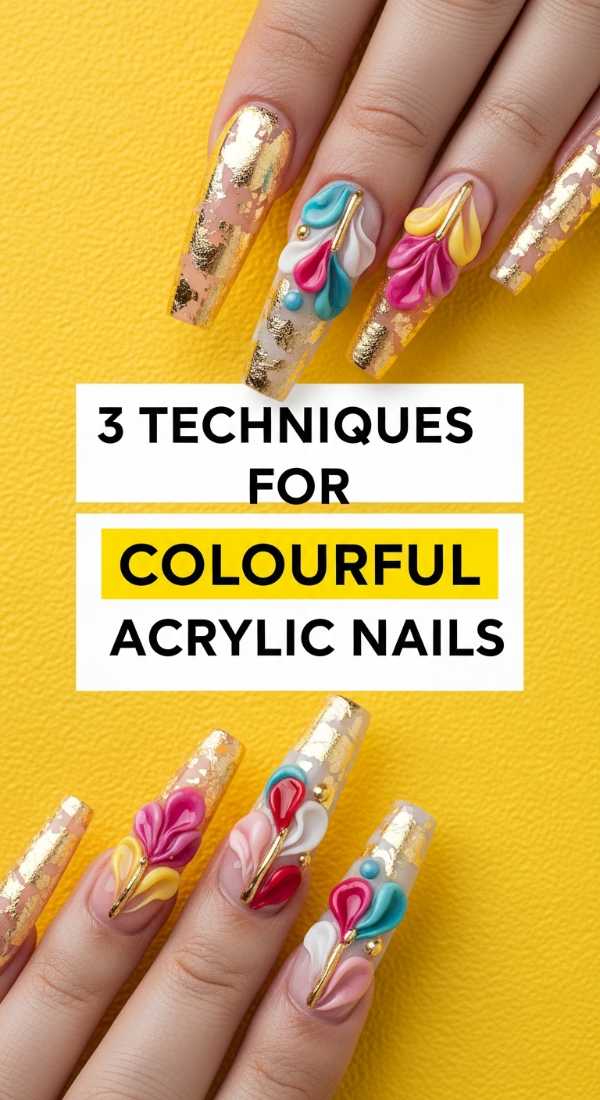
Why to love this recipe:
Acrylics give us the length to truly play. It’s like having a bigger canvas for our dreams. These techniques add dimension and depth that you just can’t get with regular polish.
Essential Ingredients:
- Colored acrylic powders
- Monomer
- Clear ‘encapsulation’ powder
- Acrylic brush (Size 8 or 10)
How to Prepare:
- Color Blocking: Lay down beads of different colored acrylic side-by-side.
- Encapsulation: Place glitter or dried flowers on a thin layer of color and cover with clear acrylic.
- Ombre Bead Work: Blending a pink bead into a white bead at the mid-section for a ‘Baby Boomer’ look.
Budget Range
- Mia Secret Colored Acrylic Set ($25)
- Young Nails Monomer ($20)
- Kolinsky Acrylic Brush ($30)
The Sharp Edge: 9 Steps for Bold Colorful Stiletto Nails
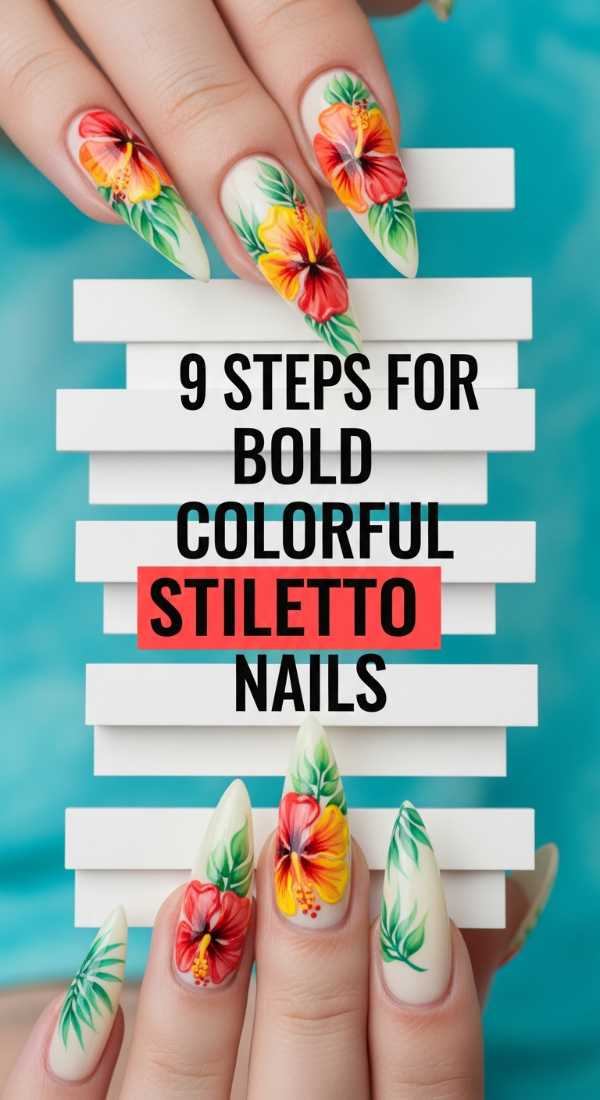
Why to love this recipe:
Stiletto nails are for the bold, the brave, and the fierce. They are a statement of power. When you combine that sharp shape with vibrant color, you become unstoppable, my loves.
Essential Ingredients:
- Stiletto nail tips
- Strong nail glue
- Heavy-duty hand file (100/180 grit)
- Electric nail drill
How to Prepare:
- Prep the natural nail by removing shine.
- Glue on the stiletto tips firmly.
- Blend the ‘well’ of the tip into the natural nail.
- File the sides to ensure a sharp, symmetrical point.
- Apply a base coat of colorful gel.
- Add a second, brighter color in a geometric pattern.
- Use a third color for ‘outlining’ the shape.
- Buff the surface smooth.
- Apply a ‘no-wipe’ top coat for a glass-like finish.
Budget Range
- MelodySusie Electric Drill ($60)
- Kiara Sky Gelly Tips ($30)
- Beetles Gel Polish Set ($20)
Island Vibes: 10 Easy Steps for 3D Tropical Nails
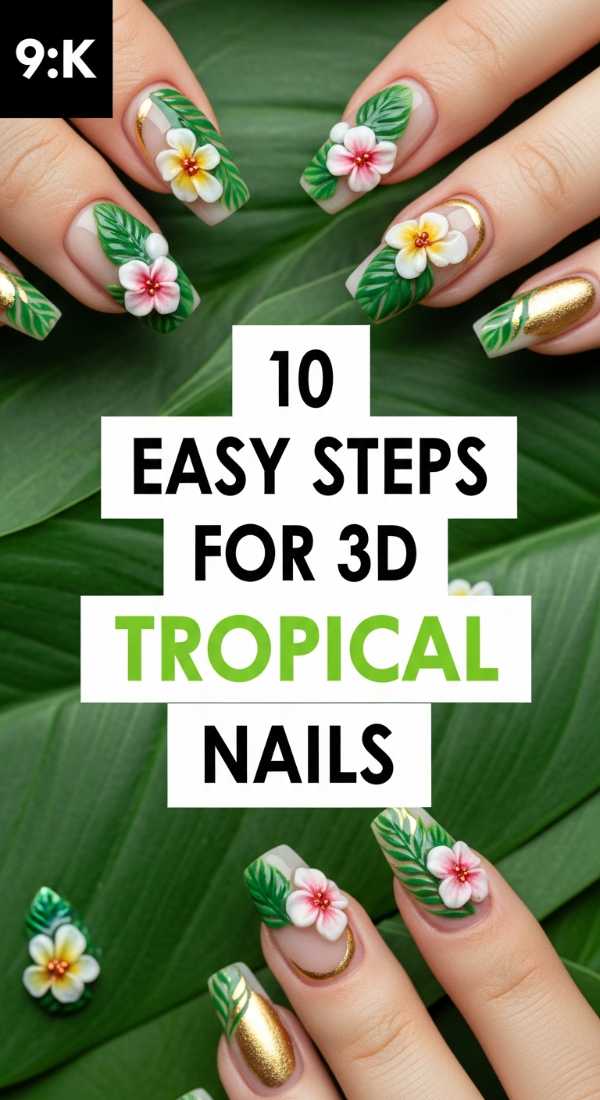
Why to love this recipe:
Even if you’re stuck in the city, your nails can be a vacation. This 3D look brings the texture of the tropics—think hibiscus flowers and lush palm leaves—right to your fingertips.
Essential Ingredients:
- 3D builder gel or polygel
- Neon green and pink polishes
- Small silicone tools
- Gold studs
How to Prepare:
- Paint a turquoise base to represent the ocean.
- Cure under the lamp.
- Take a small bead of green builder gel.
- Place it on the nail and shape it into a leaf using a silicone tool.
- Indent the ‘veins’ of the leaf.
- Cure the leaf.
- Add a pink bead and shape it into five flower petals.
- Add a gold stud to the center of the flower.
- Paint over the 3D shapes with colored gel.
- Top coat only the base, leaving the 3D parts matte or semi-glossy.
Budget Range
- Makartt Builder Gel ($12)
- Silicone Nail Tool Set ($8)
- Tropical Nail Charm Kit ($10)
The Soft Fade: 5 Tips for Vibrant Ombre Nails

Why to love this recipe:
The ombre is the ultimate sunset for your hands. It’s soft, it’s dreamy, and it reminds us that one beautiful thing can transition into another without losing its essence.
Essential Ingredients:
- Latex tape or liquid peel
- Wedge makeup sponges
- Highly pigmented cream polishes
How to Prepare:
- Protect your skin with liquid latex around the nail bed.
- Paint your lightest color as the base and let it dry.
- Apply stripes of your chosen colors directly onto the makeup sponge.
- Dab the sponge onto the nail repeatedly, moving slightly up and down to blend.
- Apply a top coat while the colors are still slightly wet to merge them perfectly.
Budget Range
- Zoya Polish ($12)
- Liquid Latex Barrier ($9)
- Bulk Makeup Sponges ($5)
The Midas Touch: 4 Secrets to Apply Gold Nail Charms
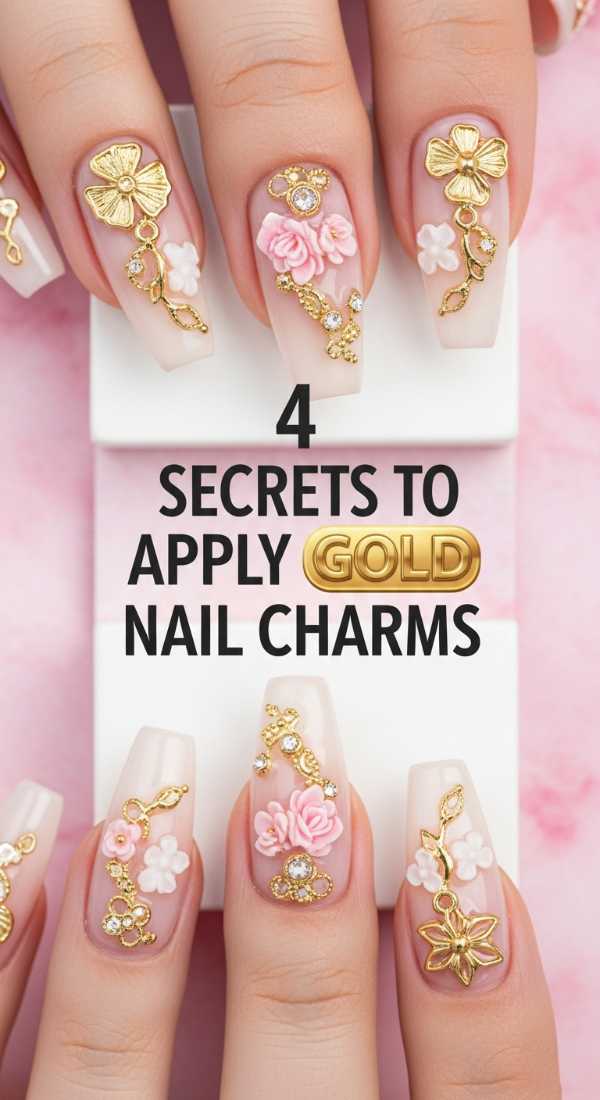
Why to love this recipe:
Every maximalist needs a little gold! Charms are the jewelry for your nails. They add that final ‘expensive’ touch that makes you feel like royalty every time you catch a glimpse of your hands.
Essential Ingredients:
- Gold alloy charms (moons, stars, logos)
- Rhinestone glue (thicker than regular glue)
- Wax picker tool
- Pointed tweezers
How to Prepare:
- Place a small dollop of thick rhinestone glue exactly where you want the charm.
- Use a wax picker to gently lift the gold charm and press it into the glue.
- Ensure the edges of the charm are flush with the nail so they don’t snag on your hair.
- Use a fine brush to apply top coat *around* the charm, but not over it, to keep the gold shining bright.
Budget Range
- Daily Charme Gold Collection ($15)
- Makartt Rhinestone Glue ($10)
- Wax Picker Pen ($7)
Go Forth and Shine
Loves, my wish for you is that every time you look down at your vibrant, maximalist nails, you feel a surge of confidence and a reminder that you are allowed to take up space. You are allowed to be bright, bold, and beautiful. Don’t let anyone tell you that ‘less is more’—in the world of creativity, more is a celebration! Tag me in your creations, and let’s keep making the world a little more colorful, one manicure at a time.