
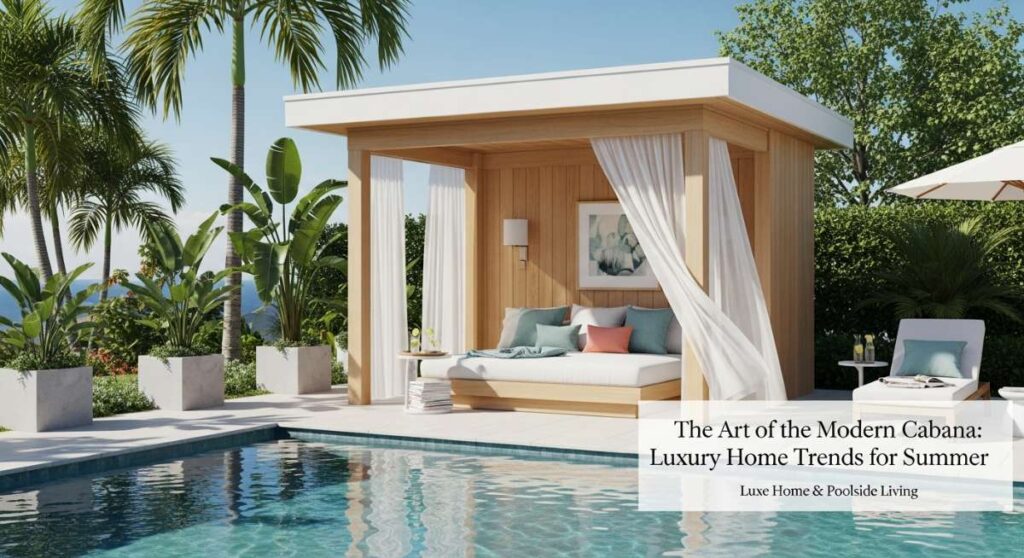
The Art of the Modern Cabana: Luxury Home Trends for Summer
There is a specific kind of magic that happens when the sun begins its slow descent, casting a long, amber glow over a perfectly curated patio. We’ve all felt that pull—the desire to turn our homes into more than just a place to sleep, but a sanctuary that rivals the most exclusive Mediterranean resorts. This summer, the trend is moving away from the purely functional and toward the deeply experiential, where every corner of our outdoor and indoor living space tells a story of relaxation and refined taste.
Creating a luxury home isn’t just about the price tag of your furniture; it’s about the intention behind your environment. It’s the way a plush towel feels against your skin after a dip, the scent of jasmine wafting from a botanical corner, and the visual peace of an organized poolside. As we dive into this season’s ultimate lifestyle guide, I’m sharing my favorite ways to elevate your space into a modern cabana that breathes life into your daily routine and makes every weekend feel like a high-end getaway.
How to Create a Botanical Haven for Lasting Serenity
Why we love this
There is something profoundly soul-soothing about being surrounded by lush, verdant layers of life that filter the sunlight and soften the hard edges of modern architecture. We love this because it transforms a standard room into a living, breathing lung for the home, where the earthy scent of damp soil and the tactile softness of velvet-leafed Philodendrons create a multisensory retreat. It is the ultimate luxury to step away from the digital world and lose yourself in a sea of emerald greens, where the air feels cooler and every breath feels cleaner and more intentional.
Essential Elements:
- A variety of heights (floor plants, tabletop gems, and hanging vines).
- High-quality ceramic or stone planters in earthy, neutral tones.
- Organic potting mix enriched with perlite and orchid bark.
- Natural light or full-spectrum LED grow lights for darker corners.
- A decorative brass mister for humidity and aesthetic charm.
How to make it
- Begin by identifying your ‘anchor’ plants—large-scale specimens like a Fiddle Leaf Fig or a Strelitzia (Bird of Paradise)—and place them in the corners of the room to establish a vertical frame and draw the eye upward.
- Layer in mid-sized plants on pedestals or side tables; choose varieties with interesting textures like the ruffled fronds of a Boston Fern or the architectural spikes of a Sansevieria to create visual depth and complexity.
- Incorporate trailing plants such as Pothos or String of Hearts on high shelves, allowing the vines to cascade down like natural curtains, which softens the visual transition between the wall and the ceiling.
- Group plants in odd numbers (3, 5, or 7) to mimic natural growth patterns and ensure you are using pots with drainage holes to prevent root rot while maintaining a consistent aesthetic across your containers.
- Finish by fine-tuning the environment: wipe down the leaves with a damp cloth to remove dust—which allows the plant to photosynthesize more efficiently—and add a layer of decorative pebbles or moss to the top of the soil for a professional, polished finish.
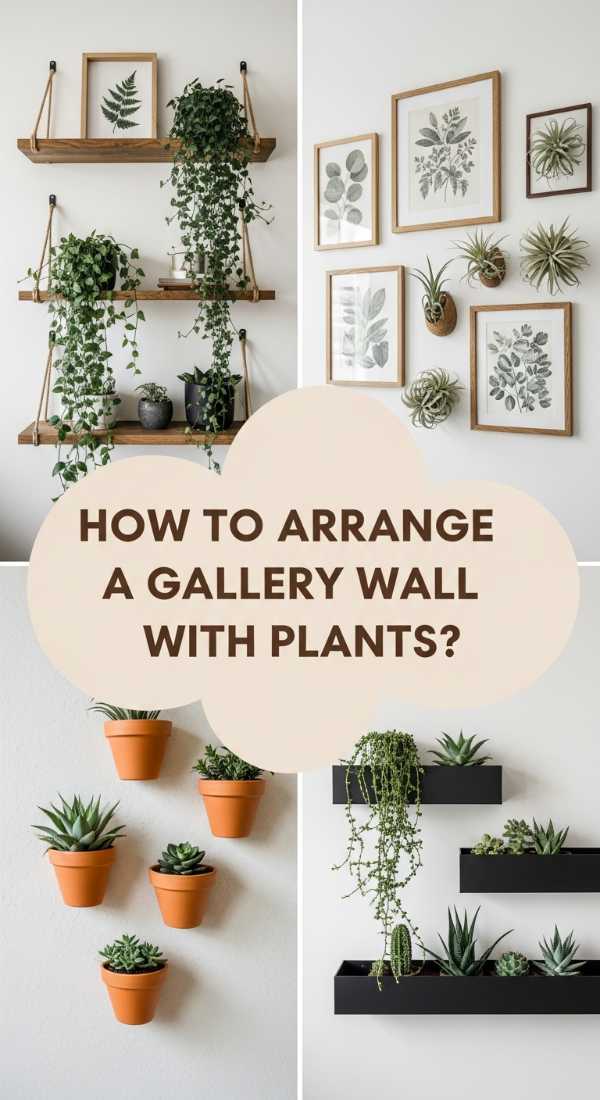
How to Design a Living Gallery Wall for a Fresh Indoor Vibe
Why we love this
A living gallery wall is a masterclass in dynamic decor, offering a changing landscape that standard framed prints simply cannot match. We love the way the different shades of moss and air plants create a 3D texture that begs to be touched, bringing a tactile, forest-like quality into a sleek urban setting. It’s an evocative conversation starter that smells faintly of rain and ancient woods, providing a focal point that is both visually stimulating and emotionally grounding, perfect for a high-traffic living area or a serene home office.
Essential Elements:
- A series of uniform shadow boxes or reclaimed wood frames.
- Preserved sheet moss and reindeer moss in various shades of green.
- Hardy air plants (Tillandsia) of varying sizes.
- Floral adhesive or hot glue gun for securing moss.
- Small, discreet wire hooks for mounting air plants.
How to make it
- Select your frames and remove the glass; sand the wood if necessary to ensure a smooth finish, and then lay them out on a flat surface to plan your composition across the entire ‘gallery’ set before you start gluing.
- Apply a generous but controlled layer of floral adhesive to the backboard of the frame, then press large pieces of preserved sheet moss down, working from the center outward to create a lush, continuous base layer that hides the backing completely.
- Introduce texture by tufting reindeer moss in contrasting shades—lime green and deep forest green work beautifully together—layering them over the sheet moss to create a topographical, 3D effect that mimics a forest floor.
- Position your air plants in the ‘valleys’ of the moss; use small wire loops to secure them so they are easy to remove for their weekly soak, ensuring you don’t glue the living plants directly so they stay healthy and vibrant.
- Mount the frames on your wall with a 2-inch gap between each to maintain a clean, curated look, and give the air plants a light misting immediately after hanging to help them settle into their new artistic environment.
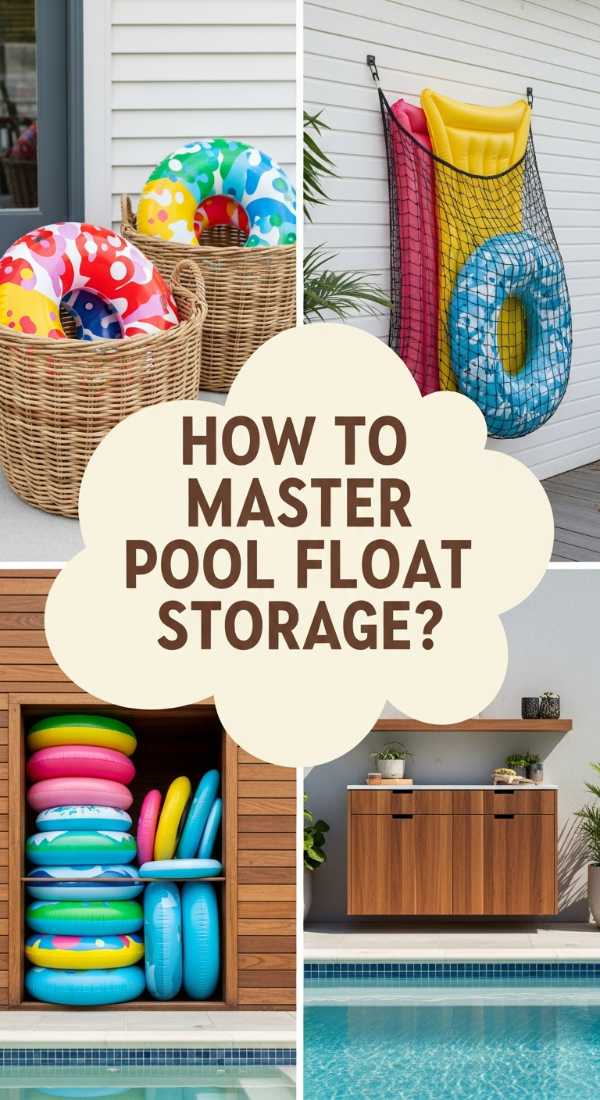
How to Organize Pool Floats for a Clutter Free Summer Oasis
Why we love this
Nothing disrupts the sleek, glassy surface of a luxury pool like a chaotic heap of neon vinyl floating haphazardly in the breeze. We love an organized float system because it restores the architectural integrity of your outdoor space, allowing the pool to remain a tranquil mirror for the sky rather than a storage bin. When floats are neatly tucked away, the entire patio feels larger and more inviting, radiating a sense of order and high-end hospitality that makes every afternoon swim feel like a curated event at a private beach club.
Essential Elements:
- A dedicated vertical storage rack or oversized mesh baskets.
- Bungee cords or specialized float straps.
- A clean, dry storage area away from direct, harsh sunlight.
- Non-abrasive cleaning wipes for vinyl surfaces.
- A high-volume electric pump for quick inflation/deflation.
How to make it
- Start by thoroughly cleaning every float with a mild soap solution and a soft cloth to remove chlorine residue and sunblock oils, which can degrade the material and cause it to become sticky over time.
- Ensure every item is bone-dry before storage; use a microfiber towel to get into the crevices of the float handles and valves, as any trapped moisture will lead to mildew and unpleasant odors during the summer heat.
- Sort your floats by size and type, placing large loungers in vertical slots on a rack to prevent them from bending or warping under their own weight, while smaller rings and noodles can be gathered into a stylish mesh basket for easy access.
- For seasonal storage, use an electric pump to partially deflate the floats; they should be soft to the touch rather than rigid, which prevents the seams from stretching and cracking during temperature fluctuations in the storage area.
- Arrange the storage solution in a shaded, well-ventilated corner of the yard or a pool house, ensuring it is out of the primary sightline from your main lounge chairs to keep the focus on the water and the view.
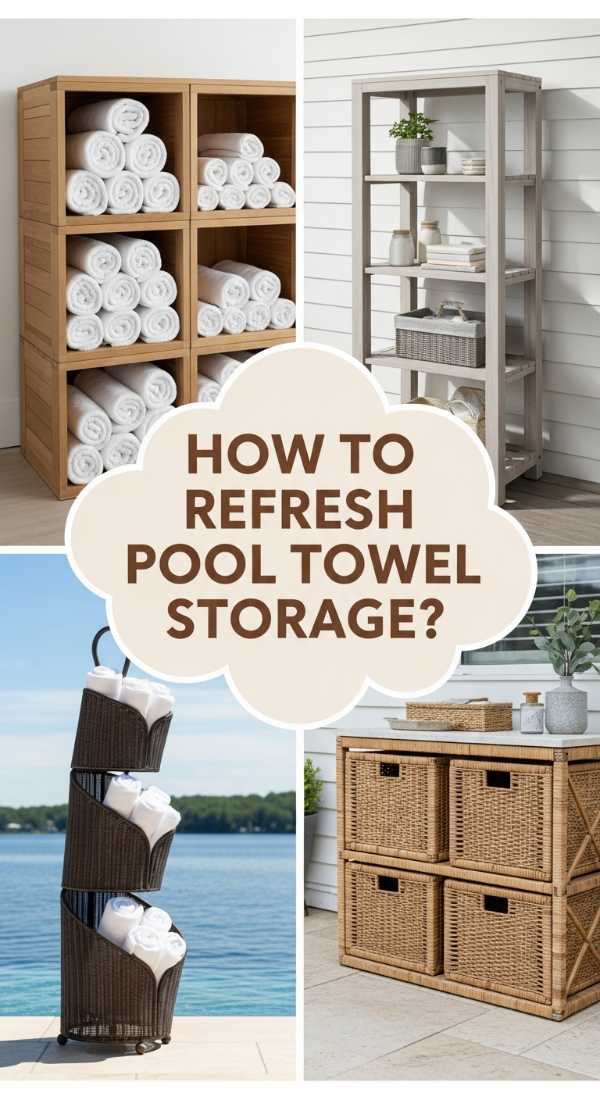
How to Store Plush Pool Towels for Guest Ready Luxury
Why we love this
The sensation of wrapping oneself in a thick, sun-warmed towel that smells of lavender and sea salt is the pinnacle of the poolside experience. We love this organizational touch because it signals to your guests that every detail of their comfort has been considered, turning a simple utility into a spa-like indulgence. A neatly stacked pile of high-GSM cotton towels in a textured wicker basket provides a visual promise of softness and warmth, elevating the aesthetic of your cabana from ‘backyard’ to ’boutique hotel’ in an instant.
Essential Elements:
- High-quality, 100% long-staple cotton towels (look for 600+ GSM).
- Large, breathable woven baskets or a dedicated teak shelving unit.
- Scented linen spray or dried lavender sachets.
- Fabric softener or white vinegar for maintaining fluffiness.
- A weather-resistant cover for outdoor storage bins.
How to make it
- Wash your towels using a gentle detergent and swap traditional fabric softeners for half a cup of white vinegar in the rinse cycle; this removes detergent buildup and keeps the fibers incredibly absorbent and soft to the touch.
- Tumble dry on a medium-low heat setting with wool dryer balls to agitate the fibers and maximize loft; remove them while they are still slightly warm to prevent stiffening and to make the folding process smoother.
- Use the ‘hotel roll’ technique: fold the towel in half lengthwise, then roll it tightly from one end to the other to create a neat, uniform cylinder that showcases the plush texture and fits perfectly into round baskets.
- Arrange the rolled towels vertically in your chosen basket, ensuring the ‘seams’ are tucked downward for a clean, professional appearance that looks inviting and organized from every angle.
- Place a lavender sachet at the bottom of the basket and mist the top layer with a light linen spray just before guests arrive, creating a subtle, calming olfactory experience that enhances the luxury of the towel.
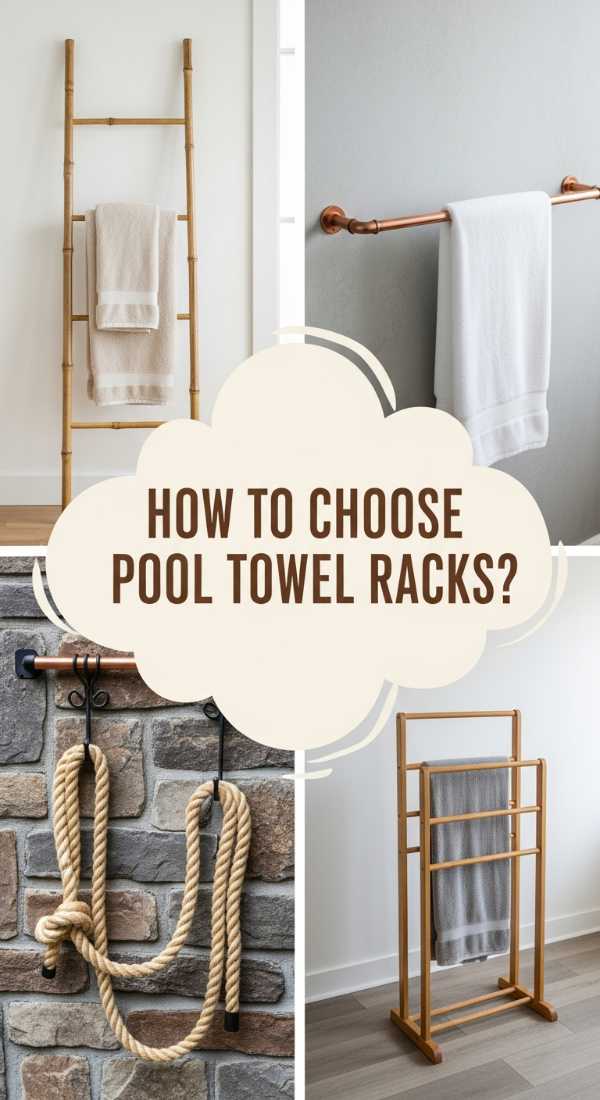
How to Build a Stylish Towel Rack for Chic Outdoor Living

Why we love this
A custom towel rack is the bridge between functionality and high-end design, offering a designated place for wet linens that doesn’t involve draping them over expensive patio furniture. We love the way a well-crafted wooden or metallic rack adds a vertical element to the pool deck, acting as a functional sculpture that catches the breeze. It’s about creating a space where everything has its place, ensuring your outdoor living area remains uncluttered, airy, and effortlessly sophisticated throughout the busiest summer weekends.
Essential Elements:
- Weather-resistant wood like Teak, Cedar, or Ipe.
- Outdoor-rated wood stain or sealant.
- Stainless steel or brass hardware (hooks and screws).
- A drill with various bit sizes and a level.
- Heavy-duty sandpaper (80, 120, and 220 grit).
How to make it
- Measure and cut your primary vertical supports and horizontal cross-beams; for a sleek ‘ladder’ look, use 2×2 lumber for the sides and 1-inch dowels or slats for the rungs, ensuring all pieces are uniform in length for a balanced frame.
- Sand every piece of wood meticulously, starting with the 80-grit to remove imperfections and finishing with the 220-grit for a buttery-smooth surface that won’t snag delicate towel fibers or scratch your skin.
- Pre-drill pilot holes at every joint to prevent the wood from splitting, then assemble the frame using stainless steel screws which are resistant to rust and the corrosive effects of pool chemicals and salt air.
- Apply two coats of high-quality outdoor sealant or an oil-based stain, allowing at least 24 hours of drying time between coats to ensure the wood is fully protected against UV rays and moisture penetration.
- Mount heavy-duty brass hooks at the top for extra storage of swim bags or hats, and place the finished rack in a sunny spot with good airflow to ensure towels dry rapidly between uses.
How to Craft DIY Float Storage for a Budget Friendly Backyard
Why we love this
There is a unique satisfaction in creating a high-functioning organizational tool that looks like a million bucks but costs a fraction of that. We love this DIY float storage because it uses simple, clean lines to tackle one of the most awkward storage challenges in the home—the oversized pool toy. By utilizing clever materials like PVC or sleek netting, you can create a custom-sized corral that keeps your vibrant floats upright and accessible, turning what could be a messy pile into an organized, colorful display that celebrates the fun of summer.
Essential Elements:
- Furniture-grade PVC pipes or heavy-duty wooden dowels.
- PVC elbow and T-connectors (if using pipe).
- All-weather bungee netting or nylon cord.
- Zip ties or stainless steel eye hooks.
- Spray paint designed for plastic or wood in a chic neutral color (matte black or white).
How to make it
- Construct a rectangular base frame using your PVC pipes and corner connectors; ensure the base is wide enough to support the largest float you own without tipping over during a summer storm.
- Build four vertical corner pillars by attaching upright pipes to the base connectors, then connect them at the top with a secondary rectangular frame to create a sturdy, three-dimensional ‘cage’ structure.
- Spray paint the entire assembly with a high-quality outdoor paint; choosing a matte finish in a dark charcoal or a crisp white will instantly make the budget materials look like expensive custom-built hardware.
- Once dry, wrap the bungee netting around the sides of the frame and secure it tightly with zip ties; the netting should be taut enough to hold floats upright but flexible enough to stretch slightly when you’re pulling a large lounger out.
- Position the storage unit against a wall or fence and use the bungee cord to create a ‘top’ strap that keeps the floats from flying away on windy days, ensuring your backyard stays tidy regardless of the weather.
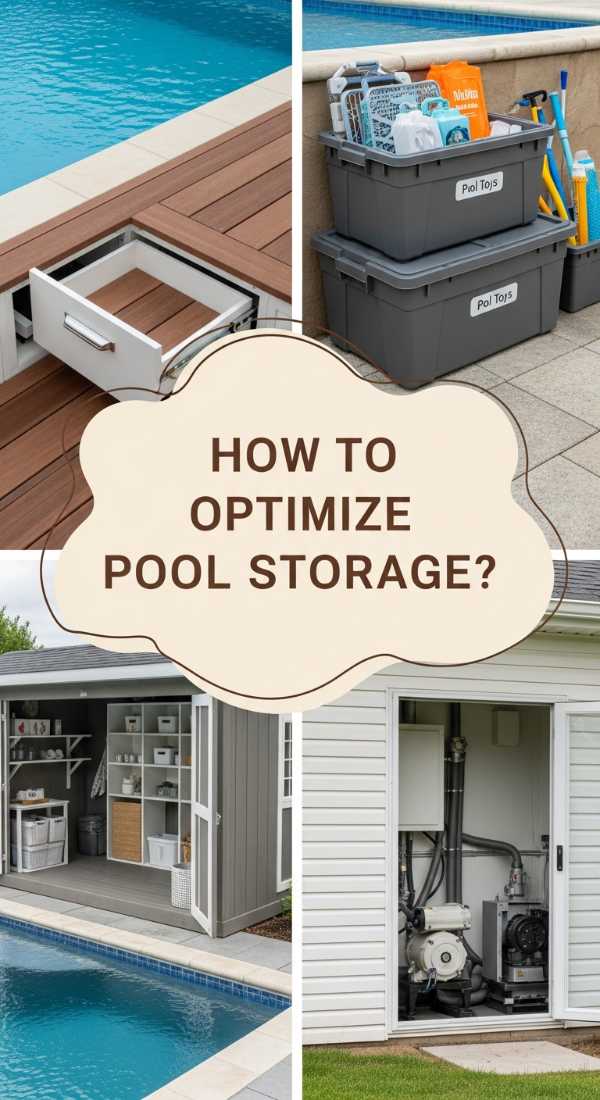
How to Master Pool Storage for an Effortless Entertaining Space
Why we love this
True luxury is the absence of stress, and nothing removes stress like a storage system that works perfectly when you’re hosting a crowd. We love the ‘master storage’ approach because it categorizes everything from goggles to sunscreen into intuitive zones, allowing the host to remain present with their guests rather than hunting for a spare pair of flip-flops. It’s about creating a flow where every guest knows exactly where to find what they need, fostering an atmosphere of effortless ease and thoughtful preparation that defines modern luxury living.
Essential Elements:
- Weatherproof storage benches or ‘deck boxes’ with hydraulic lids.
- Smaller clear acrylic bins for ‘like-with-like’ organization.
- Label maker with waterproof tape.
- Hooks for wet swimwear and bags.
- A dedicated ‘Sun Station’ tray for lotions and sprays.
How to make it
- Divide your outdoor storage into three distinct zones: the ‘Dry Zone’ for towels and clothing, the ‘Wet Zone’ for pool toys and floats, and the ‘Utility Zone’ for chemicals and maintenance tools, ensuring the utility zone is locked and away from children.
- Utilize clear, stackable acrylic bins inside your larger deck boxes to house smaller items like goggles, diving rings, and waterproof speakers; this prevents the ‘bottomless pit’ effect where items are lost under larger equipment.
- Create a ‘Sun Station’ by arranging luxury sunscreens, cooling mists, and bug sprays on a stylish stone or marble tray; this should be placed on a side table near the lounge area for easy guest access.
- Label the inside lip of your storage bins or drawers so that both family members and guests know where to return items, which maintains the system’s integrity throughout the season without constant supervision.
- Perform a weekly ‘edit’ where you discard empty lotion bottles, check for any tears in pool toys, and restock the towel bin to ensure the space is always in a state of ‘ready-to-host’ perfection.
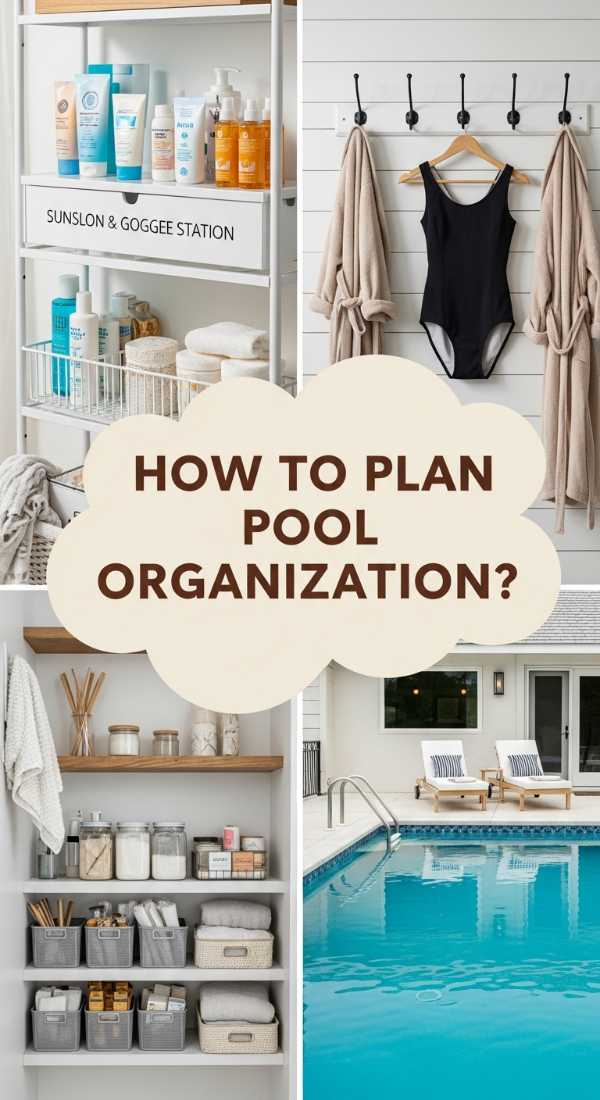
How to Achieve Total Pool Organization for Ultimate Weekend Relaxation

Why we love this
Weekend relaxation is a precious commodity, and it is best served in an environment that feels quiet and controlled. We love total pool organization because it eliminates the visual noise of the everyday—the stray sandal, the half-inflated ball, the tangled hose—leaving only the soothing sound of moving water and the rustle of palms. This level of organization creates a mental ‘off-switch,’ allowing you to fully submerge yourself in the luxury of your surroundings without the nagging feeling that there’s a mess to clean up later.
Essential Elements:
- Uniform storage containers in a single color palette.
- A hose reel (hidden or decorative).
- Vertical wall-mounted racks for skimmers and brushes.
- Outdoor rugs to define ‘zones’ of activity.
- A consistent cleaning schedule integrated into a digital planner.
How to make it
- Audit your entire poolside area and remove any items that aren’t used weekly; luxury is as much about what you take away as what you add, so aim for a minimalist, high-impact aesthetic.
- Install wall-mounted hangers on the side of the house or a fence to keep cleaning poles and skimmers off the ground; this protects the equipment from damage and keeps the walkway clear and safe for guests.
- Use outdoor area rugs to visually separate the dining area from the lounging area; this ‘zoning’ creates a sense of architectural order even in an open outdoor space, making it feel like a series of intentional rooms.
- Implement a ‘last-call’ routine every Sunday evening where you reset the storage bins, coil the hose, and wipe down the surfaces, ensuring that when you walk out next Saturday, you are greeted by a pristine oasis rather than a chore list.
- Choose a singular accent color for your storage bins and accessories—such as navy blue or sage green—to tie the various organizational elements together into a cohesive, professionally-designed look.
How to Paint a Lush Plant Mural for a Dreamy Statement Wall
Why we love this
A hand-painted mural is the ultimate expression of personal luxury, offering a bespoke piece of art that breathes life into an otherwise sterile wall. We love the botanical mural trend because it brings the vibrancy of the jungle indoors or to a patio, creating a perpetual summer vibe that never fades, even when the season turns. The interplay of deep forest greens and soft minty hues creates a backdrop that is both energetic and tranquil, turning a simple wall into a dreamy, immersive portal to nature that feels both sophisticated and deeply artistic.
Essential Elements:
- High-quality interior or exterior latex paint in a gradient of greens.
- A variety of brushes (flat for broad leaves, detail brushes for veins).
- A projector or chalk for sketching the design.
- Painter’s tape and drop cloths.
- A clear UV-resistant topcoat for outdoor murals.
How to make it
- Clean the wall surface thoroughly to remove any oils or dust, then apply a neutral base coat in an off-white or soft beige to ensure your botanical colors pop with maximum vibrancy and clarity.
- Sketch your design using a projector for precision, or freehand large, overlapping Monstera and Palm leaves with chalk; starting with the largest leaves in the background and layering smaller ones in the foreground creates a professional sense of depth.
- Mix your paint palette, creating at least four different shades of green; start by blocking in the base colors of the leaves using a flat brush, working from the top of the wall down to avoid drips and smudges.
- Add ‘dimension’ by using a darker shade for the shadows where leaves overlap and a lighter, lime-toned green for the highlights where the ‘sun’ would naturally hit the foliage, blending the edges slightly while the paint is wet for a soft, painterly look.
- Once the mural is completely dry, use a fine detail brush to add the delicate veins and stems in a deep charcoal or brown, then seal the entire work with a matte topcoat to protect the colors from fading and to make the wall easy to wipe clean.
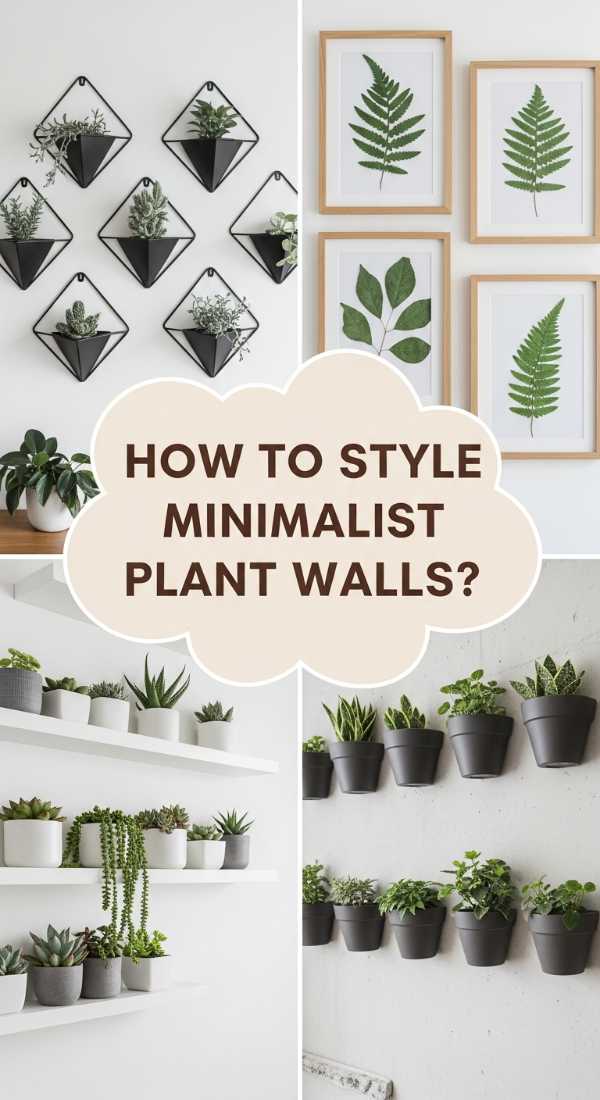
How to Curate a Minimalist Plant Gallery for a Modern Aesthetic
[IMAGE_10]
Why we love this
Minimalism isn’t about having nothing; it’s about having the *perfect* thing. We love a minimalist plant gallery because it treats every specimen like a piece of high art, allowing the unique silhouette of a single leaf or the elegant curve of a branch to take center stage. This approach creates a clean, architectural vibe that feels incredibly modern and spacious, offering a sense of ‘curated calm’ that is the hallmark of luxury living. It’s the perfect solution for those who want the freshness of greenery without the visual clutter of a dense indoor jungle.
Essential Elements:
- Identical, high-end planters (think matte white ceramic or raw concrete).
- Plants with strong, structural shapes (Snake Plants, Zamioculcas, or Ficus Lyrata).
- Floating shelves or thin-profile black metal pedestals.
- White space (at least 12-18 inches between each plant).
- Precision pruning shears to maintain shapes.
How to make it
- Select a limited palette for your containers; using the same material and color for every pot creates a ‘museum’ effect that unifies different plant species into a single, cohesive art installation.
- Choose plants with distinct, ‘graphic’ shapes—avoid messy or bushy varieties in favor of those with clear verticality or striking leaf patterns that look beautiful even from a distance.
- Space your plants generously on floating shelves or along a hallway; the ‘negative space’ between the pots is just as important as the plants themselves, as it allows the eye to rest and appreciate each individual specimen.
- Ensure each plant is perfectly centered in its pot and that the soil is covered with a uniform layer of white quartz pebbles or black lava rock to maintain the clean, monochromatic aesthetic that defines minimalism.
- Rotate your plants 90 degrees every week to ensure they receive even light and grow straight upward; this prevents them from leaning and maintains the architectural symmetry that is vital for a high-end minimalist look.
Conclusion: Embracing the Luxe Life
As the days grow longer and the air turns warm, your home should be your primary destination for rest and rejuvenation. By focusing on these luxury trends—from the intentional organization of your pool space to the artistic infusion of greenery—you are doing more than just decorating; you are designing a life that celebrates beauty and order. This summer, let your home be the cabana of your dreams, a place where every detail is a reflection of your commitment to living well. Whether you are hosting a grand sunset soirée or enjoying a quiet morning by the water, these elevated touches will ensure your season is nothing short of extraordinary.