

The 5-Minute Food Board That’s Taking Over TikTok
We’ve all been there—it’s 6:00 PM on a Tuesday, the sun is still high, and the last thing you want to do is stand over a hot stove for an hour. Enter the viral trend that has completely saved my summer sanity: the 5-minute food board. What started as a ‘girl dinner’ staple has evolved into a full-blown lifestyle movement, proving that you don’t need a culinary degree to create something that looks like it belongs in a high-end editorial. It’s about the art of the assembly, the vibrant colors of fresh produce, and the joy of picking and choosing exactly what you crave.
This aesthetic, effortless way of eating isn’t just about the photos; it’s about reclaiming your time during the most beautiful months of the year. Whether you’re hosting a backyard bash or just trying to feed the kids between pool sessions, these food board inspirations and summer recipes are designed to be quick, gorgeous, and absolutely delicious. Let’s dive into the viral ideas that are taking over our feeds and our kitchen counters this season!
7 Easy Summer Meals to Make Tonight (Step-by-Step Guide)

Why we love this
There is nothing quite like the sizzle of Zesty Lime Shrimp Tacos hitting a hot pan on a humid evening. This meal is a sensory explosion, combining the smoky aroma of charred corn with the bright, acidic burst of fresh lime juice and the cooling creaminess of sliced avocado. Every bite feels like a celebration of coastal living, offering a light yet deeply satisfying texture that won’t leave you feeling weighed down in the summer heat. It is the quintessential ‘quick win’ that looks incredibly impressive on a wooden serving board surrounded by extra lime wedges and cilantro.
Ingredients
- 1 lb Large shrimp, peeled and deveined
- 2 tbsp Olive oil
- 1 tbsp Chili powder
- 1 tsp Cumin
- Corn tortillas
- Fresh cilantro and lime wedges
- Shredded cabbage slaw
How to make it
- Pat the shrimp completely dry using paper towels; this is the secret to getting a perfect sear rather than steaming them. In a medium bowl, toss the shrimp with olive oil, chili powder, cumin, and a pinch of salt until evenly coated.
- Heat a large cast-iron skillet over medium-high heat until it begins to shimmer. Add the shrimp in a single layer, ensuring they aren’t crowded, which allows the edges to caramelize and turn a vibrant opaque pink. Cook for about 2 minutes per side.
- While the shrimp rest, char your corn tortillas directly over a low gas flame for 10-15 seconds per side using metal tongs. You’re looking for those beautiful blackened ‘leopard spots’ that add a smoky depth to the bread.
- Assemble the tacos by placing a generous heap of crunchy cabbage slaw at the base, followed by 3-4 shrimp, a slice of creamy avocado, and a heavy sprinkle of chopped cilantro. Serve immediately while the shrimp are still sizzling and the tortillas are warm.
5 Best Chicken Caesar Wraps Recipes for Lunch

Why we love this
The Parmesan-Crusted Chicken Caesar Wrap is the ultimate upgrade to a classic lunch staple. Imagine biting through a warm, toasted flour tortilla into a core of crisp, chilled romaine lettuce that has been tossed in a velvety, garlic-forward dressing. The addition of a golden-brown parmesan crust on the outside of the wrap adds a salty, nutty crunch that contrasts beautifully with the juicy, tender chicken inside. It’s the perfect portable meal for a picnic or a busy workday, offering a sophisticated blend of savory umami and refreshing greens.
Ingredients
- Large flour tortillas
- Cooked chicken breast, sliced
- Romaine lettuce, chopped
- Caesar dressing (high quality)
- Shredded parmesan cheese
- Croutons, crushed
How to make it
- In a large mixing bowl, combine the chopped romaine, sliced chicken, and crushed croutons. Drizzle with Caesar dressing and toss thoroughly until every leaf is glistening, but not soggy.
- Lay a tortilla flat and place a generous portion of the salad mixture in the center. Fold the sides in and roll tightly, ensuring the ends are tucked to prevent the filling from escaping.
- Sprinkle a thin layer of shredded parmesan cheese directly onto a non-stick skillet set over medium heat. Once the cheese begins to melt and bubble, place the wrap seam-side down directly onto the cheese.
- Press down lightly with a spatula for about 60 seconds until the cheese forms a golden, crispy crust that adheres to the tortilla. Carefully flip and repeat on the other side for a fully toasted, cheesy exterior.
10 Refreshing Summer Desserts You’ll Love

Why we love this
Nothing beats the heat quite like a Mango Chili-Lime Sorbet. This dessert is a vibrant masterpiece of contrasting flavors: the tropical, honey-like sweetness of ripe mangoes is sharpened by a zing of lime and finished with a playful kick of Tajin spice. The texture is incredibly silky and smooth, melting on the tongue like a frozen cloud of sunshine. It smells like a vacation in the tropics and provides an instant cooling sensation that makes it the perfect finale for any summer dinner party or food board spread.
Ingredients
- 3 cups Frozen mango chunks
- 1/4 cup Fresh lime juice
- 2 tbsp Honey or agave nectar
- 1/2 tsp Tajin seasoning
- Fresh mint for garnish
How to make it
- Place your frozen mango chunks into a high-powered blender or food processor. Let them sit at room temperature for about 5 minutes to soften slightly, which helps achieve a creamier consistency without adding too much liquid.
- Add the lime juice and honey to the blender. Pulse the mixture several times to break up the large chunks, then blend on high speed. Use a tamper or spatula to push the fruit down toward the blades as needed.
- Continue blending until the mixture is completely smooth and resembles a thick, soft-serve ice cream. If it’s too thick, add a teaspoon of water at a time until the blades move freely.
- Scoop the sorbet into chilled bowls or a hollowed-out mango skin for a viral-worthy presentation. Sprinkle generously with Tajin seasoning and garnish with a sprig of fresh mint before serving immediately.
8 Must-Have Picnic Side Dishes for Summer

Why we love this
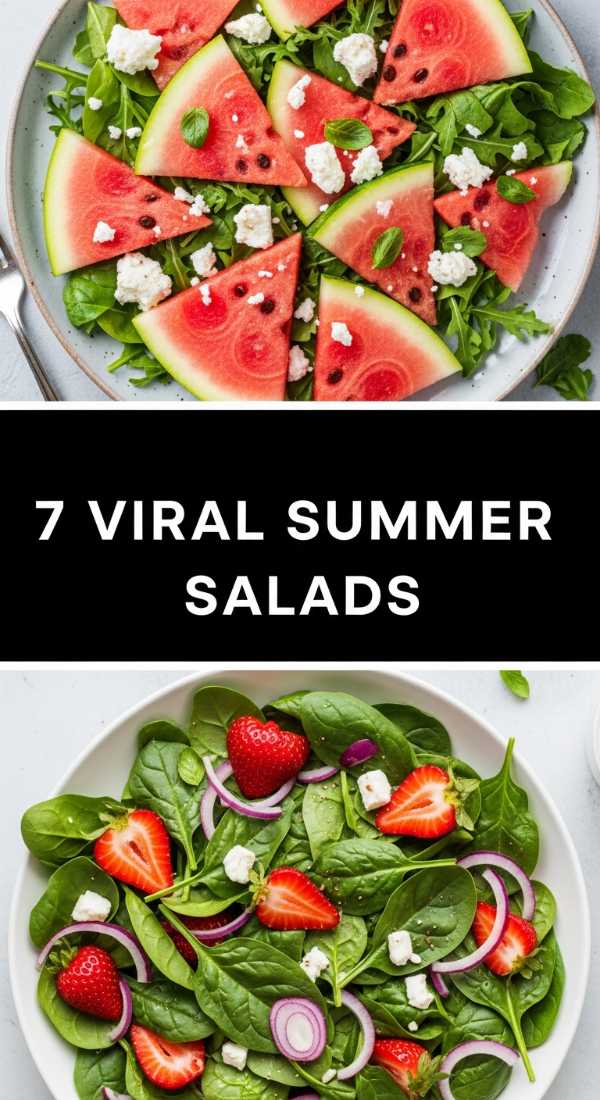
The Honey-Glazed Watermelon and Feta Salad is the side dish you didn’t know you needed. It’s a stunning visual addition to any picnic, featuring deep red cubes of juicy watermelon topped with snowy white crumbles of salty feta and bright green mint leaves. The aroma is incredibly fresh and herbaceous, while the flavor profile hits every note: sweet, salty, tangy, and cool. It’s a hydrating, refreshing dish that cleanses the palate and acts as the perfect companion to heavier grilled meats or sandwiches.
Ingredients
- 1 small Seedless watermelon, cubed
- 7 oz Feta cheese, crumbled
- 1/4 cup Fresh mint, julienned
- 2 tbsp Honey
- 1 tbsp Balsamic glaze
How to make it
- Start by cubing your watermelon into uniform 1-inch squares. For the best texture, ensure the watermelon has been thoroughly chilled in the refrigerator for at least 4 hours before slicing.
- Arrange the watermelon cubes on a large, flat platter rather than a deep bowl; this prevents the weight of the fruit from crushing the bottom pieces and releasing too much juice.
- Evenly distribute the crumbled feta cheese over the top. Use a high-quality sheep’s milk feta for a creamier texture and a more pronounced salty bite that stands up to the sweetness of the fruit.
- Whisk the honey with a tiny splash of warm water to loosen it, then drizzle it in a zigzag pattern over the salad. Finish with the balsamic glaze and a shower of fresh mint. Serve immediately to maintain the crispness of the watermelon.
6 Simple Summer Crockpot Recipes for Busy Days
Why we love this
Slow Cooker Hawaiian Pulled Pork is the ultimate ‘set it and forget it’ meal that brings the spirit of a luau to your kitchen without the heat of an oven. The pork shoulder becomes so tender it practically melts at the touch of a fork, infused with the sweet, tangy essence of pineapple juice and the deep, smoky notes of liquid smoke. The aroma that fills your home as it cooks is intoxicatingly sweet and savory, promising a rich, hearty meal that feels celebratory yet requires almost zero effort during those long, lazy summer afternoons.
Ingredients
- 3-4 lb Pork shoulder (butt)
- 1 cup Pineapple juice
- 1/4 cup Soy sauce
- 1 tbsp Liquid smoke
- 2 tsp Garlic powder
- Slider buns and pineapple rings for serving
How to make it
- Place the pork shoulder in the crockpot and rub all sides with garlic powder, salt, and pepper. If you have time, sear the meat in a hot pan for 3 minutes per side first to lock in the juices, though this is optional for a truly ‘simple’ day.
- Pour the pineapple juice, soy sauce, and liquid smoke over the meat. The liquid should come about a third of the way up the pork; do not submerge it entirely, as the meat will release its own juices during the cooking process.
- Cover and cook on the low setting for 8-10 hours. Low and slow is the only way to achieve that signature ‘fall-apart’ texture; cooking on high for a shorter time can result in tougher meat fibers.
- Once finished, remove the pork to a large bowl and shred using two forks. Discard any excess fat. Add a ladle of the cooking liquid back into the meat to keep it moist, then pile high on slider buns with a grilled pineapple ring.
7 Viral Summer Salad Recipes to Try Now
Why we love this
The Green Goddess Cabbage Salad took TikTok by storm for a reason: it is the ultimate crunchy, savory, and nutrient-dense dip masquerading as a salad. The texture is incredibly satisfying—a fine, confetti-like chop of cabbage and cucumbers that provides a consistent crunch in every spoonful. The dressing is a vibrant, creamy masterpiece of basil, spinach, and nuts, offering a deep herbaceous flavor that feels incredibly healthy yet indulgent. It’s best eaten with tortilla chips, making it the perfect ‘social’ salad for sharing with friends on a balcony.
Ingredients
- 1 small Green cabbage, finely diced
- 3 Persian cucumbers, finely diced
- 1 bunch Green onions, sliced
- Dressing: 1 cup Basil, 1 cup Spinach, 2 cloves Garlic, 1/4 cup Walnuts, 1/3 cup Olive oil, 2 tbsp Rice vinegar, Juice of 2 lemons
How to make it
- The key to this salad is the ‘micro-chop.’ Finely dice the cabbage, cucumbers, and green onions into pieces no larger than a pea. This ensures that every bite contains a perfect ratio of vegetable to dressing.
- In a high-speed blender, combine all the dressing ingredients: basil, spinach, garlic, walnuts, olive oil, vinegar, and lemon juice. Blend until completely smooth and a vibrant, bright green color is achieved.
- Pour the dressing over the chopped vegetables in a large mixing bowl. Use a large spoon to fold and massage the dressing into the cabbage; let it sit for at least 15 minutes before serving.
- The resting period is crucial as the acidity in the dressing slightly softens the cabbage while the flavors meld together. Serve as a dip with sturdy corn chips or as a topping for grilled fish.
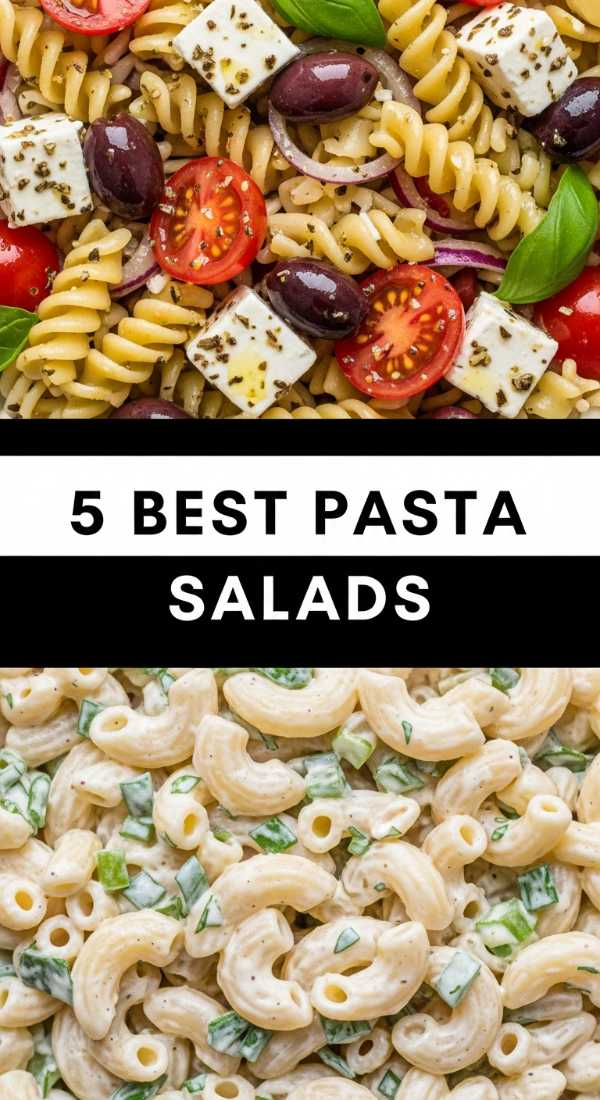
5 Best Summer Pasta Salads for Your Cookout

Why we love this
Lemon Herb Orzo with Roasted Asparagus is a sophisticated departure from the heavy, mayo-based pasta salads of the past. This dish is light, bright, and singing with the flavors of a summer garden. The al dente orzo pearls provide a delightful mouthfeel, while the tender-crisp asparagus and the bite of red onion add layers of complexity. It smells like fresh-cut herbs and sunshine, and because it tastes even better at room temperature, it is the perfect low-maintenance addition to a summer cookout board.
Ingredients
- 1 lb Orzo pasta
- 1 bunch Asparagus, trimmed and cut into 1-inch pieces
- 1/2 cup Feta cheese
- 1/4 cup Fresh dill and parsley, chopped
- Dressing: 1/3 cup Olive oil, Juice of 1 Lemon, 1 tsp Dijon mustard
How to make it
- Boil the orzo in a large pot of heavily salted water. To get the perfect texture, cook for 1 minute less than the package directions suggest; the pasta will continue to absorb the dressing as it cools.
- While the pasta cooks, toss the asparagus pieces in olive oil and roast at 400°F for 8-10 minutes. You want them to be vibrant green with just a hint of char on the tips.
- Whisk the olive oil, lemon juice, and Dijon mustard in a small jar until emulsified. This dressing is simple but provides the necessary bright acidity to lift the earthy flavor of the pasta.
- Drain the orzo and immediately toss with the dressing while the pasta is still warm. Add the roasted asparagus, fresh herbs, and feta. Gently fold everything together and chill for at least 30 minutes before serving.
9 Summer Grilling Recipes You Haven’t Tried Yet

Why we love this
Grilled Peach and Halloumi Skewers are a revelation for anyone who loves the combination of sweet and salty. When peaches hit the grill, their natural sugars caramelize, creating a jammy, honeyed texture that is perfectly balanced by the ‘squeaky,’ salty, and firm nature of Halloumi cheese. The smoke from the grill adds a sophisticated depth that elevates these simple ingredients into a gourmet appetizer. It’s a visually stunning dish that looks incredible on a platter, garnished with a drizzle of balsamic and a few mint leaves.
Ingredients
- 3 ripe but firm Peaches, sliced into wedges
- 8 oz Halloumi cheese, cubed
- Fresh mint leaves
- Balsamic glaze
- Wooden skewers (soaked in water for 30 mins)
How to make it
- Alternate threading the peach wedges and Halloumi cubes onto your pre-soaked skewers. Ensure the flat sides of the peaches and cheese are facing the same way to maximize contact with the grill grates.
- Preheat your grill to medium-high heat. Lightly brush the grates with oil to prevent the Halloumi—which can be a bit sticky—from clinging to the metal.
- Place the skewers on the grill and cook for 2-3 minutes per side. Do not move them too early; you want to wait until distinct grill marks form and the Halloumi develops a golden, crispy exterior.
- Remove from the heat once the peaches are softened and the cheese is warm and slightly gooey. Transfer to a board, drizzle with balsamic glaze, and scatter fresh mint over the top for a pop of color and aroma.
10 Easy Summer Cocktail Ideas for Your Party
Why we love this
The Sparkling Strawberry Elderflower Spritz is the liquid embodiment of a summer afternoon. It’s light, effervescent, and incredibly floral, thanks to the delicate notes of elderflower liqueur. The muddled strawberries add a natural, berry-sweetness and a beautiful blush-pink hue that looks stunning in a wine glass. It’s the kind of drink that makes any occasion feel special, offering a crisp, refreshing finish that isn’t overly sugary, making it dangerously easy to sip while lounging by the pool.
Ingredients
- 2 oz Elderflower liqueur (like St-Germain)
- 3 oz Prosecco, chilled
- 1 oz Club soda
- 3 Fresh strawberries, hulled
- Mint sprig and lemon slice for garnish
How to make it
- In the bottom of a wine glass or a cocktail shaker, muddle the fresh strawberries until they are broken down and have released their juices. If you prefer a clear drink, strain this pulp; for a rustic ‘TikTok’ look, keep the fruit in.
- Fill the glass to the brim with large ice cubes. The more ice you use, the slower it melts, keeping your drink cold without diluting the flavor.
- Pour in the elderflower liqueur, followed by the chilled Prosecco. Using a long bar spoon, gently stir from the bottom once to incorporate the flavors without popping too many of the bubbles.
- Top with a splash of club soda for extra fizz. Garnish with a fresh strawberry on the rim, a lemon wheel, and a slapped sprig of mint (slapping the mint releases the essential oils for a better aroma).
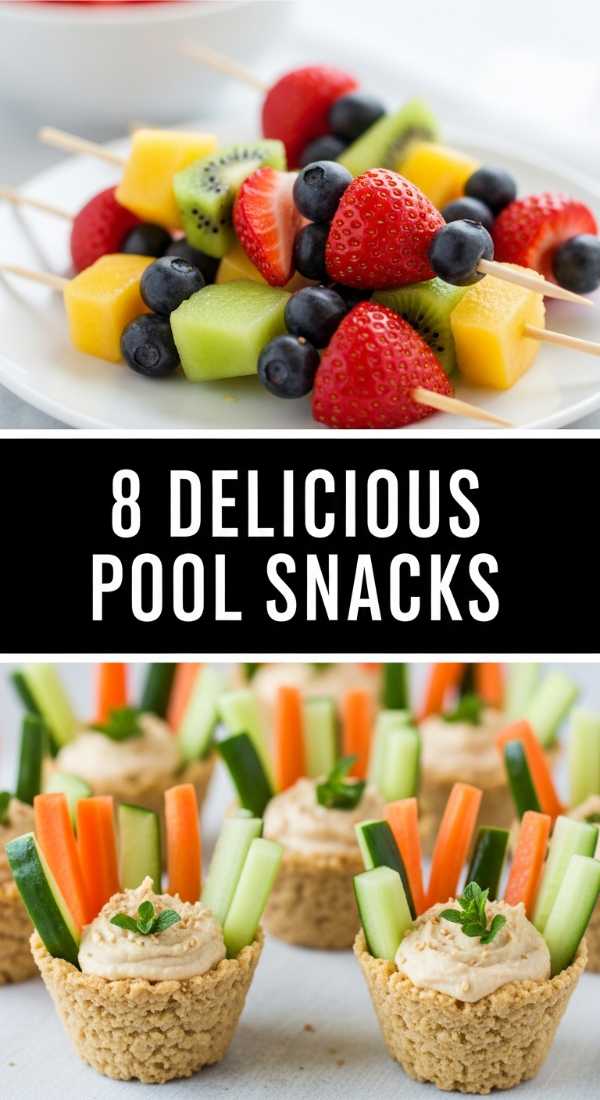
8 Delicious Healthy Pool Snacks for Kids
[IMAGE_10]
Why we love this
Frozen Yogurt Berry Bark is the ‘coolest’ way to keep kids hydrated and happy during a pool day. This snack is a textural delight, offering the satisfying snap of frozen yogurt followed by the icy, tart burst of blueberries and raspberries. It’s a healthy alternative to ice cream that looks like a work of art, with vibrant red and blue fruits popping against a creamy white background. It’s easy for little hands to grab and eat on the go, making it the ultimate mess-free summer treat.
Ingredients
- 2 cups Greek yogurt (plain or vanilla)
- 2 tbsp Honey or maple syrup
- 1 cup Mixed berries (blueberries, raspberries, sliced strawberries)
- 1/4 cup Granola or shredded coconut
How to make it
- Line a large rimmed baking sheet with parchment paper. In a small bowl, whisk together the Greek yogurt and honey until smooth and well-combined.
- Pour the yogurt onto the parchment paper and use an offset spatula to spread it into an even layer, about 1/4 inch thick. Don’t go too thin, or it will shatter too easily; too thick, and it will be hard to bite.
- Scatter the mixed berries and granola evenly over the surface. Gently press the berries into the yogurt with the back of a spoon to ensure they are anchored in place.
- Freeze for at least 3-4 hours, or until the yogurt is rock-solid. Once frozen, lift the parchment paper and break the bark into large, irregular shards. Serve immediately in a chilled bowl, as it melts quickly in the sun!
Conclusion
The beauty of the 5-minute food board and these seasonal recipes lies in their flexibility. Summer is a time for connection, relaxation, and savoring the abundance of fresh ingredients available to us. By focusing on assembly, vibrant colors, and simple techniques, you can create memorable meals that look as good as they taste without spending your whole day in the kitchen. So, grab a board, pick a recipe, and start enjoying the flavor of summer!