
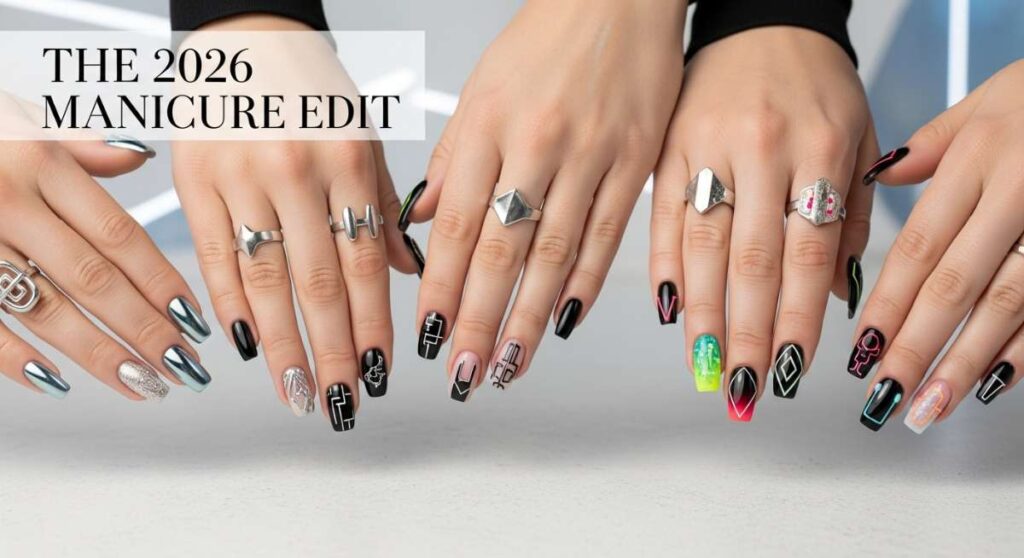
The 2026 Manicure Edit: Bold Designs You’ll Be Wearing in the Future
Hello, my loves! Can you feel it? There’s a new energy in the air, a soft whisper of the future that’s calling us to express ourselves in ways we’ve never dared before. As we look toward 2026, our nails aren’t just an accessory; they are a canvas for our dreams, a tiny sanctuary of self-care that we carry with us every single day. I’ve spent months dreaming up these trends, and honestly, sharing them with you feels like a warm, cloud-soft embrace.
In this fast-paced world, taking twenty minutes to sit with your favorite polish is a radical act of love. Whether you’re celebrating a massive milestone or just want to feel the glow of a sunset on your fingertips, these designs are meant to make you feel seen, held, and absolutely beautiful. Let’s dive into the future together, shall we?
7 Steps to Style Your Dreamy Graduation Nails

Why to love this Design:
Graduation is such a soul-stirring moment of transition, my loves. These nails are designed to reflect that shimmering bridge between who you were and who you are becoming—elegant, sophisticated, but with a touch of celebratory sparkle that catches the light as you reach for that diploma.
Essential Elements:
- Sheer milky white base
- Gold leaf flakes or fine micro-shimmer
- Precision detailing brush
- High-shine gel top coat
How to Prepare:
- Cleanse your nail beds thoroughly to ensure a smooth, long-lasting bond.
- Shape your nails into a soft almond or oval to elongate the fingers.
- Apply a thin layer of a strengthening base coat.
- Layer two coats of a milky, translucent white for that ‘cloud’ effect.
- Use tweezers to delicately place gold leaf near the cuticle or the free edge.
- Seal with a thick, glossy top coat to protect your hard work.
- Finish with a drop of lavender cuticle oil for a calming scent during your big day.
Budget Range
- Essie Hard to Resist Nail Strengthener ($11)
- OPI Funny Bunny Polish ($12)
- Generic Gold Leaf Foil Flakes ($6)
4 Ways to Master Sunset Chrome Nails
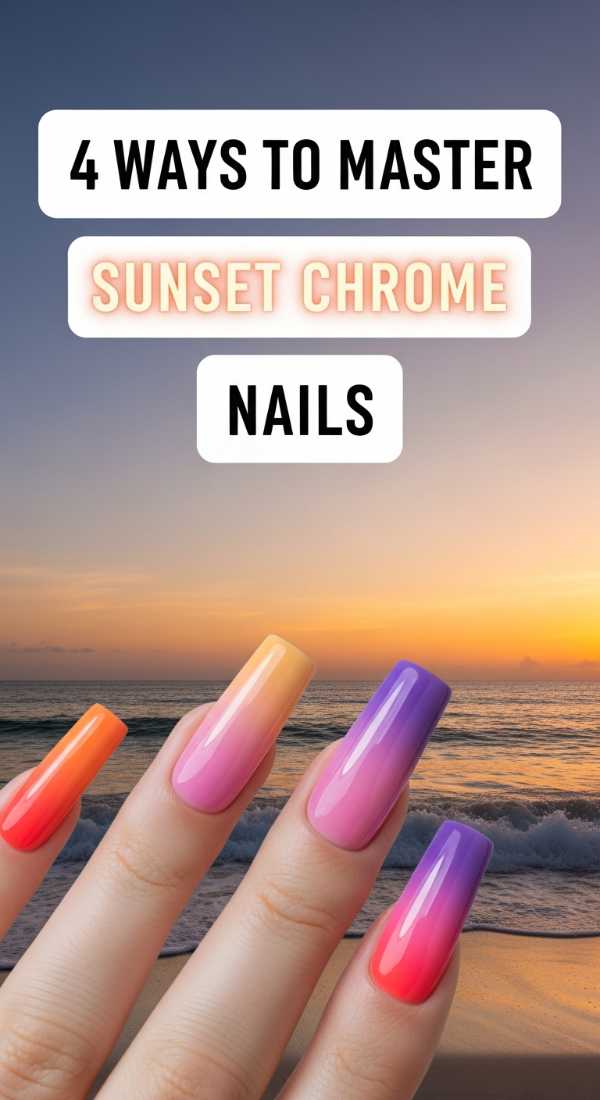
Why to love this Design:
Imagine the sky at 8:00 PM on a warm July evening—that perfect melt of apricot, violet, and gold. Sunset chrome brings that ethereal magic to your hands, giving you a futuristic glow that feels both high-tech and deeply organic.
Essential Elements:
- Orange and pink gel polishes
- Fine-grade iridescent chrome powder
- Sponge applicator
- No-wipe top coat
How to Prepare:
- Create a vertical gradient by sponging bright orange and soft magenta side-by-side.
- Cure the gradient and apply a ‘no-wipe’ top coat specifically designed for chrome.
- Buff the iridescent powder into the nail until it mirrors the sky.
- Seal the mirror finish with a final layer of high-gloss gel.
Budget Range
- Artdone Chrome Nail Powder Set ($15)
- Modelones Sunset Gel Polish Trio ($14)
- UV LED Nail Lamp ($25)
5 Hacks for Neon Yellow Nails Designs
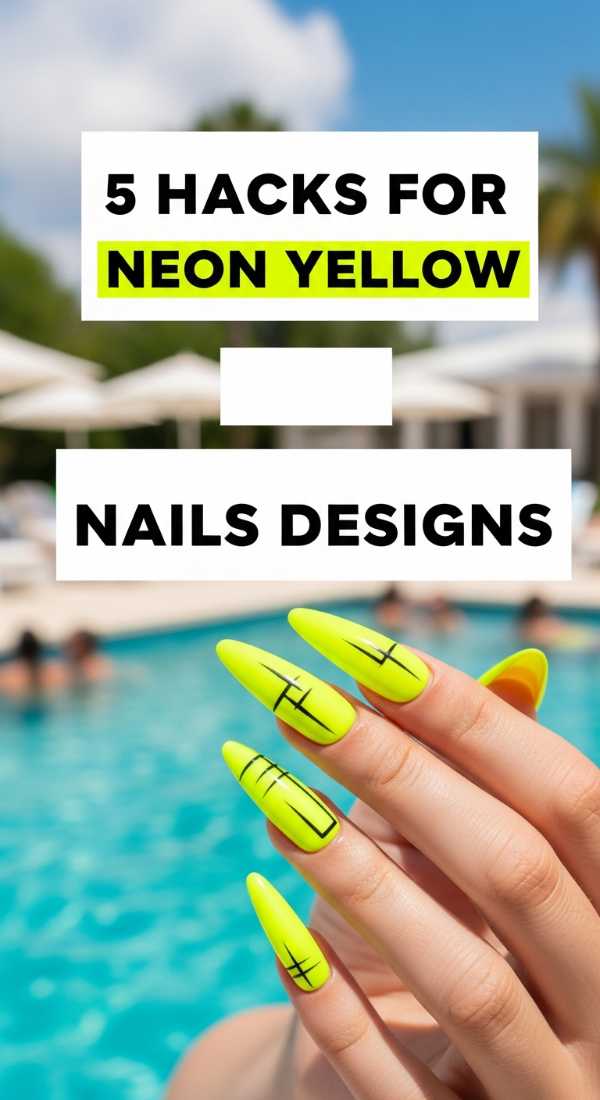
Why to love this Design:
Neon yellow is the ultimate dopamine hit! In 2026, we’re moving away from ‘construction vest’ yellow and toward a ‘cyber-lime’ glow. It’s energetic, fearless, and reminds us to find the joy in every little moment.
Essential Elements:
- White base polish (to make the neon pop)
- Matte top coat (for a modern twist)
- Neon pigment or high-vis polish
How to Prepare:
- Always start with a white base coat; it acts like a literal lightbulb under your neon.
- Apply the neon in thin, even layers to avoid streakiness.
- Try a matte top coat to give the bright color a sophisticated, velvet-like finish.
- Add a single ‘cyber-line’ of silver chrome for a futuristic edge.
- Use a clean-up brush dipped in acetone for crisp, perfect edges around the cuticle.
Budget Range
- Orly Neon Heat Polish ($12)
- Holler and Glow Neon Pigments ($8)
- Beetles Matte Top Coat ($7)
3 Tips for Summer Goth Nails
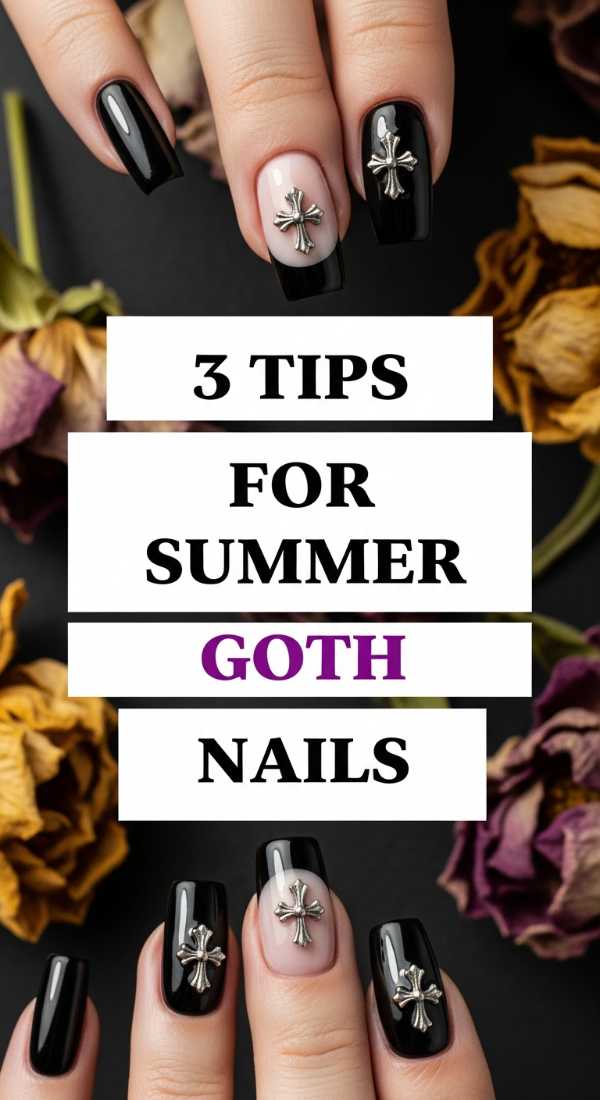
Why to love this Design:
Who says dark colors are only for winter? Summer Goth is all about moodiness under the sun. It’s for my loves who find beauty in the shadows even when the weather is bright—think sheer blacks and ‘oil slick’ finishes.
Essential Elements:
- Sheer black ‘jelly’ polish
- Star and moon decals
- Ultra-glossy finish
How to Prepare:
- Use a ‘jelly’ black polish rather than a solid creme to keep the look light and airy.
- Accent one or two nails with tiny silver stars to mimic a summer midnight sky.
- Keep the nail shape short and square for a ‘clean girl goth’ aesthetic.
Budget Range
- Cirque Colors Spotted Black Polish ($14)
- Lights Lacquer Starry Decals ($7)
- Seche Vite Dry Fast Top Coat ($10)
12 Ideas for May Birthday Nails
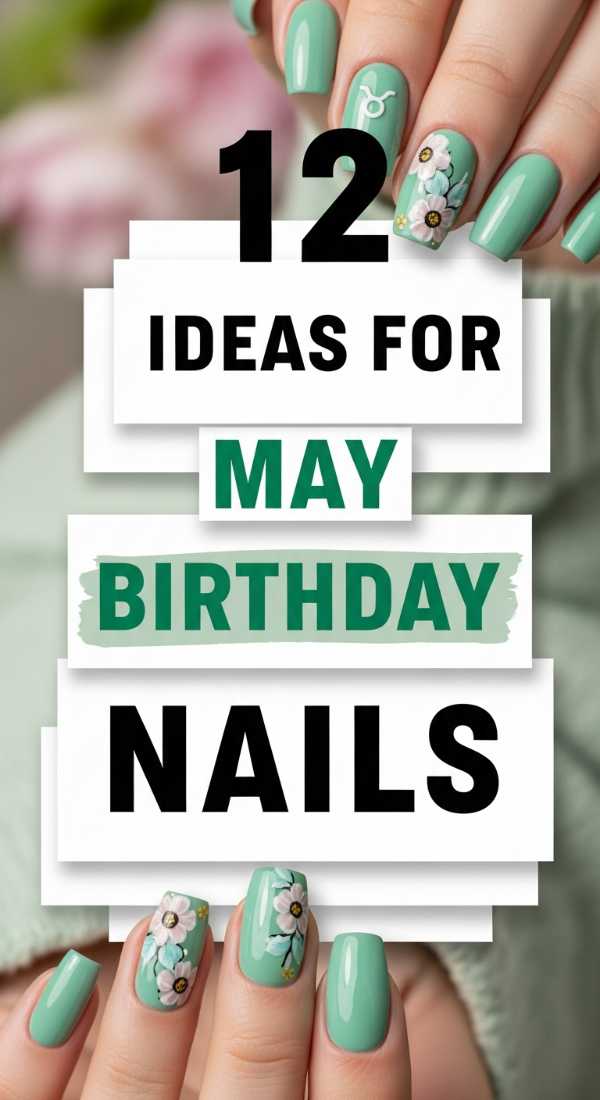
Why to love this Design:
May is the heart of spring, loves. It’s all about the emerald birthstone and the blooming of lily of the valley. These designs celebrate growth, fertility, and the lush green world waking up around us.
Essential Elements:
- Emerald green chrome
- Dried pressed flowers
- Nail glue
- Gold wire accents
How to Prepare:
- Deep emerald French tips.
- Pressed daisy accents on a nude base.
- Emerald marble with gold leaf veins.
- Soft sage green matte finish.
- Tiny 3D resin butterflies.
- Birthstone ‘jewel’ stones at the base of each nail.
- Negative space floral patterns.
- Iridescent ‘dewdrop’ clear gel droplets.
- Glitter ombre in shades of moss.
- Hand-painted lily of the valley.
- Gold-lined half moons.
- Velvet magnetic green finish.
Budget Range
- ILNP Reminisce Ultra Chrome Green ($12.50)
- Pressed Flower Nail Kit ($9)
- Makartt Nail Rhinestone Glue ($8)
5 Techniques for Pucci Nails
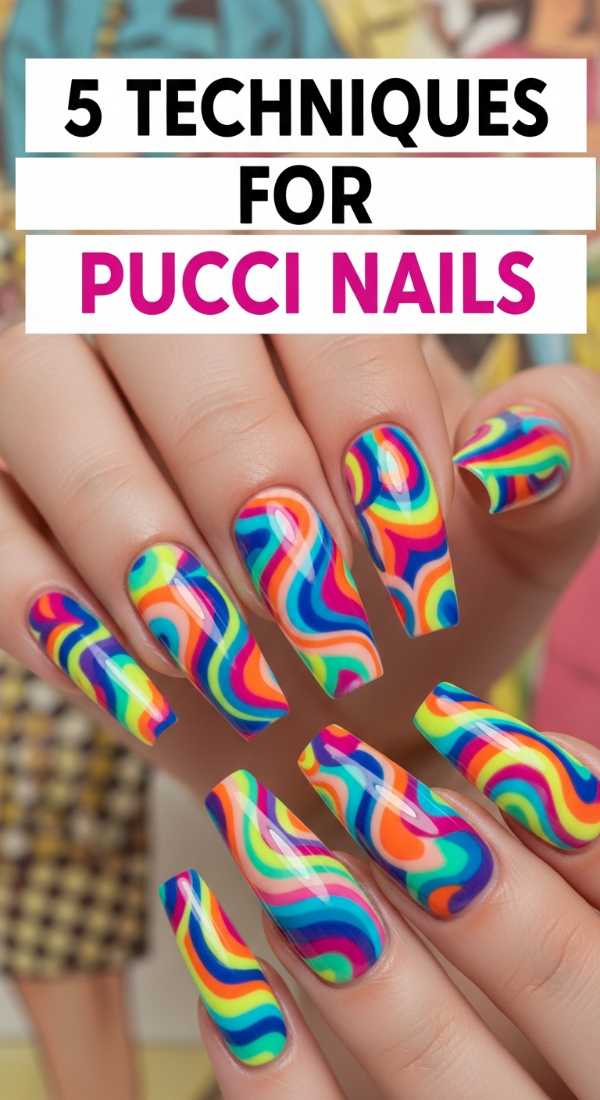
Why to love this Design:
The 1960s are calling, but we’re answering from 2026! Pucci-inspired swirls are all about fluid movement and bold, unexpected color combinations. They feel like a vacation in the Italian Riviera, wrapped in a futuristic hug.
Essential Elements:
- Long striping brush
- 4-5 contrasting pastel and bold colors
- Steady hand (or a bracing surface!)
How to Prepare:
- Sketch your swirl pattern on paper first to visualize the flow.
- Apply your lightest color as the background base.
- Use a long-haired liner brush to drag ‘ribbons’ of color across the nail.
- Keep colors separated with thin white or black ‘contour’ lines.
- Flash-cure between colors to prevent the swirls from bleeding into each other.
Budget Range
- Winstonia Professional Nail Art Brushes ($12)
- Revel Nail Dip Powder/Polish in Bold Tones ($15)
- Sally Hansen Insta-Dri Colors ($6 each)
4 Secrets for Hands and Toes Nails Matching
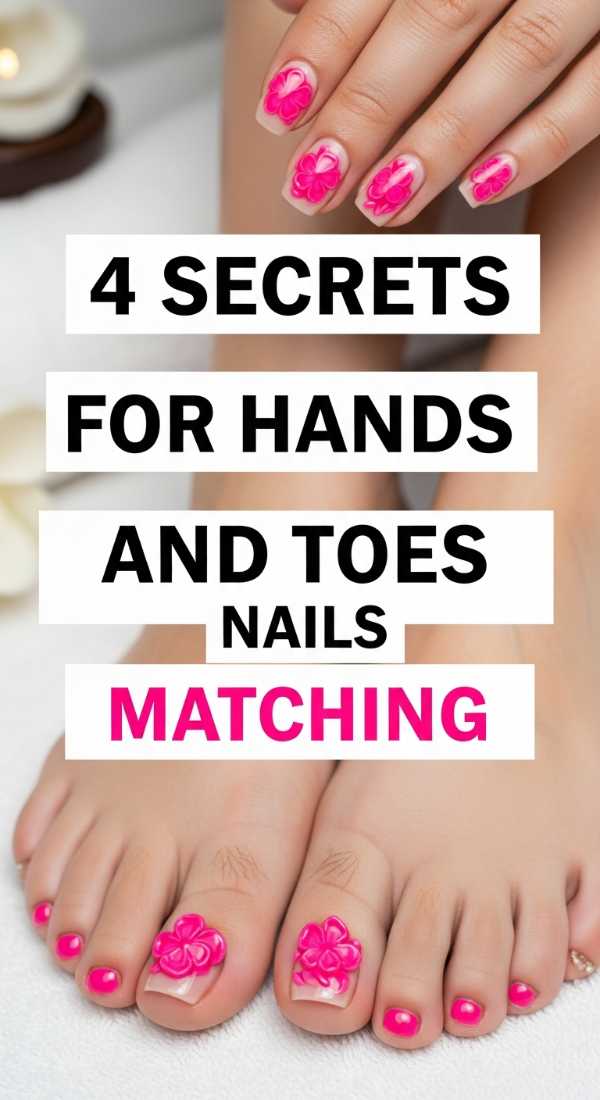
Why to love this Design:
In 2026, we’re moving past identical matching. It’s all about ‘sister, not twin’ energy. Coordinating your mani and pedi creates a cohesive look that feels intentional, polished, and oh-so-chic.
Essential Elements:
- Complementary color palette
- Shared texture (like both being matte)
- A ‘bridging’ accent nail
How to Prepare:
- Pick a ‘hero’ color for your hands and use its metallic or glitter version for your toes.
- Use the same nail art motif (like a tiny dot) on the thumb and the big toe only.
- Keep the intensity similar—pair pastels with pastels, or neons with neons.
- Always use the same top coat finish (glossy or matte) to tie the two together.
Budget Range
- Zoya Professional Lacquer Duo ($20)
- Butter London Patent Shine 10X ($18)
- Deborah Lippmann Gel Lab Pro ($20)
8 Steps to Paint Lemon and Blue Nails
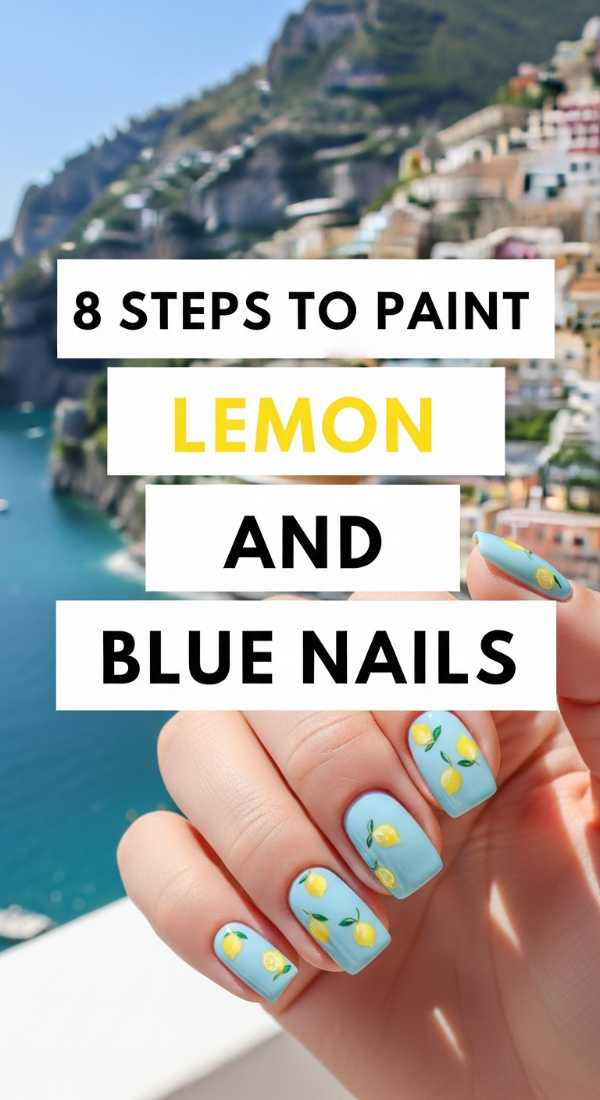
Why to love this Design:
This is the ‘Amalfi Coast’ aesthetic, loves. The sharp, zesty yellow of a lemon against the deep, ceramic blue of the Mediterranean. It’s classic, refreshing, and absolutely timeless.
Essential Elements:
- Cobalt blue polish
- Citrus yellow polish
- Fine detail brush for leaves
- White base for ceramic patterns
How to Prepare:
- Paint your thumb and pinky in a solid, deep cobalt blue.
- On the middle nails, apply a crisp white base.
- Use a dotting tool to create small yellow circles (the lemons).
- Add tiny green ‘leaves’ using a toothpick or fine brush.
- Incorporate ’tile’ patterns with blue lines around the lemons.
- Add a tiny touch of gold glitter to the center of the lemons for a 2026 twist.
- Top with a ceramic-effect top coat.
- Massage in lemon-scented balm to complete the sensory experience.
Budget Range
- Kiko Milano Smart Nail Lacquer in Cobalt ($6)
- Holo Taco Lemon Sucker ($14)
- Nail Art Dotting Tool Set ($5)
5 Ways to Rock Teal Western Nails
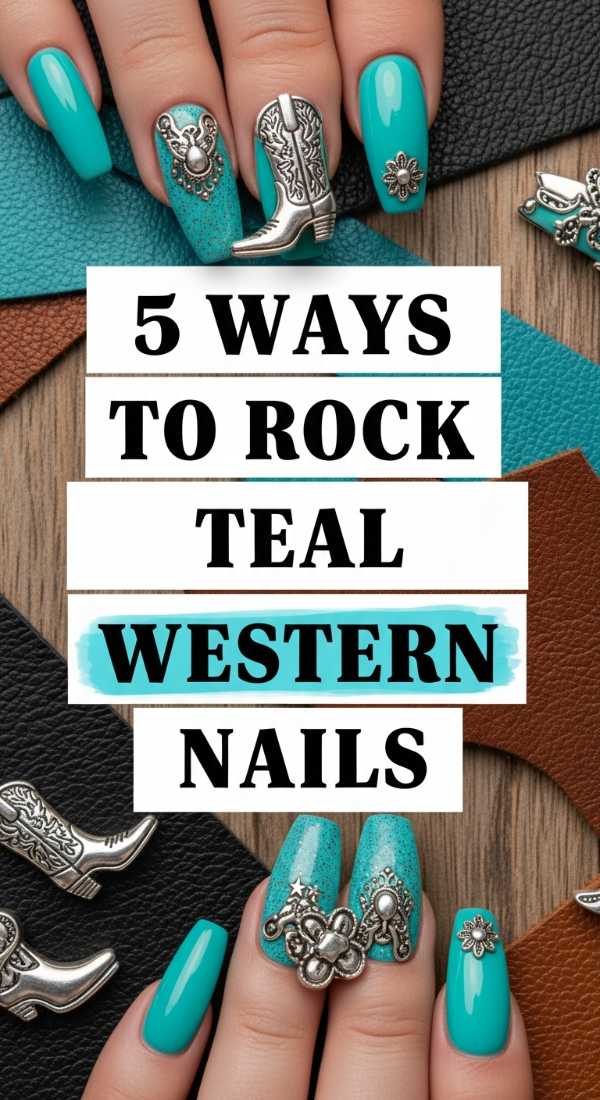
Why to love this Design:
Cowgirl core is evolving! We’re taking that rugged, western spirit and dipping it in shades of turquoise and teal. It feels earthy but expensive—the kind of nails you’d wear to a high-fashion rodeo in the future.
Essential Elements:
- Teal turquoise polish
- Silver metallic liner
- Marble tint
How to Prepare:
- Apply a ‘turquoise stone’ effect by swirling teal with drops of black and gold.
- Use silver chrome polish to create ‘belt buckle’ inspired accents.
- Try a cow-print accent nail but in teal and white instead of black and white.
- Add a matte top coat to simulate the texture of suede.
- Apply a tiny turquoise stud or rhinestone at the base of the nail.
Budget Range
- Cirque Colors Turquoise Jelly ($14)
- Maniology Western Stamp Plate ($9)
- DND Teal We Meet Again Gel ($12)
Embracing Your Future Self
My loves, as we look at these designs, remember that the most beautiful thing you can wear is your own confidence. 2026 is going to be a year of bold choices and soft landings. Whether you choose the electric hum of neon yellow or the quiet grace of a graduation milky-white, know that your hands are a reflection of your journey. Take this time for yourself—you deserve every second of this colorful, beautiful life. I can’t wait to see which look you choose!