

The 10-Minute Viral Food Board That’s Taking Over the Internet
We’ve all been there—the sun is setting, the kids are hungry, or you’ve just walked through the door after a long day at the office, and the last thing you want to do is spend an hour hovering over a hot stove. But then, you see it: that perfectly curated, colorful food board on your feed that looks like it was plucked straight from a professional kitchen. It’s the kind of meal that invites everyone to gather around, grab a fork, and dive into a tapestry of flavors, making dinner feel like an event rather than a chore.
Today, I’m showing you how to recreate that viral magic with a board that looks high-end but is secretly incredibly simple to pull together. This isn’t just about feeding your family; it’s about reclaiming your evening and finding joy in the textures and aromas of fresh, home-cooked components. Let’s break down the ten essential elements that will turn your wooden board into a viral masterpiece that tastes even better than it looks.
How to prep garlic chicken?
Why we love this
There is nothing quite as comforting as the scent of garlic hitting a hot pan filled with golden butter. This garlic chicken is the ultimate crowd-pleaser because it balances a crispy, savory exterior with a succulent, juicy center that practically melts in your mouth. As you bite into a piece, you’re met with a burst of aromatic herbs and the mellow, nutty sweetness of toasted garlic, making it the perfect protein anchor for your food board. It’s simple, rustic, and evokes the feeling of a cozy bistro dinner right in your own kitchen.
Ingredients
- 2 lbs boneless, skinless chicken breasts or thighs, cut into bite-sized cubes
- 6 cloves of fresh garlic, minced finely
- 3 tbsp salted butter
- 1 tbsp olive oil
- 1 tsp dried oregano
- Salt and cracked black pepper to taste
- Fresh parsley for garnish
How to make it
- Begin by patting your chicken cubes completely dry with paper towels; this is the secret to getting a golden-brown sear rather than steaming the meat.
- Season the chicken generously with salt, pepper, and oregano in a large bowl, tossing to ensure every piece is evenly coated.
- Heat a large cast-iron skillet over medium-high heat and add the olive oil and 1 tablespoon of butter. Once the butter is foaming, add the chicken in a single layer, making sure not to crowd the pan (cook in batches if necessary).
- Let the chicken sear undisturbed for 3-4 minutes until a deep golden crust forms, then flip and cook for another 2 minutes.
- Lower the heat to medium and add the remaining 2 tablespoons of butter and the minced garlic. Stir constantly for about 1 minute, spooning the melted garlic butter over the chicken until the garlic is fragrant and golden but not burnt.
- Remove from heat immediately and garnish with fresh parsley before transferring to your board.
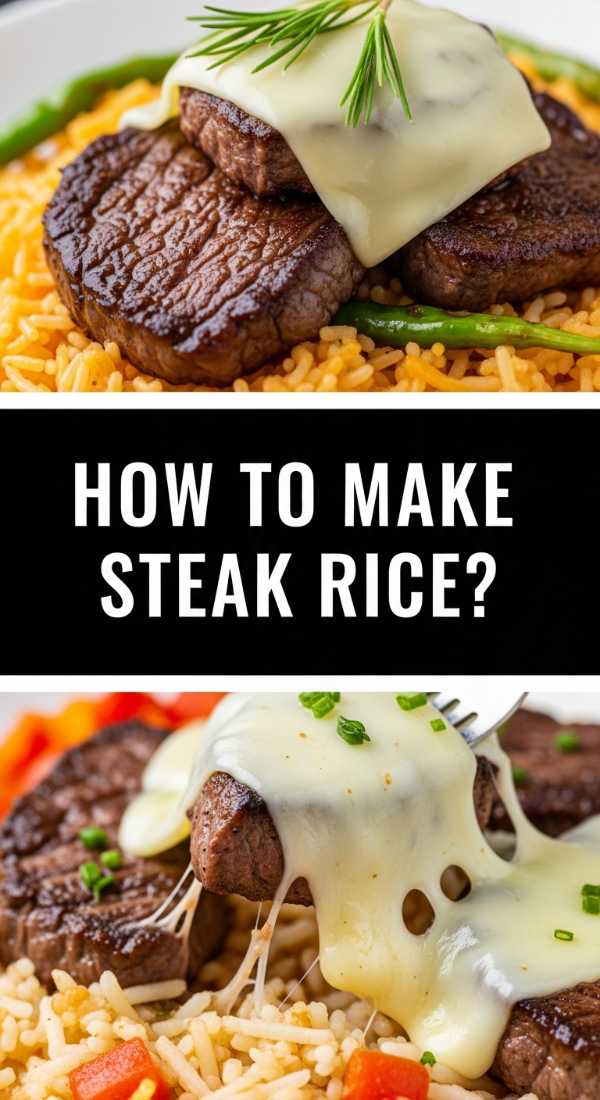
How to make steak rice?

Why we love this
Steak rice is the ultimate fusion of luxury and comfort, combining the deep, umami richness of perfectly seared beef with the fluffy, soaking power of aromatic grains. Imagine the juices from the steak trickling down into a bed of warm rice, infusing every bite with a savory depth that feels incredibly indulgent. The texture contrast between the tender, medium-rare steak and the soft, light rice creates a satisfying mouthfeel that keeps you coming back for more. It’s a hearty, grounding addition to your board that looks stunning when garnished with bright green scallions.
Ingredients
- 1 lb flank steak or ribeye, thinly sliced against the grain
- 2 cups cooked long-grain white rice (jasmine or basmati)
- 2 tbsp soy sauce
- 1 tbsp sesame oil
- 1 tsp grated ginger
- 2 green onions, sliced
- 1 tsp sesame seeds
How to make it
- Start with cold, leftover rice or freshly cooked rice that has been spread out on a tray to cool slightly; this prevents it from becoming mushy when mixed.
- In a small bowl, whisk together the soy sauce, sesame oil, and grated ginger to create a quick savory glaze.
- Heat a heavy skillet or wok over very high heat until it’s nearly smoking, then add a splash of high-smoke-point oil.
- Flash-sear the steak strips for just 60-90 seconds per side. You want a dark char on the outside while keeping the inside tender and pink. Remove the steak from the pan and let it rest on a plate.
- In the same pan, add the rice and the soy-ginger mixture. Toss rapidly over high heat for 2-3 minutes, scraping up any browned bits from the steak.
- Fold the steak and its resting juices back into the rice, garnish with green onions and sesame seeds, and serve warm.
How to cook crispy potatoes?
Why we love this
Is there anything more universally adored than a perfectly crispy potato? These little golden nuggets are the stars of the board, offering a shatteringly crisp outer shell that gives way to a fluffy, cloud-like interior. The sound of the crunch alone is enough to make your mouth water, and when they are tossed in flaky sea salt and rosemary, the aroma is simply intoxicating. They add a vital structural element to the meal, providing a satisfying salty snap that complements the softer proteins and vegetables beautifully.
Ingredients
- 1.5 lbs Yukon Gold potatoes, chopped into 1-inch chunks
- 1/4 cup extra virgin olive oil
- 1 tsp garlic powder
- 1 tbsp chopped fresh rosemary
- 1 tsp flaky sea salt
- 1/2 tsp black pepper
How to make it
- Place the potato chunks in a large pot of cold, salted water and bring to a boil. Simmer for about 8-10 minutes until the edges are just soft but the potatoes aren’t falling apart.
- Drain the potatoes and let them steam-dry in the colander for 2 minutes. Give them a vigorous shake to roughen up the edges; those fuzzy bits will turn into the crispiest parts.
- Preheat your oven to 425°F (220°C) and place a large baking sheet inside to get hot.
- In a bowl, toss the parboiled potatoes with olive oil, garlic powder, salt, and pepper until well coated.
- Carefully spread the potatoes onto the hot baking sheet in a single layer. Roast for 25-30 minutes, flipping halfway through, until they are deep golden brown and audibly crunchy.
- Toss with fresh rosemary immediately upon removing from the oven while the oil is still sizzling.
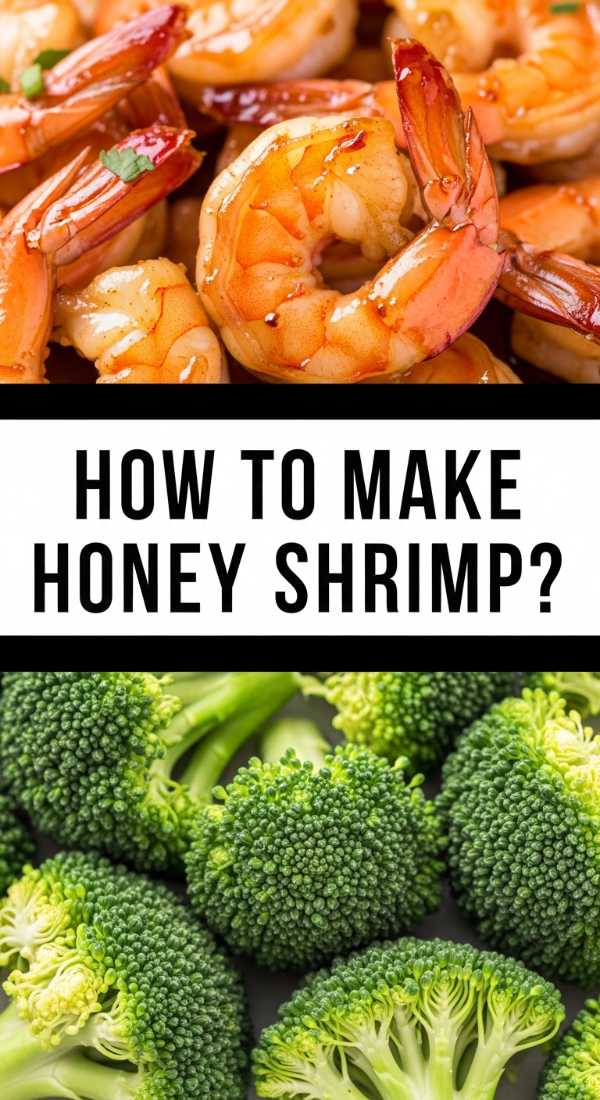
How to make honey shrimp?

Why we love this
Honey shrimp brings a delightful touch of sweetness and a glossy, lacquered finish to your viral food board. The shrimp are succulent and snappy, coated in a sticky glaze that balances the floral notes of honey with a sharp tang of citrus. As they caramelize in the pan, they develop beautiful charred edges that add a subtle smokiness to the flavor profile. It’s a light yet flavor-packed addition that offers a bright, oceanic contrast to the heavier meat dishes, making the entire board feel balanced and fresh.
Ingredients
- 1 lb large shrimp, peeled and deveined
- 3 tbsp honey
- 2 tbsp soy sauce
- 1 tbsp fresh lemon juice
- 1 tsp minced garlic
- 1/4 tsp red pepper flakes
- Fresh cilantro for garnish
How to make it
- In a small bowl, whisk together the honey, soy sauce, lemon juice, garlic, and red pepper flakes until the honey is fully incorporated.
- Pat the shrimp dry with a paper towel to ensure the glaze sticks properly and the shrimp sear instead of steaming.
- Heat a large non-stick skillet over medium-high heat with a tablespoon of oil. Add the shrimp in a single layer, making sure they don’t touch.
- Sear the shrimp for 2 minutes on one side until they turn pink and opaque. Flip them over and cook for another minute.
- Pour the honey mixture into the pan. It will bubble vigorously. Continue to cook for 1-2 minutes, tossing the shrimp constantly, until the sauce thickens into a sticky glaze that coats every shrimp.
- Remove from heat before the honey burns, garnish with cilantro, and arrange them neatly on your board.
How to prep baked salmon?
Why we love this
Baked salmon is the epitome of effortless elegance. When prepared correctly, the fish is incredibly tender, flaking apart at the mere suggestion of a fork to reveal a rich, buttery interior. The vibrant pink hue of the salmon adds a stunning pop of color to your board, while the bright zest of lemon and the earthy fragrance of dill create a clean, sophisticated flavor. It’s a powerhouse of healthy fats that leaves you feeling nourished and satisfied, providing a silky texture that melts beautifully against the crunchier elements of the meal.
Ingredients
- 2 large salmon fillets (about 6 oz each)
- 2 tbsp olive oil
- 1 lemon, thinly sliced
- 2 sprigs fresh dill
- 1/2 tsp smoked paprika
- Salt and pepper to taste
How to make it
- Preheat your oven to 400°F (200°C) and line a small baking sheet with parchment paper for easy cleanup.
- Place the salmon fillets on the parchment, skin-side down. Drizzle with olive oil and rub it into the flesh to ensure even seasoning.
- Season generously with salt, black pepper, and a dusting of smoked paprika for a hint of color and warmth.
- Top each fillet with two thin lemon slices and a sprig of fresh dill. This infuses the fish with aromatics as it bakes.
- Bake for 12-15 minutes, depending on the thickness of the fillets. To check for doneness, press the thickest part with a fork; it should flake easily and the center should be just barely opaque.
- Let the salmon rest for 3 minutes before placing it on the board to allow the juices to redistribute, ensuring every bite is moist.
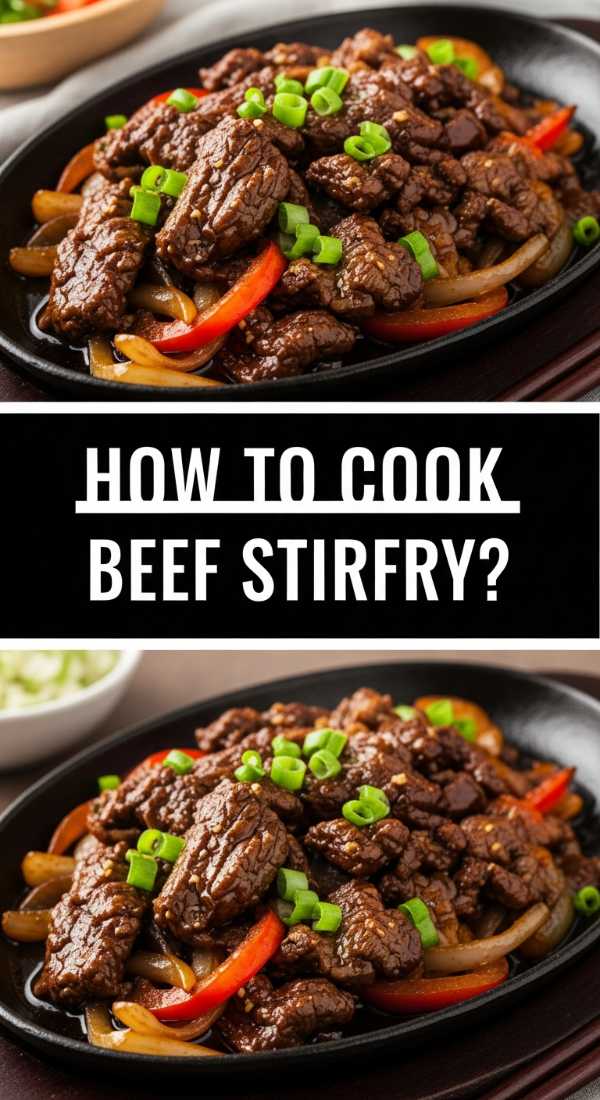
How to cook beef stirfry?

Why we love this
Beef stir-fry is all about energy, heat, and vibrant colors. The high-heat cooking method locks in the juices of the beef while keeping the vegetables snappy and bright. Every bite is a celebration of textures—the chew of the beef, the crunch of bell peppers, and the slippery, savory sauce that ties it all together. The aroma of ginger and toasted sesame oil wafting from the pan is enough to draw anyone to the table. It’s a fast-paced dish that brings a sense of liveliness and a punch of ginger-infused heat to your food assembly.
Ingredients
- 1 lb sirloin steak, sliced into very thin strips
- 2 cups mixed bell peppers and snap peas
- 3 tbsp oyster sauce
- 1 tbsp rice vinegar
- 1 tbsp fresh ginger, julienned
- 2 tbsp vegetable oil
How to make it
- The key to a great stir-fry is preparation; have all your ingredients chopped and your sauce mixed before you turn on the stove, as the process happens very fast.
- Whisk the oyster sauce and rice vinegar together in a small bowl.
- Heat your wok or a large skillet over high heat until a drop of water flicked onto it dances and evaporates instantly. Add 1 tablespoon of oil.
- Add the beef strips in a single layer. Let them sear for 1 minute without moving them to develop a crust, then toss for another minute and remove them from the pan.
- Add the remaining oil, then toss in the peppers, snap peas, and ginger. Stir-fry for 2-3 minutes until the veggies are tender-crisp and bright.
- Return the beef to the pan, pour in the sauce, and toss everything together for 30 seconds until the sauce is glossy and bubbling. Transfer to the board immediately.
How to make creamy pasta?
Why we love this
Creamy pasta acts as the luxurious, velvet heart of the food board. It’s pure comfort in a bowl, with long strands of pasta swirled in a rich, parmesan-infused sauce that is both silky and decadent. The way the sauce clings to the pasta ensures that every mouthful is an explosion of creamy, cheesy goodness. It provides a neutral yet deeply satisfying base that pairs perfectly with the garlic chicken or the crispy potatoes, making the board feel like a complete, well-rounded feast that satisfies the soul.
Ingredients
- 8 oz fettuccine or linguine
- 1 cup heavy cream
- 1/2 cup freshly grated Parmesan cheese
- 2 tbsp unsalted butter
- 1/4 tsp nutmeg
- Salt and plenty of cracked black pepper
How to make it
- Bring a large pot of heavily salted water to a boil and cook the pasta according to the package directions until it is just ‘al dente’ (firm to the bite).
- Before draining, reserve at least 1/2 cup of the starchy pasta water—this is the secret ingredient for a smooth sauce.
- In a large skillet over medium heat, melt the butter and add the heavy cream. Bring to a gentle simmer for 2 minutes until it begins to slightly thicken.
- Whisk in the Parmesan cheese and nutmeg, stirring until the cheese is completely melted and the sauce is smooth.
- Add the cooked pasta directly into the sauce. Toss vigorously, adding a splash of the reserved pasta water as needed to loosen the sauce until it coats every strand perfectly.
- Season with a generous amount of cracked black pepper and serve in a small bowl nestled onto your board.
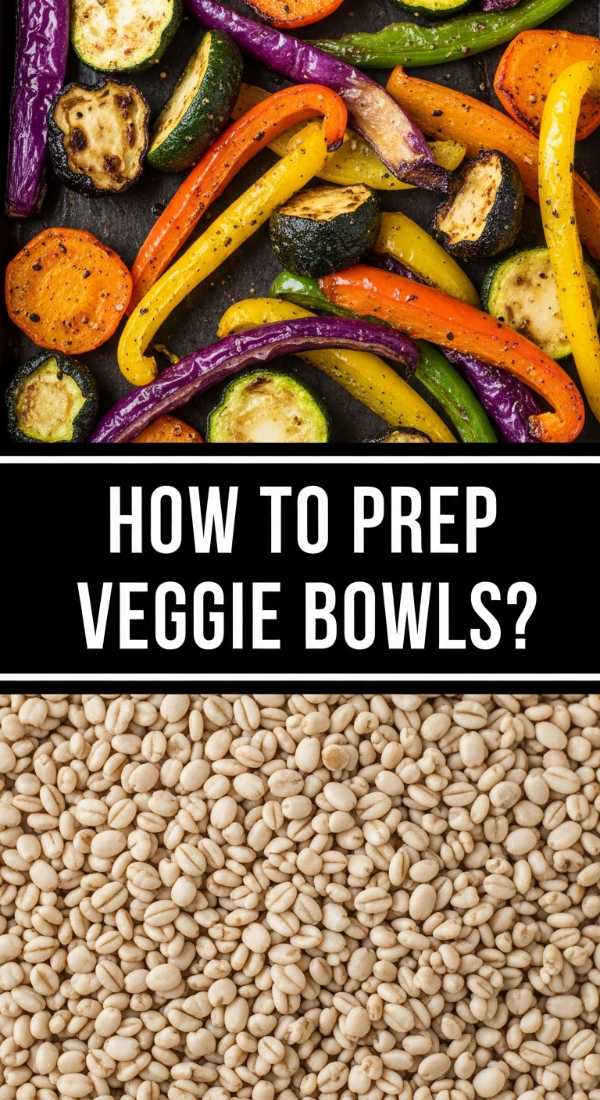
How to prep veggie bowls?

Why we love this
Veggie bowls bring the “lifestyle” to the lifestyle blog, offering a rainbow of colors and a refreshing, earthy grounding to the meal. We love them because they are infinitely customizable and feel like a celebration of the season’s best produce. From the creamy richness of avocado to the sweet crunch of roasted carrots, these bowls provide a much-needed lightness and a variety of nutrients. They make the board look bountiful and healthy, ensuring there is something vibrant and fresh to balance out the richer, cooked components.
Ingredients
- 1 cup cooked quinoa or farro
- 1 cup roasted sweet potato cubes
- 1 avocado, sliced
- 1/2 cup shredded red cabbage
- 2 tbsp tahini
- Lemon wedges for squeezing
How to make it
- Start by building a base of your favorite grain; quinoa provides a nutty flavor and great protein.
- Prepare your roasted vegetables in advance (roast sweet potatoes at 400°F with olive oil for 20 minutes) so they are ready to assemble.
- Arrange the ingredients in small clusters within a shallow bowl or directly on the board: grains in one spot, roasted veg in another, and raw, crunchy cabbage in between.
- Add the avocado slices last to prevent browning, and give them a quick spritz of lemon juice.
- Drizzle the entire section with a simple tahini dressing (tahini, lemon juice, and a splash of warm water whisked together).
- Top with a sprinkle of hemp seeds or microgreens for that professional, viral blogger finish.
How to make breakfast bars?
Why we love this
Who says a food board is only for dinner? These breakfast bars add a sweet, chewy, and wholesome element that can act as a snack or a dessert-like finish to your board. They are packed with toasted oats, sweet dried fruits, and crunchy nuts, held together by the natural sweetness of honey or maple syrup. We love them because they feel like a treat but are secretly filled with energy-boosting ingredients. They add a rustic, homemade charm to the display and provide a wonderful textural contrast to the savory items.
Ingredients
- 2 cups rolled oats
- 1/2 cup almond butter
- 1/3 cup honey or maple syrup
- 1/2 cup dried cranberries or chocolate chips
- 1/4 cup crushed walnuts
- 1 tsp cinnamon
How to make it
- Line an 8×8 inch baking pan with parchment paper, leaving an overhang on the sides for easy removal.
- In a large bowl, combine the oats, dried fruit, walnuts, and cinnamon.
- In a microwave-safe bowl, warm the almond butter and honey together for 30 seconds, then stir until smooth.
- Pour the wet mixture over the dry ingredients and stir until every oat is thoroughly coated. The mixture should be sticky and hold together when pressed.
- Transfer the mixture to the prepared pan. Use the back of a spoon or a flat glass to press the mixture down as firmly as possible; this prevents the bars from crumbling.
- Refrigerate for at least 2 hours (or overnight) to set. Lift out using the parchment paper, slice into rectangles, and stack them artfully on your board.
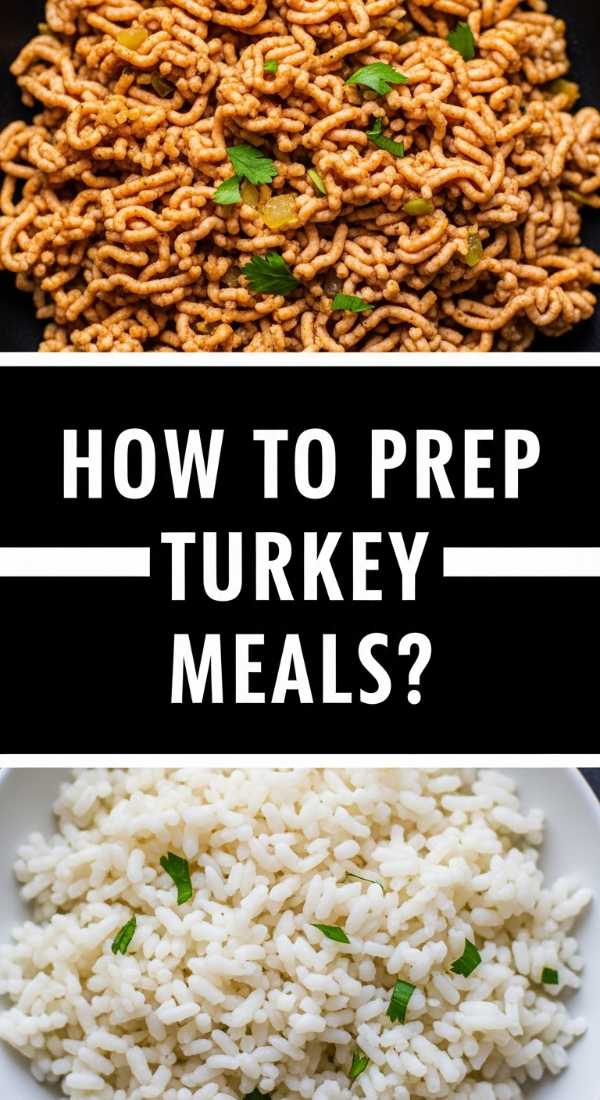
How to prep turkey meals?
[IMAGE_10]
Why we love this
Turkey is often overlooked, but when prepped correctly, it’s a lean, savory powerhouse that absorbs flavors beautifully. These turkey meal-prep bites are seasoned with poultry herbs that evoke the warmth of a holiday dinner but are light enough for a Tuesday night. We love them for their versatility and the way they provide a dense, satisfying protein option that feels slightly lighter than beef. They are the perfect “filler” for the board, ensuring everyone leaves the table feeling full and nourished without the post-dinner slump.
Ingredients
- 1 lb ground turkey or turkey breast tenderloins, cubed
- 1 tbsp olive oil
- 1 tsp dried sage
- 1 tsp dried thyme
- 1/2 tsp onion powder
- Salt and pepper to taste
How to make it
- If using ground turkey, form them into small, bite-sized meatballs. If using tenderloins, cut them into uniform 1-inch cubes for even cooking.
- Toss the turkey with olive oil, sage, thyme, onion powder, salt, and pepper in a medium bowl.
- Heat a skillet over medium heat. Since turkey is very lean, you may need a little extra oil to prevent sticking.
- Cook the turkey pieces for 8-10 minutes, turning frequently. You are looking for an internal temperature of 165°F (74°C). The outside should be lightly browned and the herbs should be fragrant.
- If the pan gets too dry, add a splash of chicken broth to deglaze and keep the meat moist.
- Let the turkey rest for a few minutes before serving to ensure the juices stay locked inside the meat.
Conclusion: Bring the Board to Life
Creating a viral food board is less about following a strict recipe and more about the art of assembly and the joy of sharing. By combining these ten diverse elements—from the sizzle of garlic chicken to the sweet chew of breakfast bars—you create a dining experience that appeals to every sense. The magic happens when your guests (or your family!) reach in and start mixing and matching flavors. So, grab your largest wooden board, light a candle, and enjoy the beautiful, delicious chaos of a meal that looks as good as it tastes. Happy hosting!