

We’ve all been there—scrolling through gorgeous home design feeds, sighing at the price tags of professional landscaping and high-end renovations. It feels like creating a sanctuary requires a second mortgage, doesn’t it? But here’s a little secret I’ve learned: the most soulful, head-turning homes aren’t built with a massive checkbook; they’re crafted with a little sweat equity and a lot of heart. There is something profoundly satisfying about looking at a blooming flower bed or a custom-built deck and knowing you made that happen with your own two hands.
Today, I’m pulling back the curtain on the viral DIY hacks that are saving homeowners thousands while boosting curb appeal to the moon. Whether you’re looking to transform a tired ranch exterior or create a whimsical escape for your chickens, these projects are designed to be budget-friendly and high-impact. Let’s stop spending a fortune on things we can do better ourselves. Grab your gardening gloves and a glass of iced tea—it’s time to turn your home into the retreat you’ve always dreamed of without breaking the bank.
How to Create Lush Front Yard Flower Beds for Instant Curb Appeal
Why we love this
There is nothing quite like the soft, sweet fragrance of blooming jasmine and damp mulch greeting you after a long day at work. A lush flower bed transforms a flat, uninspired lawn into a living tapestry of textures—the velvet touch of lamb’s ear, the vibrant pop of purple salvia, and the gentle rustle of ornamental grasses in the breeze. It makes your home feel welcoming and established, as if the house itself is nestled deep within a natural embrace, providing a sense of peace that starts the moment you pull into the driveway.
Essential Elements:
- Cardboard or landscape fabric for weed suppression
- Nutrient-rich topsoil and organic compost
- A mix of perennials (Coneflowers, Hostas) and annuals (Petunias, Zinnias)
- Natural cedar mulch
- Edging material (stones or bender board)
How to make it
- Define the shape of your bed using a garden hose to create natural, flowing curves rather than rigid straight lines.
- Remove the grass or use the ‘no-dig’ method by laying down thick cardboard over the grass to smother it, which adds organic matter back into the soil.
- Layer 3-4 inches of high-quality compost and topsoil over your base, ensuring a slight slope away from the house for proper drainage.
- Arrange your plants while they are still in their pots to visualize the height levels; place taller shrubs in the back and shorter, sprawling groundcovers in the front.
- Dig holes twice as wide as the root ball, gently loosen the roots, and plant at the same depth as the container.
- Apply a 2-inch layer of cedar mulch to retain moisture and suppress weeds, taking care not to pile it directly against the plant stems.
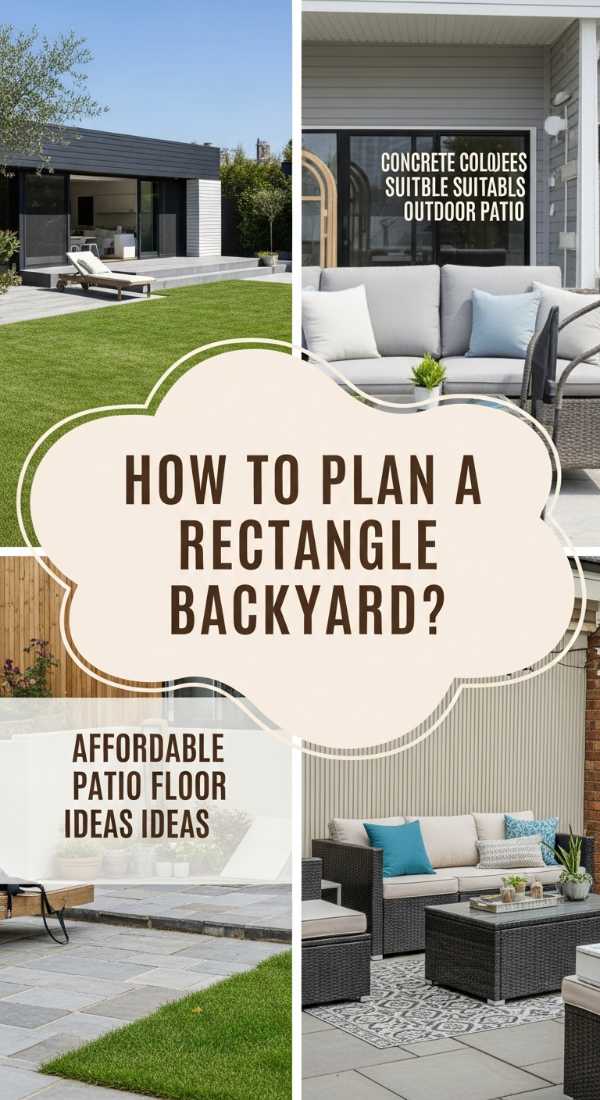
How to Design a Rectangular Backyard Layout for Maximum Outdoor Living
Why we love this
A well-planned rectangular backyard feels like a series of outdoor rooms, each with its own mood and purpose. Imagine the transitions: the cool, smooth feel of a stone patio under your feet in the dining area, shifting to the soft, lush carpet of a manicured lawn in the play zone. The geometric symmetry provides a sense of modern order that is incredibly soothing to the eye, making even a small space feel expansive and intentional. It’s the perfect backdrop for golden hour cocktails and late-night stargazing.
Essential Elements:
- Graph paper or digital design tool
- String lines and stakes for marking
- Hardscape materials (pavers, gravel, or decking)
- Low-voltage path lighting
- Zoned furniture (dining set, lounge chairs)
How to make it
- Measure your entire backyard perimeter and plot it on graph paper to identify the total square footage available for ‘zones.’
- Divide the rectangle into three distinct sections: the transition zone (closest to the house), the activity zone (lawn or play area), and the destination zone (fire pit or garden retreat).
- Use string lines and stakes to mark out the boundaries of each zone to ensure they are perfectly square and aligned.
- Install your hardscape first, ensuring a level base of crushed stone and sand to prevent future shifting or puddling.
- Create clear walkways between zones using consistent materials like pea gravel or stepping stones to guide the flow of movement.
- Add vertical elements like tall planters or small trees at the corners of the zones to define the ‘walls’ of your outdoor rooms.
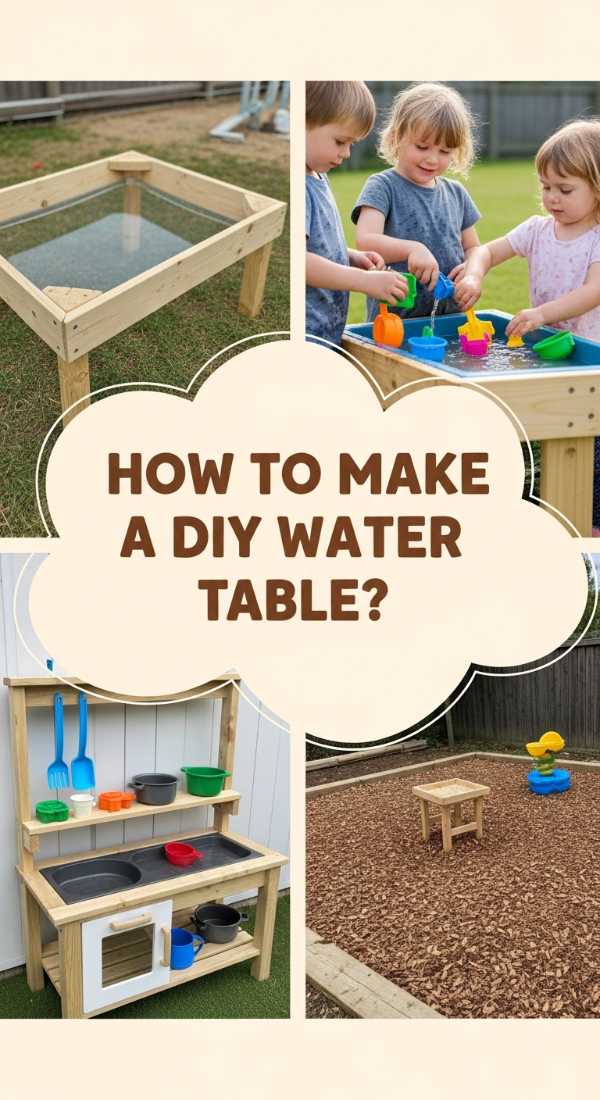
How to Build a Custom Water Table for Endless Summer Fun
![]()
Why we love this
The sound of splashing water and the cool mist on a hot July afternoon is the ultimate sensory experience for little ones. This custom water table isn’t just a toy; it’s a sleek, wooden piece of functional art that fits beautifully on any patio. We love the smooth, sanded cedar finish that resists rot and the way the sparkling water catches the sunlight, inviting hours of tactile play and imaginative exploration. It’s a focal point that brings the whole family together for cooling relief and joyful laughter.
Essential Elements:
- Untreated Cedar 2x4s and 1x4s
- Heavy-duty plastic storage bins
- Exterior grade wood screws
- Waterproof wood sealant
- PVC pipe and a small submersible pump (optional for fountains)
How to make it
- Build a rectangular frame using the 2×4 cedar boards, sized specifically to fit the lip of your plastic bins so they hang securely.
- Construct four sturdy legs and attach them to the inside corners of the frame using pocket holes or lag bolts for maximum stability.
- Add a lower shelf using 1×4 slats to provide storage for water toys and to reinforce the leg structure.
- Sand every surface thoroughly with 120-grit sandpaper to ensure there are no splinters for tiny hands to find.
- Apply two coats of a non-toxic, waterproof sealant to protect the wood from constant water exposure and UV rays.
- Drop the bins into the frame and fill with water; if adding a pump, drill a small hole in the bottom of one bin for the tubing and seal it with marine-grade silicone.
How to Refresh a Ranch Exterior for a Modern Home Transformation
Why we love this
There is a unique satisfaction in taking a dated, 1970s ranch and revealing its sleek, mid-century potential. We love the contrast of deep, moody charcoal paint against warm, natural wood accents—it’s a visual dialogue between modern sophistication and cozy tradition. The transformation is tactile; you can feel the updated texture of the smooth siding and the solid weight of a new modern front door. It’s about taking something familiar and making it feel brand new and undeniably stylish.
Essential Elements:
- High-quality exterior masonry or siding paint
- Cedar slatting for accent walls
- Modern black hardware (door handles, house numbers)
- Updated outdoor sconce lighting
- Power washer and high-grit sandpaper
How to make it
- Power wash the entire exterior to remove decades of dirt and loose paint, ensuring a pristine surface for new adhesion.
- Caulk all gaps around windows and doors with a high-flexibility exterior sealant to improve energy efficiency and aesthetics.
- Apply a high-quality primer followed by two coats of exterior satin paint, using a professional-grade sprayer for a flawless, streak-free finish.
- Install horizontal cedar slats over a portion of the brick or siding near the entryway to break up the long horizontal lines typical of ranch homes.
- Swap out old, ornate hardware for matte black, minimalist pieces that emphasize clean lines.
- Finish the look by installing modern, downward-facing LED sconces to highlight the home’s new architectural texture at night.
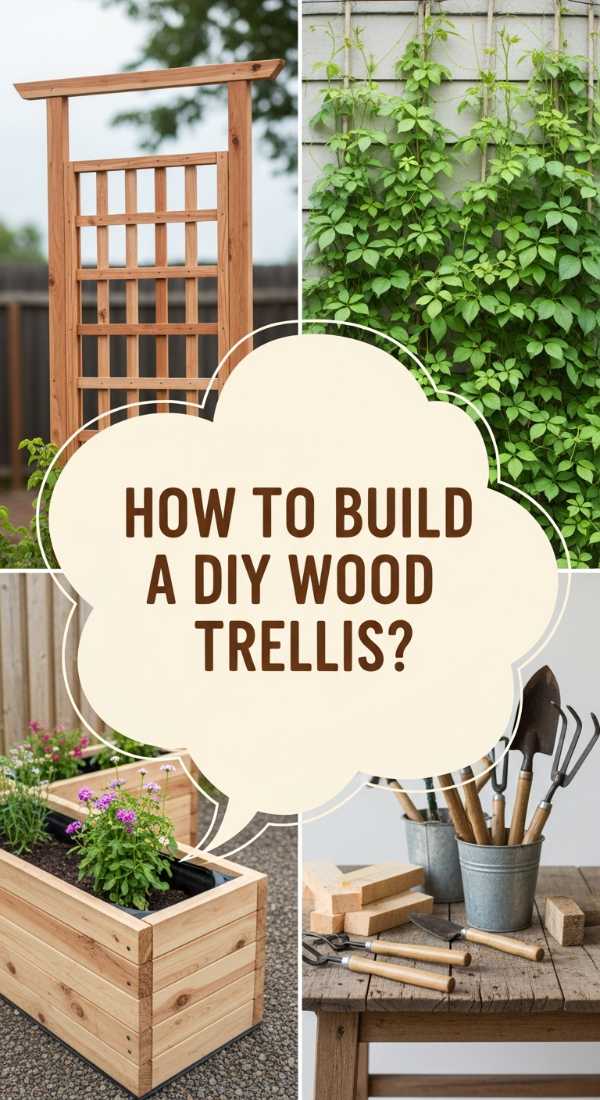
How to Construct a Vertical Wood Trellis for a Growing Garden Sanctuary

Why we love this
A vertical trellis is like building a skyscraper for your garden, allowing vines to reach for the clouds and creating a living wall of green. We love the architectural elegance of the geometric wood patterns and the intoxicating scent of climbing roses or honeysuckle as they weave through the slats. It adds a sense of privacy and seclusion, turning a simple backyard into a hidden sanctuary where the world falls away and you’re surrounded by the vibrant energy of growing things.
Essential Elements:
- Pressure-treated 2×2 or 1×2 wood furring strips
- Galvanized finishing nails or outdoor wood glue
- Wood stain or exterior paint
- Wall anchors or heavy-duty stakes
- Climbing plants (Clematis, Morning Glories, or Climbing Roses)
How to make it
- Determine your desired pattern (diamond, grid, or chevron) and cut your wood strips to length using a miter saw for clean angles.
- Lay out the perimeter frame on a flat surface and secure the corners with wood glue and two nails per joint.
- Space your interior slats evenly, using a scrap piece of wood as a spacer to ensure a professional, uniform look across the entire grid.
- Fasten each intersection of the slats with a single nail to allow for slight natural expansion and contraction of the wood.
- Apply a weather-resistant stain to protect the wood from the moisture that will inevitably be trapped against it by the foliage.
- Mount the trellis to a wall using spacers (like small blocks of wood) so there is a 1-inch gap for the vines to wrap around the back of the slats.
How to Style a Nostalgic Teen Room for the Ultimate Retro Vibe
Why we love this
Step into a room that feels like a time capsule from the best parts of the 70s and 90s. We love the warmth of amber-hued disco balls, the fuzzy texture of a shag rug underfoot, and the vibrant glow of neon signs. This style is all about personality and comfort—a place where every poster and vinyl record tells a story. It’s a sensory feast of bold patterns and soft fabrics that creates a safe, creative haven for dreaming and hanging out with friends.
Essential Elements:
- Retro-inspired wallpaper or a bold paint mural
- Lava lamps and string lights
- Vintage furniture (bean bags, wicker chairs)
- Gallery wall of vinyl covers and polaroids
- Textured textiles (velvet pillows, crochet blankets)
How to make it
- Start with a base color palette of warm earth tones like mustard yellow, burnt orange, and avocado green to set the retro foundation.
- Create a focal point by installing a removable ‘peel and stick’ funky geometric wallpaper on the wall behind the bed.
- Layer lighting at different heights, using a combination of warm LED strips under the bed frame and vintage-style table lamps for a cozy glow.
- Incorporate a ‘music corner’ with a record player and a display shelf for vinyl, which adds both a visual and auditory retro element.
- Mix textures by pairing a sleek, mid-century modern desk with a chunky knit throw and a high-pile rug for maximum tactile comfort.
- Personalize the space with a DIY gallery wall using washi tape to hang a mix of vintage magazine clippings and personal photos.
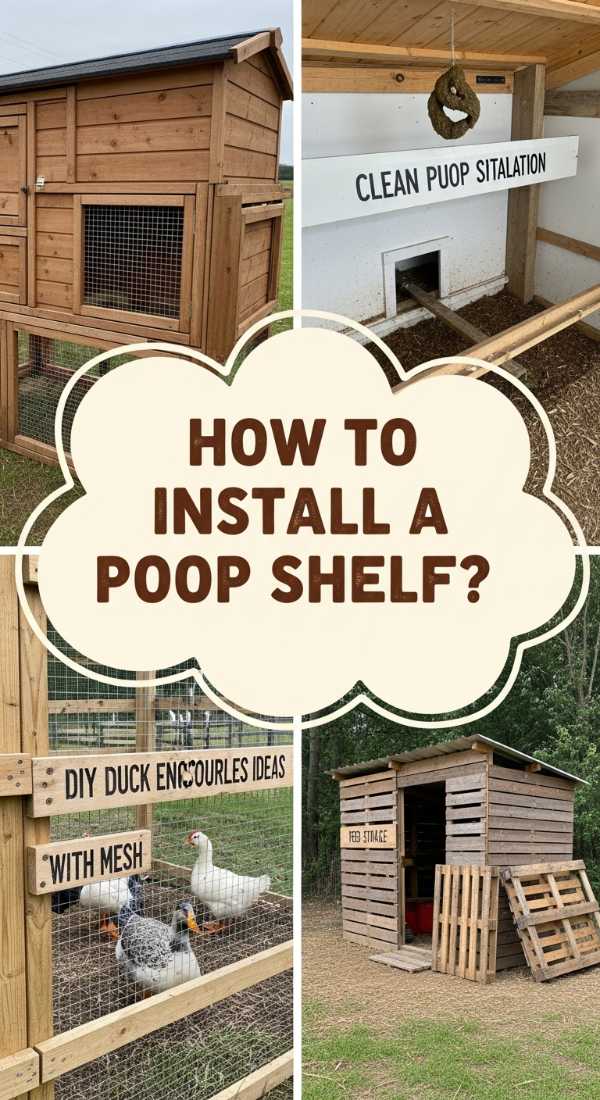
How to Upgrade a Chicken Coop for a Clean and Happy Flock
Why we love this
There is a deep, rustic charm in a well-kept chicken coop that smells of fresh pine shavings and dried lavender. We love the sight of happy hens scratching in a secure, beautiful run that matches the aesthetic of the main house. Upgrading your coop isn’t just about the birds; it’s about creating a farm-to-table experience that feels clean, organized, and intentional. The smooth click of a secure latch and the easy glide of a sliding nesting box tray make the daily ritual of egg-gathering a true pleasure.
Essential Elements:
- Hardware cloth (not chicken wire) for predator proofing
- Hemp or pine bedding
- Automated coop door
- Wipeable surfaces (Linoleum for the floor)
- Exterior-grade paint and trim
How to make it
- Strip out any old, soiled wood and replace the flooring with a single sheet of linoleum to make cleaning out droppings as easy as a quick sweep.
- Replace all standard chicken wire with 1/2-inch galvanized hardware cloth, burying it 12 inches into the ground to prevent digging predators.
- Install a gravity-fed PVC feeder and a nipple waterer system to keep food and water clean and reduce daily maintenance chores.
- Add a fresh coat of low-VOC exterior paint to the coop’s exterior and paint the trim a contrasting color for a ‘cottage’ aesthetic.
- Hang a ‘herbal bouquet’ of dried mint and marigolds inside the coop to naturally repel flies and keep the air smelling fresh.
- Upgrade to an automatic solar-powered door that opens at sunrise and closes at sunset, ensuring your flock is safe even if you’re not home.
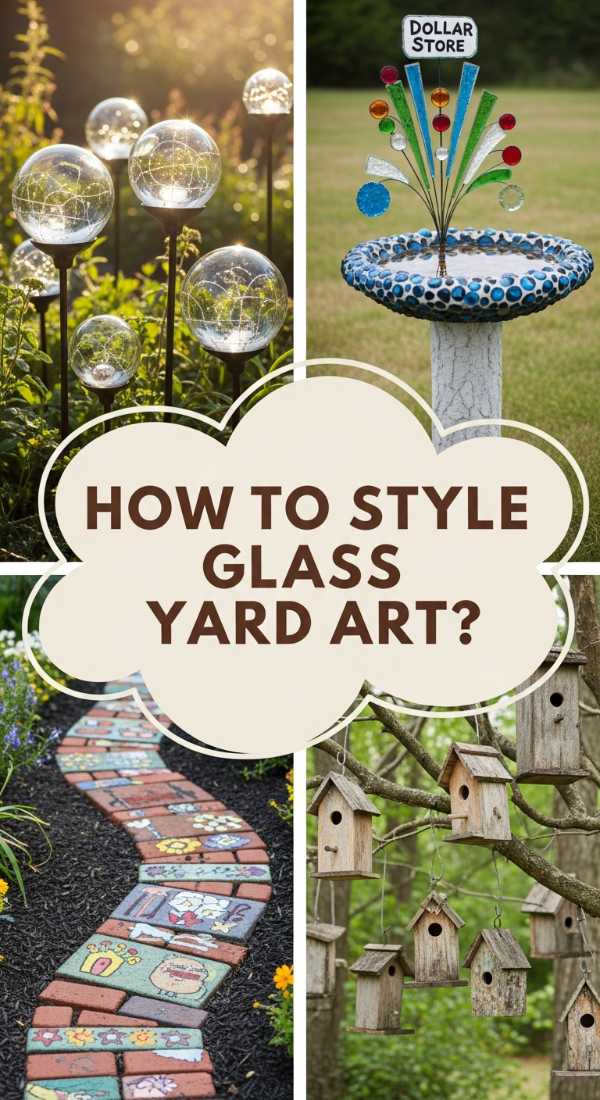
How to Display Colorful Yard Art for a Whimsical Garden Escape
Why we love this
Garden art is the jewelry of the landscape, adding a sparkling personality that plants alone can’t provide. We love the way a bright blue ceramic birdbath or a collection of hand-painted glass mushrooms catches the morning dew, creating a sense of wonder and play. It turns a standard garden into a whimsical escape, a place where you can wander and find little surprises tucked behind every hosta leaf. It’s about joy, color, and the freedom to be a little bit magical in your own backyard.
Essential Elements:
- Weatherproof sculptures or statues
- Upcycled materials (old bicycles, painted tires)
- Bright, outdoor-rated spray paints
- Clear UV-resistant sealant
- Sturdy garden stakes or pedestals
How to make it
- Choose a theme—such as ‘vintage rustic’ or ‘neon modern’—to ensure your yard art feels like a curated collection rather than random clutter.
- Scour thrift stores for unique metal or ceramic items, like old watering cans or iron gates, and give them new life with a bold, uniform color.
- Apply a UV-resistant clear coat to any painted items to prevent the sun from fading the vibrant hues over time.
- Place larger art pieces at the end of garden paths to serve as ‘visual destinations’ that draw visitors through the space.
- Tuck smaller, whimsical items like glass pebbles or fairy houses into the shadows of larger plants for a sense of discovery.
- Use varying heights by placing some items directly on the ground and elevating others on stone plinths or wooden stumps to create a dynamic skyline.
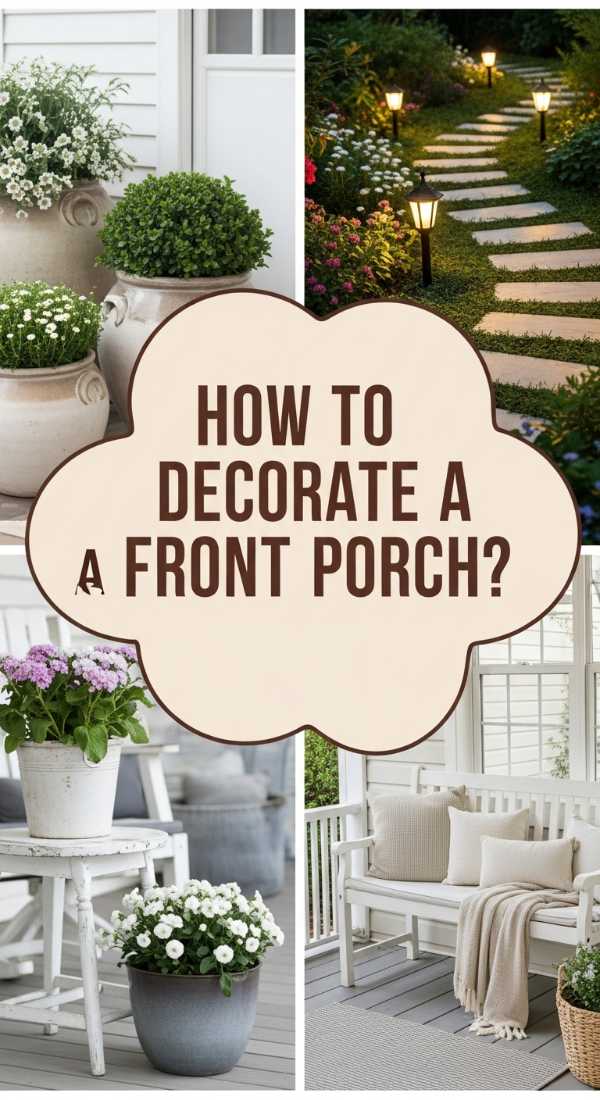
How to Arrange Front Porch Flower Pots for a Welcoming Home Entry

Why we love this
Your front porch is the handshake of your home, and nothing says ‘welcome’ quite like a perfectly balanced arrangement of containers. We love the lush explosion of color—the tall, architectural spikes of dracaena paired with the soft, cascading ‘spiller’ of silver falls dichondra. The aroma of fresh earth and sweet blossoms as you walk through the door creates an instant sense of transition from the busy world to your private sanctuary. It’s a small, high-impact detail that makes your home feel loved and curated.
Essential Elements:
- Assorted large containers with drainage holes
- High-quality potting mix (not garden soil)
- The ‘Thriller, Filler, Spiller’ plant combination
- Slow-release fertilizer
- Decorative moss or river rocks
How to make it
- Select pots of varying heights but in a cohesive color palette (like various shades of terracotta or navy blue) to create visual interest.
- Fill the bottom third of very large pots with empty plastic water bottles to save on heavy soil and improve drainage.
- Start with your ‘Thriller’—a tall, dramatic plant like a Canna Lily or Ornamental Grass—placed in the center or back of the pot.
- Surround the Thriller with ‘Fillers’—mounding plants like Geraniums or Petunias—to give the arrangement volume and density.
- Plant ‘Spillers’ along the edges, such as Sweet Potato Vine or Ivy, so they can gracefully tumble over the sides of the container.
- Water deeply until it runs out the bottom, and top the soil with a thin layer of Spanish moss to hide the dirt and keep the roots cool.
How to Build a Floating Deck for a Luxury Backyard Retreat
[IMAGE_10]
Why we love this
There is a literal and figurative lift that comes with stepping onto a floating deck. We love the clean, modern lines of the horizontal planks and the way it defines a dedicated space for relaxation without the need for complex permanent footings. It feels like an island in the middle of your yard—a smooth, warm wooden surface where you can kick off your shoes, feel the sun-warmed grain under your toes, and breathe in the scent of fresh cedar. It’s the ultimate DIY luxury that instantly upgrades your lifestyle.
Essential Elements:
- Pressure-treated 2x6s for the frame
- Composite or Cedar decking boards
- Concrete deck blocks
- Level and chalk line
- Hidden deck fasteners for a seamless look
How to make it
- Clear the area of all grass and debris, lay down landscape fabric, and cover it with a thin layer of gravel to prevent weeds and rot under the deck.
- Position concrete deck blocks at the four corners and every 4 feet along the perimeter, using a long straight edge and a level to ensure they are perfectly even.
- Build the outer box frame using pressure-treated lumber, then install joists every 16 inches on center to support the weight of the decking.
- Squaring the frame is critical; measure diagonally from corner to corner and adjust until both measurements are identical.
- Lay your decking boards across the joists, using spacers to maintain a consistent 1/8-inch gap for drainage and airflow.
- Secure the boards using hidden fasteners or color-matched deck screws, then trim the edges with a circular saw for a perfectly straight, professional finish.
Transforming Your Home One Project at a Time
Creating a beautiful home isn’t about how much money you can throw at a problem—it’s about the creativity and care you put into every corner of your space. From the way your front porch greets a guest to the peaceful retreat of a floating deck, these hacks prove that luxury is a DIY away. I hope these projects inspire you to pick up a tool, plant a seed, and start building the home you deserve. Happy DIY-ing!
Frequently Asked Questions
Q: Do I need professional tools for these hacks?
A: Most of these projects require only basic power tools like a drill, a miter saw, and a level. For bigger projects like the floating deck, you can often rent tools from your local hardware store.
Q: What is the best wood to use for outdoor garden projects?
A: Cedar and Redwood are excellent because they are naturally rot-resistant. If you’re on a tighter budget, pressure-treated pine is a great alternative, provided you seal it properly.
Q: How can I keep my front yard flower beds looking good all year?
A: The secret is ‘succession planting.’ Mix evergreen shrubs with perennials that bloom at different times (spring, summer, and fall) so there is always something green or blooming.