
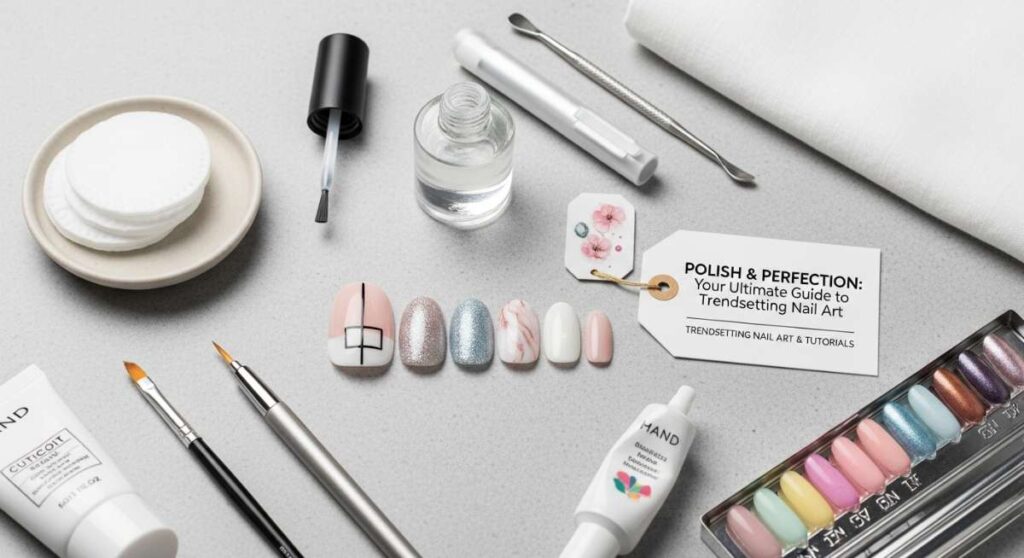
Polish & Perfection: Your Ultimate Guide to Trendsetting Nail Art
Hello, my beautiful loves! Pull up a chair and let’s take a deep breath together. There is something so profoundly soothing about the ritual of painting our nails, isn’t there? It’s more than just color on a canvas; it’s a moment of quiet reflection, a cloud-soft embrace for your soul as you curate the version of yourself you want to show the world today. Whether you’re sipping a warm latte or watching the sunset, your hands are your most active storytellers.
I’ve spent the last few weeks dreaming up designs that feel like a gentle hug and a burst of sunshine all at once. My mission is to help you find that perfect sparkle that makes you smile every time you catch a glimpse of your reflection in a shop window. We aren’t just doing manicures; we’re creating little masterpieces that celebrate the vibrant, unique spirit that is *you*.
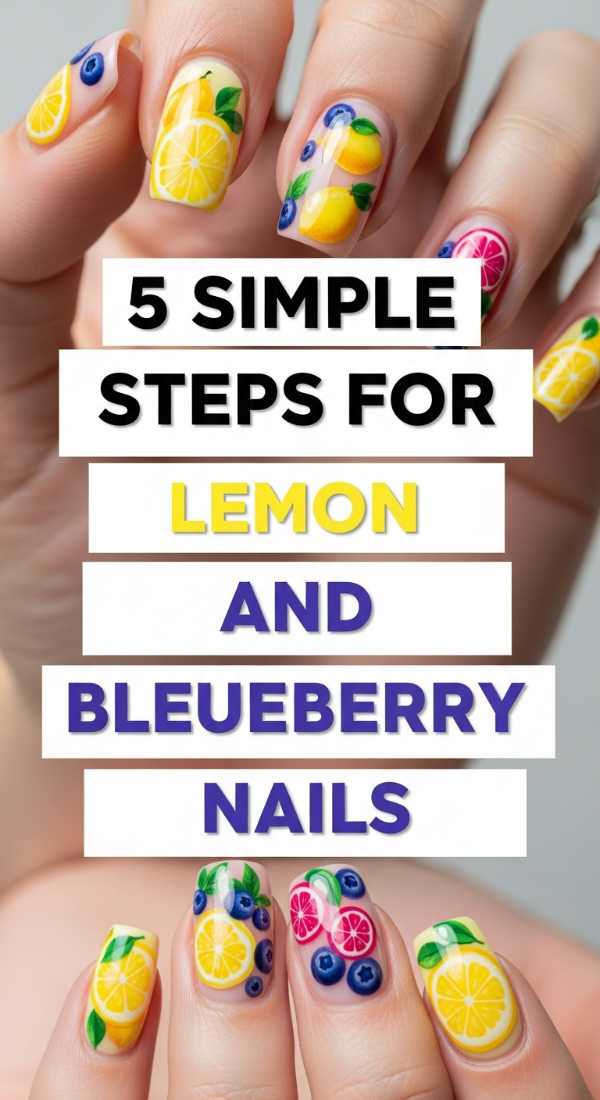
Squeeze of Sunshine: Lemon and Blueberry Nails [ID:0]
Why to love this Design:
This design is like a picnic in a bottle! The tart yellow of the lemons perfectly balances the deep, comforting blue of the berries, giving your hands a fresh, cottage-core aesthetic that is simply irresistible for those sunny afternoon walks.
Essential Elements:
- Bright Citron Yellow polish
- Deep Navy Blue polish
- White detailing lacquer
- Ultra-fine nail art brush
- Glossy top coat
How to Prepare:
- Apply a clear base coat to protect your natural nails.
- Paint two coats of white or pale nude as your canvas.
- Use your fine brush to dot small yellow circles for lemons and navy dots for berries.
- Add tiny green leaves and white ‘shine’ marks to the fruit.
- Seal the sweetness with a high-shine top coat.
Budget Range
- Essie ‘Check Your Baggage’ Yellow ($10)
- OPI ‘Mi Casa Es Blue Casa’ ($11)
- Sally Hansen Insta-Dri White ($6)
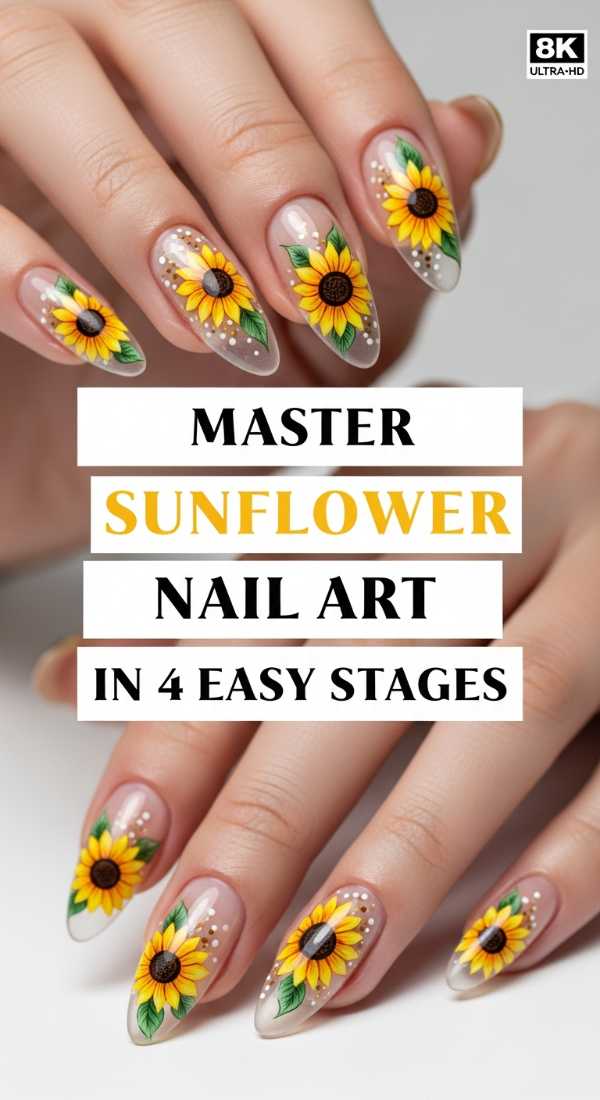
Golden Hour Glow: Master Sunflower Nail Art [ID:1]
Why to love this Design:
Sunflowers are the ultimate symbol of loyalty and warmth. Wearing them on your fingertips is like carrying a little piece of the sun with you, ensuring that even on cloudy days, you’re radiating light and positivity to everyone you touch.
Essential Elements:
- Mustard Yellow polish
- Chocolate Brown polish
- Dotting tool
- Matte top coat (optional for a rustic look)
How to Prepare:
- Paint your base in a soft sky blue or clear nude.
- Place a large brown dot near the base or corner of the nail using a dotting tool.
- Pull thin, petal-shaped strokes of mustard yellow outward from the brown center.
- Add tiny black or darker brown dots inside the center for texture and finish with a top coat.
Budget Range
- Holo Taco ‘Butterscotch Hop’ ($13)
- Revlon ‘Storehouse Brown’ ($8)
- Dotting Tool Set from Amazon ($5)
Liquid Gold: Butter Yellow Nails Chrome [ID:2]

Why to love this Design:
If you want to feel like a modern-day goddess, this is your look. The butter-yellow base is creamy and soft, but that chrome finish adds a futuristic, high-fashion edge that catches the light in the most mesmerizing way.
Essential Elements:
- Creamy Butter Yellow polish
- Yellow or Gold Chrome Powder
- Sponge applicator
- No-wipe gel top coat
How to Prepare:
- Apply and cure your butter yellow base polish.
- Apply a no-wipe top coat and cure, then immediately buff the chrome powder over the surface until it mirrors.
- Seal with a final layer of top coat to lock in that metallic shine.
Budget Range
- Zoya ‘Darcy’ ($12)
- Artdone Chrome Powder Kit ($9)
- Gelish No-Wipe Top Coat ($15)
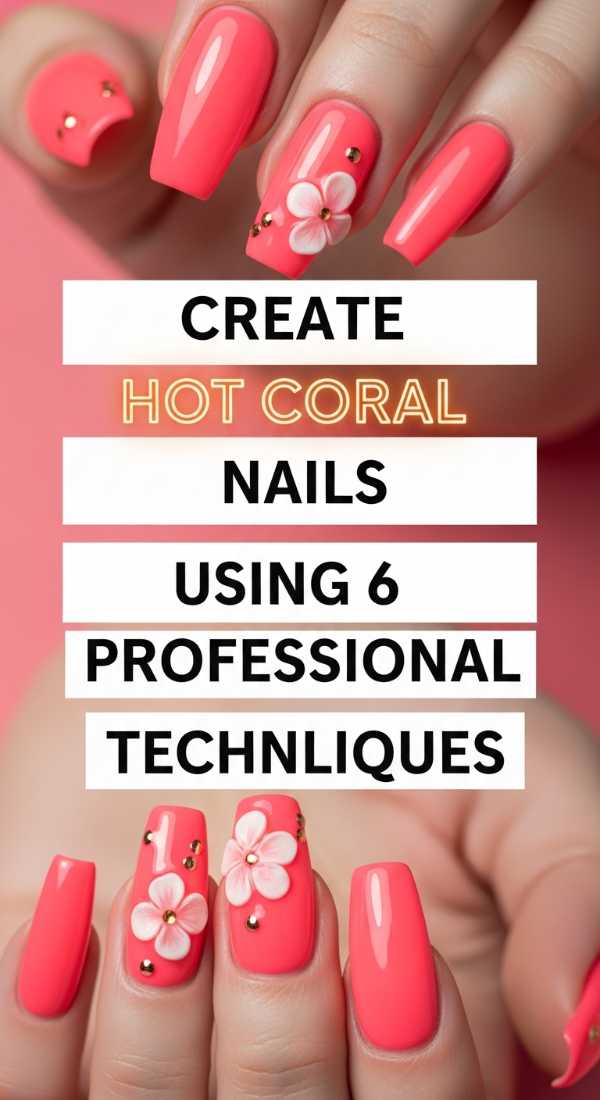
Tropical Heat: Hot Coral Nails [ID:3]
Why to love this Design:
Hot coral is the color of confidence, my loves! It’s bold, it’s fiery, and it reminds me of vibrant sunsets over the ocean. It’s the perfect shade for when you’re feeling adventurous and ready to take on the world.
Essential Elements:
- Vibrant Coral polish
- Gold foil flakes
- Striping tape
- Professional grade cuticle oil
How to Prepare:
- Cleanse nail beds thoroughly for maximum adhesion.
- Apply a base bonder to prevent staining from the high pigment.
- Apply two thin, even coats of coral polish.
- Place gold foil flakes near the cuticle for a ‘melted’ effect.
- Use striping tape for clean geometric accents if desired.
- Finish with a thick, ‘plumping’ top coat for a professional gel-like look.
Budget Range
- Orly ‘No Filter’ Coral ($15)
- Maniology Gold Leaf Flakes ($7)
- Seche Vite Dry Fast Top Coat ($10)
Ocean Breeze: Blue Tropical Nails [ID:4]
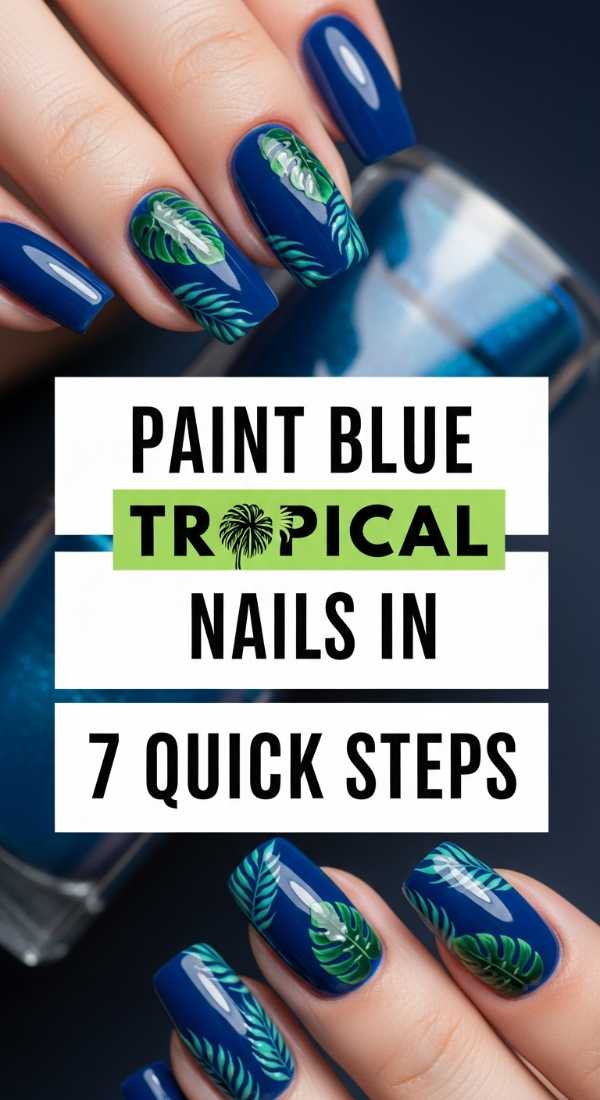
Why to love this Design:
Close your eyes and imagine the sound of waves. That’s what this design feels like. It’s a vacation for your hands, featuring lush palm leaves against a backdrop of Caribbean blue that is pure serenity.
Essential Elements:
- Turquoise or Teal Blue polish
- Forest Green polish
- Stamping plate with leaf patterns
- White stamping polish
How to Prepare:
- Base coat and two layers of turquoise blue.
- Pick up a palm leaf design from your stamping plate using forest green.
- Transfer the design to the center of your nail.
- Add a smaller leaf in white for depth.
- Clean up the edges with an acetone-dipped brush.
- Apply a matte top coat for a sophisticated ‘suede’ feel.
- Moisturize your cuticles with coconut oil.
Budget Range
- ILNP ‘The Re-Entry’ Blue ($12)
- Whats Your Nail Stamping Plate ($10)
- CND Vinylux ‘Palm Deco’ ($11)
Artistic Soul: Spring Abstract Nails [ID:5]
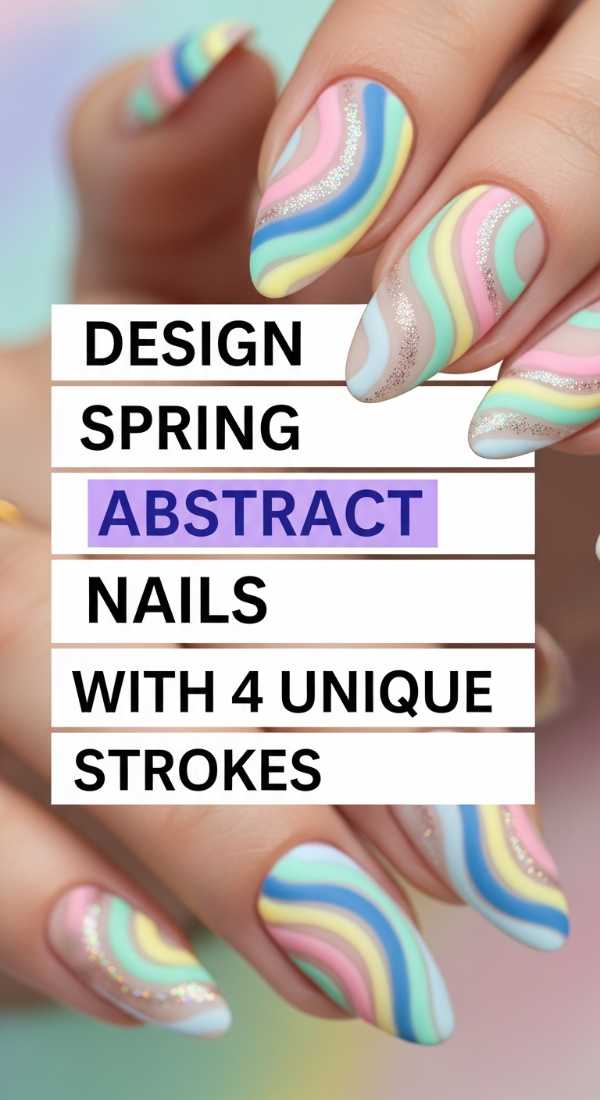
Why to love this Design:
Abstract art is the ultimate form of self-expression because there are no rules! These four unique strokes represent the beautiful messiness of life, turning your nails into a gallery of modern, pastel-toned joy.
Essential Elements:
- Pastel Pink, Lavender, and Mint polishes
- Black detail ink or polish
- Flat-head brush
How to Prepare:
- Swipe a single horizontal stroke of mint green across the middle.
- Add a vertical ‘blob’ of lavender overlapping the green.
- Place a small, intentional dot of pink near the tip.
- Finish with a tiny black ‘squiggles’ or ‘flicks’ to tie the composition together.
Budget Range
- Olive & June ‘The Spring Set’ ($40 for 6)
- Beetles Abstract Brush Set ($8)
Whimsical Dreams: Lavender Sparkle Nails [ID:6]
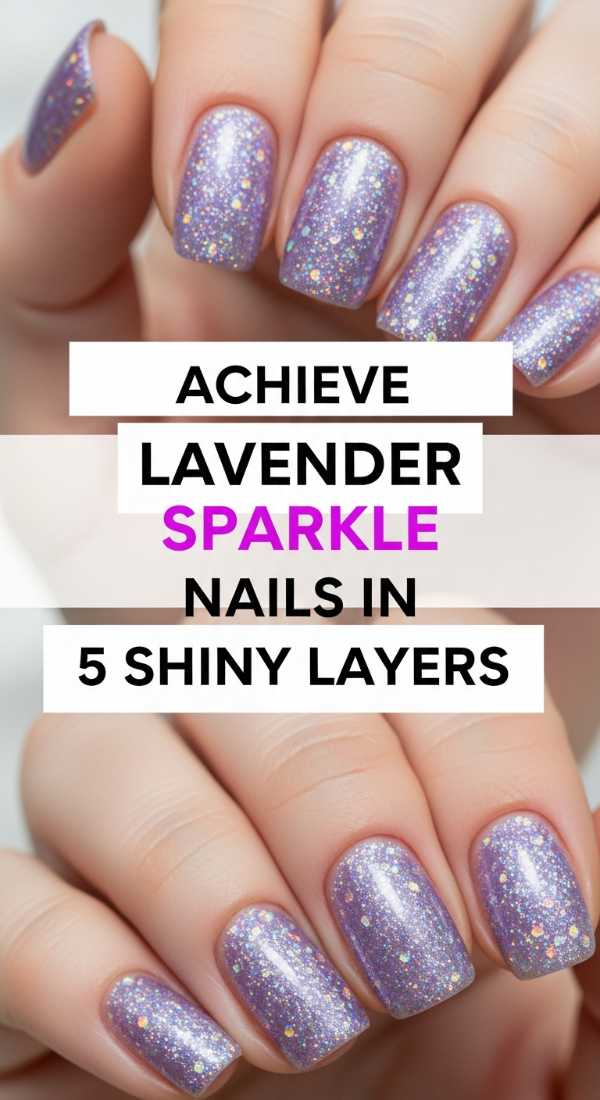
Why to love this Design:
Lavender is so soothing, isn’t it? Adding layers of sparkle makes it feel like a fairy tale. It’s feminine, soft, and has just enough shimmer to make you feel like you’re walking on clouds.
Essential Elements:
- Pale Lavender cream polish
- Fine silver glitter topper
- Holographic flakies
- Purple tinted jelly polish
How to Prepare:
- Apply a solid base of lavender cream.
- Sponge a light layer of silver glitter onto the tips.
- Apply one coat of lavender jelly to ‘sandwich’ the glitter.
- Add holographic flakes for extra dimension.
- Finish with a high-gloss top coat.
Budget Range
- Cirque Colors ‘Lavender Sky’ ($13)
- Lights Lacquer ‘Glisten’ ($13)
Aquatic Elegance: Teal Spring Nails [ID:7]
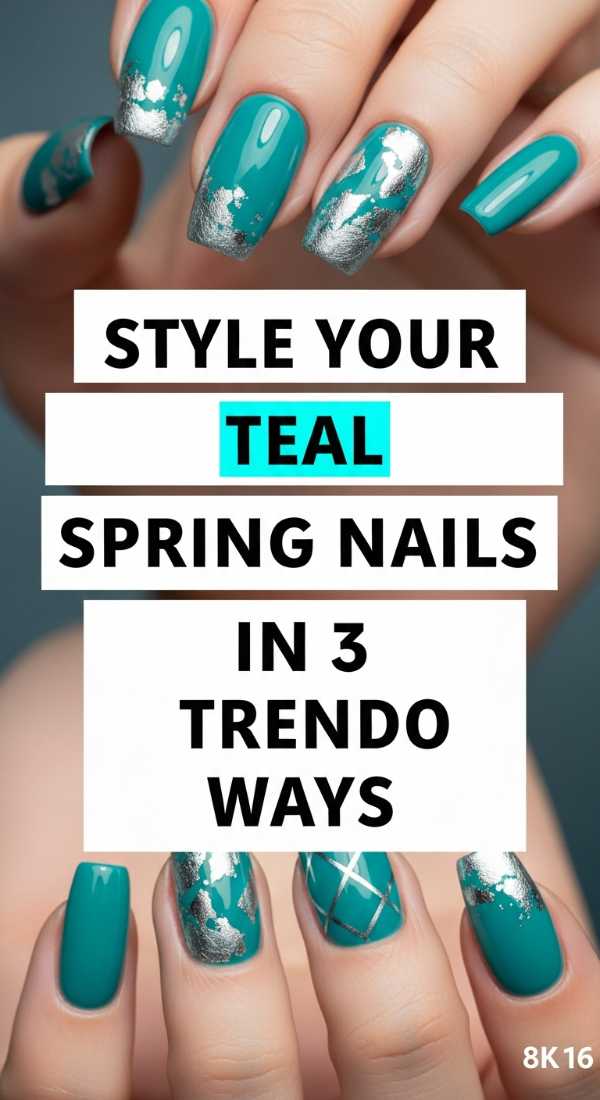
Why to love this Design:
Teal is the sophisticated cousin of blue and green. It’s rich, grounded, and looks stunning on every skin tone. These three styling ways ensure you can wear this trend from the office to a garden party.
Essential Elements:
- Deep Teal polish
- Silver striping tape
- Clear rhinestones
How to Prepare:
- Style 1 (Minimalist): A solid teal coat with a single silver stripe down the ring finger.
- Style 2 (Glam): Teal base with a cluster of rhinestones at the cuticle.
- Style 3 (Modern French): A teal base with silver metallic tips.
Budget Range
- Deborah Lippmann ‘Deep Teal’ ($20)
- Amazon Nail Art Rhinestone Kit ($6)
Garden Party: Bright Spring Nails [ID:8]
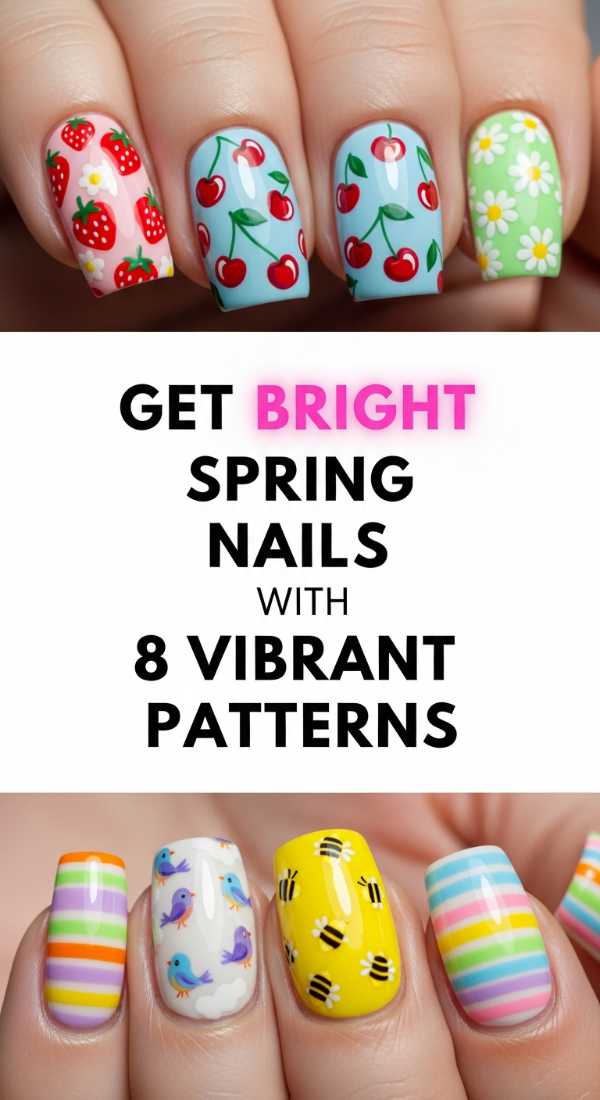
Why to love this Design:
Why choose one pattern when you can have eight? This look is for my loves who want to celebrate every flower in the garden. It’s vibrant, energetic, and a total conversation starter.
Essential Elements:
- Rainbow assortment of neon pastels
- Dotting tools and liners
How to Prepare:
- Paint each nail a different base color.
- Pattern 1: Polka dots.
- Pattern 2: Micro-daisies.
- Pattern 3: Gingham checks.
- Pattern 4: Vertical stripes.
- Pattern 5: Clouds.
- Pattern 6: Mini hearts.
- Pattern 7: Zig-zags.
- Pattern 8: Fruit slices.
Budget Range
- Modelones 20-piece Gel Set ($30)
- Nail Art Liner Brush Set ($7)
Retro Vibes: Funky Spring Nails [ID:9]
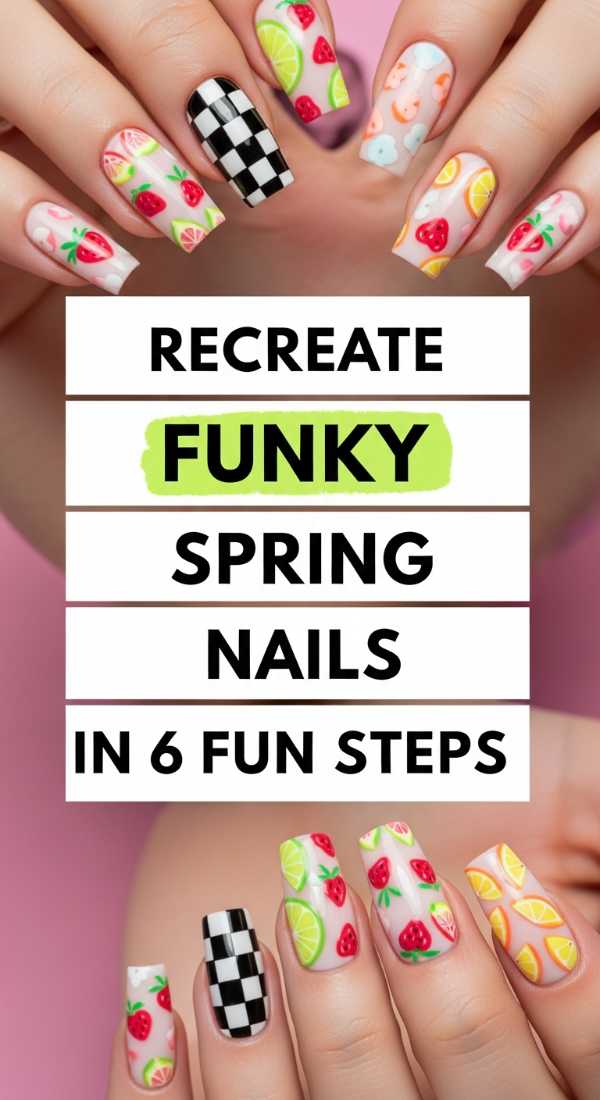
Why to love this Design:
Let’s get a little funky! This design takes us back to the 70s with groovy swirls and unexpected color combos. It’s playful, nostalgic, and reminds us not to take life too seriously.
Essential Elements:
- Avocado Green, Burnt Orange, and Cream polishes
- Long liner brush
How to Prepare:
- Base coat in a neutral cream.
- Draw a large ‘S’ curve in green.
- Follow the curve with a parallel line in orange.
- Fill in the spaces with smaller ‘echo’ swirls.
- Add white dots for a ‘mod’ look.
- Seal with a high-gloss top coat.
Budget Range
- Floss Gloss ’70s Trio’ ($24)
- Smith & Cult ‘Extra Ordinary’ ($18)
Wrap Your World in Color
My sweet loves, I hope these designs spark a little flame of creativity in your heart today. Remember, nail art isn’t about being perfect—it’s about the process of taking care of yourself and expressing the beauty you carry inside. Whether you choose a simple butter yellow or a complex tropical scene, do it with love. You deserve to feel polished, perfected, and entirely yourself. Until next time, stay colorful!