

I know exactly how your Tuesday feels because I’m living it too. The sun is setting, the kids are asking what’s for dinner for the tenth time, and the thought of standing over a hot stove for an hour feels less like a chore and more like a punishment. We’ve all been there—staring at the fridge, wishing a gourmet meal would just assemble itself. That is exactly why I fell head-over-heels in love with the ‘Simple Food Board’ trend taking over my feed lately.
It’s not just a meal; it’s an experience. Imagine a massive wooden board overflowing with textures, colors, and flavors that require minimal effort but offer maximum satisfaction. It’s about taking those pantry staples and fresh summer finds and arranging them into a feast that feels intentional and celebratory. Whether you’re hosting a last-minute get-together or just trying to survive a busy weeknight, this approach to eating is a total game-changer for the soul.
HOW TO MAKE ROTEL DIP?
Why we love this
There is something undeniably nostalgic and comforting about a bowl of warm, gooey Rotel dip sitting at the center of a spread. The way the creamy, melted cheese clings to a salty tortilla chip is pure magic, offering a velvety texture that contrasts perfectly with the chunky, zesty tomatoes and green chilies. As the steam rises, you get hits of savory meat and a subtle heat that lingers just long enough to make you reach for another dip. It’s the ultimate crowd-pleaser that brings everyone to the table with its bold, smoky aroma and satisfyingly rich finish.
Ingredients
- 16 oz Velveeta cheese, cubed
- 1 can (10 oz) Ro-Tel Diced Tomatoes and Green Chilies (undrained)
- 1 lb ground beef or spicy sausage
- 1/2 tsp taco seasoning
- Fresh cilantro for garnish
How to make it
- Begin by browning your ground beef or sausage in a large skillet over medium-high heat. Use a wooden spoon to break the meat into small, uniform crumbles so every bite of dip has a consistent texture. Cook until the meat is deeply browned and no pink remains, which usually takes 7-9 minutes.
- Drain the excess fat thoroughly by tipping the skillet over a heat-safe container or lining a plate with paper towels to ensure your dip isn’t greasy.
- Return the skillet to low heat and add the cubed Velveeta cheese. It is vital to keep the heat low during this phase; high heat can cause the cheese to grain or separate. Stir constantly as the cubes begin to soften.
- Pour in the entire can of Ro-Tel, including the juices. The acidity in the tomato juice helps thin the cheese to the perfect dipping consistency.
- Continue stirring until the mixture is completely smooth and glossy. Look for a slow, lava-like flow when you lift your spoon. Once fully melted and combined, transfer to a warmed serving bowl and top with fresh cilantro.
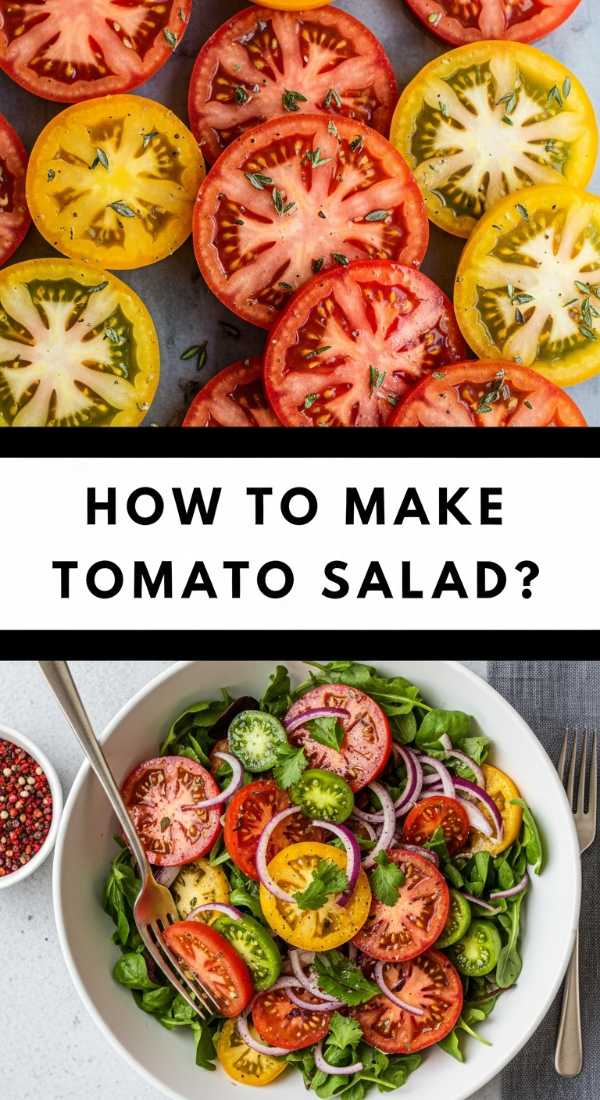
HOW TO MAKE TOMATO SALAD?

Why we love this
A fresh tomato salad is the quintessence of summer on a plate, offering a vibrant burst of acidity that cuts through richer board components. The sensation of biting into a sun-ripened heirloom tomato, releasing its sweet, cool juices, is unmatched when paired with the sharp bite of red onion and the peppery finish of fresh basil. The olive oil coats your palate in a silky film, while the flaky sea salt draws out the hidden depths of the fruit’s flavor. It’s a clean, crisp, and incredibly fragrant dish that looks like a jewel-toned masterpiece under the light.
Ingredients
- 2 lbs assorted heirloom tomatoes
- 1/2 small red onion, thinly shaved
- 1/4 cup extra virgin olive oil
- 2 tbsp balsamic glaze
- Handful of fresh basil leaves
- Flaky sea salt and cracked black pepper
How to make it
- Select tomatoes of varying sizes and colors to provide visual interest. Slice the larger tomatoes into thick rounds (about 1/2 inch) and halve the smaller cherry tomatoes. This creates a variety of textures in the mouth.
- Arrange the tomato slices on a shallow platter, slightly overlapping them. Tuck the thinly shaved red onions between the layers. Pro tip: Soak the onions in ice water for 10 minutes beforehand to remove their harsh ‘sting’ while keeping them crunchy.
- Generously sprinkle the tomatoes with flaky sea salt. Let them sit for at least 5 minutes before adding oil; this ‘macerating’ process draws out the juices to create a natural dressing.
- Drizzle the high-quality extra virgin olive oil over the top in a slow stream, followed by the balsamic glaze.
- Tear the basil leaves by hand rather than chopping them with a knife to prevent bruising and preserve their bright green color and aromatic oils. Scatter them over the salad just before serving.
HOW TO BAKE POUND CAKE?

Why we love this
A true pound cake is a marvel of simplicity, boasting a dense, buttery crumb that feels incredibly substantial yet melts away on the tongue. The aroma of toasted butter and vanilla wafting through the kitchen as it bakes creates a sense of warmth and home that is hard to replicate. When you slice into it, the golden-brown crust provides a gentle crunch that gives way to a pale, tight-grained interior that is perfectly sweet without being overwhelming. It’s the ideal canvas for fresh berries or a dollop of whipped cream, making it a sophisticated anchor for any dessert board.
Ingredients
- 1 lb (4 sticks) unsalted butter, softened
- 3 cups granulated sugar
- 6 large eggs, room temperature
- 4 cups all-purpose flour
- 3/4 cup whole milk
- 1 tbsp vanilla extract
- 1/2 tsp salt
How to make it
- Preheat your oven to 325°F (165°C). This lower temperature is crucial for pound cake, as it allows the dense batter to cook through evenly without burning the exterior. Grease and flour a large Bundt pan meticulously.
- In a stand mixer, cream the butter and sugar on medium-high for at least 5-7 minutes. You are looking for the mixture to turn pale yellow and look fluffy, almost like whipped frosting. This aeration is what gives the cake its lift.
- Add the eggs one at a time, beating well after each addition. Ensure each egg is fully incorporated before adding the next to maintain the emulsion.
- Alternately add the flour and milk, starting and ending with the flour. Mix on the lowest speed just until the streaks of white disappear. Overmixing at this stage will lead to a tough, rubbery cake.
- Pour the thick batter into the pan and smooth the top. Bake for 75-90 minutes. The cake is done when a long wooden skewer inserted into the center comes out clean or with just a few moist crumbs. Let it cool in the pan for 20 minutes before inverting.
HOW TO MAKE CHICKEN WRAPS?

Why we love this
Chicken wraps offer a satisfyingly compact explosion of flavors and textures, making them the ultimate ‘grab-and-go’ component for a busy weeknight board. The soft, floury tortilla yields to a crunch of fresh lettuce, followed by the savory, seasoned bite of tender chicken breast. Every mouthful is balanced by a creamy dressing that ties the greens and proteins together into a cohesive, delicious package. They are refreshing, filling, and visually appealing when sliced on a bias, showing off the colorful layers of vegetables and meat tucked neatly inside.
Ingredients
- Large flour tortillas
- 2 cups cooked chicken breast, shredded or sliced
- 1 cup shredded romaine lettuce
- 1/2 cup diced cucumbers
- 1/4 cup ranch or Caesar dressing
- 1/2 cup shredded cheddar cheese
How to make it
- Warm the tortillas in a dry skillet over medium heat for about 15 seconds per side. This makes them pliable and prevents them from cracking during the rolling process.
- Lay the tortilla flat and spread a thin layer of your chosen dressing across the center, leaving a 1-inch border around the edges. This acts as the ‘glue’ for your ingredients.
- Layer the shredded lettuce first to create a moisture barrier, followed by the chicken, cucumbers, and cheese. Keep the fillings concentrated in the lower third of the tortilla.
- Fold the left and right sides of the tortilla inward over the filling. Then, starting from the bottom, roll the tortilla up tightly while keeping the sides tucked in.
- Place the wrap seam-side down on a cutting board and use a serrated knife to slice it diagonally. This presentation makes the wraps easier to handle and shows off the fresh ingredients inside.
HOW TO MAKE STRAWBERRY PIE?
Why we love this
Nothing says ‘viral dessert’ like a vibrant, glossy strawberry pie that looks like it came straight from a professional bakery. The contrast between the cold, juicy berries and the buttery, flaky crust creates a sensory experience that is both refreshing and indulgent. As you cut a slice, the thick, sweet glaze holds the fruit together in a stunning ruby-red mountain, while the scent of fresh strawberries fills the air. It’s a light yet decadent finish to a meal that captures the essence of a sun-drenched afternoon in every single bite.
Ingredients
- 1 pre-baked 9-inch pie crust
- 6 cups fresh strawberries, hulled
- 1 cup granulated sugar
- 3 tbsp cornstarch
- 1 cup water
- 1 small box (3 oz) strawberry gelatin powder
How to make it
- Select the most beautiful, uniform strawberries to remain whole, and set aside about 2 cups of the less attractive ones to be crushed. Place the whole berries into your pre-baked and cooled pie crust, pointing the tips upward for a professional look.
- In a medium saucepan, combine the sugar, cornstarch, water, and the 2 cups of crushed berries. Whisk constantly over medium heat until the mixture reaches a boil.
- Continue to cook for about 2-3 minutes. You will see the mixture transform from cloudy to translucent and thick. Once it coats the back of a spoon heavily, remove from heat.
- Stir in the strawberry gelatin powder until completely dissolved. This adds color and ensures the pie sets firmly enough to slice cleanly.
- Pour the warm glaze evenly over the whole berries in the crust, ensuring it seeps into all the gaps. Refrigerate for at least 4 hours, or until the glaze is firm and cold to the touch.
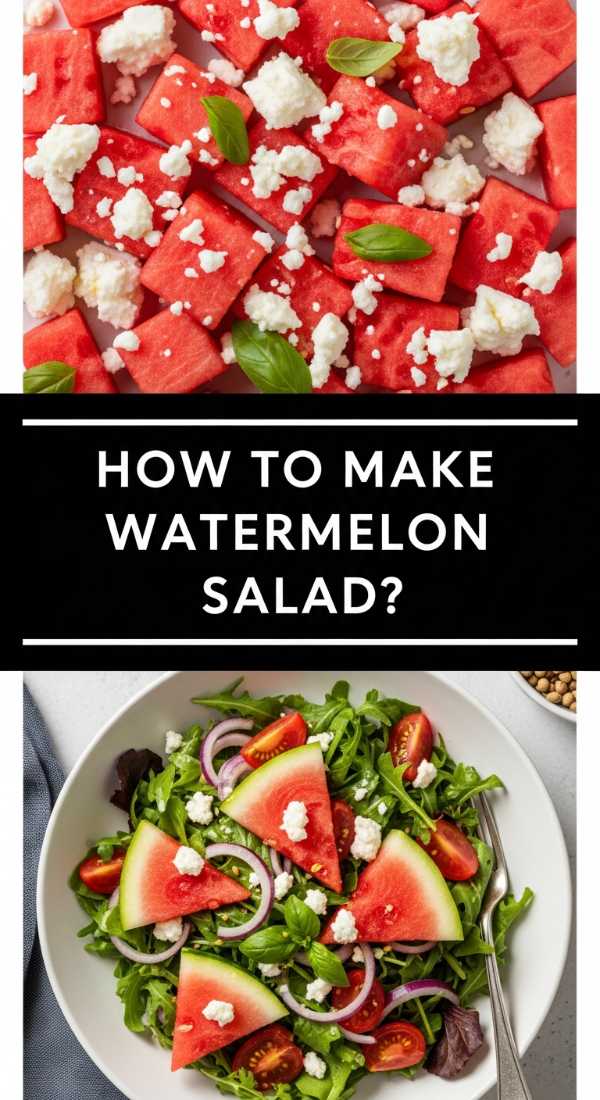
HOW TO MAKE WATERMELON SALAD?

Why we love this
This salad is a masterclass in flavor contrast, pitting the icy sweetness of watermelon against the sharp, salty tang of crumbled feta cheese. The texture is a delightful surprise; the crisp, watery crunch of the fruit is punctuated by the creamy, slightly grainy cheese and the refreshing hit of fresh mint. It’s an incredibly hydrating and cooling dish that cleanses the palate, making it a perfect companion to grilled meats or spicy dips. Every bite feels like a splash of cold water on a hot day, finished with a zesty lime zing that keeps you coming back for more.
Ingredients
- 6 cups seedless watermelon, cubed
- 1 cup feta cheese, crumbled
- 1/4 cup fresh mint leaves, chiffonade
- 1 lime, juiced
- Optional: 1/4 cup thinly sliced radishes for extra crunch
How to make it
- Start with a cold watermelon. Cubing the fruit into uniform 1-inch squares not only looks better on the board but ensures a consistent ratio of fruit to cheese in every bite.
- Place the cubes in a large, chilled bowl. If the watermelon has released a lot of juice during the cutting process, drain it off slightly so the salad isn’t swimming in liquid.
- Sprinkle the crumbled feta over the top. Use a high-quality feta stored in brine for the best texture and saltiness.
- Add the fresh mint. To ‘chiffonade’, stack the leaves, roll them like a cigar, and slice thin ribbons. This prevents the mint from bruising and releases its oils perfectly.
- Drizzle the lime juice over the top just before serving. Toss very gently with your hands or a large spoon to avoid breaking the watermelon cubes or turning the feta into a paste.
HOW TO MARINATE GRILLED CHICKEN?
Why we love this
A perfectly marinated grilled chicken is the backbone of any great food board, offering a savory, charred exterior and a ridiculously juicy interior. The marinade infuses the meat with layers of garlic, citrus, and herbs, ensuring that the flavor goes all the way to the bone. As it hits the hot grates, the sugars in the marinade caramelize, creating those beautiful, dark grill marks and a smoky aroma that is mouth-watering. It’s a versatile protein that feels substantial and deeply satisfying, providing a warm, savory anchor to the fresher elements of the spread.
Ingredients
- 1.5 lbs chicken thighs or breasts
- 1/3 cup olive oil
- 1/4 cup lemon juice
- 4 cloves garlic, minced
- 1 tsp dried oregano
- 1 tsp smoked paprika
- Salt and pepper to taste
How to make it
- If using chicken breasts, place them between two sheets of plastic wrap and pound them to an even 3/4-inch thickness using a meat mallet. This is the secret to even cooking and preventing dry edges.
- In a gallon-sized zip-top bag, whisk together the olive oil, lemon juice, garlic, oregano, paprika, salt, and pepper. The acid in the lemon juice tenderizes the proteins, while the oil carries the flavors.
- Add the chicken to the bag, seal it, and massage the marinade into the meat. Ensure every inch is coated.
- Refrigerate for at least 30 minutes, but ideally 4-6 hours. Avoid marinating for more than 12 hours, as the lemon juice can eventually start to ‘cook’ the meat and make the texture mushy.
- Grill over medium-high heat (about 400°F). Cook for 6-7 minutes per side. Use an instant-read thermometer to check for an internal temperature of 165°F. Let the meat rest for 5 minutes before slicing to keep the juices locked in.
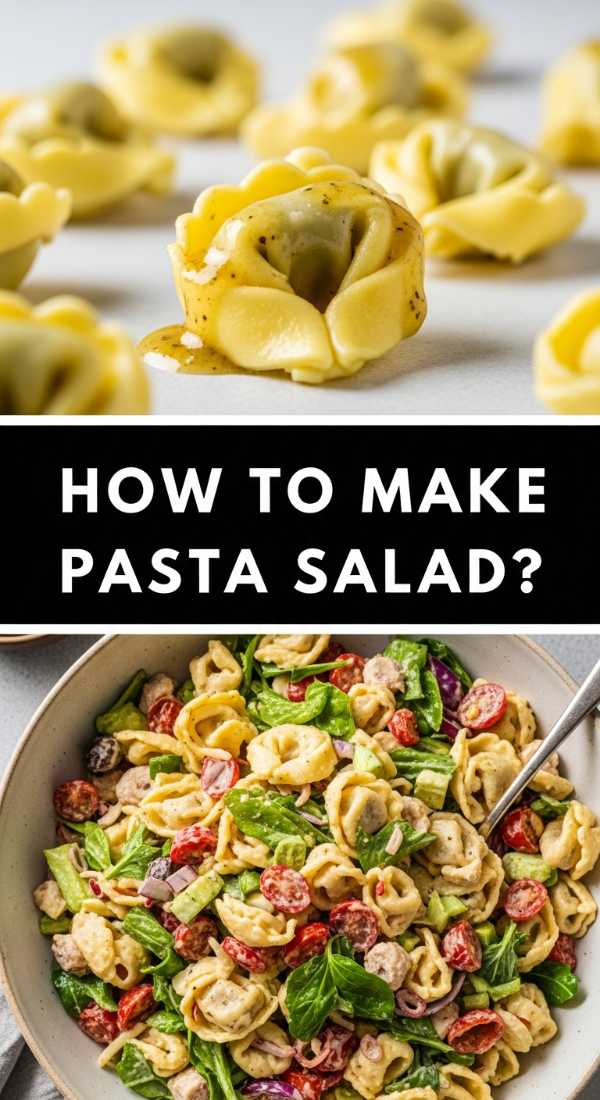
HOW TO MAKE PASTA SALAD?
Why we love this
Pasta salad is the ultimate ‘make-ahead’ hero, characterized by al dente noodles that have soaked up a tangy, herbaceous vinaigrette. Each forkful is a treasure hunt of textures—from the snap of fresh bell peppers and the chew of pepperoni to the creamy richness of fresh mozzarella pearls. It’s hearty enough to be a main dish but light enough to serve as a side, offering a cooling, savory experience that only gets better as it sits. The colors are festive and bright, making it an instant visual highlight of any board.
Ingredients
- 1 lb rotini or fusilli pasta
- 1 cup Italian dressing (homemade or store-bought)
- 1 cup cherry tomatoes, halved
- 1/2 cup black olives, sliced
- 1/2 cup bell peppers, diced
- 1/2 cup mozzarella pearls
- 1/4 cup fresh parsley, chopped
How to make it
- Cook the pasta in a large pot of heavily salted boiling water. Aim for ‘al dente’—usually 1 minute less than the package instructions. The pasta should have a firm bite, as it will soften slightly once the dressing is added.
- Drain the pasta and rinse it under cold water immediately. This stops the cooking process and washes away excess starch, preventing the noodles from sticking together in a clump.
- While the pasta is still slightly damp, toss it with half of the Italian dressing. Doing this while the pasta is slightly warm allows it to absorb the flavors more deeply into the noodle itself.
- Add the tomatoes, olives, peppers, and mozzarella pearls. Fold them in gently to ensure even distribution without bruising the vegetables.
- Chill for at least 2 hours. Before serving, add the remaining dressing and the fresh parsley. Pasta tends to ‘drink’ the dressing as it sits, so this second pour ensures the salad is moist and flavorful when it hits the board.
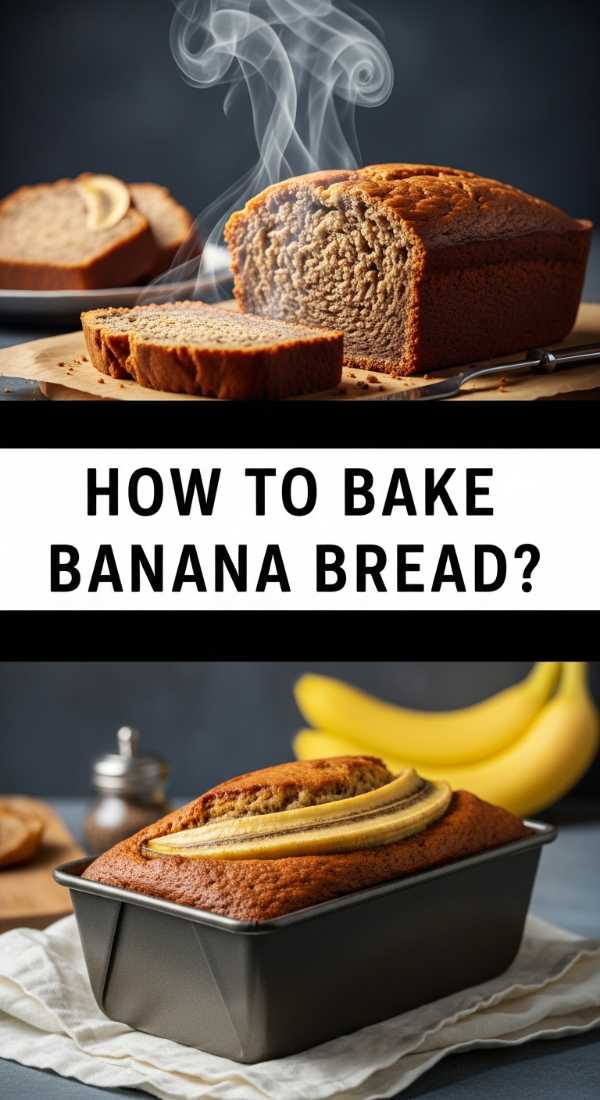
HOW TO BAKE BANANA BREAD?

Why we love this
Warm banana bread is like a hug in loaf form, offering a moist, tender crumb and an intoxicatingly sweet, caramelized aroma. The deep mahogany crust hides an interior that is rich with the natural sugars of overripe bananas, punctuated by the occasional crunch of a toasted walnut. It’s a comforting, rustic addition to a food board that works beautifully for brunch or as a sweet-savory snack. The way a slice feels—slightly heavy, incredibly soft, and naturally sweet—makes it an irresistible treat that feels both humble and luxurious.
Ingredients
- 3 very overripe bananas, mashed
- 1/3 cup melted butter
- 3/4 cup granulated sugar
- 1 large egg, beaten
- 1 tsp vanilla extract
- 1 tsp baking soda
- 1.5 cups all-purpose flour
- 1/2 cup chopped walnuts (optional)
How to make it
- Preheat your oven to 350°F (175°C) and grease a 4×8-inch loaf pan. Use bananas that are covered in black spots; the darker they are, the sweeter and more moisture they will provide to the bread.
- In a large mixing bowl, mash the bananas with a fork until they are a smooth liquid with only a few small lumps remaining.
- Stir the melted butter into the mashed bananas. Add the sugar, beaten egg, and vanilla extract. Whisk by hand until the mixture is cohesive and slightly bubbly.
- Sprinkle the baking soda and flour over the wet ingredients. Fold them in using a spatula. Stop the moment you no longer see streaks of dry flour. Over-mixing will develop the gluten and result in a tough, rubbery loaf rather than a tender one.
- Fold in the walnuts if using. Pour the batter into the prepared pan and bake for 50-60 minutes. Test for doneness by inserting a toothpick into the center; it should come out clean with no wet batter attached. Let cool on a wire rack before slicing.
HOW TO MAKE PINA COLADA?
[IMAGE_10]
Why we love this
The Piña Colada is a tropical vacation served in a glass, offering a creamy, frosty escape from the everyday grind. The combination of velvety coconut cream and tart, bright pineapple creates a flavor profile that is sun-drenched and exotic. As you sip it through a straw, the icy, snow-like consistency melts on your tongue, releasing hints of sweet rum and fruit. It’s a lush, indulgent drink that feels celebratory, especially when garnished with a bright maraschino cherry and a wedge of fresh pineapple. It’s the perfect refreshing pairing for a board full of salty and savory snacks.
Ingredients
- 2 oz white rum
- 2 oz cream of coconut (like Coco Lopez)
- 4 oz pineapple juice
- 1/2 cup frozen pineapple chunks
- 1 cup ice
- Garnish: Pineapple wedge and maraschino cherry
How to make it
- Place your blender jar in the freezer for 10 minutes before starting. A chilled jar helps keep the drink from melting too quickly as it blends.
- Add the frozen pineapple chunks and ice to the blender first. Using frozen fruit instead of just ice creates a much smoother, ‘sorbet-like’ texture that doesn’t get watered down.
- Pour in the liquid ingredients: the white rum, the pineapple juice, and the cream of coconut. Note that cream of coconut is much thicker and sweeter than coconut milk; ensure you are using the correct one for that iconic silky mouthfeel.
- Blend on high speed for at least 45-60 seconds. You want to hear the sound of the ice transition from a loud crunch to a quiet whir. This ensures there are no large ice chunks left.
- Pour into a chilled Hurricane glass. Garnish immediately with a fresh pineapple wedge on the rim and a cherry on top. Serve with a straw while it’s still frosty and thick.
Conclusion
Creating a viral simple food board isn’t about being a master chef; it’s about the joy of assembly and the magic of sharing. By combining these easy-to-follow recipes, you can turn a mundane weeknight into a vibrant, interactive dining experience that feeds both the body and the soul. So, grab your biggest board, put on some music, and start building your own masterpiece tonight!
Frequently Asked Questions
Can I prepare these components in advance? Yes! Most items like the pasta salad, marinated chicken (pre-grill), and the banana bread can be made a day ahead. The tomato and watermelon salads are best made 30 minutes before serving to keep them crisp.
How do I keep the Rotel dip warm on the board? If you aren’t serving it immediately, you can place the dip in a small decorative slow cooker or a fondue pot to maintain that perfect gooey consistency throughout the evening.
What is the best way to arrange the board for a viral look? Start with your largest bowls (like the Rotel dip and pasta salad) to create anchors, then fill in the gaps with the wraps, slices of cake, and the fruit salads. Use fresh herbs as ‘fillers’ to hide any bare spots on the wood!