
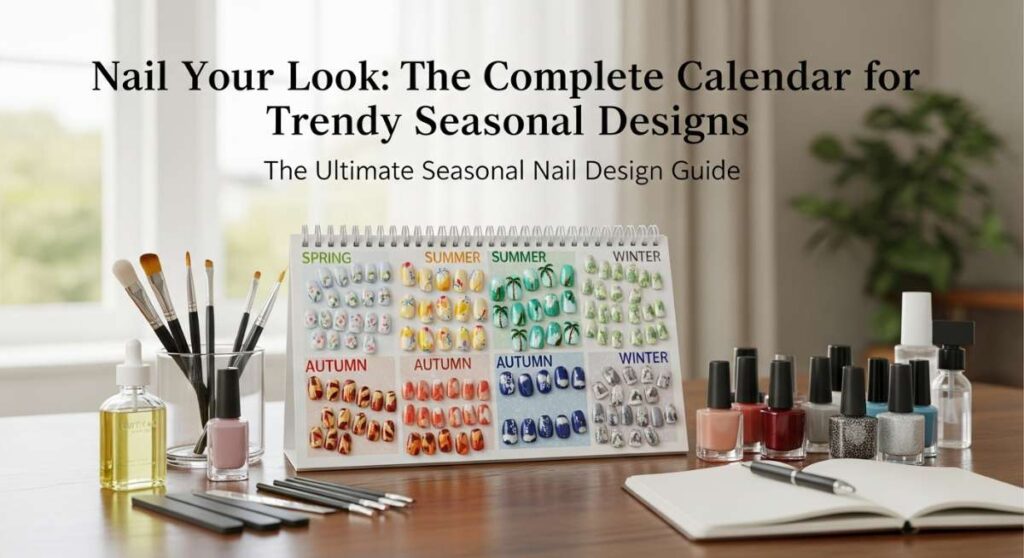
Nail Your Look: The Complete Calendar for Trendy Seasonal Designs
Hi loves! There is something so incredibly magical about looking down at your hands and seeing a tiny, glittering reflection of your soul. Whether you’re clutching a warm latte in the rain or waving hello to a summer sunset, your nails are your ultimate accessory—a soft whisper of who you are and who you’re becoming. I’ve spent so many afternoons tucked away in my favorite chair, dreaming up designs that feel like a cloud-soft embrace, and today, I’m so excited to share my heart with you in this seasonal guide.
We all have those moments where we want to feel a little bolder, a little softer, or maybe a little more mysterious. That’s why I’ve curated this special calendar just for you. From the edgy whispers of a gothic spring to the vibrant energy of summer stilettos, we’re going to walk through this journey together, one brushstroke at a time. Grab your favorite tea, settle in, and let’s find the look that makes your heart flutter.
6 Easy Steps to Style Gothic Spring Nails

Why to love this Design:
Spring isn’t just about soft pastels; it’s also about the beautiful mystery of new beginnings. Gothic spring nails blend the edge of midnight black with the delicate bloom of the season, creating a look that is both moody and ethereal.
Essential Elements:
- Matte black base polish
- Pressed dried flowers in dark purples or deep reds
- Silver micro-beads
- Fine-liner brush for vine details
How to Prepare:
- Gently shape your nails into a soft almond to elongate the fingers.
- Apply a high-quality base coat to protect your natural nail.
- Paint two thin layers of matte black polish.
- Using tweezers, carefully place a single dried dark flower on the accent nail.
- Add delicate silver vines using a fine-liner brush around the flower.
- Seal the look with a matte top coat for that velvet-soft finish.
Budget Range
- OPI Matte Top Coat ($11.00)
- Essie ‘Licorice’ Black Polish ($10.00)
- Nail Art Dried Flower Kit ($8.00)
5 Ways to Design Your College Graduation Nails

Why to love this Design:
Oh, my darling, you’ve worked so hard! Graduation is a milestone that deserves to be celebrated with elegance. These designs are meant to look stunning while you hold that hard-earned diploma, reflecting both your school spirit and your bright future.
Essential Elements:
- Your school colors (accented)
- Sheer nude or ‘milky’ base
- Gold leaf flakes
- Sticker numbers for your graduation year
How to Prepare:
- Start with a clean, buffed surface to ensure your mani lasts through all the photos.
- Apply a sheer nude base to keep the look sophisticated and timeless.
- On the ring finger, create a thin French tip using one of your school’s colors.
- Dab tiny flecks of gold leaf onto the tips for a celebratory shimmer.
- Apply a high-gloss top coat to make your nails shine like your future.
Budget Range
- Olive & June Sheer Polish ($9.00)
- Gold Leaf Flakes ($6.00)
- Precision Nail Art Brush Set ($12.00)
7 Quick Tips for Bright Summer Nails
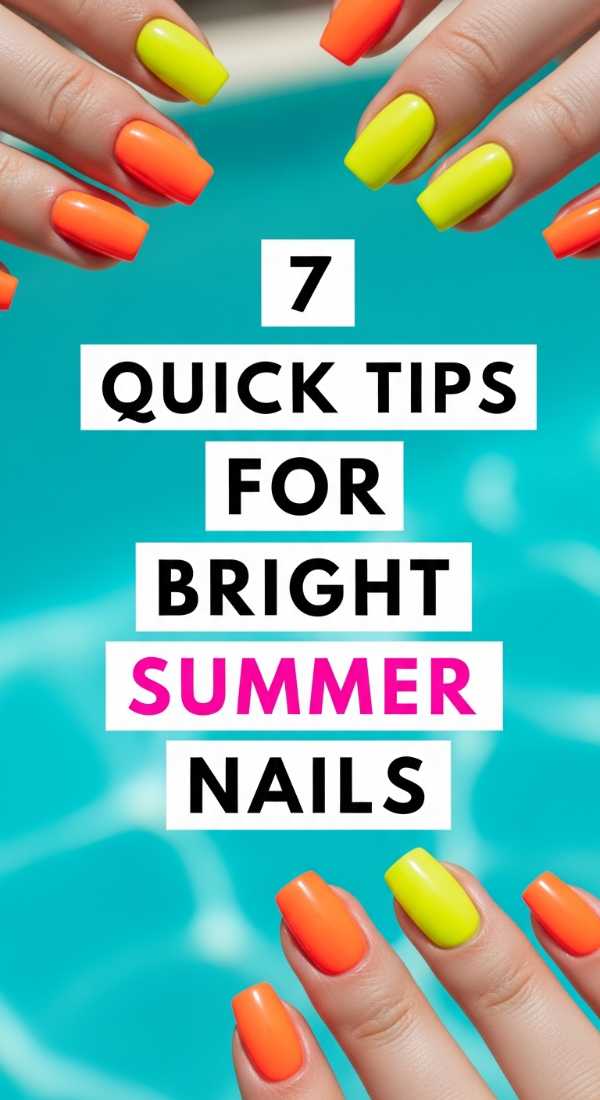
Why to love this Design:
Summer is the season of pure, unadulterated joy! Bright nails are like a burst of sunshine on your fingertips. They demand attention, radiate confidence, and look absolutely incredible against a sun-kissed glow.
Essential Elements:
- Neon pigments or polishes
- White base coat (to make neons pop!)
- Glossy top coat
- Cuticle oil for hydration
How to Prepare:
- Keep your nails short and square for a modern, punchy look.
- Always use a white base coat first; it makes the bright colors truly electric.
- Choose two clashing neon colors like orange and pink for a fun vibe.
- Apply the first color to the thumb, middle, and pinky.
- Apply the second color to the index and ring fingers.
- Add a second coat quickly to keep the pigment smooth and even.
- Finish with a super-glossy top coat to mimic the shine of the ocean.
Budget Range
- Orly Neon Earth Collection ($15.00)
- Holler and Glow Neon Strips ($7.00)
- Sally Hansen Insta-Dri Top Coat ($6.00)
4 Easy Ways to Get Yellow Spring Nails
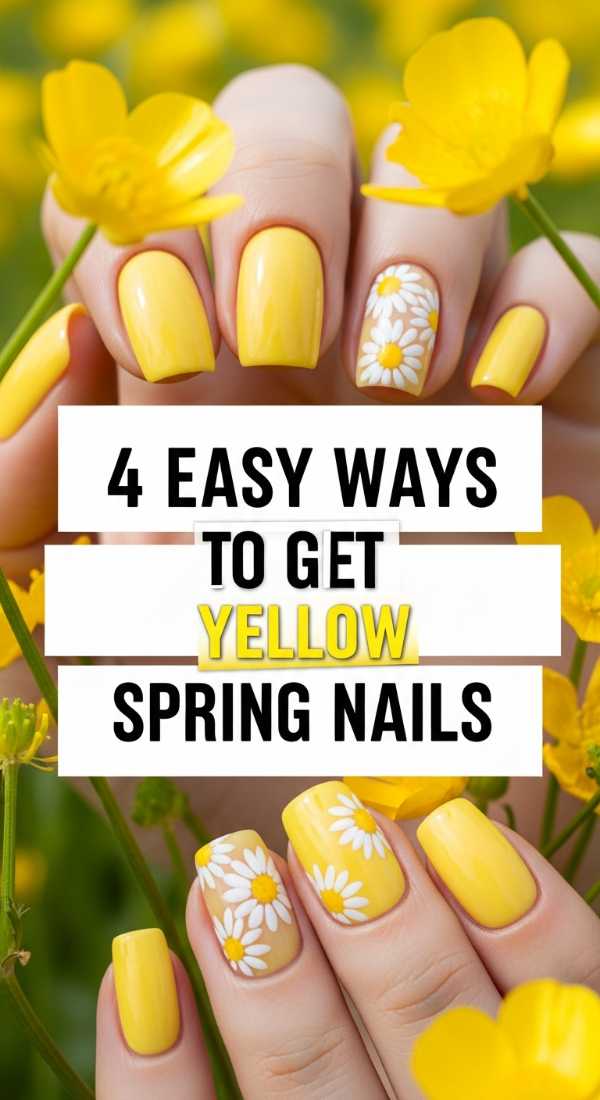
Why to love this Design:
Yellow is the color of optimism, darlings. It’s the first daffodil peeking through the snow. These yellow spring nails are soft, cheerful, and designed to bring a smile to your face every time you type or text.
Essential Elements:
- Pastel lemon polish
- Matte top coat
- Small dotting tool
- White acrylic paint
How to Prepare:
- Apply a strengthening base coat to ensure a smooth canvas for the light color.
- Paint two coats of pastel lemon, allowing them to dry completely between layers.
- Use a dotting tool to create tiny white daisies on the corners of your nails.
- Finish with a matte top coat to give the yellow a soft, marshmallow-like texture.
Budget Range
- Zoya ‘Darcy’ Yellow Polish ($12.00)
- Dotting Tool Set ($5.00)
- NailTek Strengthener ($10.00)
8 Steps to Create Peach Nails with Designs
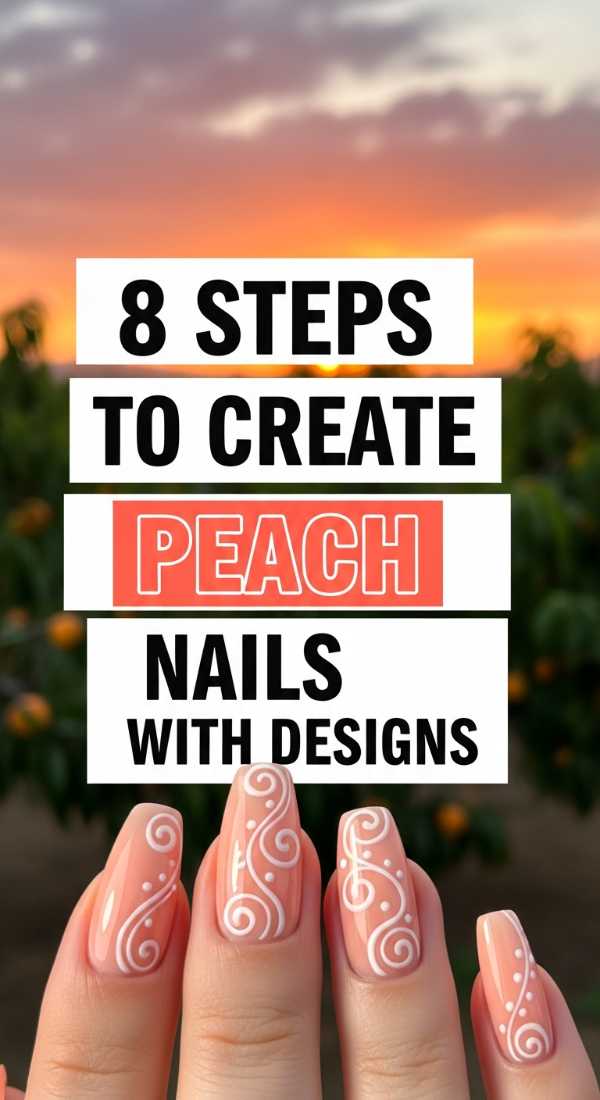
Why to love this Design:
Peach is the ultimate ‘soft girl’ aesthetic. It’s warm, flattering for every skin tone, and feels so incredibly cozy. Adding delicate designs like tiny peaches or swirls makes it feel like a whimsical summer dream.
Essential Elements:
- Creamy peach polish
- Green and orange detail polish
- Fine-tip nail pen
- Hydrating base coat
How to Prepare:
- Soak your hands in warm water to soften the cuticles before starting.
- Apply your hydrating base coat to create a healthy foundation.
- Paint two layers of your favorite creamy peach shade.
- On your accent nail, draw two small orange circles near the cuticle.
- Use the green polish to add a tiny leaf to each circle, creating mini peaches.
- Draw thin, white wavy lines on the other nails for a retro feel.
- Allow the art to dry for at least five minutes before sealing.
- Apply a thick gel-effect top coat for a professional finish.
Budget Range
- Essie ‘Tart Deco’ ($10.00)
- Nail Art Detail Pens ($14.00)
- Seche Vite Dry Fast Top Coat ($9.00)
10 Bold Steps to Master Pucci Nails
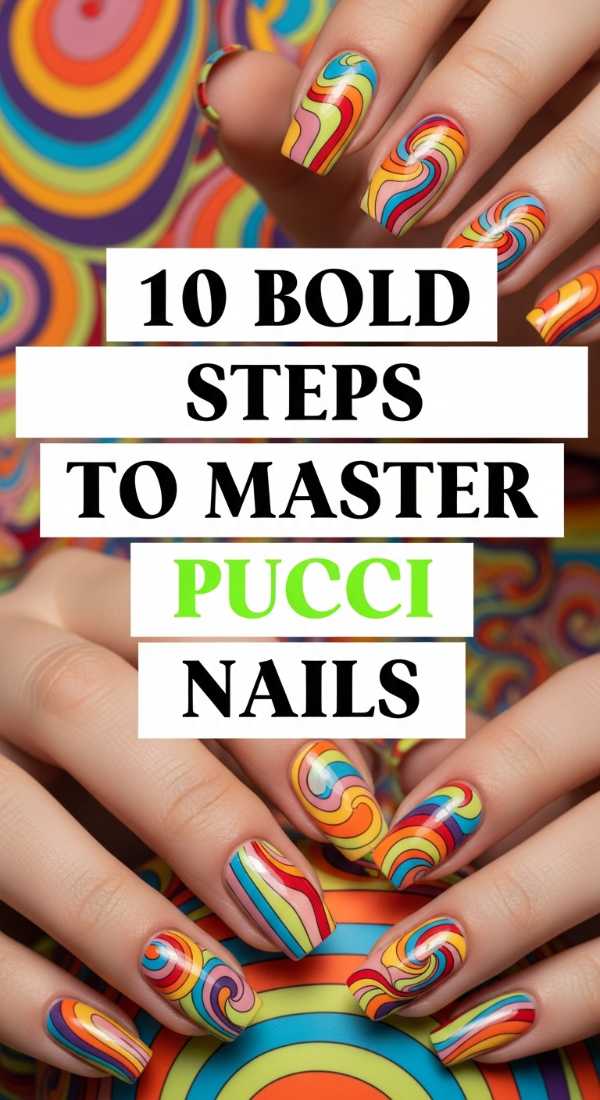
Why to love this Design:
If you love a vintage vibe, Pucci-inspired nails are your soulmate. These swirling, geometric patterns are a nod to 1960s Italian luxury—bold, colorful, and undeniably chic. It’s art on your fingertips, loves!
Essential Elements:
- 4-5 coordinating polish colors (blues, pinks, oranges)
- Striper brush (long and thin)
- Black and white detailing polish
- Patience and a steady hand!
How to Prepare:
- Select your color palette and lay the bottles out in order.
- Apply a neutral nude base to allow the colors to stand out.
- Using the striper brush, draw a large ‘S’ curve across the nail.
- Fill in one side of the curve with your first bright color.
- Create a second, smaller curved shape inside the first one with a different color.
- Use white polish to create thin borders between each color block.
- Add a few black dots or thin lines to mimic the iconic Pucci print.
- Repeat the process on each nail, varying the direction of the swirls.
- Clean up the edges with a brush dipped in acetone.
- Seal with a high-shine top coat to make the colors vibrate.
Budget Range
- Modelones Liner Gel Set ($18.00)
- Pure Acetone Clean-up Kit ($8.00)
- LED Nail Lamp for Gel ($25.00)
5 Expert Tips for Hot Pink Nails with Flowers

Why to love this Design:
Hot pink is a power move, but when you add delicate flowers, it becomes a beautiful balance of strength and softness. It’s the perfect look for a girl’s night out or a summer garden party where you want to feel vibrant.
Essential Elements:
- Neon pink polish
- Floral nail stickers or decals
- Fine tweezers
- Plumping top coat
How to Prepare:
- Buff the nail surface to ensure the hot pink pigment adheres smoothly.
- Apply two coats of neon pink, ensuring you cap the free edge of the nail.
- Once dry, use tweezers to place floral decals near the side walls of the nail.
- Press the decals down firmly to remove any air bubbles.
- Apply two layers of a plumping top coat to give it a salon-gel look.
Budget Range
- OPI ‘Pink Flamenco’ ($11.00)
- Floral Decal Sheet ($5.00)
- Gellen Gel Top Coat ($8.00)
6 Simple Ways to Mix Lemon and Blue Nails
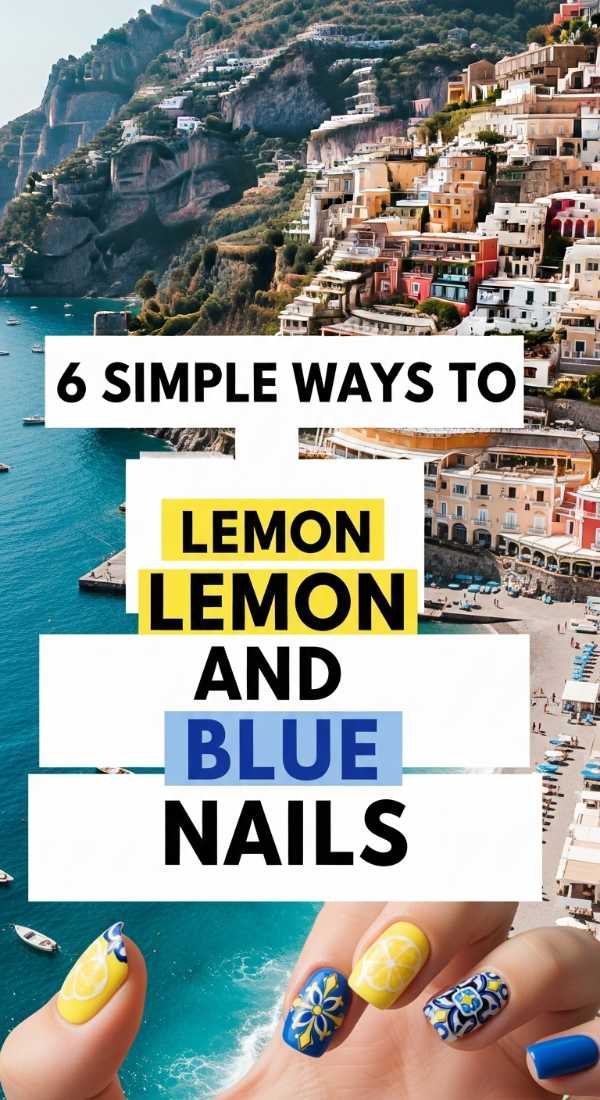
Why to love this Design:
Imagine the Amalfi Coast in a manicure! The contrast of zesty lemon yellow against Mediterranean blue is so refreshing. It’s a sophisticated way to play with color blocking while keeping a summer theme.
Essential Elements:
- Bright lemon yellow
- Cobalt or royal blue
- Striping tape
- Matte and Glossy top coats
How to Prepare:
- Paint half your nails lemon yellow and the other half cobalt blue.
- Use striping tape to create a crisp line down the center of the ring finger.
- Paint one side yellow and the other blue for a split-color look.
- Apply a matte top coat to the yellow sections and a glossy one to the blue.
- Add a tiny lemon slice sticker to the blue nails for a pop of whimsy.
- Finish by massaging lemon-scented cuticle oil for the full experience.
Budget Range
- China Glaze ‘Celtic Sun’ ($8.00)
- Bluesky Cobalt Gel ($10.00)
- Lemon Cuticle Oil ($7.00)
9 Unique Ways to Style Sunset Aura Nails

Why to love this Design:
Aura nails are all about your inner energy. By using sunset colors like orange, pink, and violet, you’re creating a glowing effect that looks like a masterpiece. It’s dreamy, modern, and absolutely mesmerizing.
Essential Elements:
- Makeup sponge (for dabbing)
- Orange, pink, and purple polishes
- Nude base color
- Fine iridescent glitter
How to Prepare:
- Start with a nude or light pink base coat.
- Apply a small dot of orange polish to the center of a makeup sponge.
- Surround it with a ring of pink, then a ring of purple.
- Gently dab the sponge onto the center of your nail to create a diffused glow.
- Repeat the dabbing process to build the color intensity.
- Use a clean sponge to blend the edges of the ‘aura’ into the base color.
- Apply a thin layer of iridescent glitter over the center to add depth.
- Clean up any polish on the skin using a small brush and remover.
- Seal with a thick top coat to smooth out the texture from the sponge.
Budget Range
- Wedge Makeup Sponges ($4.00)
- Cirque Colors Aura Collection ($14.00)
- Iridescent Topper ($9.00)
3 Easy Steps for Summer Stiletto Nails
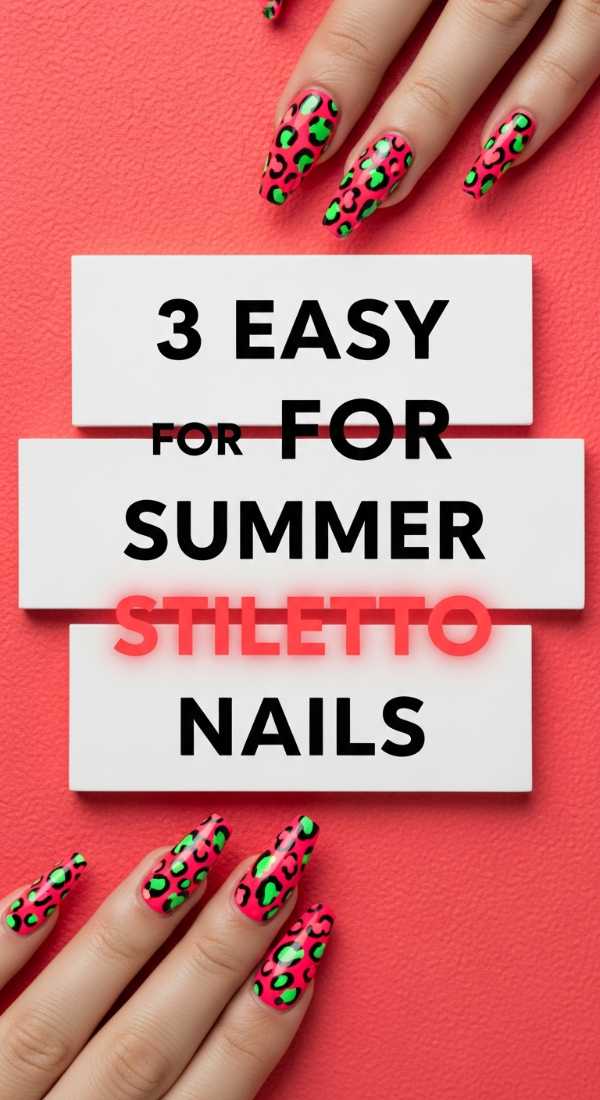
Why to love this Design:
Stiletto nails are for my fierce loves! This shape is bold and elongated, providing the perfect canvas for summer colors. Even with a simple design, the shape itself makes a powerful statement of confidence.
Essential Elements:
- Stiletto-shaped nail tips or extensions
- Electric teal polish
- Strong nail glue
How to Prepare:
- Glue on your stiletto tips, ensuring they are straight and secure.
- File the sides slightly to make the point extra sharp and sleek.
- Apply two coats of electric teal and finish with a high-shine top coat.
Budget Range
- Full Cover Stiletto Tips ($10.00)
- Kiss Maximum Speed Glue ($5.00)
- Essie ‘Naughty Nautical’ ($10.00)
Wrapping Your Look in Love
I hope this guide feels like a warm hug and a spark of inspiration all at once. Remember, loves, there are no rules in beauty—only what makes you feel most like *you*. Whether you go for the moody gothic vibes or the sun-drenched aura glow, wear it with your head held high. Your hands tell the story of your life; make sure it’s a beautiful one. Until next time, stay luminous!