
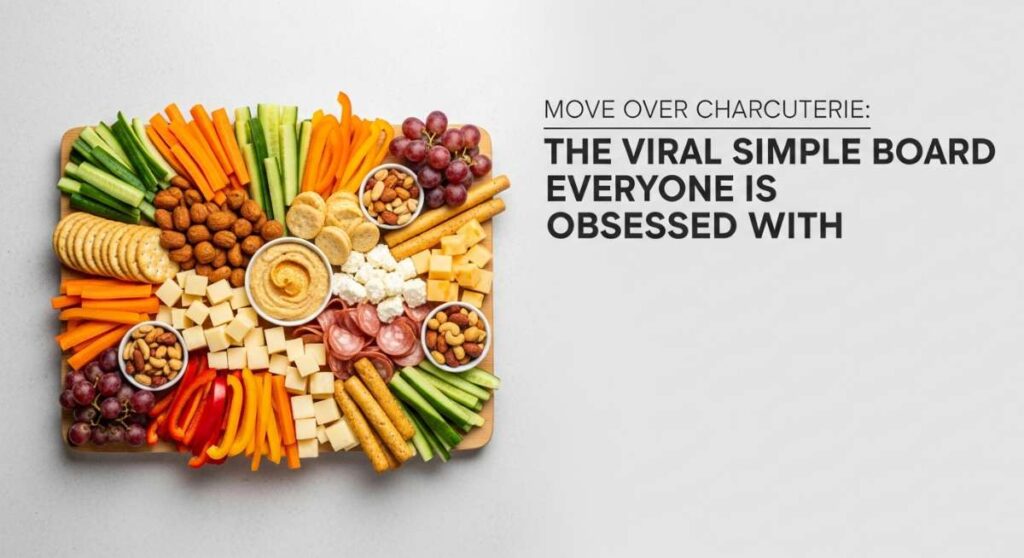
Gathering around a table has always been my favorite way to connect, but let’s be honest—the era of the hyper-curated, sixty-ingredient charcuterie board is starting to feel a little exhausting. We’ve all spent hours agonizing over the perfect placement of a brie wedge or the exact fold of a salami rose, only for the actual eating experience to feel a bit disjointed. Lately, I’ve found myself leaning into something much more soulful: the ‘Simple Board.’ It’s about focusing on one or two star elements, prepared perfectly, and letting the conversation take center stage instead of the garnish.
There is a certain magic in the simplicity of a single, well-executed dish served communally. Whether it’s a pile of warm, zesty shrimp or a platter of perfectly grilled vegetables, these boards invite people to dig in without hesitation. It’s less about the performance of hosting and more about the sensory joy of the food itself. The aroma of fresh herbs and the vibrant colors of seasonal produce do all the heavy lifting, creating an atmosphere that feels effortless, intentional, and incredibly inviting.
In this post, I’m sharing the viral favorites that are redefining what it means to host. These aren’t just recipes; they are the building blocks of a slower, tastier way of living. From the sweet crunch of a summer pie to the savory comfort of a creamy dip, these simple boards are exactly what your next gathering needs to feel like home.
The Ultimate Fresh Strawberry Pie Board

Why we love this
There is nothing quite like the scent of sun-ripened strawberries filling a kitchen on a warm afternoon. This pie is a celebration of texture, combining a buttery, flakey crust that shatters upon impact with a glossy, ruby-red filling that tastes like pure sunshine. Every bite offers a perfect balance of tartness and honey-like sweetness, finished with a dollop of cold cream that melts into the warm fruit. It’s the kind of dessert that makes you want to close your eyes and savor the fleeting magic of summer with every single forkful.
Ingredients
- 2 quarts fresh strawberries, washed and hulled
- 1 cup granulated sugar
- 3 tablespoons cornstarch
- 1/4 teaspoon salt
- 1 tablespoon lemon juice
- 1 pre-baked 9-inch pie crust
- Whipped cream for serving
How to make it
- Begin by preparing your berries; set aside about half of the prettiest, most uniform strawberries to remain whole. Mash the remaining berries in a medium saucepan until they are relatively liquid but still have some small chunks.
- In a small bowl, whisk together the sugar and cornstarch to prevent clumping, then stir this mixture into the mashed strawberries along with the salt and lemon juice.
- Place the saucepan over medium heat and cook the mixture, stirring constantly with a wooden spoon. Watch for the color change—the glaze will transition from a cloudy pink to a deep, translucent red as it thickens. Once it reaches a thick, jam-like consistency and begins to bubble, remove it from the heat and let it cool for 10 minutes.
- Arrange your whole, fresh strawberries decoratively inside your pre-baked, cooled pie crust, pointing the tips upward for a professional look.
- Slowly pour the slightly cooled glaze over the fresh berries, ensuring every crevice is filled and the fruit is thoroughly coated. Chill the pie in the refrigerator for at least 3-4 hours until the filling is firm and set before slicing.
The Crowd-Pleasing Rotel Dip Board
Why we love this
This dip is the undisputed king of comfort food, offering a creamy, molten landscape of cheese punctuated by the smoky heat of green chilies and savory browned meat. The aroma is instantly nostalgic, evoking memories of game days and casual backyard hangouts where the only rule is to keep dipping until the bowl is empty. Its velvety texture clings perfectly to a salty tortilla chip, providing a satisfying crunch followed by a rich, spicy explosion of flavor that keeps everyone coming back for more.
Ingredients
- 1 lb ground beef or breakfast sausage
- 1 block (16 oz) Velveeta cheese, cubed
- 1 can (10 oz) Rotel diced tomatoes and green chilies
- 1/2 teaspoon garlic powder
- 1/4 cup chopped cilantro (optional garnish)
- Tortilla chips for serving
How to make it
- In a large skillet or heavy-bottomed pot, brown the ground meat over medium-high heat. Use a spatula to break the meat into very fine crumbles, as this ensures an even distribution of protein in every bite.
- Once the meat is fully cooked and no pink remains, drain the excess fat thoroughly to prevent the dip from becoming oily.
- Reduce the heat to low and add the cubed Velveeta cheese and the entire can of Rotel (including the liquid, as this thins the cheese to the perfect dipping consistency).
- Stir the mixture gently and continuously. You want a slow melt to avoid scorching the cheese on the bottom of the pan; look for a smooth, glossy texture with no visible lumps.
- Once fully melted and integrated, stir in the garlic powder. Serve immediately on a board surrounded by chips, or transfer to a small slow cooker on the ‘warm’ setting to maintain that perfect, flowy consistency throughout the party.
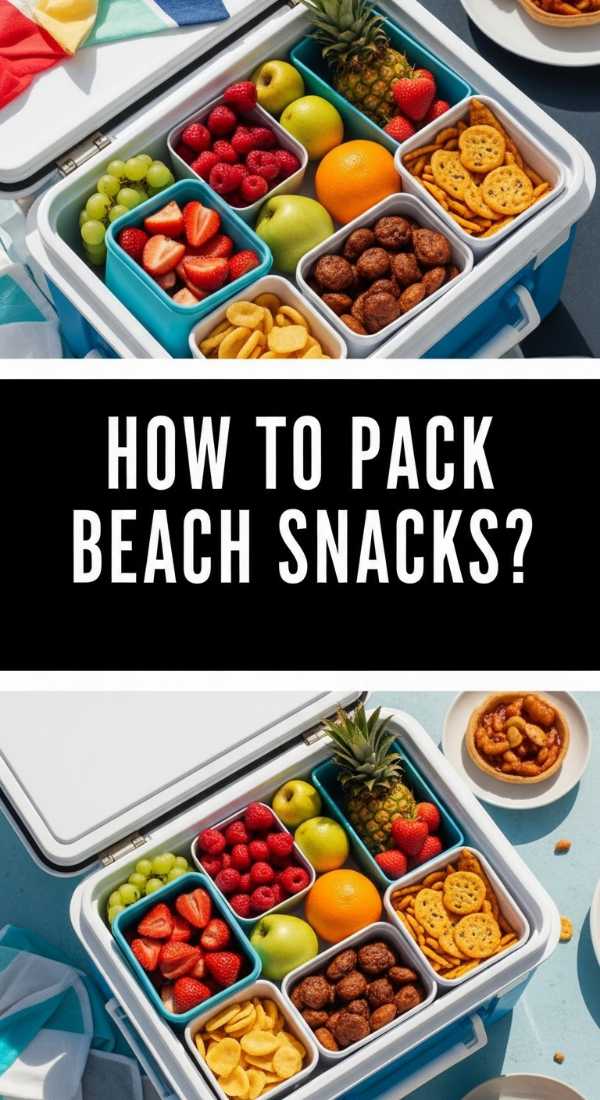
The Ultimate Beach Snack Board

Why we love this
When you’re lounging by the waves, you need snacks that are as refreshing as the ocean breeze and won’t wilt under the summer sun. This board is all about vibrant, hydrating fruits and salty, protein-packed bites that provide the energy needed for a day of swimming and sunbathing. The contrast between a crisp, cold grape and a savory piece of jerky is incredibly satisfying, while the absence of heavy sauces ensures everything stays clean and easy to eat with your hands. It’s a sensory kit for the perfect seaside escape.
Ingredients
- Frozen green and red grapes
- Pre-sliced watermelon wedges
- Individual packs of beef jerky or turkey sticks
- Almonds or pistachios
- Assorted hard cheeses (like aged cheddar)
- Whole grain crackers
How to make it
- Preparation is key for the beach; start by washing your fruit and slicing the watermelon into easy-to-grab triangles with the rind still on for a natural handle.
- Freeze your grapes overnight; they act as delicious, edible ice cubes that won’t water down your snacks and stay cold for hours in a cooler.
- Slice your hard cheeses into thick batons or cubes; avoid soft cheeses like brie or goat cheese, as they will lose their shape and become messy in the heat.
- Use a partitioned airtight container or a sturdy tray with a lid to keep the sand out. Place the heavier items like nuts and crackers in the center and surround them with the chilled fruit.
- Pack the snacks in a cooled bag with ice packs underneath the tray to maintain a crisp texture, ensuring the crackers stay dry by keeping them in their own sealed sleeve until the moment of serving.
Whipped Creamy Butter Board

Why we love this
There is something fundamentally luxurious about a cloud of whipped butter spread thick over a warm, crusty loaf of bread. This board takes a simple staple and turns it into an artisanal experience, with flakes of sea salt and sprigs of fresh herbs catching the light. The texture is airy and ethereal, melting the moment it touches your tongue and releasing a rich, dairy sweetness that is infinitely better than anything store-bought. It’s a conversation starter that celebrates the beauty of basic, high-quality ingredients.
Ingredients
- 2 cups heavy whipping cream (room temperature)
- 1/2 teaspoon flaky sea salt
- Optional: Fresh thyme, honey, or red pepper flakes for topping
- Warm sourdough or baguette
How to make it
- Pour the room-temperature heavy cream into the bowl of a stand mixer fitted with the whisk attachment. Starting at a medium speed, begin whisking until the cream reaches the whipped cream stage.
- Increase the speed to high and continue whisking past the soft peak stage. You will notice the cream begin to look grainy and yellow; keep going until the solid butter fat completely separates from the liquid buttermilk.
- Drain the buttermilk (save it for pancakes!) and place the solid butter into a bowl of ice-cold water. Knead the butter with your hands or a spoon to squeeze out any remaining buttermilk; this step is crucial to prevent the butter from turning sour.
- Once washed, pat the butter dry with a paper towel and return it to the mixer. Add your sea salt and whip on medium-high for 1-2 minutes until it becomes light, fluffy, and spreadable.
- Spread the whipped butter across a wooden board using the back of a spoon to create decorative swoops and swirls, then garnish with herbs or honey and serve alongside warm bread.
The Easy Camping Meal Board
Why we love this
Eating outdoors elevates even the simplest meal into a rugged, flavorful feast that tastes like woodsmoke and adventure. This camping board focuses on hearty, foil-packet style cooking that locks in all the juices and fats, creating a tender, charred result that is impossible to replicate in a standard kitchen. The smell of searing protein over an open flame combined with the crisp night air creates a grounding, primal experience that brings everyone closer together. It’s messy, it’s hot, and it’s perfectly rustic.
Ingredients
- Smoked sausages or kielbasa, sliced
- Baby potatoes, halved
- Bell peppers and onions, roughly chopped
- Olive oil
- Smoked paprika, garlic salt, and cracked black pepper
How to make it
- Prep your ingredients at home by chopping the sausages and vegetables into uniform, bite-sized pieces so they cook at the same rate.
- Toss everything in a large bowl with a generous glug of olive oil and the spices until every surface is well-coated.
- Layout large squares of heavy-duty aluminum foil. Place a portion of the mixture in the center of each, then fold the edges up tightly to create a sealed pouch, leaving a little room for steam to circulate.
- Place the foil packets directly onto a grate over hot coals (not active flames). Cook for about 15-20 minutes, flipping the packets once halfway through using long-handled tongs to ensure the potatoes soften and the sausage carmelizes.
- Carefully open one packet to check for doneness; the potatoes should be fork-tender and the onions translucent. Empty the packets onto a large wooden board for a communal, rustic presentation that’s easy to clean up.
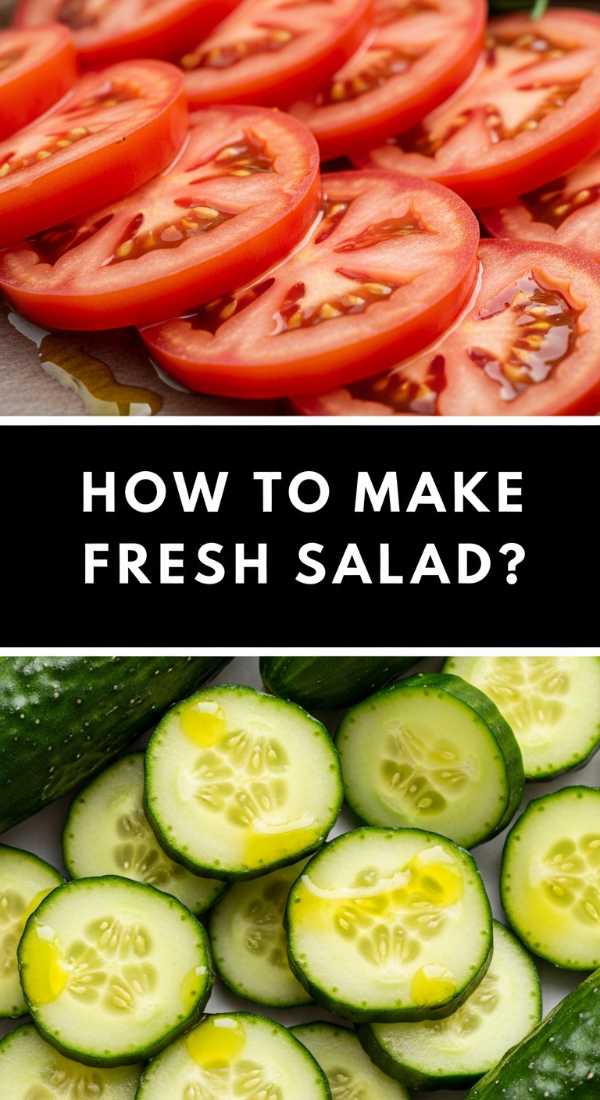
The Crisp Garden Fresh Salad Board

Why we love this
A fresh salad board is a vibrant masterpiece of color and crunch that feels like a reset button for your palate. The snap of a perfectly chilled radish, the peppery bite of arugula, and the acidic tang of a lemon vinaigrette work together to create a symphony of clean, bright flavors. It’s a sensory delight that celebrates the garden’s bounty, looking like a living painting spread across your table. Each bite is light and refreshing, making it the perfect accompaniment to a heavy summer meal or a standalone star for a light lunch.
Ingredients
- Mixed baby greens and romaine hearts
- Watermelon radishes, thinly sliced
- English cucumbers, sliced into ribbons
- Heirloom cherry tomatoes, halved
- Feta cheese crumbles
- Lemon-tahini or balsamic dressing
How to make it
- Start by washing your greens in very cold water and using a salad spinner to get them bone-dry; dressing will not cling to wet leaves, resulting in a soggy salad.
- Use a mandoline or a very sharp knife to slice the radishes and cucumbers into paper-thin pieces, which adds a delicate, professional texture to the board.
- Lay the greens down first as a lush bed, then artfully nestle the cucumbers and radishes among the leaves. Scatter the cherry tomatoes and feta cheese over the top for pops of color and creaminess.
- Instead of tossing the salad in a bowl, keep the dressing in a small carafe on the side or lightly drizzle it just before serving to maintain the structural integrity of the leaves.
- Season the entire board with a final pinch of flaky salt and cracked black pepper to make the natural flavors of the vegetables sing.
Perfectly Grilled Veggie Board
Why we love this
Grilling vegetables transforms them from simple sides into charred, caramelized stars of the show. The high heat of the grill coaxes out the natural sugars in peppers and asparagus, creating a smoky sweetness that is addictive and deeply satisfying. There is a beautiful contrast between the crisp, slightly blackened exterior and the tender, juicy interior of a well-grilled zucchini. Served on a board, these vegetables look stunning and offer an earthy, fire-kissed aroma that draws everyone to the table immediately.
Ingredients
- Asparagus spears (tough ends trimmed)
- Bell peppers, seeded and quartered
- Zucchini, sliced into long planks
- Red onion, cut into thick rounds
- Balsamic glaze and olive oil
How to make it
- Preheat your grill to medium-high heat (about 400°F). While it heats, lay all your vegetables on a flat tray and coat them generously with olive oil, salt, and pepper.
- Place the denser vegetables, like the onions and peppers, on the hottest part of the grill first, as they take longer to soften.
- Add the asparagus and zucchini last; these only need about 3-4 minutes per side. You are looking for distinct, dark grill marks while the vegetables still retain a slight “snap” or bite.
- Avoid moving the vegetables too much once they are on the grates; letting them sit undisturbed for a few minutes is what creates those beautiful charred lines.
- Transfer the hot vegetables to a board and immediately drizzle with a thick balsamic glaze, which will slightly melt and create a savory-sweet sauce that coats everything perfectly.
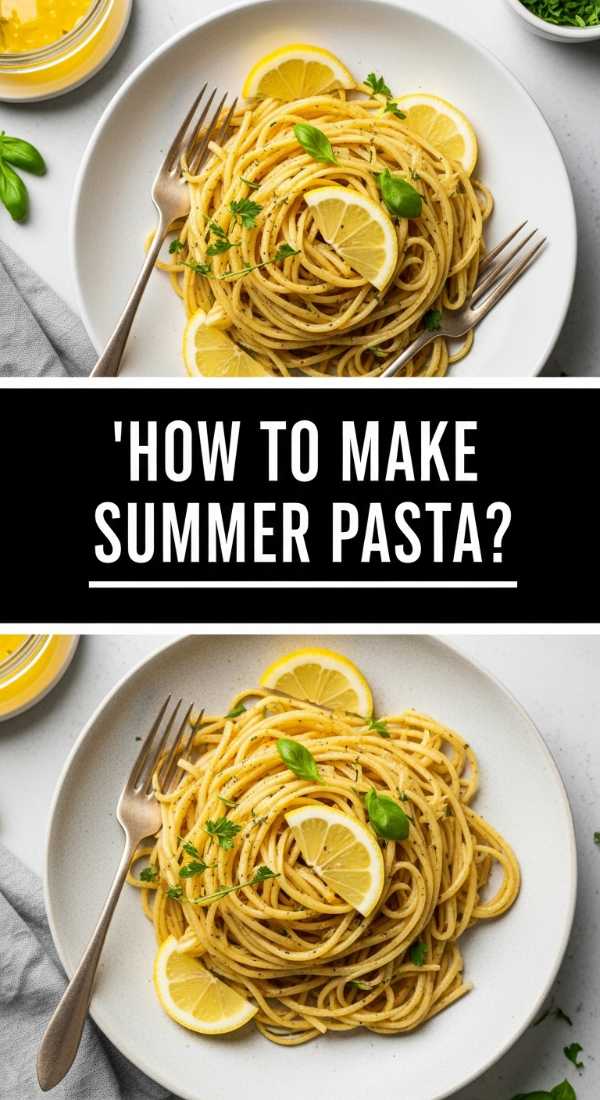
Bright Summer Pasta Board
Why we love this
This pasta board is the epitome of effortless summer dining, featuring long strands of noodles tossed in a sauce of pure sunlight and herbs. The aroma of sautéed garlic and fresh lemon zest is intoxicating, promising a meal that is filling yet surprisingly light. It’s a dish that feels like an Italian seaside vacation, with the silky texture of the pasta providing the perfect canvas for the sharp tang of parmesan and the heat of red pepper flakes. It’s communal, comforting, and visually stunning when piled high on a platter.
Ingredients
- 1 lb linguine or spaghetti
- 4 cloves garlic, thinly sliced
- 1/2 cup extra virgin olive oil
- Zest and juice of 2 lemons
- 1/2 cup grated Parmesan cheese
- Fresh basil and red pepper flakes
How to make it
- Bring a large pot of heavily salted water to a rolling boil. Cook the pasta until it is just shy of al dente; it should still have a firm core as it will finish cooking in the sauce.
- Before draining, reserve at least 1 cup of the starchy pasta water—this is the secret to a glossy, emulsified sauce.
- In a wide skillet, heat the olive oil over medium-low heat. Add the sliced garlic and cook slowly until it is fragrant and pale golden; do not let it brown or it will turn bitter.
- Add the lemon juice and half of the pasta water to the oil, whisking to combine. Toss in the hot pasta and the parmesan cheese, stirring vigorously. The cheese and water will create a creamy, light emulsion that coats every strand.
- Transfer the pasta to a large board or platter, topping with the lemon zest, fresh basil leaves, and a sprinkle of red pepper flakes for a hit of color and heat.
Garlic Butter Summer Shrimp Board

Why we love this
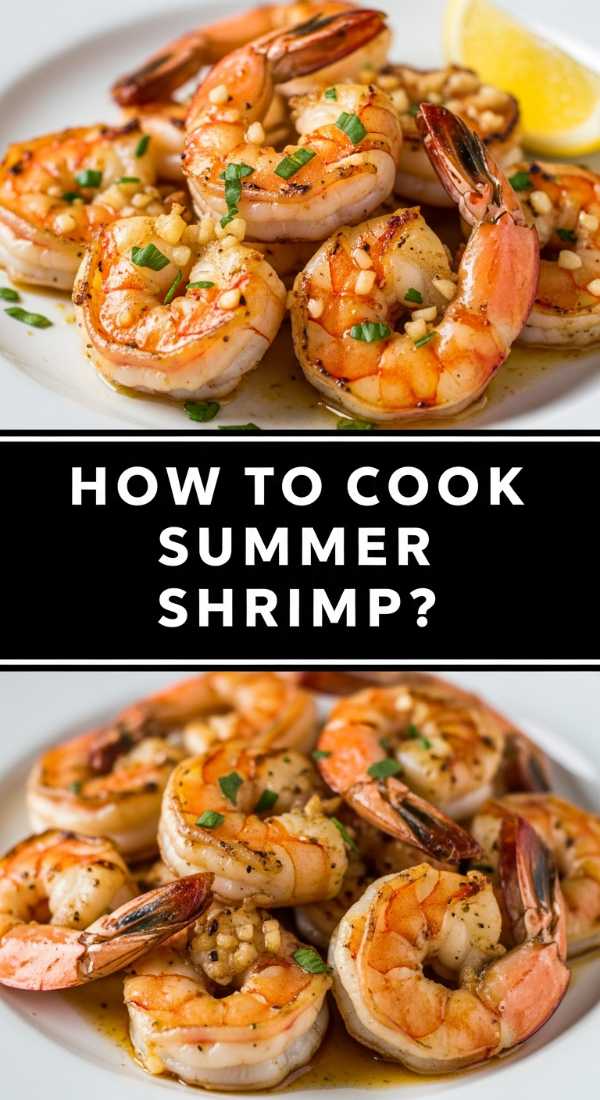
There is something undeniably festive about a board piled high with succulent, garlic-infused shrimp. The pink, curled shellfish looks beautiful against a garnish of bright green parsley and charred lemon halves. As you peel or bite into the shrimp, you get a burst of rich, savory butter followed by the delicate, sweet flavor of the sea. It’s a hands-on eating experience that encourages guests to linger, dip their bread in the leftover garlic butter, and enjoy the tactile joy of a well-prepared seafood feast.
Ingredients
- 1.5 lbs large shrimp (peeled and deveined)
- 4 tablespoons unsalted butter
- 3 cloves garlic, minced
- 1 teaspoon smoked paprika
- Fresh parsley, chopped
- Lemon wedges
How to make it
- Pat the shrimp dry with paper towels before cooking; any excess moisture will cause the shrimp to steam rather than sear, preventing that delicious crust from forming.
- Melt the butter in a large skillet over medium-high heat until it begins to foam. Add the minced garlic and sauté for only 30 seconds to release the aroma without burning.
- Add the shrimp in a single layer. Sprinkle with the smoked paprika and a pinch of salt. Cook for about 2 minutes per side.
- Look for the visual cue: the shrimp are done when they turn opaque and form a ‘C’ shape. If they curl into an ‘O’, they are overcooked and may be rubbery.
- Squeeze fresh lemon juice over the pan to deglaze the browned bits of garlic, then pour the shrimp and all the pan juices onto a board. Garnish heavily with parsley and serve with extra lemon wedges.
The Ultimate Chicken Wrap Board
[IMAGE_10]
Why we love this
Chicken wraps are the perfect solution for a versatile, crowd-pleasing lunch that feels substantial without being heavy. The contrast between the warm, seasoned chicken and the cool, crisp vegetables wrapped in a soft flour tortilla is incredibly satisfying. These wraps are easy to customize, making the board an interactive experience where everyone can grab their favorite combination. The addition of a creamy sauce or hummus provides a luxurious mouthfeel that ties all the fresh components together into one portable, delicious package.
Ingredients
- 2 lbs grilled chicken breast, sliced into strips
- Large flour tortillas
- Shredded romaine lettuce
- Sliced tomatoes and avocado
- Hummus or ranch dressing
- Pickled red onions
How to make it
- Grill or pan-sear your chicken breasts until they reach an internal temperature of 165°F, then let them rest for 5 minutes before slicing to keep the juices locked in.
- Lightly warm the tortillas on a dry skillet for 10 seconds per side; this makes them much more pliable and less likely to tear during folding.
- To assemble for the board, spread a thin layer of hummus or dressing down the center of each tortilla. This acts as the “glue” for your other ingredients.
- Layer the lettuce, tomato, avocado, and chicken strips on top. For a professional fold, tuck in the sides first, then roll from the bottom up, keeping the tension tight.
- Slice the wraps in half on a diagonal to show off the colorful interior. Arrange them on the board with the cut side facing up, interspersed with bowls of extra dipping sauce and pickled onions for a vibrant, ready-to-eat display.
Embracing the Simple Board Lifestyle
At the end of the day, the best meals aren’t defined by how much time you spent on the presentation, but by the memories made while sharing them. Moving toward these simple, single-focus boards allows you to reclaim your time and energy, focusing on high-quality ingredients and the people sitting across from you. Whether it’s the sweetness of a strawberry pie or the savory pull of a rotel dip, these dishes prove that less really is more. So, put down the tweezers, stop worrying about the perfect cheese rose, and start enjoying the messy, beautiful, delicious reality of the simple board.