
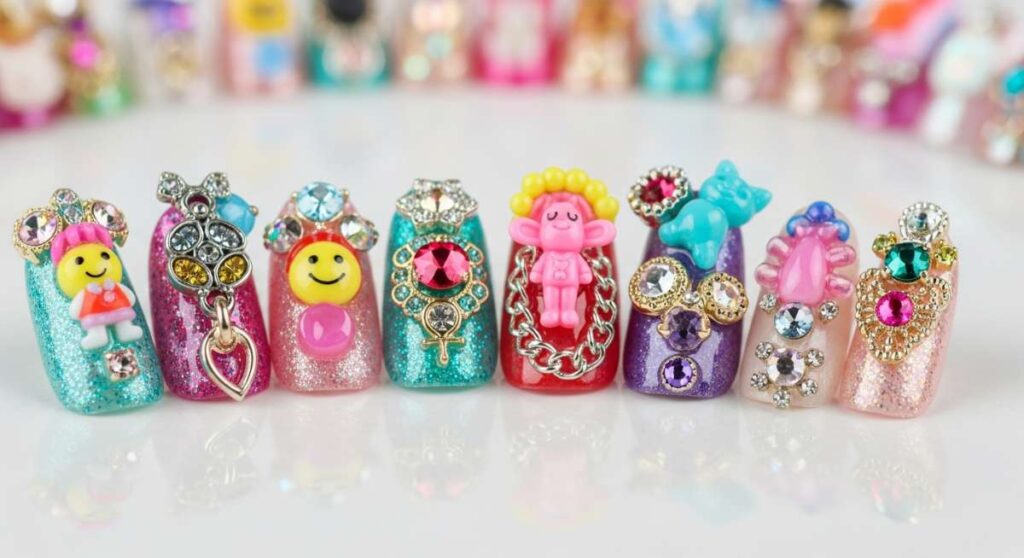
More is More: The Ultimate Guide to Maximalist Junk Nails
Hello, my loves! Grab a warm cup of tea and settle in, because today we are talking about something that truly makes my heart dance. You know those days when you feel a little ‘too much’ for the world? Well, in our little corner of the internet, ‘too much’ is exactly where the magic happens. We are diving deep into the vibrant, chaotic, and utterly soulful world of maximalist junk nails—the kind of art that tells a story on every single fingertip.
For me, painting my nails has always been a form of a soft, cloud-like embrace for my soul. It’s that tiny window of time where I get to be the architect of my own joy. Junk nails aren’t just about the glitter and the charms; they are about reclaiming our playfulness. They are a celebration of color, texture, and the beautiful messiness of being human. So, let’s get our kits ready and turn our hands into a masterpiece of ‘more’.
4 steps to blend multi colored nails
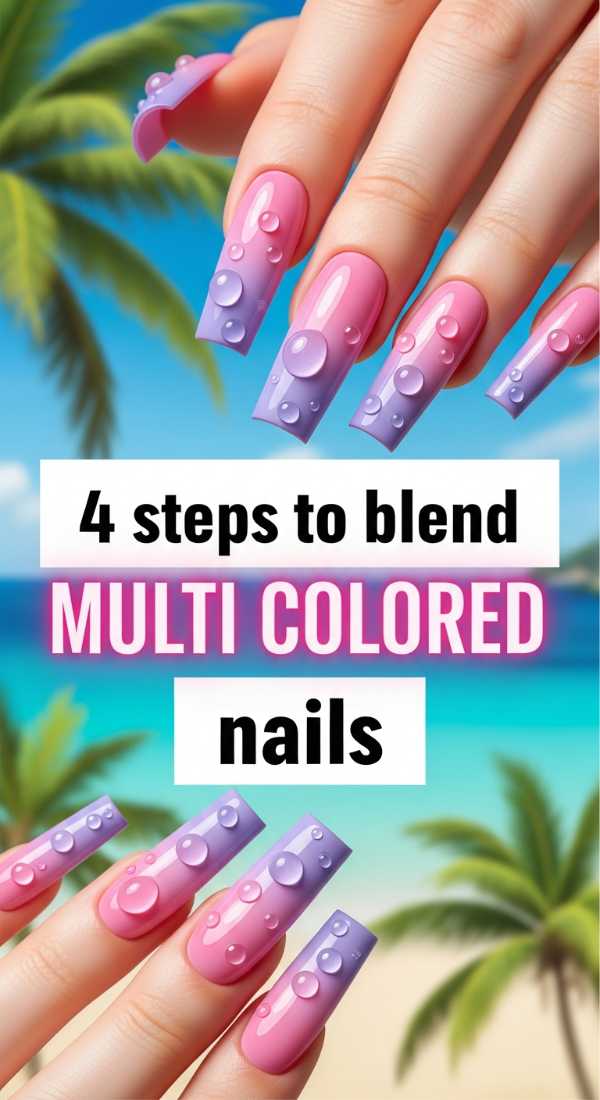
Why to love this recipe:
Blending colors is like watching a sunset right on your fingertips. It creates a seamless transition that feels soft, ethereal, and completely magical for your daily look. This recipe is perfect for when you want harmony amidst the maximalist chaos.
Essential Ingredients:
- Three shades of pastel or neon polish
- A makeup wedge sponge
- Liquid latex or painter’s tape
- A high-shine top coat
How to Prepare:
- Apply your base color and let it dry completely.
- Apply liquid latex around your cuticles to keep things tidy.
- Paint stripes of your chosen colors directly onto the makeup sponge.
- Gently dab the sponge onto your nail until the colors melt together beautifully.
Budget Range
- Essie Play Date Polish ($10)
- Walgreens Makeup Sponges ($3)
- Sally Hansen Top Coat ($7)
5 minutes to create colorful junk nails
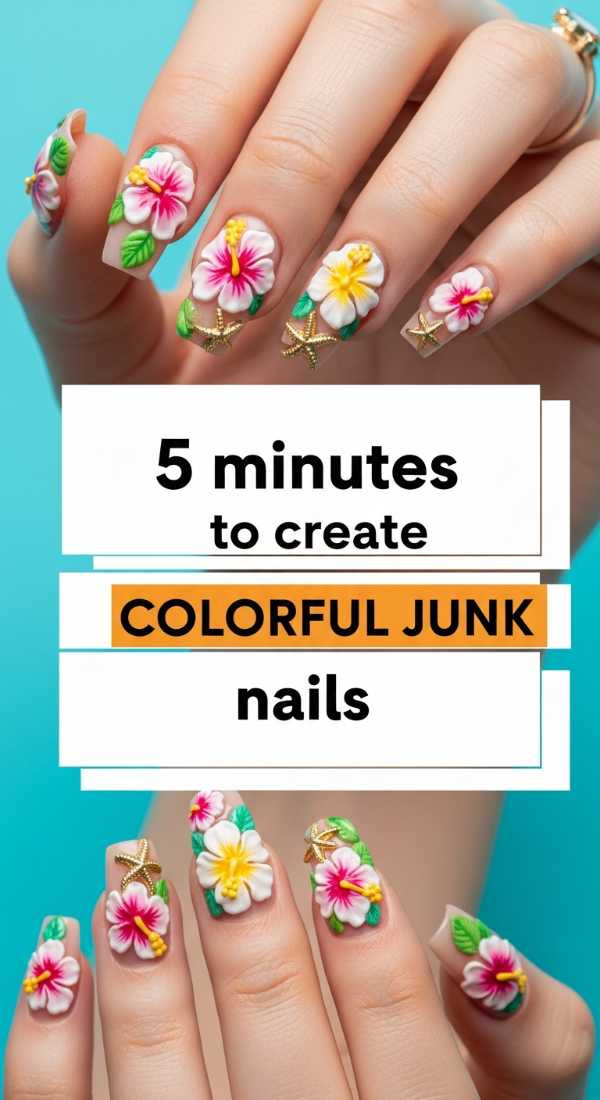
Why to love this recipe:
Life moves so fast, my loves, but your nails don’t have to look rushed. This quick-fix recipe is the ultimate way to inject a burst of personality into your day when you only have a moment to breathe.
Essential Ingredients:
- Multi-colored nail stickers
- Tiny rhinestones
- Quick-dry clear polish
- Tweezers
How to Prepare:
- Start with a clean or pre-polished nail surface.
- Use tweezers to randomly place 3-5 stickers on each nail.
- Pop a rhinestone in the gaps for that ‘junk’ aesthetic.
- Seal everything with a thick layer of quick-dry polish.
Budget Range
- Amazon Nail Decal Pack ($8)
- Tweezerman Tweezers ($12)
- Wet n Wild Clear Coat ($2)
6 ways to style different color nails
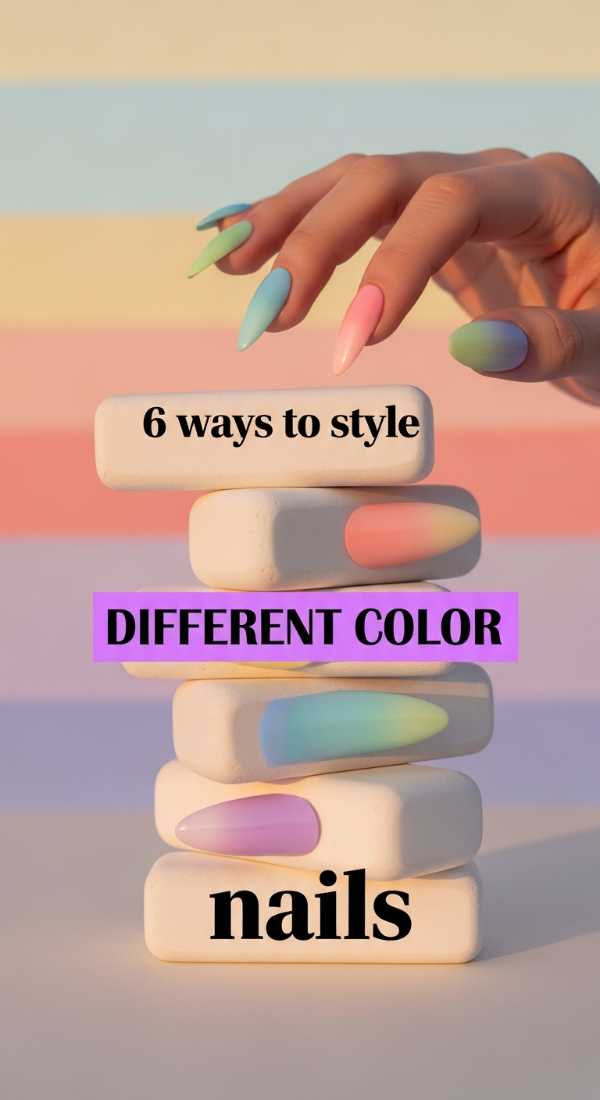
Why to love this recipe:
Sometimes the hardest part of maximalism is knowing how to wear it! This ‘recipe’ isn’t about the paint, but about the ‘flavor’ you bring to your entire outfit when your nails are the star of the show.
Essential Ingredients:
- Monochrome outfits
- Chunky rings
- Confidence
- A mix of matte and glossy finishes
How to Prepare:
- Pair vibrant nails with an all-white or all-black outfit to let the colors pop.
- Stack gold or silver rings on every finger to complement the junk nail textures.
- Mix matte nails with glossy charms for visual depth.
- Coordinate one nail color with your handbag for a subtle ‘planned’ look.
- Use sheer ‘jelly’ polishes on some fingers for a glass-like effect.
- Don’t be afraid to clash—neon green nails love a hot pink sweater!
Budget Range
- H&M Ring Set ($9)
- OPI Matte Top Coat ($11)
- ZARA Basic Tee ($15)
3 easy hacks for colorful nail designs
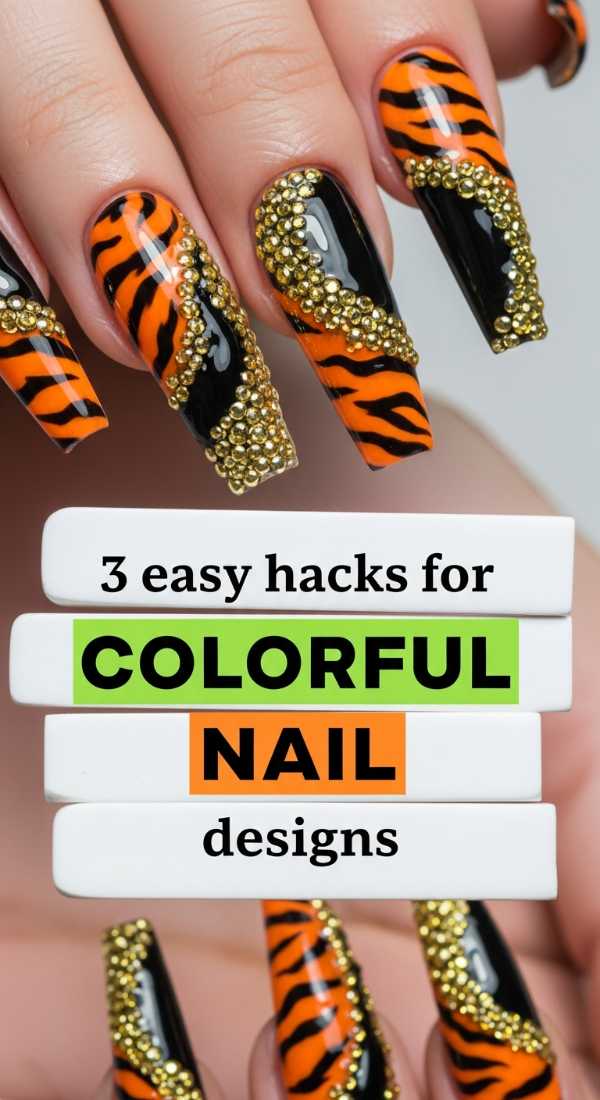
Why to love this recipe:
You don’t need a professional studio to create art that feels like a hug. These hacks use things you already have at home to create professional-looking colorful designs with zero stress.
Essential Ingredients:
- A toothpick or bobby pin
- Cornstarch (for matte finish)
- Old eyeshadow palette
How to Prepare:
- Dip a toothpick into a contrasting color to create perfect tiny dots or swirls.
- Mix a little cornstarch into clear polish to create a DIY custom matte shade.
- Rub a bit of shimmering eyeshadow over tacky polish for a personalized chrome effect.
Budget Range
- Household Toothpicks ($1)
- Argo Cornstarch ($2)
- NYX Eyeshadow Singles ($5)
7 steps to master color nails
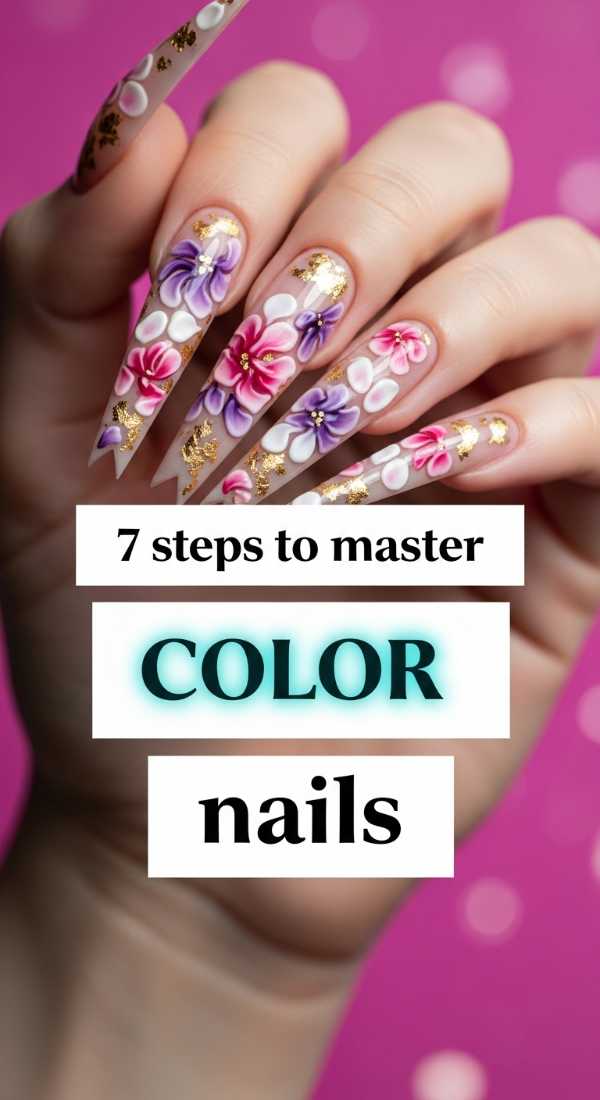
Why to love this recipe:
Mastery comes from the foundation, just like a peaceful morning sets the tone for the day. This recipe ensures your colorful canvas is strong, healthy, and ready for all the junk nail goodness.
Essential Ingredients:
- Nail file and buffer
- Cuticle softener
- Strengthening base coat
- 7 different polish shades
How to Prepare:
- Shape your nails into a uniform almond or square shape.
- Gently push back cuticles to maximize nail real estate.
- Apply a strengthening base coat to prevent staining.
- Paint each finger a different vibrant color.
- Apply a second coat for full opacity.
- Clean up edges with a brush dipped in acetone.
- Finish with a nourishing cuticle oil.
Budget Range
- Holler and Glow Cuticle Oil ($6)
- Orly Bonder Base Coat ($12)
- Revlon Nail File ($4)
4 techniques for vibrant multi colored nails
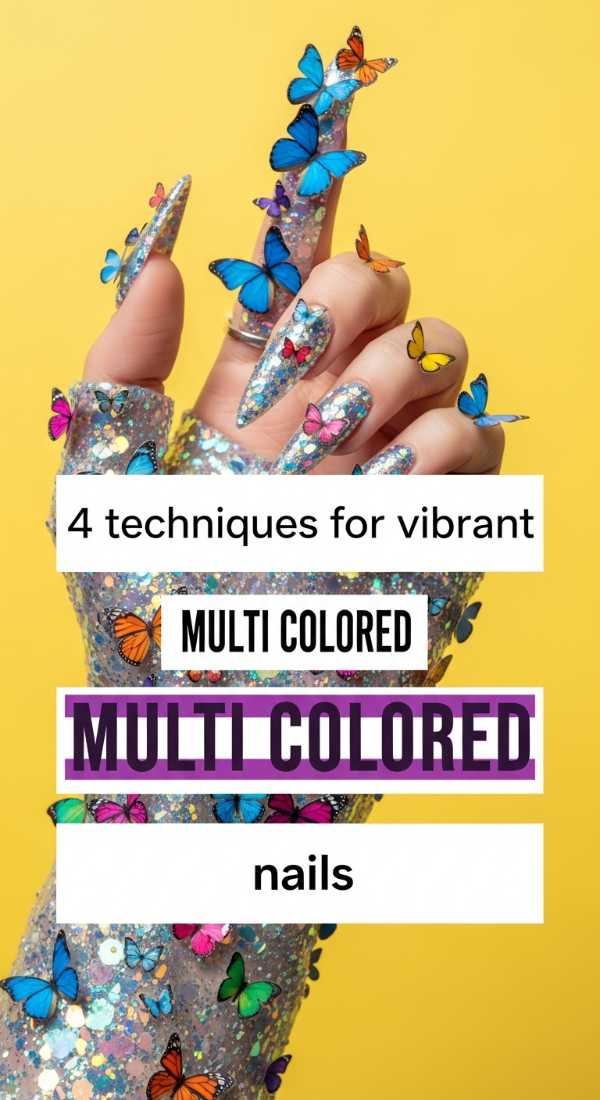
Why to love this recipe:
Texture is the secret ingredient to a soul-filling manicure. These four techniques will take your multi-colored nails from flat to ‘wow’ by adding layers of visual interest.
Essential Ingredients:
- A piece of plastic wrap
- A thin detailing brush
- Striping tape
- Dotting tools
How to Prepare:
- The Marble Look: Dab wet polish with plastic wrap for a textured stone effect.
- The Line Work: Use striping tape to create crisp geometric color blocks.
- The Floral: Use a dotting tool to cluster 5 dots into tiny flowers.
- The Micro-French: Use the detailing brush to add neon tips to different colored bases.
Budget Range
- Saran Wrap ($4)
- Nail Art Brush Set ($7)
- Beetles Gel Liner Polish ($15)
5 tricks for perfect colorful junk nails
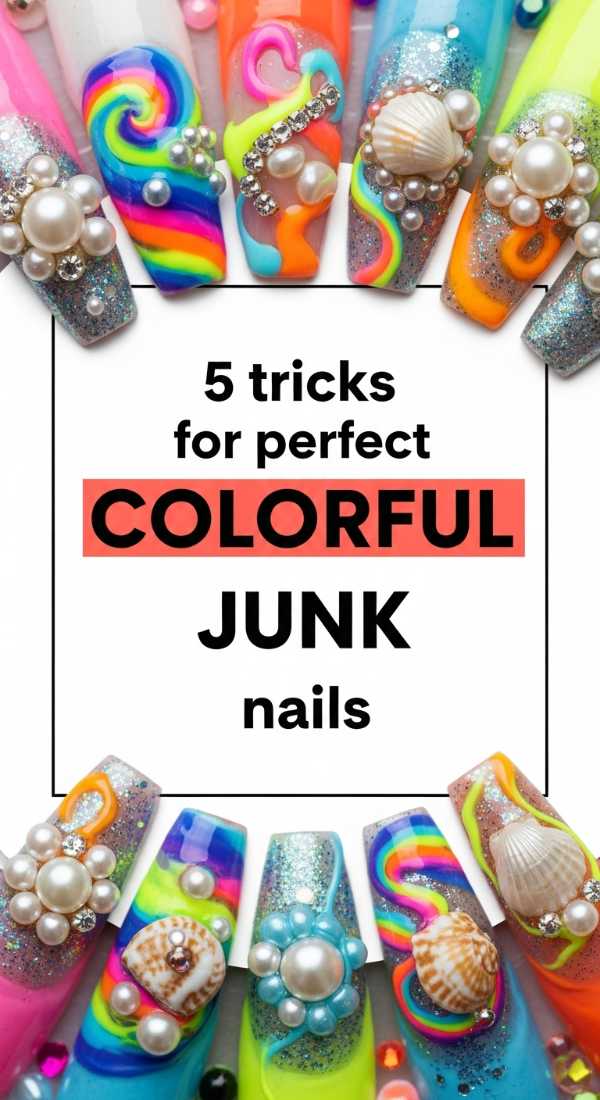
Why to love this recipe:
The beauty of junk nails is the 3D element, but keeping those charms on can be a struggle! These tricks ensure your ‘junk’ stays beautiful and secure through every hug and high-five.
Essential Ingredients:
- Nail jewelry glue or builder gel
- Tiny charms (hearts, bears, stars)
- UV lamp (if using gel)
- Wax picker tool
How to Prepare:
- Apply a small bead of builder gel where you want your heaviest charm.
- Use the wax picker to place the charm and ‘flash cure’ it for 10 seconds.
- Fill in the tiny gaps around the charm with a top coat to prevent snagging.
- Layer smaller beads around the large ones for a ‘clustered’ look.
- Always double-seal the edges of your nail.
Budget Range
- Makartt Rhinestone Glue ($9)
- SunUV LED Lamp ($25)
- Mixed Resin Charms ($6)
6 secrets to unique different color nails
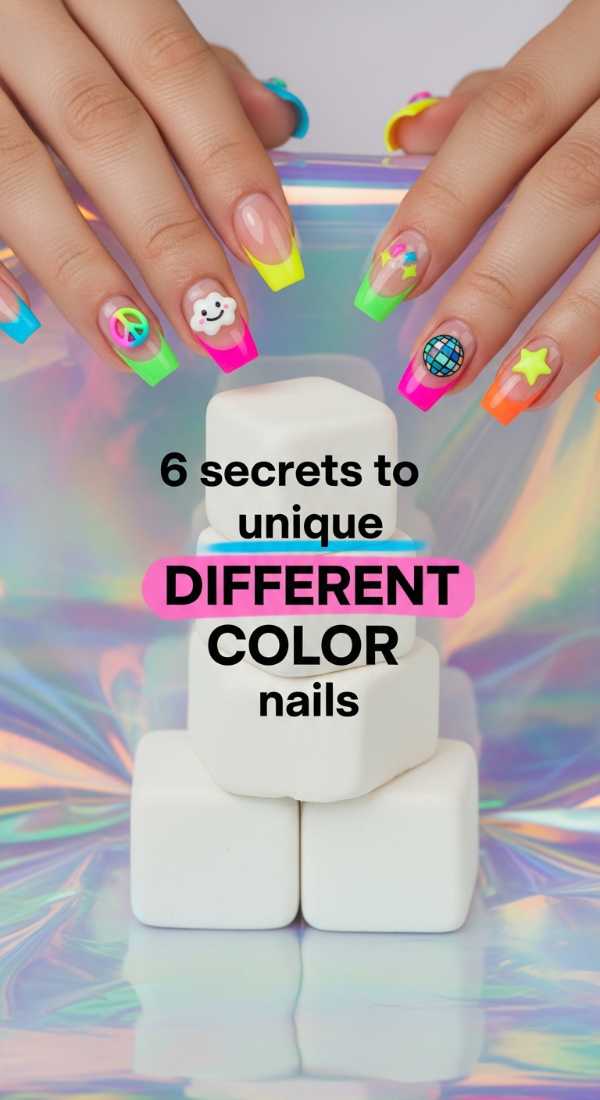
Why to love this recipe:
Your uniqueness is your superpower! These secrets are all about breaking the rules and finding a ‘different color’ flow that feels uniquely and beautifully you.
Essential Ingredients:
- Mismatched textures (glitter vs cream)
- Temperature-changing polish
- Glow-in-the-dark accents
How to Prepare:
- Pair a glitter nail next to a cream nail for sensory contrast.
- Use mood-changing polish so your ‘different colors’ shift with your tea.
- Add a tiny hidden glow-in-the-dark dot on your pinky for a night-time surprise.
- Alternate warm tones on one hand and cool tones on the other.
- Use a ‘jelly’ topper over a solid color to create a custom new shade.
- Write a tiny word of intention on one nail with a fine-liner pen.
Budget Range
- Cirque Colors Thermal Polish ($16)
- Maniology Stamping Polish ($8)
- Sharpie Fine Point (if adventurous) ($2)
3 steps to glow with colorful nail designs
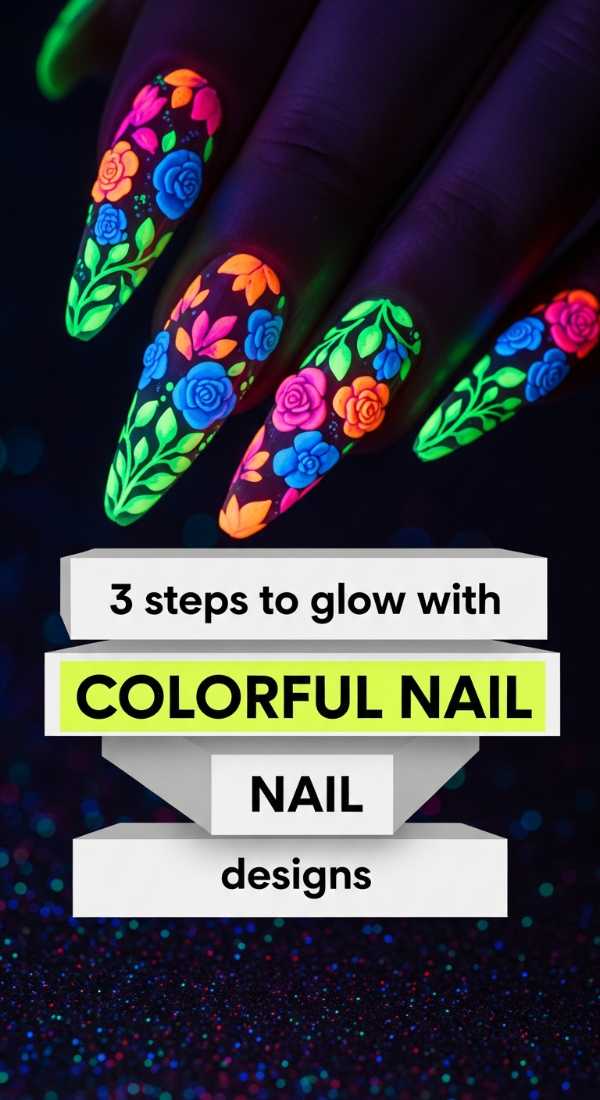
Why to love this recipe:
There is a specific kind of radiance that comes when you feel put together. This short recipe focuses on the ‘glow’ factor—making sure your colorful designs look expensive and healthy.
Essential Ingredients:
- Exfoliating hand scrub
- High-gloss plumping top coat
- Vitamin E oil
How to Prepare:
- Exfoliate your hands before starting to create a soft, glowing canvas.
- Apply two coats of a ‘plumping’ top coat to give that gel-like thickness.
- Massage Vitamin E oil into your knuckles for a photo-ready finish.
Budget Range
- Tree Hut Shea Sugar Scrub ($10)
- Seche Vite Dry Fast Top Coat ($9)
- Jason Vitamin E Oil ($12)
8 steps to achieve professional color nails
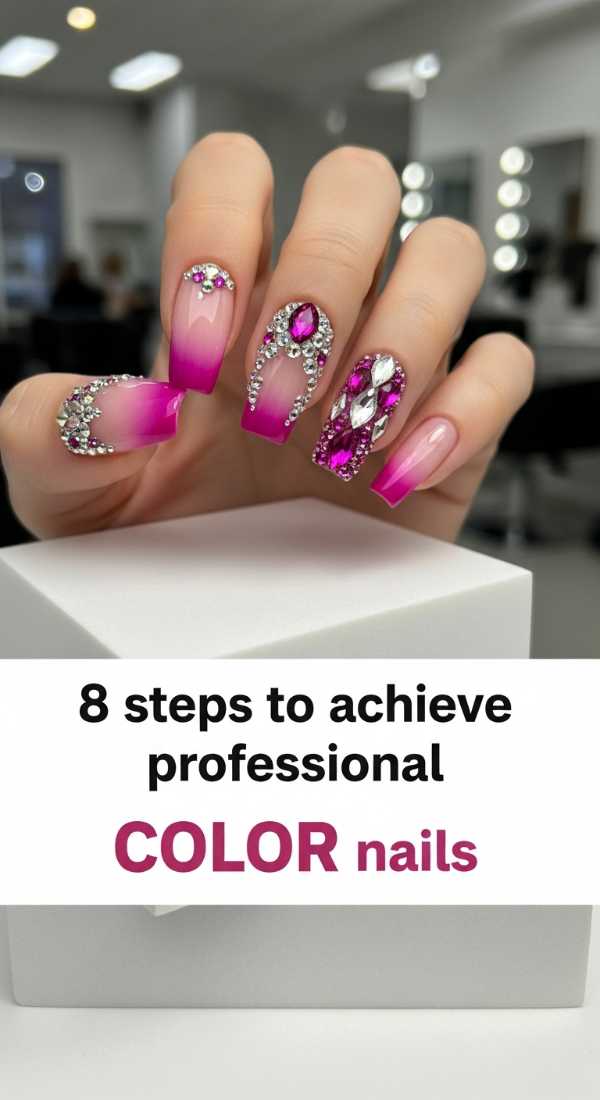
Why to love this recipe:
Sometimes we want that ‘just stepped out of a high-end salon’ feeling without leaving our cozy sanctuary. This 8-step process is the ultimate ritual for professional-grade maximalism.
Essential Ingredients:
- Dehydrator or alcohol wipes
- Gel base and top coat
- Professional grade pigments
- Lint-free wipes
How to Prepare:
- Dehydrate the nail plate with alcohol to ensure maximum adhesion.
- Apply a thin base coat and cure.
- Apply your first color layer with precision, staying 1mm away from the cuticle.
- Cure and apply a second layer for deep, professional saturation.
- Apply charms using a dedicated jewelry resin.
- Encapsulate small glitters with a layer of clear builder gel.
- Finish with a non-wipe top coat for maximum shine.
- Remove any ‘tackiness’ with a lint-free wipe for a squeaky clean finish.
Budget Range
- Gelish Mini Start Kit ($35)
- Alcohol Prep Pads ($5)
- Lint-Free Wipes ($6)
Embrace Your Inner Maximalist
My lovely friends, I hope this guide inspires you to take up space and show off your vibrant colors. Maximalist junk nails are more than just a trend; they are a permission slip to be loud, colorful, and unapologetically yourself. Whether you start with a simple blend or go all out with 3D charms, remember that the most important ingredient is the joy you feel while creating. Your hands do so much for you—let them be a source of wonder! Until next time, stay sparkly and keep blooming.