
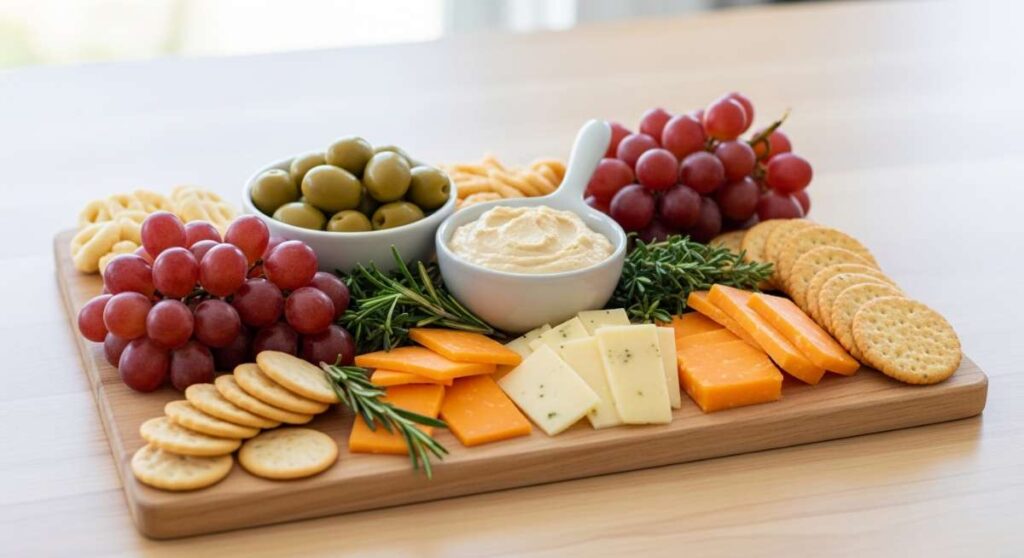
Minimal Effort, Maximum Impact: The Ultimate Viral Food Board Guide
Let’s be honest: we’ve all had those evenings where the thought of standing over a stove for an hour feels like a mountain we just can’t climb. I’ve been there more times than I can count, staring into a fridge of ingredients but lacking the spark to turn them into a ‘real’ meal. That’s exactly how the viral food board concept saved my kitchen life. It’s not just about eating; it’s about a lifestyle shift where we prioritize beauty and flavor without the burnout.
The magic of a food board lies in its versatility. It’s an invitation to graze, to mix and match, and to enjoy high-quality proteins and vibrant veggies in a way that feels intentional rather than rushed. Whether you’re hosting a few friends or just treating yourself to a solo dinner after a long day, these boards bring a sense of abundance to the table. Today, I’m sharing my secrets for mastering the individual components that make these boards go viral every time.
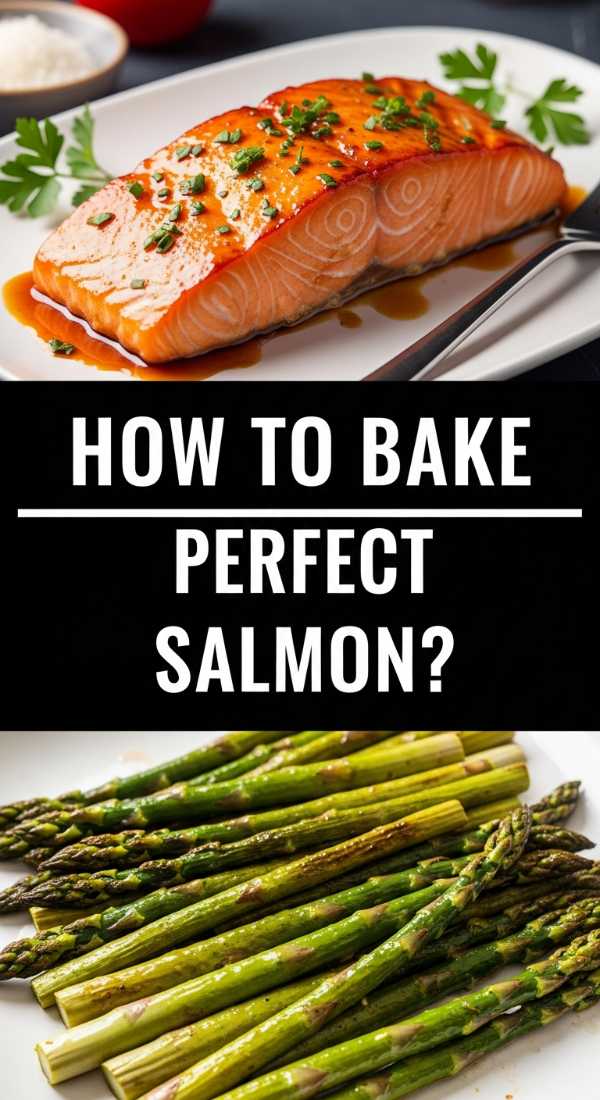
How to bake perfect salmon
Why we love this
There is something truly luxurious about a perfectly baked piece of salmon that flakes effortlessly under the weight of a fork. When done right, the exterior takes on a slight honey-colored glaze while the interior remains a buttery, translucent pink that melts on the tongue. The aroma of fresh lemon zest and cracked black pepper fills the kitchen, signaling a meal that is both light and deeply satisfying. It’s the ultimate centerpiece for a board, offering a rich, silken texture that pairs beautifully with crunchy elements.
Ingredients
- 2 large salmon fillets (center-cut preferred)
- 2 tablespoons olive oil
- 1 organic lemon, thinly sliced
- 2 cloves garlic, minced
- Sea salt and cracked black pepper
- Fresh dill for garnish
How to make it
- Preheat your oven to 375°F (190°C) and line a baking sheet with parchment paper to ensure easy cleanup and prevent sticking.
- Pat the salmon fillets completely dry with paper towels; this is the secret to a better sear and preventing the fish from steaming in its own moisture.
- Rub the olive oil and minced garlic over the flesh side of the fish, then season generously with sea salt and black pepper.
- Place the lemon slices on top of the fillets to infuse them with citrus oils and keep the meat moist during the cooking process.
- Bake for 12-15 minutes, or until the thickest part of the fish reaches an internal temperature of 145°F and the meat opaque and flakes easily when tested with a fork.
How to prep healthy bowls

Why we love this
Healthy bowls are the ultimate canvas for color and nutrition, offering a satisfying crunch in every single bite. We love how the earthy base of grains contrasts with the sharp, acidic snap of pickled onions and the creamy richness of ripe avocado. Every bowl feels like a personalized gift to your body, filled with vibrant greens that look as good as they taste. It’s the kind of meal that leaves you feeling energized and glowing, rather than weighed down by heavy fats or sugars.
Ingredients
- Cooked quinoa or brown rice
- Massaged kale or baby spinach
- Roasted sweet potatoes
- Sliced cucumbers and radishes
- Tahini dressing or hummus
- Toasted pumpkin seeds
How to make it
- Start by building a sturdy base with two cups of fluffy grains, ensuring they are seasoned with a pinch of salt and a drizzle of lime juice for brightness.
- Add a handful of leafy greens that have been lightly massaged with olive oil; this breaks down the tough fibers and makes them much more palatable.
- Arrange your roasted vegetables in distinct sections around the bowl, keeping the colors separated to create that ‘viral’ visual appeal.
- Add your fresh elements like sliced radish or cucumber for a water-rich crunch that refreshes the palate between heavier bites.
- Drizzle the dressing in a zig-zag pattern over the top and finish with a sprinkle of seeds to add a nutty texture and healthy fats.
How to make creamy oats

Why we love this
Waking up to a bowl of velvet-smooth oats is like getting a warm hug from the inside out. The texture is key here; it shouldn’t be sticky or dry, but rather a luscious, pudding-like consistency that carries the scent of warm vanilla and toasted nuts. As you stir in a swirl of almond butter or a handful of tart berries, the steam carries the comforting aroma of a cozy café. It’s the perfect slow-morning ritual that feels decadent despite being incredibly simple and wholesome.
Ingredients
- 1 cup rolled oats (not instant)
- 2 cups liquid (half water, half almond milk)
- A pinch of sea salt
- 1 teaspoon vanilla extract
- Maple syrup to taste
- Fresh blueberries and hemp seeds
How to make it
- In a small saucepan, bring your water and almond milk to a gentle simmer over medium heat; never start with cold liquid and oats together if you want a creamy texture.
- Add the oats and a pinch of salt, which is crucial for drawing out the nutty flavor of the grain and balancing the sweetness.
- Reduce the heat to low and stir frequently with a wooden spoon—this agitation releases the natural starches of the oats, creating that desired creaminess.
- Cook for about 5-7 minutes until the liquid is mostly absorbed but the oats still look ‘loose’ and glossy.
- Remove from heat, stir in the vanilla and maple syrup, and let it sit for two minutes to thicken perfectly before serving.
How to roast better chicken

Why we love this
There is a specific, primal joy in the sound of chicken skin crackling as it comes out of the oven, perfectly golden and shimmering. The meat remains incredibly succulent, dripping with savory juices that have been infused with rosemary and garlic. Each slice offers a harmony of textures, from the crisp, salty exterior to the tender, herb-scented interior. It’s a versatile protein that anchors any food board, providing a hearty and comforting element that everyone at the table will reach for first.
Ingredients
- 4 bone-in, skin-on chicken thighs
- 3 tablespoons softened butter
- Fresh rosemary and thyme, chopped
- 1 teaspoon smoked paprika
- 4 cloves garlic, smashed
- Kosher salt
How to make it
- Ensure your chicken is at room temperature for 20 minutes before cooking; this allows for more even heat distribution and prevents a rubbery texture.
- Mix the softened butter with the herbs, paprika, and garlic to create a compound butter that will season and self-baste the meat.
- Gently lift the skin of the chicken and spread half the butter mixture directly onto the meat, then rub the remaining butter over the top of the skin.
- Place on a rack inside a roasting pan to allow hot air to circulate under the chicken, ensuring the bottom skin doesn’t get soggy.
- Roast at 425°F (220°C) for 25-30 minutes until the skin is a deep mahogany and the internal temperature hits 165°F, then rest for 10 minutes before slicing.
How to prep fresh salads

Why we love this
A truly great salad is a symphony of garden-fresh flavors that cleanses the palate and brightens the entire meal. We love the way cold, crisp lettuce leaves interact with a zesty, home-made vinaigrette that has just the right amount of tang. The smell is incredibly refreshing—a mix of torn herbs like mint or basil and the sharp scent of freshly squeezed lemon. It brings a necessary lightness to a food board, acting as the perfect counterpoint to richer, roasted meats or salty cheeses.
Ingredients
- A mix of butter lettuce and arugula
- Shaved fennel or carrots
- Toasted walnuts
- Lemon juice and extra virgin olive oil
- Dijon mustard and honey
- Pomegranate arils for a pop of color
How to make it
- Wash your greens in ice-cold water to crisp them up, then use a salad spinner to ensure they are bone-dry so the dressing doesn’t slide off.
- Shave your vegetables using a mandoline or a sharp peeler to create paper-thin ribbons that provide a delicate, sophisticated texture.
- Prepare a quick emulsion by whisking the lemon juice, mustard, and honey, then slowly drizzling in the olive oil while whisking vigorously.
- Toss the greens and shaved veggies in a large bowl with just enough dressing to coat, using your hands to ensure every leaf is kissed by the vinaigrette.
- Top with the nuts and pomegranate arils right before serving to maintain the crunch and prevent the salad from becoming weighed down.
How to cook cheap lentils

Why we love this
Lentils are the unsung heroes of the pantry, transforming into an earthy, savory base that feels expensive despite costing pennies. When cooked correctly, they hold their shape perfectly, offering a pleasant bite that is neither mushy nor hard. They soak up aromatics like onion, garlic, and bay leaves, creating a fragrance that is deeply grounding and wholesome. They add a rustic, artisanal feel to any board, providing a plant-based protein that satisfies even the most dedicated meat-eaters.
Ingredients
- 1 cup French green or black beluga lentils
- 3 cups vegetable broth
- 1 small onion, halved
- 2 bay leaves
- A splash of red wine vinegar
- Finely chopped parsley
How to make it
- Rinse the lentils thoroughly in a fine-mesh sieve under cold running water, checking for any small stones or debris.
- Place the lentils in a pot with the broth, onion halves, and bay leaves—starting with a flavorful liquid is the easiest way to elevate this simple ingredient.
- Bring to a gentle boil, then immediately turn the heat down to a very low simmer; boiling them too vigorously will cause the skins to burst.
- Cook uncovered for 20-25 minutes until the lentils are tender but still ‘al dente’ (firm to the bite), then drain any excess liquid remaining.
- While still warm, stir in a splash of red wine vinegar and fresh parsley; the heat allows the lentils to absorb the acid, brightening the earthy flavor.
How to make juicy meatballs

Why we love this
There is nothing quite like a platter of meatballs that are so tender they can be cut with a spoon. The smell of browning beef and pork mixed with garlic and parmesan is enough to make anyone’s mouth water instantly. They provide a satisfying, savory punch to a board, especially when paired with a bright marinara or a cool yogurt dip. We love the contrast between the caramelized, dark brown exterior and the moist, herb-flecked center that bursts with flavor in every mouthful.
Ingredients
- 1 lb ground beef (80/20 mix)
- 1/2 cup panko breadcrumbs soaked in 1/4 cup milk
- 1 egg, beaten
- 1/2 cup grated Parmesan cheese
- Fresh oregano and garlic powder
- Salt and pepper
How to make it
- Start by making a ‘panade’ by soaking the breadcrumbs in milk for five minutes; this is the pro secret to meatballs that stay moist and never get tough.
- In a large bowl, combine the meat, panade, egg, cheese, and spices, using your hands to mix just until combined—over-mixing will lead to dense, rubbery balls.
- Roll the mixture into small, uniform rounds (about the size of a golf ball) to ensure they all cook at the same rate and look consistent on your board.
- Sear the meatballs in a hot skillet with a tablespoon of oil for 2-3 minutes per side until a deep brown crust forms.
- Transfer the skillet to a 350°F (175°C) oven for another 8-10 minutes to finish cooking through without drying out the exterior.
How to prep fluffy eggs

Why we love this
Fluffy scrambled eggs are a thing of beauty—bright yellow, light as air, and practically glowing with richness. They feel like a weekend morning captured in a dish, offering a soft, comforting texture that contrasts perfectly with crusty bread or salty bacon on a brunch board. The gentle aroma of melted butter and the delicate steam rising from the plate create an atmosphere of pure relaxation and indulgence. It’s a humble ingredient elevated to a gourmet experience through technique alone.
Ingredients
- 3 large organic eggs
- 1 tablespoon heavy cream or whole milk
- 1 tablespoon unsalted butter
- A pinch of fine sea salt
- Fresh chives, finely chopped
How to make it
- Whisk the eggs and cream together in a bowl until no streaks of white remain and the mixture is slightly frothy; this incorporates air for maximum lift.
- Melt the butter in a non-stick skillet over low heat until it begins to foam but does not brown.
- Pour in the egg mixture and let it sit undisturbed for about 30 seconds until the edges just start to set.
- Using a silicone spatula, gently push the eggs from the outside toward the center, creating large, soft folds rather than small, chopped-up bits.
- Remove the pan from the heat while the eggs still look slightly wet; the residual heat will finish the cooking on the plate, ensuring they stay silky and moist.
How to sear steak bites

Why we love this
Steak bites are the ultimate finger food for meat lovers, offering all the intensity of a ribeye in a snackable format. We love the dramatic sizzle of the steak hitting a scorching hot pan and the way the garlic butter bubbles and browns around each piece. The result is a savory, umami-rich crust that gives way to a tender, pink center that is incredibly satisfying to chew. Topped with a sprinkle of flaky sea salt, they bring an undeniable ‘wow’ factor to any gathering or food board.
Ingredients
- 1 lb Sirloin or Ribeye steak, cut into 1-inch cubes
- 2 tablespoons high-smoke point oil (like avocado oil)
- 2 tablespoons butter
- 3 cloves garlic, crushed
- Fresh rosemary sprig
- Flaky sea salt
How to make it
- Pat the steak cubes completely dry with paper towels and season them generously with salt and pepper right before they hit the pan.
- Heat your cast-iron skillet over high heat until the oil is shimmering and just starting to smoke; a hot pan is non-negotiable for a good crust.
- Add the steak in a single layer, ensuring you don’t crowd the pan, and let them sear undisturbed for 2 minutes to develop a deep brown color.
- Toss the cubes, then add the butter, garlic, and rosemary to the pan, tilting it slightly to spoon the foaming butter over the meat for 1 more minute.
- Transfer the bites to a plate to rest for 3 minutes, allowing the juices to redistribute so every bite is tender and flavorful.
How to meal prep greek

Why we love this
Greek-inspired meal prep is like a vacation for your taste buds, filled with the bright, sun-drenched flavors of the Mediterranean. We love the sharp, salty punch of Kalamata olives paired with the creamy tang of feta and the herbaceous scent of dried oregano. It feels clean, vibrant, and incredibly fresh, even after a few days in the fridge. There is a satisfying balance of textures, from the crunch of cucumbers to the soft pull of pita bread, making it a joy to eat day after day.
Ingredients
- Grilled chicken breast with lemon and oregano
- Cherry tomatoes and cucumber chunks
- Kalamata olives and feta cheese crumbles
- Pickled red onions
- Tzatziki sauce
- Whole wheat pita triangles
How to make it
- Marinate your chicken in lemon juice, olive oil, and dried oregano for at least 30 minutes before grilling to ensure the flavors penetrate deep into the meat.
- Chop your cucumbers and tomatoes into large, bite-sized chunks; keeping them slightly larger helps them stay crunchy and prevents them from getting watery in storage.
- Store the ‘wet’ ingredients like tzatziki and olives in separate small containers or compartments to keep the rest of the components fresh and crisp.
- If prepping for the week, keep the feta cheese in its brine until you are ready to pack your containers to maintain its moisture and sharp flavor.
- Assemble your board or bowl by layering the greens first, followed by the protein, and then finishing with the bright accents like pickled onions and olives.
Conclusion
Creating a viral food board isn’t about perfection; it’s about the joy of assembly and the celebration of fresh, simple ingredients. By mastering these ten basic techniques, you have the foundation to create endless combinations that will impress your guests and, more importantly, nourish your soul. So, grab your favorite wooden board, pick a few of these recipes, and start building your own masterpiece tonight. Happy grazing!