
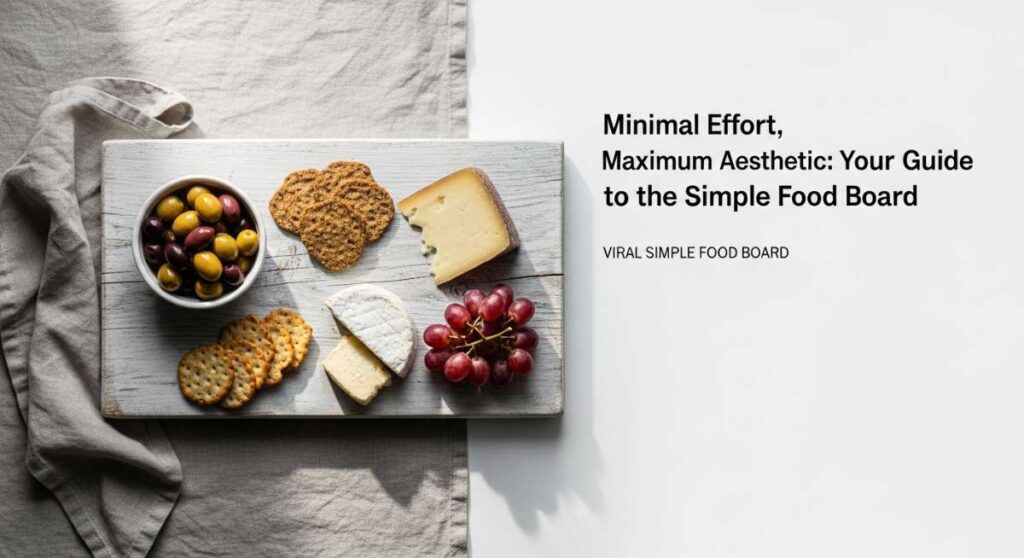
We have all been there: the sun is setting, your favorite playlist is humming in the background, and friends are about to knock on the door. You want to be the host who has it all together, but the thought of a complicated five-course meal feels more like a chore than a celebration. This is where the ‘Simple Food Board’ comes in—a viral trend that isn’t just about eating; it’s about creating an effortless vibe that feels curated, warm, and impossibly chic without spending ten hours in the kitchen.
There is something deeply communal and comforting about a massive board overflowing with textures and colors. It’s the visual equivalent of a warm hug. By combining crispy, salty, fresh, and creamy elements, you create a landscape of flavors that allows everyone to graze at their own pace. It turns a standard Tuesday night into a memory and a casual gathering into a sophisticated event. Let’s dive into the components that will make your board the talk of the grid.
How to make crispy mozzarella
Why we love this
Imagine the satisfying crunch of a golden-brown breading giving way to a center of molten, stretchy cheese that pulls apart in the most hypnotic way. These little bites are the ultimate comfort food, offering a symphony of textures from the coarse, seasoned panko to the milky, soft interior. The aroma of toasted herbs and frying oil fills the kitchen, signaling that the party has officially started. It’s a nostalgic snack elevated by high-quality cheese and the perfect dip, making it impossible to stop at just one.
Ingredients
- 1 lb low-moisture mozzarella cheese, cut into cubes
- 1 cup all-purpose flour
- 2 large eggs, beaten
- 2 cups panko breadcrumbs
- 1 tsp dried oregano
- 1/2 tsp garlic powder
- Vegetable oil for frying
- Marinara sauce for serving
How to make it
- Prepare your breading station by setting out three shallow bowls: one with flour, one with beaten eggs, and one with a mixture of panko, oregano, and garlic powder.
- Dredge each mozzarella cube in the flour, shaking off the excess so the coating isn’t too thick, then dip it thoroughly into the egg wash.
- Roll the cube in the panko mixture, pressing firmly so the breadcrumbs adhere to every side, creating a thick crust that will prevent the cheese from leaking.
- For an extra-crispy shell, double-dip the cubes back into the egg and then into the panko again, then freeze them for 30 minutes to firm up.
- Heat about 2 inches of oil in a heavy-bottomed skillet to 350°F (175°C); you’ll know it’s ready when a pinch of breadcrumbs sizzles immediately upon contact.
- Fry the cubes in small batches for 1-2 minutes, turning them with tongs until they are an even, deep golden brown.
- Drain on a wire rack or paper towels to maintain the crunch and serve immediately while the cheese is still fluid and hot.
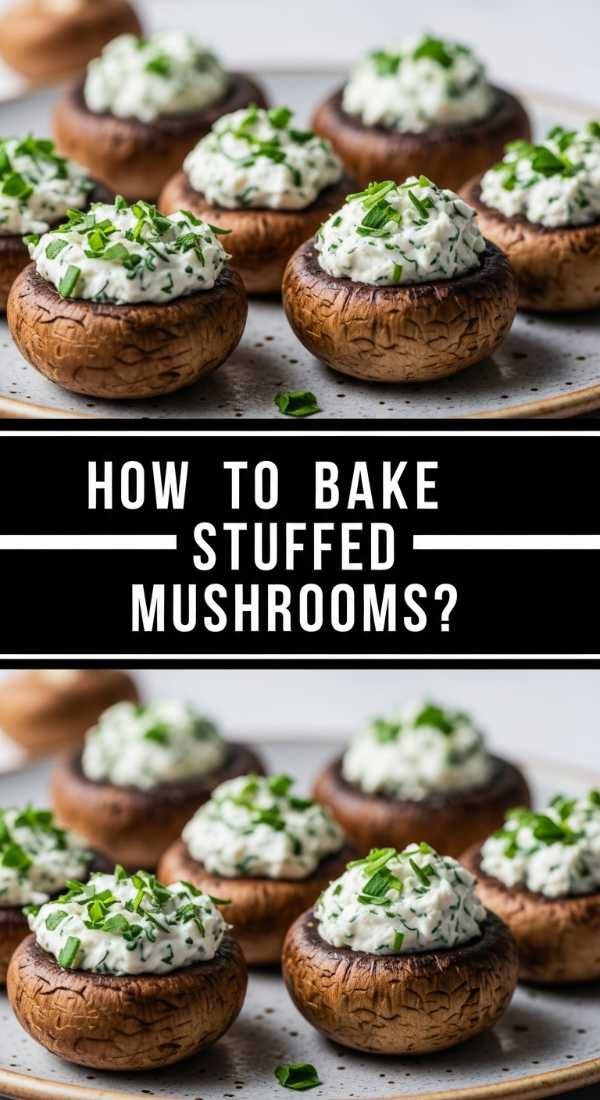
How to bake stuffed mushrooms

Why we love this
These savory gems are like tiny bowls of umami heaven, perfectly portioned for easy grabbing and even easier eating. As they bake, the mushroom caps soften and release their natural juices, which mingle with a decadent filling of garlic, herbs, and cheese to create a rich, concentrated flavor profile. The tops become beautifully toasted and slightly golden, offering a gentle resistance before you hit the tender, earthy base. They are elegant, aromatic, and provide that sophisticated touch every viral food board needs to feel complete.
Ingredients
- 15-20 large cremini mushrooms
- 2 tbsp unsalted butter
- 2 cloves garlic, minced
- 1/4 cup breadcrumbs
- 1/4 cup grated Parmesan cheese
- 4 oz cream cheese, softened
- 1 tbsp fresh parsley, chopped
- Salt and pepper to taste
How to make it
- Preheat your oven to 400°F (200°C) and line a baking sheet with parchment paper to ensure easy cleanup and prevent sticking.
- Carefully pop the stems out of the mushroom caps; finely chop the stems and set them aside while placing the hollowed caps on the baking sheet.
- Melt butter in a small skillet over medium heat and sauté the chopped stems and garlic for about 5 minutes until they are soft and fragrant.
- In a medium bowl, combine the sautéed mixture with cream cheese, Parmesan, breadcrumbs, and parsley, stirring until the filling is smooth and uniform.
- Using a small spoon or a piping bag, generously fill each mushroom cap, mounding the filling slightly over the top for a professional look.
- Bake for 18-20 minutes; watch for the mushrooms to slightly shrink and darken while the cheese filling becomes bubbly and brown on the edges.
- Let them rest for 5 minutes before serving so the filling sets slightly and you don’t burn your palate on the first bite.
How to cook buffalo cauliflower
Why we love this
This dish is a vibrant, plant-based firecracker that brings a much-needed kick of heat and a pop of bright orange color to your board. The cauliflower florets become tender-crisp in the oven, shedding their humble reputation to become something spicy, tangy, and totally addictive. The contrast between the zingy buffalo sauce and a cool, creamy dipping sauce creates a balanced flavor explosion that appeals to everyone. It’s light enough to keep you reaching for more, yet satisfyingly bold enough to stand up to the meatier items on the platter.
Ingredients
- 1 large head of cauliflower, cut into bite-sized florets
- 3/4 cup all-purpose flour
- 1 tsp garlic powder
- 1/2 cup water (or milk)
- 1 cup buffalo hot sauce
- 2 tbsp melted butter
- 1/2 tsp salt
How to make it
- Preheat your oven to 425°F (220°C) and grease a large baking sheet or use a silicone mat for the best non-stick results.
- Whisk together the flour, garlic powder, salt, and water in a large bowl until the batter is smooth and has the consistency of pancake batter.
- Toss the cauliflower florets in the batter until each piece is fully coated, then tap off the excess batter before placing them in a single layer on the baking sheet.
- Bake for 20 minutes, flipping halfway through, until the coating is firm and starting to turn a light golden color.
- While the cauliflower bakes, whisk together the buffalo sauce and melted butter in a separate bowl until fully emulsified.
- Remove the cauliflower from the oven, toss the florets in the buffalo mixture, and return them to the tray for another 10-15 minutes of roasting.
- The cauliflower is done when the sauce has thickened and adhered to the florets, showing some charred, caramelized edges for extra depth of flavor.
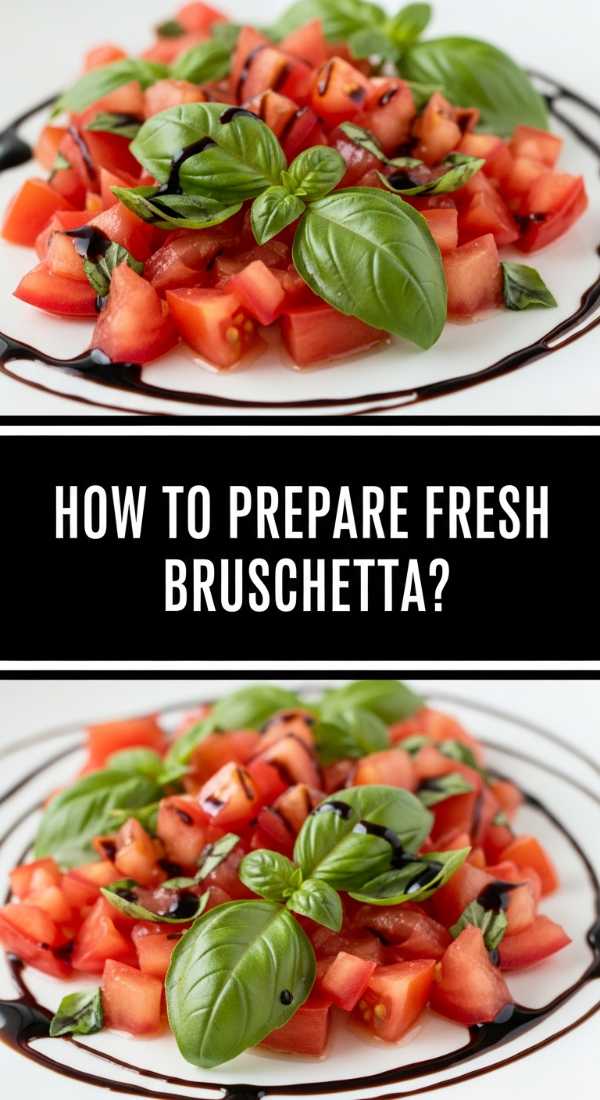
How to prepare fresh bruschetta

Why we love this
There is nothing quite like the bright, garden-fresh snap of a well-made bruschetta to cleanse the palate between richer bites. The combination of juicy, vine-ripened tomatoes and the pungent aroma of fresh basil creates a sensory experience that feels like a summer afternoon in Italy. When piled high on a piece of crusty, garlic-rubbed bread, the juices soak into the crumb while the crust remains satisfyingly crunchy. It adds a necessary lightness and a beautiful ruby-red hue that makes the entire food board look vibrant and alive.
Ingredients
- 4 large Roma tomatoes, diced
- 2 cloves garlic (1 minced, 1 whole for rubbing)
- 1/4 cup fresh basil leaves, chiffonade
- 2 tbsp extra virgin olive oil
- 1 tbsp balsamic glaze
- Salt and cracked black pepper
- 1 baguette, sliced into rounds
How to make it
- In a non-reactive bowl, combine the diced tomatoes, minced garlic, basil, and olive oil, then season generously with salt and pepper.
- Let the tomato mixture sit at room temperature for at least 30 minutes; this allows the salt to draw out the juices and the flavors to marinate together.
- Preheat your oven to 375°F (190°C) or prepare a grill pan over medium-high heat to toast the bread rounds.
- Brush the baguette slices lightly with olive oil and toast them for 5-7 minutes until they are golden and have a distinct ‘ring’ when tapped with a fingernail.
- Take the whole clove of garlic and rub it across the rough surface of the warm toasted bread to infuse it with a subtle, aromatic garlic essence.
- Top each slice with a generous spoonful of the tomato mixture, ensuring you get some of the flavorful juices on the bread.
- Finish with a drizzle of balsamic glaze right before serving to maintain the contrast between the sweet acidity and the savory tomatoes.
How to make deviled eggs

Why we love this
Deviled eggs are the undisputed royalty of party snacks, offering a nostalgic charm and a velvety texture that melts in your mouth. The yolks are transformed into a cloud-like mousse, whipped with tang and spice until they are perfectly smooth and decadent. Topped with a dusting of paprika or a sprig of dill, they look like little works of art nestled on the board. They provide a rich, protein-packed bite that bridges the gap between the crunchy vegetables and the savory meats, making them a crowd favorite every single time.
Ingredients
- 6 large eggs
- 1/4 cup mayonnaise
- 1 tsp Dijon mustard
- 1 tsp apple cider vinegar
- Salt and pepper to taste
- Smoked paprika for garnish
- Optional: Chives or jalapeño slices
How to make it
- Place eggs in a single layer in a saucepan and cover with an inch of cold water; bring to a rolling boil, then immediately turn off the heat and cover.
- Let the eggs sit in the hot water for exactly 12 minutes to ensure the yolks are fully set but still bright yellow and creamy, not gray.
- Transfer the eggs to an ice bath for 10 minutes; this shock stops the cooking process and makes the shells much easier to peel cleanly.
- Peel the eggs, slice them in half lengthwise, and gently pop the yolks into a medium mixing bowl, placing the whites on a serving platter.
- Mash the yolks with a fork until they are fine crumbs, then stir in mayonnaise, mustard, vinegar, salt, and pepper until the mixture is silky and aerated.
- Use a piping bag with a star tip to fill the egg white cavities, creating a decorative swirl that stands tall and looks professional.
- Dust lightly with smoked paprika from a height for an even coating and chill in the refrigerator for at least 30 minutes before serving.
How to bake potato skins

Why we love this
Potato skins are the ultimate vessel for all things salty and cheesy, offering a deep, earthy satisfaction that only a perfectly roasted spud can provide. The exterior skin becomes crisp and almost crackly, while the thin layer of potato inside remains fluffy and tender. When topped with sharp cheddar and smoky bacon, they become a savory powerhouse that feels substantial and indulgent. They are the ‘soul food’ of the snack board, providing a warm, hearty element that pairs perfectly with a cold drink and good conversation.
Ingredients
- 4 large Russet potatoes
- 2 tbsp melted butter
- 1 cup shredded sharp cheddar cheese
- 1/2 cup cooked bacon bits
- 1/4 cup sour cream
- 2 green onions, sliced
- Kosher salt
How to make it
- Preheat your oven to 400°F (200°C); scrub the potatoes clean, prick them with a fork, and bake for 50-60 minutes until they are tender throughout.
- Allow the potatoes to cool enough to handle, then slice them in half lengthwise and scoop out the flesh, leaving about a 1/4-inch shell.
- Increase the oven temperature to 450°F (230°C) to ensure the highest level of crispiness for the second bake.
- Brush both the inside and outside of the potato shells with melted butter and sprinkle generously with salt.
- Place the skins cut-side down on a baking sheet and bake for 10 minutes, then flip them over and bake for another 5 minutes until the edges are sizzling.
- Fill each skin with a generous amount of shredded cheese and bacon bits, then return to the oven for 2-3 minutes until the cheese is completely melted and bubbling.
- Top with a dollop of cold sour cream and a sprinkle of fresh green onions just before serving to create a temperature and texture contrast.
How to make spicy wings

Why we love this
A board isn’t quite complete without the sticky, finger-licking joy of spicy wings that bring a punch of heat and a glossy, mouth-watering sheen. The skin should be rendered until it’s thin and crisp, trapping the moisture inside so the meat remains incredibly tender and pulls away from the bone with ease. The sauce is the star here—a perfect balance of vinegar tang and chili fire that lingers on the tongue. They add a rustic, fun energy to the spread, encouraging guests to dive in and get a little messy in the best way possible.
Ingredients
- 2 lbs chicken wings (flats and drumettes)
- 1 tbsp baking powder (for crispiness)
- 1/2 tsp salt
- 1/2 cup hot sauce (Frank’s RedHot is a classic)
- 1/4 cup unsalted butter, melted
- 1 tbsp honey
How to make it
- Pat the wings extremely dry with paper towels; any moisture left on the skin will steam the wings rather than crisping them.
- Toss the dry wings in a large bowl with baking powder and salt; the baking powder raises the pH of the skin, helping it brown and crisp up brilliantly in the oven.
- Place the wings on a wire rack set over a baking sheet, which allows hot air to circulate entirely around the chicken for 360-degree crunch.
- Bake at 425°F (220°C) for 45-50 minutes, flipping halfway through, until the skin is golden brown and looks visibly blistered and crunchy.
- In a large bowl, whisk together the hot sauce, melted butter, and honey to create a glaze that is spicy, rich, and slightly sweet.
- Add the hot wings to the sauce and toss vigorously until every nook and cranny of the chicken is coated in the glossy red glaze.
- Serve immediately with plenty of napkins and a side of celery sticks to help manage the delicious heat.
How to make mini tacos

Why we love this
Mini tacos are a whimsical and delightful addition to any board, offering a concentrated burst of Mexican-inspired flavors in a single, manageable bite. The shells provide a sharp, corn-flavored crunch that shatters perfectly, leading into a savory filling of seasoned meat and fresh toppings. They are visually adorable and inherently festive, making the board feel like a celebration. Because they are so small, they allow your guests to enjoy the ‘taco night’ experience without getting too full too quickly, leaving room for all the other treats on the platter.
Ingredients
- 12-15 mini corn tortillas or pre-made mini shells
- 1/2 lb ground beef or shredded chicken
- 1 tbsp taco seasoning
- 1/2 cup shredded lettuce
- 1/4 cup crumbled cotija cheese
- 1/4 cup salsa or pico de gallo
- Lime wedges for serving
How to make it
- If using soft tortillas, use a 3-inch round cutter to create mini circles, then lightly fry them in oil or bake them draped over oven rack rungs at 375°F to get that classic ‘U’ shape.
- Brown your protein of choice in a skillet over medium heat, draining any excess fat to keep the mini shells from becoming soggy.
- Add the taco seasoning and a splash of water, simmering for 5 minutes until the liquid has reduced and the meat is deeply flavored and moist.
- Carefully spoon about one tablespoon of the seasoned meat into each mini shell, being careful not to overfill them.
- Add a pinch of finely shredded lettuce and a small sprinkle of cotija cheese to each taco for texture and a salty kick.
- Top with a tiny dot of salsa or a single slice of jalapeño for a pop of color and extra heat.
- Arrange them in a row on the board with lime wedges nearby so guests can add a fresh spritz of acidity right before eating.
How to serve spinach dip

Why we love this
Spinach dip is the ultimate communal anchor for a food board, providing a creamy, savory center that everyone loves to return to. It’s warm, gooey, and packed with the earthy flavor of spinach, all bound together in a rich base of melted cheeses and garlic. The way the dip clings to a piece of toasted bread or a crisp veggie is purely satisfying. It’s a classic for a reason—it’s comforting, reliable, and has a way of making people linger around the board just a little bit longer while they scoop up every last bit.
Ingredients
- 10 oz frozen chopped spinach, thawed and squeezed dry
- 8 oz cream cheese, softened
- 1/2 cup sour cream
- 1/4 cup mayonnaise
- 1 cup shredded mozzarella cheese
- 1/2 cup grated Parmesan
- 2 cloves garlic, minced
- A pinch of red pepper flakes
How to make it
- Preheat your oven to 375°F (190°C) and grease a small oven-safe dish or a hollowed-out bread bowl for a rustic look.
- The most critical step: squeeze the thawed spinach in a clean kitchen towel until it is bone-dry; any remaining water will make the dip thin and oily.
- In a large bowl, beat the cream cheese until smooth, then stir in the sour cream, mayonnaise, garlic, and red pepper flakes.
- Fold in the dried spinach, half of the mozzarella, and all of the Parmesan until the mixture is thick and evenly combined.
- Transfer the mixture to your prepared dish and top with the remaining mozzarella cheese to create a cheesy crust.
- Bake for 20-25 minutes until the dip is bubbling vigorously at the edges and the cheese on top has developed beautiful golden-brown spots.
- Serve warm in the center of your board surrounded by pita chips, sliced baguette, or colorful bell pepper strips for dipping.
How to make party pigs
[IMAGE_10]
Why we love this
There is a reason these are a staple at every gathering—they are the definition of simple joy. The combination of a salty, savory cocktail frank wrapped in buttery, flaky puff pastry is a match made in snacking heaven. As they bake, the pastry puffs up into golden layers that shatter with every bite, while the sausage inside becomes hot and juicy. They are the ultimate ‘hand-held’ food, requiring no utensils and offering a nostalgic flavor that appeals to kids and adults alike. They bring a sense of fun and approachability to the board.
Ingredients
- 1 package refrigerated crescent roll dough or puff pastry
- 1 package cocktail frankfurters (lil’ smokies)
- 1 egg, beaten (for egg wash)
- 1 tbsp ‘everything bagel’ seasoning or poppy seeds
- Honey mustard for dipping
How to make it
- Preheat your oven to 375°F (190°C) and line a baking sheet with parchment paper to prevent the pastry from sticking.
- Unroll your dough and cut it into small triangles or strips, approximately 1 inch wide and 3 inches long.
- Place a cocktail frank at the wide end of the dough strip and roll it up tightly, ensuring the seam is tucked underneath so it doesn’t unravel during baking.
- Arrange the wrapped sausages on the baking sheet with at least an inch of space between them to allow the pastry to puff up.
- Brush the tops of the dough lightly with the beaten egg; this is the secret to getting that professional, glossy, deep golden finish.
- Sprinkle immediately with everything bagel seasoning or poppy seeds while the egg wash is wet so the seeds stick perfectly.
- Bake for 12-15 minutes until the pastry is puffed, crisp, and beautifully golden; serve warm with a bowl of zesty honey mustard on the side.
Conclusion
Building the viral simple food board is about more than just the individual recipes; it’s about the art of assembly and the joy of sharing. By mixing these crispy, creamy, and fresh elements, you create a culinary experience that is as beautiful to look at as it is delicious to eat. Remember, the best boards are those that reflect your personal style, so don’t be afraid to add extra garnishes, fresh fruits, or your favorite nuts to fill in the gaps. Now, pour a glass of something sparkling, invite your favorite people over, and enjoy the effortless aesthetic you’ve created.