
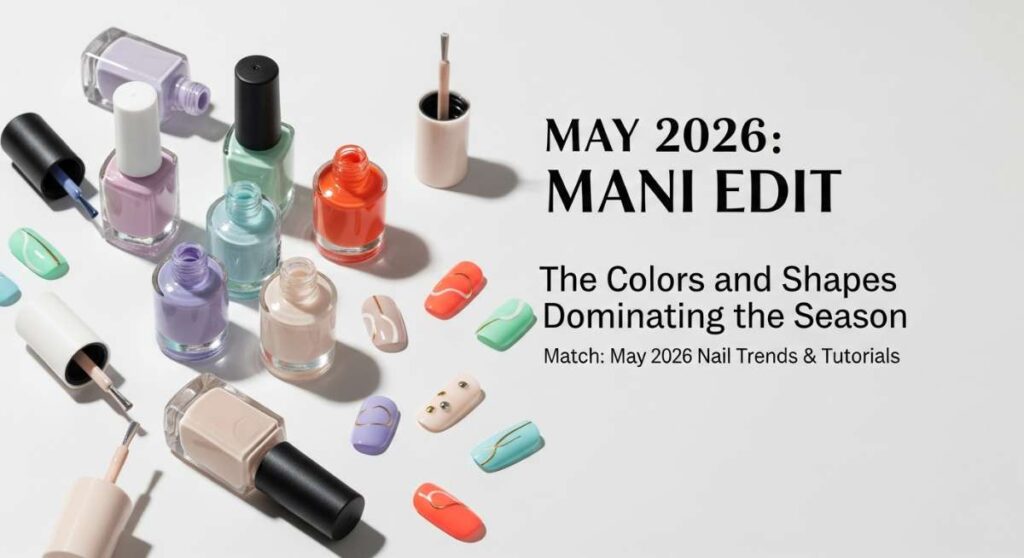
May 2026 Mani Edit: The Colors and Shapes Dominating the Season
Hello, my loves! Can you feel it? The air is finally turning sweet, the garden is waking up, and May is wrapping us in its warm, floral hug. As we step into the heart of spring, there is something so incredibly healing about sitting down, taking a deep breath, and giving our hands a little bit of magic. This month is all about soft textures, vibrant pops of joy, and shapes that make us feel like the main character of a sunshine-drenched rom-com.
I’ve been spending my afternoons experimenting with new glitters and gels, trying to capture that perfect May light. Whether you’re heading to a garden wedding or just want to feel a little more ‘you’ while sipping an iced matcha, this edit is your soft place to land. Let’s dive into the trends that are making my heart flutter this season.
3D Hibiscus Nails
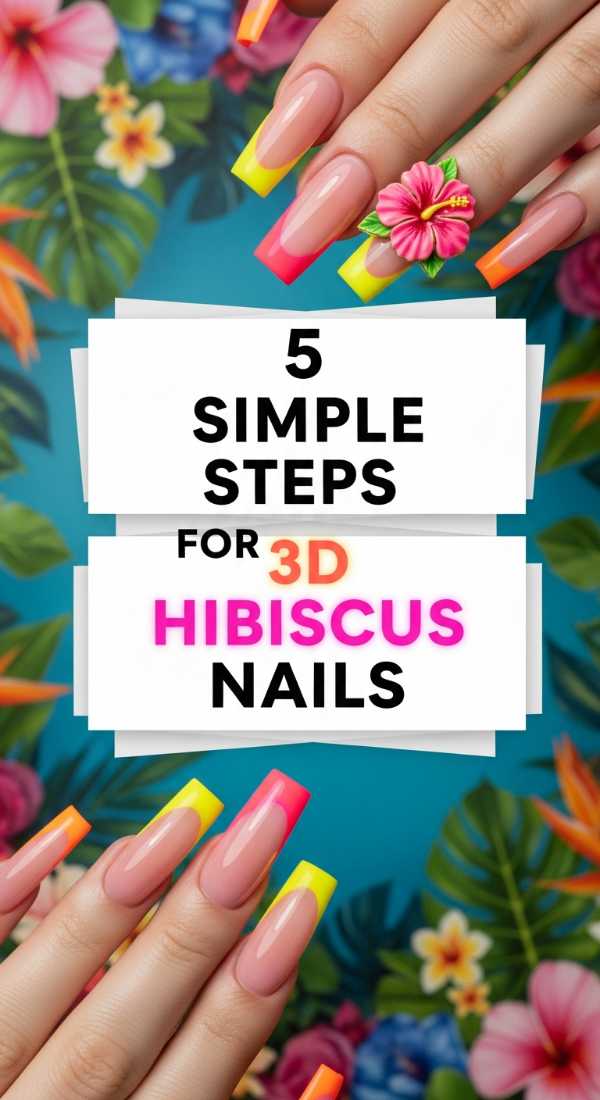
Why to love this recipe:
These nails are like a tropical vacation for your fingertips. The 3D texture adds a tactile, playful dimension that catches every bit of sunlight, making you feel like you’re walking through a blooming island paradise even on a Tuesday morning.
Essential Ingredients:
- Coral or Fuchsia gel polish
- Clear 3D builder gel or sculpture gel
- Fine liner brush
- Gold caviar beads for the center
- High-shine top coat
How to Prepare:
- Apply two coats of your base color and cure completely.
- Using a thick builder gel and a liner brush, drop five small beads in a circle to form petals.
- Drag the center of each bead toward the middle with a needle tool to create a petal shape.
- Place a gold bead or a drop of yellow gel in the center.
- Cure for 60 seconds and seal with a non-wipe top coat around the base of the flower.
Budget Range
- Affordable: Beetles Gel Polish in ‘Paradise’ ($8)
- Mid-Range: Makartt Rhinestone Glue & Sculpture Gel ($15)
- Luxury: Après Gel-X Builder in a Bottle ($25)
Iridescent Butterfly Nails
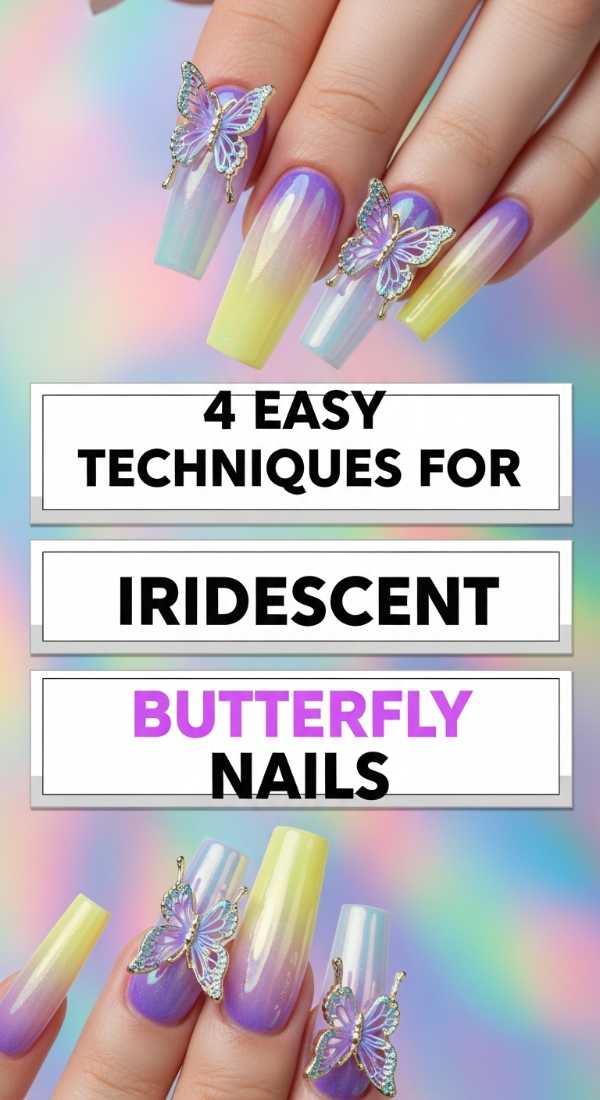
Why to love this recipe:
There is nothing more ethereal than the shimmer of a butterfly wing. This look uses layering to create a holographic depth that shifts and changes as you move, reminding us that transformation is the most beautiful part of life.
Essential Ingredients:
- Sheer milky white base
- Iridescent flake toppers
- Butterfly decals or hand-painted ink
- Detailing brush
- Magnetic velvet top coat (optional)
How to Prepare:
- Apply a milky base coat and cure.
- Press iridescent flakes onto the tacky layer, focusing on the center of the nail.
- Place your butterfly decal or use alcohol inks to sketch wing outlines.
- Trace the wing edges with a thin silver line for extra definition.
- Finish with a thick layer of top coat to ‘encapsulate’ the butterfly.
Budget Range
- Affordable: Born Pretty Iridescent Flakes ($6)
- Mid-Range: Cirque Colors ‘Mystic Moonstone’ ($14)
- Luxury: Mooncat ‘Moonfairy’ Lacquer ($16)
Neon French Tips

Why to love this recipe:
A classic French mani is always chic, but adding a neon edge makes it feel fresh and electric for May. It’s the perfect way to embrace color without feeling overwhelmed—subtle yet absolutely striking.
Essential Ingredients:
- Nude or sheer pink base
- Neon lime or hot pink gel
- French tip guide stickers or a silicone stamper
- Matte top coat (for a modern twist)
How to Prepare:
- Prep with a clean nude base and cure.
- Apply neon polish to a silicone stamper.
- Press your nail tip into the stamper at a 45-degree angle to create a crisp line.
- Use a brush dipped in acetone to clean up the ‘smile’ line.
- Cure and apply your favorite top coat.
Budget Range
- Affordable: Modelones Neon Gel Set ($12 for 6 colors)
- Mid-Range: Orly ‘Neon Earth’ Collection ($15)
- Luxury: Bio Seaweed Gel in ‘Neon Pink’ ($18)
Floral Tiger Art
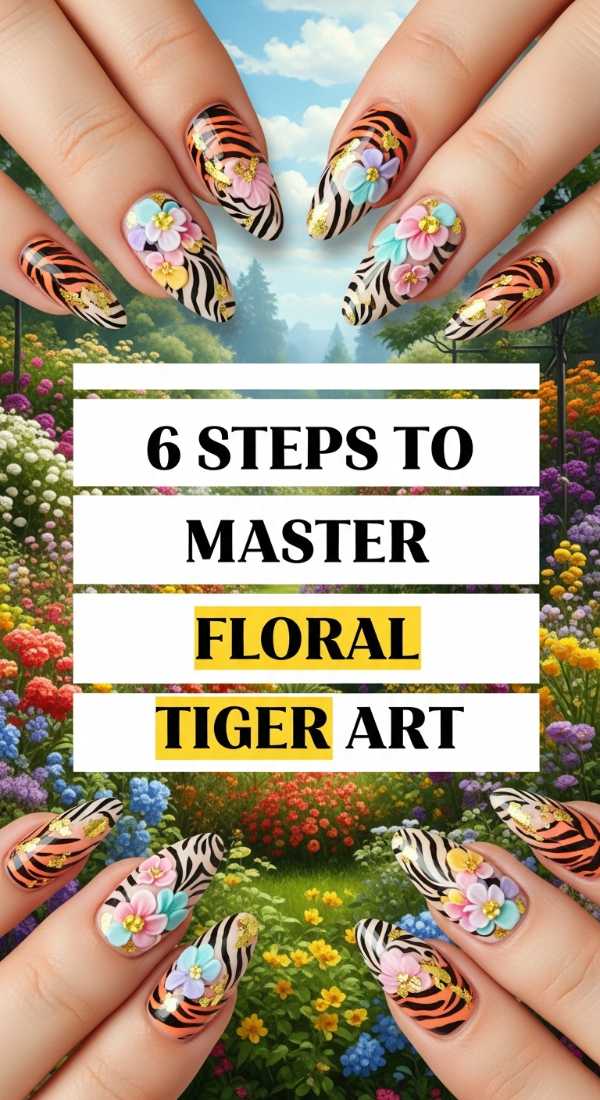
Why to love this recipe:
This is for my loves who want to show off their wild side while staying soft. Combining the fierce energy of tiger stripes with the delicacy of May blooms creates a balanced, sophisticated aesthetic that’s truly unique.
Essential Ingredients:
- Cream or beige base polish
- Black or dark brown detail gel
- Pastel floral stickers or dried flowers
- Long striping brush
How to Prepare:
- Paint your base in a creamy neutral and cure.
- Using the striping brush, paint thin, wavy ‘Y’ shapes horizontally for the tiger stripes.
- Cure the stripes.
- Apply small floral accents or hand-paint tiny daisies over the stripes.
- Seal with a glossy top coat to blend the textures.
Budget Range
- Affordable: Saviland Nail Art Liner Set ($10)
- Mid-Range: Deco Miami Floral Nail Stickers ($12)
- Luxury: Kure Bazaar ‘Nude’ Polish ($18)
Pearl Botanical Nails

Why to love this recipe:
This look is the definition of ‘cloud-soft.’ Tiny pearls paired with leafy botanical strokes evoke the feeling of a morning dew in a secret garden. It’s elegant, timeless, and incredibly romantic.
Essential Ingredients:
- Sage green or mint gel polish
- Half-pearl nail charms (various sizes)
- Gold leaf flakes
- Nail glue or thick base gel
How to Prepare:
- Apply two coats of sage green and cure.
- Paint delicate leaf stems using a darker green or white.
- Add tiny flecks of gold leaf at the base of the stems.
- Place pearls along the ‘vine’ using a dot of glue.
- Carefully top coat around the pearls to keep their luster.
Budget Range
- Affordable: Teenitor Pearl Nail Kit ($7)
- Mid-Range: Olive & June ‘Besties’ Set ($10)
- Luxury: Chanel Le Vernis in ‘Sauge Brûlée’ ($32)
Y2K Flare Nails
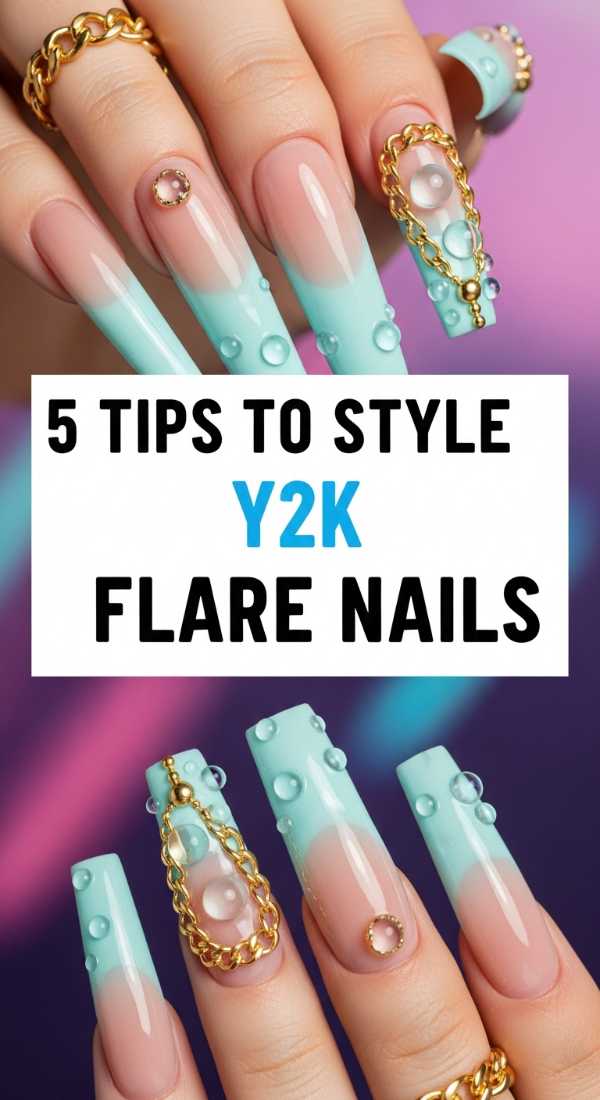
Why to love this recipe:
Nostalgia is in full bloom! The ‘duck’ or flare shape is making a major comeback for May 2026. It’s bold, it’s fun, and it provides the perfect wide canvas for all your favorite early-2000s charms.
Essential Ingredients:
- Flare-shaped nail tips
- Bright blue or lilac polish
- Star charms or chunky glitter
- Rhinestones
How to Prepare:
- Apply and shape your flare tips (wider at the edge).
- Paint with a vibrant Y2K blue and cure.
- Apply a layer of chunky silver glitter to the tips.
- Add star charms and rhinestones near the cuticle.
- Seal with a heavy-duty top coat for maximum sparkle.
Budget Range
- Affordable: ECbasket Duck Nail Tips ($9)
- Mid-Range: GellyFit Color Gel ($15)
- Luxury: Swarovski Crystal Pixie ($25)
Chrome Finish Secrets
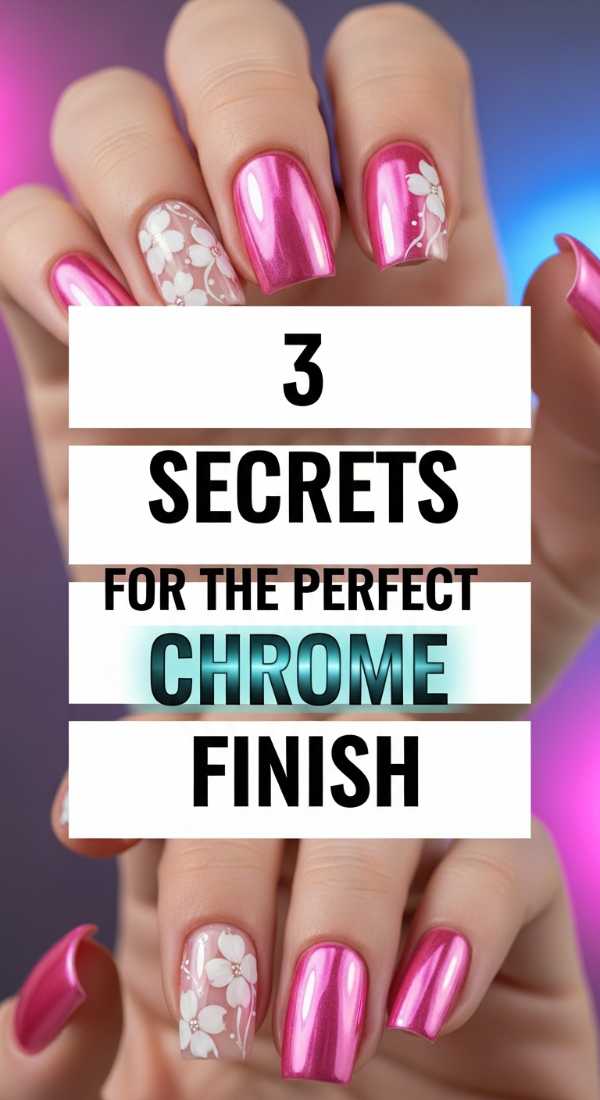
Why to love this recipe:
Chrome isn’t just a trend; it’s a lifestyle. Achieving that perfect mirror-like finish makes your nails look like liquid metal. It’s futuristic yet somehow perfectly suited for a sunny May afternoon.
Essential Ingredients:
- Black or white base gel
- No-wipe top coat
- High-quality chrome powder
- Eyeshadow applicator or silicone tool
How to Prepare:
- Apply your base color (black for depth, white for softness) and cure.
- Apply a no-wipe top coat and cure for only 30 seconds (it should be slightly warm).
- Immediately rub the chrome powder onto the nail using the applicator.
- Buff until a mirror reflection appears.
- Cure again, then seal with another layer of top coat.
Budget Range
- Affordable: Artdone Chrome Powder Set ($10)
- Mid-Range: Daily Charme Magic White Chrome ($18)
- Luxury: Akzentz Luxio Chrome ($22)
3D Coquette Bows
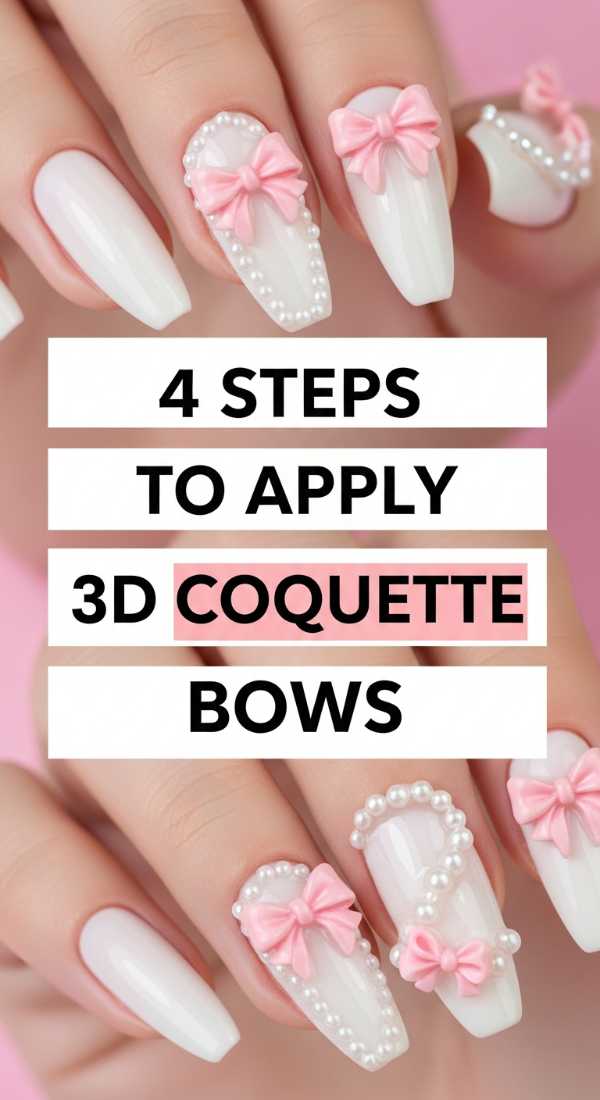
Why to love this recipe:
For the coquette at heart, bows are a must. These 3D accents add a touch of ballet-core sweetness to your look, making every gesture feel like a graceful performance.
Essential Ingredients:
- Soft pink or ‘ballet slipper’ polish
- Pre-made resin bow charms
- Strong nail adhesive or gem gel
- Fine silver glitter (for accents)
How to Prepare:
- Paint nails a soft, sheer pink and cure.
- Apply a tiny bit of silver glitter to the ring finger.
- Apply a dollop of gem gel where you want the bow.
- Press the bow charm into the gel and hold.
- Cure for 90 seconds to ensure the charm is locked in.
Budget Range
- Affordable: Amazon Resin Bow Mixed Pack ($6)
- Mid-Range: Lights Lacquer ‘Spun Sugar’ ($13)
- Luxury: Manucurist Paris Green Flash ($19)
Aura Jelly Nails
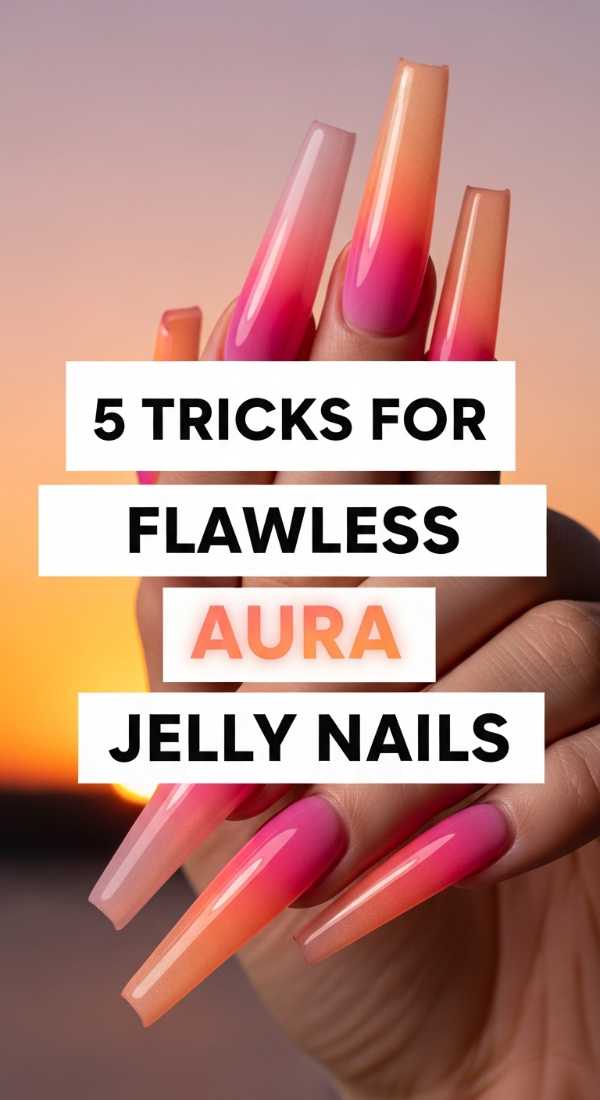
Why to love this recipe:
Aura nails represent your energy, and the jelly finish makes them look like glowing gemstones. It’s a soft, diffused gradient that feels deeply personal and spiritual.
Essential Ingredients:
- Jelly (translucent) gel polishes in two colors
- Sponge applicator
- White gel for the ‘glow’ center
- Matte top coat (optional)
How to Prepare:
- Apply one coat of the lighter jelly color and cure.
- Dab a small circle of white gel in the center of the nail (do not cure).
- Using a sponge, dab the darker jelly color around the edges, blending into the white.
- Cure the blend.
- Add a final layer of jelly polish over the whole nail to soften the gradient.
Budget Range
- Affordable: Gaoy Jelly Gel Set ($15 for 6)
- Mid-Range: Cirque Colors Jelly Collection ($14 each)
- Luxury: JinSoon ‘Dew’ Polish ($18)
Soft Glam Nails
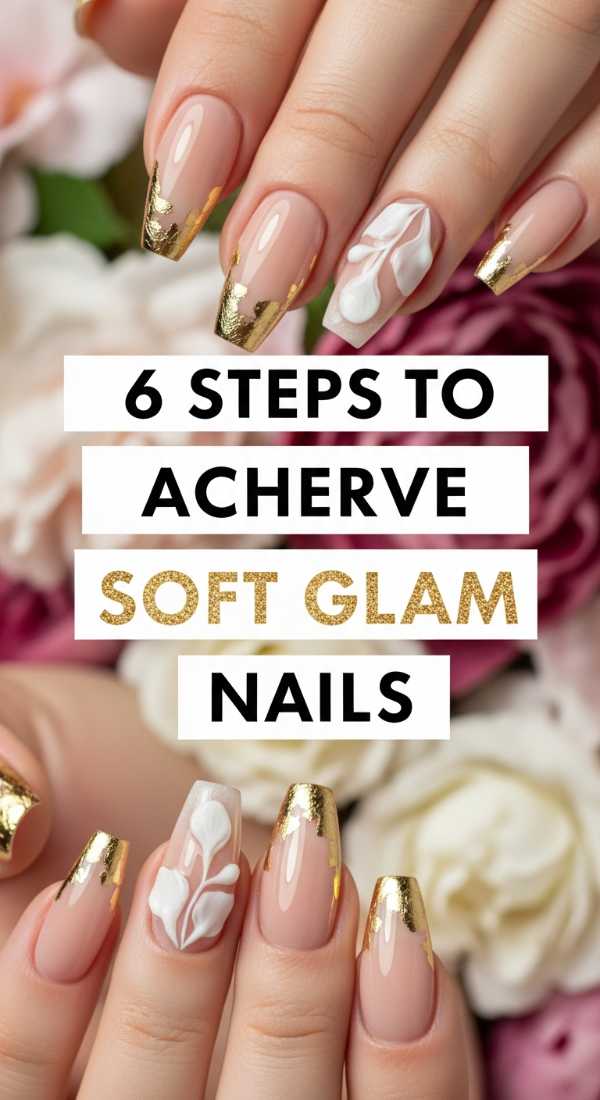
Why to love this recipe:
Sometimes, the loudest statement is a quiet one. Soft glam is about perfection in the basics—clean lines, healthy cuticles, and a ‘your nails but better’ glow that works for every occasion.
Essential Ingredients:
- Sheer nude or ‘soap nail’ polish
- Very fine champagne shimmer
- Cuticle oil
- Glass nail file (for the perfect shape)
How to Prepare:
- Shape nails into a soft almond or oval.
- Apply one coat of sheer nude and cure.
- Apply a very thin ‘dusting’ of shimmer only at the cuticles.
- Finish with a high-gloss, plumping top coat.
- Massage cuticle oil in for a healthy, hydrated look.
Budget Range
- Affordable: Essie ‘Mademoiselle’ ($10)
- Mid-Range: Dazzle Dry ‘Prima Ballerina’ ($22)
- Luxury: Dior Vernis ‘Muguet’ ($30)
Wrapping You in Color
I hope these ideas spark a little bit of joy in your heart, my loves. Whether you go for the bold flare of the Y2K era or the quiet whisper of a soft glam finish, remember that your nails are a canvas for your soul. Take this time for yourself—you deserve every bit of this pampering. Until next time, stay glowing and keep blooming!