
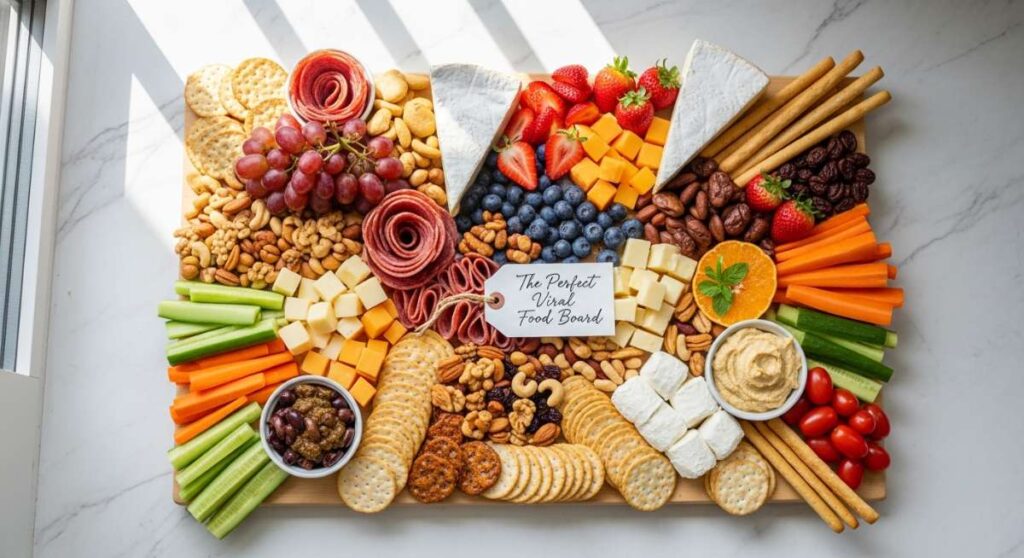
Low Effort, High Impact: The Secret to the Perfect Viral Food Board
There is something undeniably magical about a gathering that feels effortless. You know the ones—where the host seems completely relaxed, the wine is flowing, and the center of the table is anchored by a spread so vibrant and inviting it looks like it belongs on a magazine cover. We’ve all felt that pressure to perform in the kitchen, but the secret to a truly viral food board isn’t hours of frantic prep; it’s about choosing high-impact, soul-warming dishes that let the ingredients do the talking.
Food boards are more than just a trend; they are a lifestyle choice that celebrates variety and communal eating. By curating a selection of savory meats, zesty pastas, and sweet treats, you create a sensory landscape that invites guests to linger. In this guide, I’m sharing the exact components that make my viral boards legendary, focusing on textures that range from the crunch of a perfectly charred chicken to the silky, golden drizzle of homemade dandelion jelly.
How to make creamy rotel dip

Why we love this
This dip is the ultimate nostalgic comfort food, offering a velvety, molten texture that clings perfectly to every chip. As it melts, the aroma of savory beef and spicy green chiles fills the kitchen, promising a bite that is both rich and punchy. It’s the kind of dish that disappears in minutes because the combination of creamy cheese and acidic tomatoes is simply irresistible to the palate. Enjoying it warm feels like a cozy hug at a backyard party.
Ingredients
- 1 lb ground beef
- 1 block (32 oz) Velveeta cheese, cubed
- 2 cans (10 oz each) Ro-Tel diced tomatoes and green chilies
- 1 tsp taco seasoning
- 1/2 cup whole milk (optional for desired consistency)
- Fresh cilantro for garnish
How to make it
- Place a large skillet over medium-high heat and add the ground beef. Break the meat apart with a wooden spoon and cook until it is deeply browned and no longer pink, which usually takes about 7-10 minutes.
- Drain the excess fat from the skillet thoroughly to ensure the dip isn’t greasy. Stir in the taco seasoning and cook for another minute to bloom the spices.
- Reduce the heat to low and add the cubed Velveeta cheese. It is crucial to use low heat here to prevent the cheese from scorching or becoming grainy.
- Pour in both cans of Ro-Tel (do not drain them, as the juice provides essential flavor and acidity). Stir constantly with a silicone spatula as the cheese begins to liquefy.
- If the mixture feels too thick, splash in the milk one tablespoon at a time until it reaches a silky, pourable consistency. Once the dip is smooth and bubbling gently, transfer it to a warm serving bowl and garnish with fresh cilantro.
How to cook dirty spaghetti

Why we love this
Dirty spaghetti is a soulful, umami-packed twist on a classic that brings deep, earthy flavors to your food board. The combination of savory ground meats and the ‘holy trinity’ of bell peppers, onions, and celery creates an aroma that is intoxicatingly fragrant and homey. Each strand of pasta becomes coated in a rich, dark sauce that feels indulgent and complex, offering a texture that is much heartier than your standard marinara. It’s a conversation starter that tastes like a secret family recipe.
Ingredients
- 1 lb spaghetti noodles
- 1/2 lb ground beef and 1/2 lb ground pork
- 1 green bell pepper, finely diced
- 1 medium onion, finely diced
- 2 stalks celery, finely diced
- 3 cloves garlic, minced
- 2 tbsp Worcestershire sauce
- 1 tsp smoked paprika and 1/2 tsp cayenne
How to make it
- Bring a large pot of heavily salted water to a rolling boil. Add the spaghetti and cook until it is just shy of al dente (usually 1-2 minutes less than the package instructions), as it will finish cooking in the sauce.
- In a heavy-bottomed Dutch oven, brown the beef and pork over medium heat. Allow the meat to sear undisturbed for 3 minutes to develop a dark crust before breaking it up.
- Add the diced bell pepper, onion, and celery directly into the meat drippings. Sauté the vegetables until they are translucent and have softened significantly, about 8 minutes.
- Stir in the minced garlic, Worcestershire sauce, paprika, and cayenne. Let these aromatics toast for 60 seconds until the scent fills the room.
- Toss the cooked spaghetti into the meat mixture, adding a 1/2 cup of reserved pasta water. Toss vigorously over low heat for 2 minutes, allowing the starch in the water to emulsify with the fats, creating a glossy, ‘dirty’ coating on every noodle.
How to bake strawberry pie

Why we love this
There is nothing quite like the sight of a glistening strawberry pie, its vibrant red filling peeking through a golden, buttery crust. The aroma of simmering berries and sugar is the essence of summer, evoking memories of sun-drenched afternoons and garden parties. When you bite into it, you get the contrast of the flaky, salt-kissed pastry and the jammy, sweet-tart explosion of fresh fruit. It’s a showstopper dessert that adds a bright pop of color to any board spread.
Ingredients
- 2 pie crusts (homemade or store-bought)
- 6 cups fresh strawberries, hulled and sliced
- 3/4 cup granulated sugar
- 1/4 cup cornstarch
- 1 tbsp lemon juice
- 1 egg (for egg wash)
- Coarse sparkling sugar for topping
How to make it
- Preheat your oven to 400°F (200°C). Roll out one pie crust and fit it into a 9-inch pie plate, crimping the edges. Prick the bottom with a fork and chill it in the fridge while you prepare the filling.
- In a large mixing bowl, gently toss the sliced strawberries with the sugar, cornstarch, and lemon juice. Let this sit for about 10 minutes; this allows the juices to release and the cornstarch to begin its thickening magic.
- Pour the strawberry mixture into the prepared bottom crust. If there is an excessive amount of liquid at the bottom of the bowl, leave the last tablespoon behind to prevent a soggy bottom.
- Top with the second crust—either as a solid sheet with vents or a lattice pattern for a professional look. Brush the top crust lightly with a beaten egg wash and sprinkle generously with coarse sugar.
- Bake on the lower rack for 45-50 minutes. You are looking for a deep golden-brown crust and a filling that is bubbling slowly in the center. Allow the pie to cool completely for at least 4 hours to let the filling set before slicing.
How to make summer pasta

Why we love this
Summer pasta is the embodiment of freshness, focusing on light, clean flavors that don’t weigh you down. The scent of fresh basil and lemon zest provides an instant uplift, while the silky olive oil creates a luxurious mouthfeel that highlights the sweetness of cherry tomatoes. It’s a vibrant, colorful dish that looks stunning on a board, offering a refreshing break from heavier appetizers. Each bite feels like a celebration of the season’s best produce.
Ingredients
- 1 lb linguine or angel hair pasta
- 1 pint cherry tomatoes, halved
- 4 cloves garlic, thinly sliced
- 1/2 cup high-quality extra virgin olive oil
- 1/2 cup fresh basil leaves, chiffonade
- 1 lemon (zest and juice)
- Red pepper flakes to taste
How to make it
- Cook the pasta in a large pot of boiling salted water until it is perfectly al dente. Reserve at least one cup of the starchy pasta water before draining.
- While the pasta cooks, heat the olive oil in a large skillet over medium-low heat. Add the sliced garlic and red pepper flakes. The goal is to infuse the oil without browning the garlic; once it’s fragrant and soft (about 3 minutes), add the halved tomatoes.
- Cook the tomatoes just until they begin to burst and release their juices, creating a light, natural sauce. This should take about 5 minutes.
- Add the cooked pasta directly to the skillet. Pour in half of the reserved pasta water and the lemon juice. Increase the heat to medium and toss continuously for 2 minutes to create a light emulsion.
- Remove from heat and fold in the fresh basil and lemon zest. The residual heat will wilt the basil just enough to release its oils without turning it black. Serve immediately.
How to grill marinated chicken

Why we love this
Succulent and smoky, marinated grilled chicken is the protein anchor every food board needs. The char from the grill adds a sophisticated bitterness that balances the bright, herbaceous notes of the marinade, while the meat remains incredibly juicy inside. As it grills, the caramelizing sugars and herbs create an aroma that is classic, inviting, and mouthwatering. It’s a versatile component that tastes just as good at room temperature as it does hot off the grates.
Ingredients
- 2 lbs chicken thighs (boneless, skinless)
- 1/2 cup olive oil
- 1/4 cup balsamic vinegar
- 3 tbsp honey
- 2 tbsp fresh rosemary, chopped
- 4 cloves garlic, smashed
- Salt and cracked black pepper
How to make it
- In a large bowl or gallon-sized freezer bag, whisk together the olive oil, balsamic vinegar, honey, rosemary, and garlic. Ensure the honey is fully dissolved into the acid for an even marinade.
- Add the chicken thighs to the marinade, ensuring every piece is well-coated. Seal and refrigerate for at least 4 hours, though overnight is ideal for the deepest flavor penetration.
- Preheat your grill to medium-high heat (about 400°F). Clean the grates thoroughly and lightly oil them to prevent the honey in the marinade from sticking.
- Place the chicken on the grill. Cook for 6-7 minutes per side. Do not move the chicken too early; wait until it naturally releases from the grates to ensure beautiful, distinct grill marks.
- Use an instant-read thermometer to check for a final internal temperature of 165°F. Remove the chicken from the heat and let it rest on a cutting board for at least 5 minutes before slicing into strips for your board.
How to cook spring soup

Why we love this
Spring soup is a vibrant, emerald-green bowl of pure vitality that tastes exactly like the first day of the season. It has a delicate, silky texture that feels light on the tongue, with the sweetness of young peas and the cooling snap of fresh mint. The aroma is grassy and bright, providing a sophisticated and healthy addition to a diverse food spread. It’s an elegant way to incorporate greens into your board in a way that feels indulgent rather than dutiful.
Ingredients
- 2 cups fresh or frozen peas
- 1 large leek, white and light green parts only, sliced
- 4 cups vegetable broth
- 1 large potato, peeled and diced
- 1/2 cup fresh mint leaves
- 1/2 cup heavy cream or coconut milk
- Lemon wedges for serving
How to make it
- In a medium pot, sauté the sliced leeks in a tablespoon of butter or oil over medium heat until they are soft and translucent, but not browned.
- Add the diced potato and vegetable broth. Bring the mixture to a boil, then reduce the heat and simmer for about 10-12 minutes, or until the potato chunks are fork-tender.
- Stir in the peas and cook for only 3-4 minutes. You want them to be cooked through but still maintain their bright, vibrant green color. Overcooking will turn the soup a dull olive color.
- Remove the pot from the heat and stir in the fresh mint. Using an immersion blender (or a standard blender in batches), puree the soup until it is completely smooth and velvety.
- Stir in the cream for richness and season generously with salt and pepper. Return to a very low heat just to warm through. Serve in small cups or ramekins on your board with a squeeze of fresh lemon.
How to brew sun tea

Why we love this
Sun tea is the ultimate slow-living beverage, brewed by the gentle heat of the sun to create a flavor profile that is remarkably smooth and devoid of bitterness. The clarity of the tea is stunning, catching the light in a glass dispenser on your board like liquid amber. It has a naturally mellow sweetness and a clean finish that is incredibly refreshing when served over heaps of ice. It’s a nostalgic, low-effort way to provide a drink that feels special and artisanal.
Ingredients
- 8 black or green tea bags
- 1 gallon cold filtered water
- Fresh mint sprigs
- Lemon or orange slices
- Honey or simple syrup (optional)
How to make it
- Place the tea bags into a very clean 1-gallon glass jar. Using glass is essential as it absorbs and retains the sun’s heat more effectively than plastic.
- Fill the jar with cold, filtered water. Using filtered water ensures the final tea is crystal clear and free of mineral aftertastes.
- Secure the lid and place the jar in a spot that receives direct, intense sunlight for 3 to 5 hours. You will see the color slowly bleed from the bags into the water in beautiful ribbons.
- Do not leave the tea out for more than 5 hours, as the warmth can encourage bacterial growth if left too long. Once the tea is a deep, rich color, remove the tea bags.
- Stir in any sweeteners while the tea is still slightly warm from the sun, then refrigerate immediately. Serve over ice with fresh mint and citrus slices for a beautiful presentation.
How to roast easter ham

Why we love this
A perfectly roasted ham is a masterclass in the balance of sweet and salty. The exterior becomes a sticky, caramelized crust of brown sugar and spices, while the interior remains tender, pink, and incredibly savory. As it roasts, the scent of cloves and warm sugar fills the home, signaling a celebration is underway. Sliced thin and tucked into rolls on a food board, it provides a substantial, satisfying element that pairs beautifully with both sweet jellies and sharp mustards.
Ingredients
- 1 bone-in smoked ham (8-10 lbs)
- 1 cup brown sugar
- 1/2 cup honey
- 1/4 cup Dijon mustard
- 1/2 tsp ground cloves
- 1/2 cup pineapple juice
How to make it
- Preheat your oven to 325°F (165°C). Place the ham cut-side down in a roasting pan. Score the fat on the top of the ham in a diamond pattern, being careful not to cut into the meat itself.
- Cover the ham tightly with aluminum foil. This is crucial for the first phase of cooking to ensure the meat stays moist and doesn’t dry out. Bake for about 15 minutes per pound.
- While the ham is in the oven, whisk together the brown sugar, honey, mustard, cloves, and pineapple juice in a small saucepan over medium heat. Let it simmer for 5 minutes until it thickens into a syrupy glaze.
- Remove the ham from the oven about 30 minutes before it’s finished. Remove the foil and generously brush the entire surface with the glaze. Increase the oven temperature to 400°F.
- Bake for the final 20-30 minutes, basting with more glaze every 10 minutes, until the exterior is dark, bubbly, and caramelized. Let the ham rest for at least 20 minutes before carving to allow the juices to redistribute.
How to make dandelion jelly

Why we love this
Dandelion jelly is like capturing sunshine in a jar. It has a surprisingly delicate flavor that mimics high-quality honey with subtle floral notes and a hint of citrus. The jelly is a gorgeous, translucent gold that looks stunning when spread on crackers or crusty bread. Making it is a labor of love that feels incredibly rewarding, turning a common backyard flower into a gourmet delicacy that will have every guest asking for the recipe. It is the ultimate conversation piece for a viral food board.
Ingredients
- 2 cups dandelion petals (yellow parts only, no green!)
- 4 cups boiling water
- 1/4 cup lemon juice
- 1 package (1.75 oz) powdered pectin
- 4 cups granulated sugar
How to make it
- Gather fresh dandelions and carefully pull the yellow petals away from the green base. It is vital to remove all green parts, as they are very bitter and will ruin the jelly’s flavor.
- Place the petals in a heat-proof jar and pour the boiling water over them. Let this steep overnight (or at least 8 hours) to create a strong dandelion ‘tea.’
- Strain the liquid through a fine-mesh sieve or cheesecloth, squeezing the petals to get every drop of flavor. You should have about 3 to 4 cups of golden liquid.
- Pour the dandelion tea into a large pot and stir in the lemon juice and powdered pectin. Bring the mixture to a full rolling boil that cannot be stirred down.
- Add the sugar all at once and return to a rolling boil. Boil hard for exactly one minute. Perform a ‘sheet test’ on a cold spoon to check the set. Pour into sterilized jars and let cool. The jelly will set as it chills.
How to mix pina coladas
[IMAGE_10]
Why we love this
The pina colada is the ultimate tropical escape in a glass, offering a creamy, frosty texture that feels like a vacation. The combination of sweet pineapple and rich coconut cream is a classic for a reason—it’s luscious, refreshing, and perfectly balanced. The aroma of toasted coconut and fresh fruit immediately sets a relaxed, party-ready mood. Served in small glasses on a board, they provide a fun, boozy (or non-alcoholic) treat that keeps the energy high and the vibes even higher.
Ingredients
- 2 oz white rum (optional)
- 2 oz cream of coconut (like Coco Lopez)
- 4 oz pineapple juice
- 1/2 cup frozen pineapple chunks
- 1 cup ice
- Maraschino cherries and pineapple wedges for garnish
How to make it
- Chill your serving glasses in the freezer for 10 minutes prior to mixing to ensure the drink stays frosty as long as possible.
- In a high-powered blender, combine the white rum, cream of coconut, and pineapple juice. Using cream of coconut rather than coconut milk is essential for that signature thick, sweet consistency.
- Add the frozen pineapple chunks and the ice. The frozen fruit helps create a smoother, more sorbet-like texture than ice alone.
- Blend on high speed until the mixture is completely uniform and no ice chunks remain. The consistency should be thick enough to hold a straw upright.
- Taste and adjust—if it’s too sweet, add a squeeze of lime; if it’s too thin, add more frozen pineapple. Pour into the chilled glasses and garnish with a cherry and a wedge of pineapple for that iconic viral look.
Wrapping Up the Perfect Board
Building the perfect viral food board is about more than just the recipes; it’s about the joy of sharing something handmade with the people you love. Whether you’re serving a smoky roasted ham or a delicate dandelion jelly, the effort you put into these details creates an experience that lingers long after the last bite is gone. Remember, keep it simple, focus on fresh ingredients, and don’t forget to take a picture before everyone dives in!
Frequently Asked Questions
How can I keep the dip warm on a food board?
To keep dips like the Rotel cheese dip warm, you can use a small decorative slow cooker or a fondue pot set to the lowest heat. Alternatively, serving it in a heavy cast-iron crock will help retain heat for much longer than a standard ceramic bowl.
Can I make the dandelion jelly ahead of time?
Absolutely! Dandelion jelly is perfect for meal prep. Once sealed in sterilized jars, it can last for months in a cool, dark pantry. Once opened, keep it in the refrigerator and use it within a few weeks for the best flavor.
What is the best way to present pasta on a board?
For a viral look, serve pasta in small, individual-sized ramekins or use a large, shallow wooden bowl nestled into the corner of the board. Garnish with plenty of fresh herbs and extra lemon wedges to make the colors pop.