
We have all had those afternoons where the world feels a little too loud, and the thought of standing over a hot stove feels like a mountain we aren’t quite ready to climb. There is a specific kind of magic in the ‘lazy-day’ aesthetic—the soft glow of a candle, a chunky knit blanket, and a meal that feels like a celebration without the stress. This is where the viral simple food board comes in, turning basic pantry staples and fresh finds into a masterpiece of grazing. It is about more than just eating; it is about the ritual of slow living and treating yourself to something beautiful even when you are at your most relaxed.
Building one of these boards has become my favorite way to unwind. There is something deeply meditative about tucking a sprig of rosemary next to a wedge of cheese or watching honey slowly pool in the center of a board. It is a creative outlet that rewards you with every bite. Whether you are hosting a cozy movie night with your best friends or simply want to elevate your solo Sunday, this guide will show you how to curate a board that looks like a professional catering spread but feels like home.
How to pick the perfect base board?

Why we love this
The foundation of your food board sets the entire mood for your lazy-day feast. We love a high-quality wooden or marble base because it provides a warm, organic backdrop that makes the colors of your fruits and cheeses pop. Imagine the smooth, cool touch of polished marble or the rustic, textured grain of a well-loved olive wood board beneath your fingertips. It creates a grounding sensory experience that transforms a simple snack into a curated event, making even the simplest ingredients feel intentional and luxurious.
Ingredients
- Large wooden cutting board or marble slab
- Food-grade mineral oil (for wood)
- Microfiber cloth
How to make it
- Begin by selecting a board that is appropriately sized for your guest count; a 12×18 inch board is usually perfect for 2-4 people.
- If using a wooden board, inspect the surface for any dryness or splinters. Apply a small amount of food-grade mineral oil to a microfiber cloth and buff it into the wood in circular motions to bring out the rich, deep tones of the grain.
- Allow the oil to soak in for at least 20 minutes until the wood looks hydrated but not greasy to the touch.
- If using marble, ensure it has been chilled in the refrigerator for 15 minutes prior to assembly, which helps keep cheeses and meats at a safe, firm temperature.
- Place the board on a flat, stable surface where you plan to serve, as moving a fully loaded board can be tricky.
How to style the creamiest brie wheel?

Why we love this
Brie is the undisputed queen of the food board, offering a buttery, velvet-soft texture that practically melts on the tongue. We love the way its snowy white rind contrasts with the vibrant colors surrounding it, and the earthy, mushroom-like aroma that fills the air as it reaches room temperature. There is a deep sense of satisfaction in slicing into that soft center and watching the gooey cream spill out, promising a rich and decadent bite that pairs perfectly with almost everything on your board.
Ingredients
- 8oz wheel of double or triple cream Brie
- Fresh thyme sprigs
- Honey or fig jam
How to make it
- Remove the Brie from the refrigerator approximately 30 to 45 minutes before serving; cheese is best enjoyed at room temperature to allow the fats to soften and the flavors to bloom.
- Place the wheel on a clean surface. Using a sharp, thin knife dipped in warm water, carefully score the top rind in a crosshatch pattern, cutting only about 1/4 inch deep.
- Position the Brie as a ‘heavy’ anchor on your board, usually slightly off-center to create visual interest.
- Gently pull back the corners of the scored rind to reveal the soft interior, or leave it whole for a cleaner look.
- Top with a small dollop of fig jam or a sprig of thyme to signal to your guests that this is the focal point of the spread.
How to fold viral salami roses?

Why we love this
Salami roses are the ultimate ‘viral’ trick that takes a board from basic to breathtaking in seconds. We love the way the thin, salty ribbons of meat create a sculptural, floral aesthetic that looks far more difficult to achieve than it actually is. The texture is wonderfully chewy and savory, and when folded this way, it provides the perfect amount of surface area for pairing with a dab of mustard or a slice of sharp cheddar. It adds a sophisticated, artisanal touch that guests will be talking about long after the board is cleared.
Ingredients
- 15-20 thin slices of round salami (Genova or Sopressata work best)
- A small wine glass or champagne flute
How to make it
- Take your first slice of salami and fold it over the rim of the glass so that half is inside and half is outside.
- Place the second slice overlapping the first by about 50%, pressing it firmly against the rim to ensure it sticks.
- Continue this process, layering the slices around the entire circumference of the glass until you have completed 3 to 4 full rotations.
- As you add layers, press down firmly on the ‘petals’ at the rim to compress the meat and create a sturdy shape.
- Carefully flip the glass over onto your board and lift it slowly; the salami will maintain a beautiful, blooming rose shape. Gently fluff the outer layers for a more natural look.
How to select the freshest seasonal fruits?

Why we love this
Fresh fruit is the palate cleanser of the board, offering a burst of natural sweetness and acidity that cuts through the richness of the meats and cheeses. We love the vibrant jewel tones of blackberries, the crisp snap of a cold grape, and the floral fragrance of a perfectly ripe strawberry. Choosing seasonal produce ensures that every bite is juicy and at its peak flavor profile. It brings a sense of freshness and light to the board, making the entire spread feel balanced, healthy, and incredibly inviting to the eye.
Ingredients
- 1 cup red or green seedless grapes
- Handful of fresh raspberries or blackberries
- 1 crisp apple (Honeycrisp or Pink Lady)
- Fresh mint leaves for garnish
How to make it
- Wash all fruit thoroughly in cold water and pat completely dry with a paper towel; moisture is the enemy of a crisp board and can make crackers soggy.
- Keep grapes on their stems but snip them into small ‘mini-bunches’ of 3-5 grapes using kitchen shears to make them easy for guests to grab.
- Slice the apple into thin, uniform wedges. To prevent browning, toss the slices in a small bowl with a teaspoon of lemon juice or soak them in salted water for 5 minutes before drying.
- Arrange the larger fruit (grapes) first to fill gaps, then nestle the smaller berries into the ‘nooks and crannies’ created by the cheese and meat.
- Finish by tucking a few mint leaves around the fruit to add a pop of green and a refreshing aroma.
How to roast sweet honey-glazed nuts?

Why we love this
Roasted nuts provide that essential ‘crunch’ factor that every good board needs. We love the way the heat of the oven transforms raw pecans or walnuts into toasted, fragrant gems coated in a sticky-sweet glaze. The aroma of warm cinnamon and honey wafting through the kitchen is the epitome of the lazy-day aesthetic. They offer a smoky, earthy depth that pairs beautifully with blue cheese or sharp Gouda, providing a satisfying textural contrast to the softer elements on the board.
Ingredients
- 1 cup raw pecans or walnut halves
- 2 tbsp honey or maple syrup
- 1/2 tsp sea salt
- 1/4 tsp cinnamon
How to make it
- Preheat your oven to 325°F (165°C). Line a small baking sheet with parchment paper to prevent sticking.
- In a medium bowl, whisk together the honey, sea salt, and cinnamon until smooth.
- Add the nuts to the bowl and toss thoroughly until every nut is evenly coated in the honey mixture.
- Spread the nuts in a single layer on the baking sheet, ensuring they aren’t crowded together.
- Bake for 10-12 minutes. Watch them closely; nuts can go from perfectly toasted to burnt very quickly. Look for a deepened golden color and a fragrant scent.
- Remove from the oven and let them cool completely on the tray; they will become crunchier as they cool. Once hardened, break them apart and place them in a small ramekin on the board.
How to create a zesty whipped feta dip?

Why we love this
A good dip acts as the ‘glue’ for your board, giving you something to dunk those crackers and veggies into. We love whipped feta because it is incredibly airy and light, yet packs a punch of tangy, salty flavor that wakes up the taste buds. The texture is silky smooth, and when topped with a bit of lemon zest, it feels bright and sophisticated. It is the kind of dip that makes you want to keep coming back for ‘just one more bite,’ acting as a creamy bridge between the savory meats and the sweet fruits.
Ingredients
- 4oz feta cheese (block in brine is best)
- 2 tbsp Greek yogurt or sour cream
- 1 tbsp olive oil
- Zest of half a lemon
- 1 clove minced garlic
How to make it
- Place the crumbled feta and Greek yogurt into a small food processor or blender.
- Add the olive oil, minced garlic, and lemon zest.
- Pulse the mixture on high for about 1-2 minutes. The goal is a completely smooth, mousse-like consistency. If it’s too thick, add a teaspoon of water or more olive oil.
- Taste and adjust; you likely won’t need salt because of the feta, but a crack of black pepper can add nice heat.
- Spoon the dip into a small decorative bowl. Use the back of a spoon to create a ‘swirl’ or well in the center and fill it with a tiny drizzle of olive oil before placing it on the board.
How to layer artisanal crackers for crunch?

Why we love this
Crackers are the sturdy vessels that carry all your delicious toppings from board to mouth. We love a variety of artisanal crackers because they add different shapes, seeds, and textures to the spread. From the snap of a thin wheat cracker to the buttery crumble of a shortbread-style biscuit, they provide the necessary structural integrity for piling on cheese and meat. The visual of a neatly stacked or fanned-out ‘cracker river’ adds a sense of flow and abundance to the overall design, making the board look professional and full.
Ingredients
- 1 box multi-seed crackers
- 1 box thin water crackers
- 1 bag of toasted baguette slices or pita chips
How to make it
- Choose at least three different shapes of crackers (circles, squares, and long rectangles) to create visual diversity.
- Create a ‘river’ effect by fanning the crackers out in a curved line that snakes across the board from one corner to the other.
- Overlap the crackers slightly so they support each other and stay upright, rather than lying flat.
- If space is tight, stack some crackers vertically in a small pile next to the dip bowl.
- Ensure the crackers are placed away from any ‘wet’ ingredients like cut fruit or pickles to maintain their maximum crunch until the moment they are eaten.
How to marinate citrus-infused olives?

Why we love this
Olives bring a much-needed briny, salty punch to the lazy-day board. We love marinating them ourselves because it elevates a basic jarred olive into something that tastes like it came from a high-end Mediterranean deli. The infusion of orange zest and red pepper flakes adds a bright, citrusy high note and a subtle back-end heat that cuts through the fattiness of the salami. The glossy sheen of the oil makes them look incredibly appetizing, and their firm, meaty texture provides a lovely contrast to the soft cheeses.
Ingredients
- 1 cup pitted Castelvetrano or Kalamata olives
- 2 tbsp extra virgin olive oil
- 1 strip of orange zest
- 1/4 tsp crushed red pepper flakes
- 1 sprig of rosemary
How to make it
- Drain the olives from their original brine and rinse them briefly under cold water to remove excess salt.
- In a small saucepan over very low heat, combine the olive oil, orange zest, red pepper flakes, and the rosemary sprig.
- Heat the oil gently for about 3-5 minutes until you start to smell the rosemary and orange. Do not let the oil smoke or boil.
- Add the olives to the warm oil and toss to coat. Turn off the heat and let them sit for at least 15 minutes to infuse.
- Transfer the olives and a bit of the infused oil to a small dish on the board, leaving the rosemary sprig on top for a rustic garnish.
How to use fresh herbs for the final touch?

Why we love this
Fresh herbs are the ‘confetti’ of the food board world; they are the final flourish that brings everything to life. We love using sprigs of rosemary, thyme, or even edible flowers because they add an element of greenery that makes the board feel like a lush, edible garden. The scent of fresh herbs as you lean in to grab a snack adds an extra layer of sensory delight, making the experience feel fresh and high-end. It’s a simple trick that bridges the gap between ‘food on a plate’ and ‘culinary art.’
Ingredients
- 3-4 sprigs of fresh rosemary
- Small bunch of fresh thyme
- Optional: edible pansies or nasturtiums
How to make it
- Rinse the herbs and shake them dry over the sink to ensure no water droplets remain.
- Look for the ‘dead zones’ on your board—anywhere where you can see the wood or marble base peaking through.
- Tuck small sprigs of rosemary under the edges of your cheese wheels to create a ‘nested’ look.
- Scatter tiny thyme leaves over the whipped dip or the fruit sections for a speckled, gourmet effect.
- If using edible flowers, place them sparingly (usually 3 in a triangular pattern) to draw the eye around the entire board.
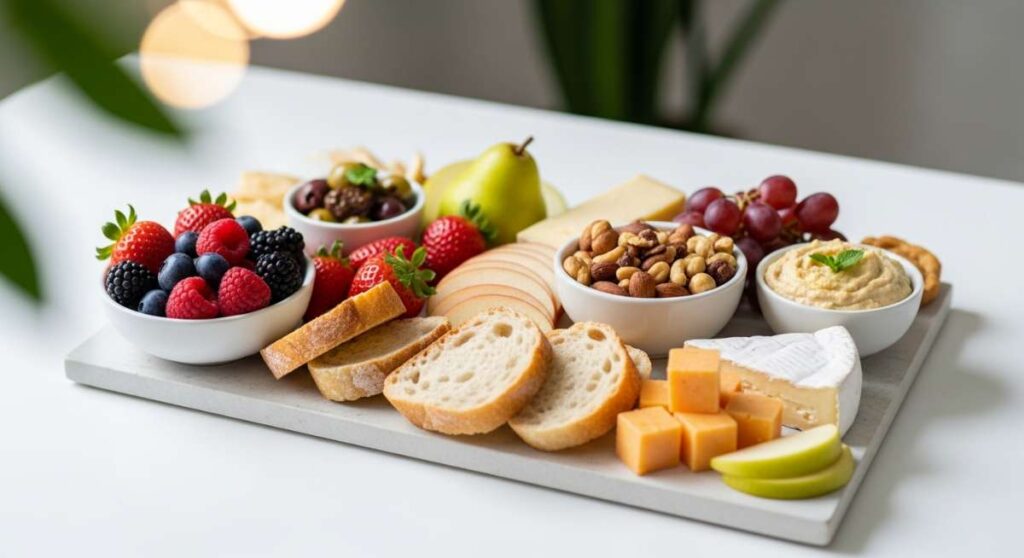
How to balance colors for the ultimate photo?
[IMAGE_10]
Why we love this
We eat with our eyes first, and a well-balanced board is a feast for the soul as much as the stomach. We love the process of arranging colors because it’s where your inner artist gets to shine. By balancing deep reds, bright greens, creamy whites, and golden ambers, you create a visual rhythm that is incredibly satisfying to look at. A beautiful board not only makes for the perfect viral social media post but also makes the act of eating feel more special, intentional, and rewarding. It turns a lazy day into a memorable, aesthetic experience.
Ingredients
- All the components prepared in the previous steps
- Natural lighting (near a window)
- A steady hand
How to make it
- Use the ‘Rule of Thirds’: Place your largest items (the Brie, the dip bowl, the salami roses) in a triangular pattern to create balance.
- Distribute colors evenly; don’t put all the green grapes next to the green herbs. Move them to opposite sides of the board.
- Fill every single gap. A ‘viral’ board looks abundant, so if you see a hole, fill it with a nut, a berry, or an extra cracker.
- Consider the heights. Use small bowls for olives or nuts to add verticality and prevent the board from looking flat.
- Before serving, take a photo from directly above (top-down) in natural light to capture the full symmetry and color palette of your creation.
The Art of the Slow Afternoon
Building a simple food board is an invitation to slow down. In a world that demands we always be productive, taking thirty minutes to fold salami into roses and arrange crackers in a sweeping curve is a radical act of self-care. It reminds us that the best things in life don’t have to be complicated—they just have to be shared and enjoyed. So, light your favorite candle, pour a glass of something sparkling, and enjoy your lazy-day masterpiece.