

How to Style a Gallery Wall That Looks Expensive
We’ve all had that moment—standing in the middle of a room, staring at a vast, blank wall that feels more like a void than a part of our home. It’s intimidating, isn’t it? You want your space to feel curated, intentional, and, let’s be honest, a little bit luxurious, but the path from a stack of mismatched frames to a Pinterest-worthy masterpiece feels like a mystery. I remember the first time I tried to hang a gallery wall; it ended with twelve extra holes in the drywall and a lopsided mess that looked more like a garage sale than a high-end salon.
But here is the secret: an expensive-looking gallery wall isn’t about the price tag on the art—it’s about the soul of the arrangement. It’s about how the textures catch the afternoon sun, the way a specific color palette grounds the room, and the stories each piece whispers to your guests. When done right, a gallery wall becomes the heartbeat of your home, an elevated sanctuary that wraps you in comfort the moment you walk through the door. Today, we are diving deep into ten stunning ways to transform your walls into an upscale oasis of inspiration.
How to Elevate Outdoor Spaces for a Cozy Oasis
Why we love this
There is something incredibly decadent about bringing the sophistication of interior design into the fresh, open air. This approach transforms a simple exterior wall into a lush, sensory experience where the scent of cedar frames mingles with the evening breeze. We love how the tactile contrast of smooth glass against rugged stone or wood siding creates a visual depth that feels both grounded and ethereal. It turns a standard backyard into an extension of your living room, inviting you to linger longer with a glass of wine while the shadows of the leaves dance across your curated collection.
Essential Elements:
- Weather-resistant frames (aluminum or treated teak)
- UV-protected plexiglass
- Outdoor-safe canvas prints
- Woven resin accents
- Low-voltage accent lighting
How to make it
- Begin by selecting a focal point on your exterior wall, ensuring it is a protected area away from direct irrigation or heavy splash zones.
- Choose a unified color palette for your frames—matte black or weathered oak works beautifully—to maintain a cohesive, expensive look against the natural backdrop.
- Layout your arrangement on the ground first, leaving at least 3 inches of space between pieces to allow the wall texture to breathe.
- Install heavy-duty masonry anchors or siding hooks, ensuring each piece is secured firmly to withstand wind gusts.
- Incorporate a few non-traditional items like a flat-backed resin planter or a decorative outdoor clock to break up the lines.
- Finish by installing a soft LED spotlight above the collection to create a warm, inviting glow after sunset.
How to Transform Your Patio for Relaxing Evenings
Why we love this
Imagine the soft hum of crickets and the gentle flicker of candlelight reflecting off a wall of beautifully arranged botanical sketches. Transforming your patio with a gallery wall creates an intimate ‘room’ feel in an outdoor setting, making the space feel finished and high-end. The texture of the paper, even behind protective layers, adds a softness that offsets the hard lines of patio furniture, while the rhythmic repetition of frames provides a sense of order and calm that is essential for a relaxing evening retreat.
Essential Elements:
- Monochromatic botanical prints
- Slim-profile metal frames
- Battery-operated flickering wall sconces
- Macramé wall hangings for texture
- Exterior-grade mounting tape
How to make it
- Clean the patio wall thoroughly with a stiff brush to remove any dust or debris that might interfere with mounting.
- Measure the center of your wall at eye level (roughly 57 to 60 inches from the patio floor) and mark it lightly with a pencil.
- Select frames of varying sizes but stick to a single finish, like brushed gold or black, to keep the look sophisticated and unified.
- Mount the largest piece in the center and work your way outward in a balanced, asymmetrical pattern.
- Use exterior-grade ‘no-nail’ mounting strips if you are working with brick or stucco to avoid permanent damage.
- Tuck small sprigs of dried lavender or eucalyptus behind the frames to release a subtle, calming aroma whenever you walk by.
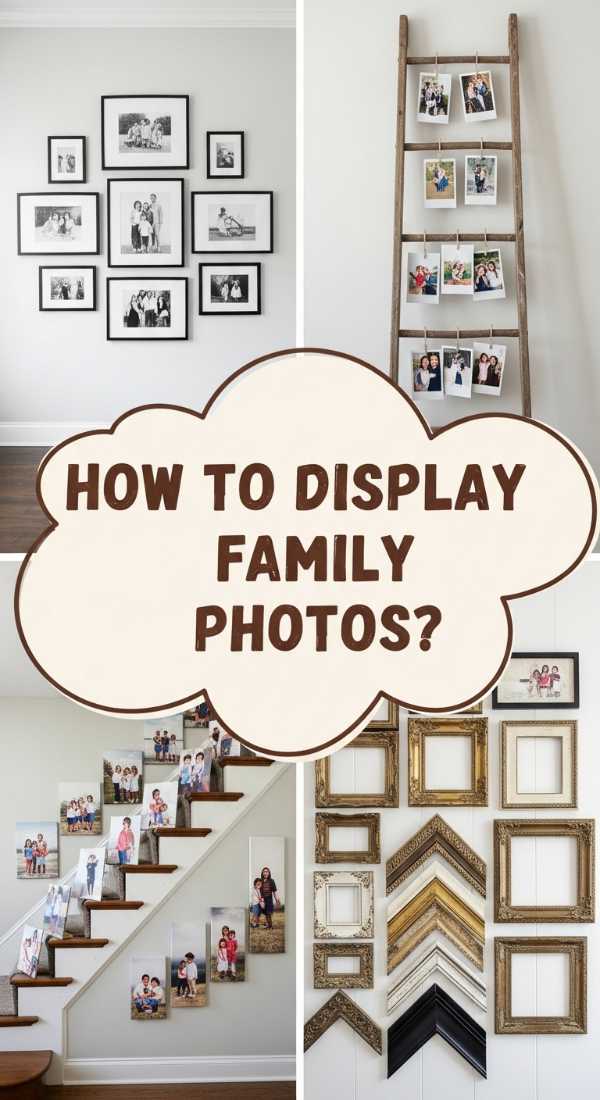
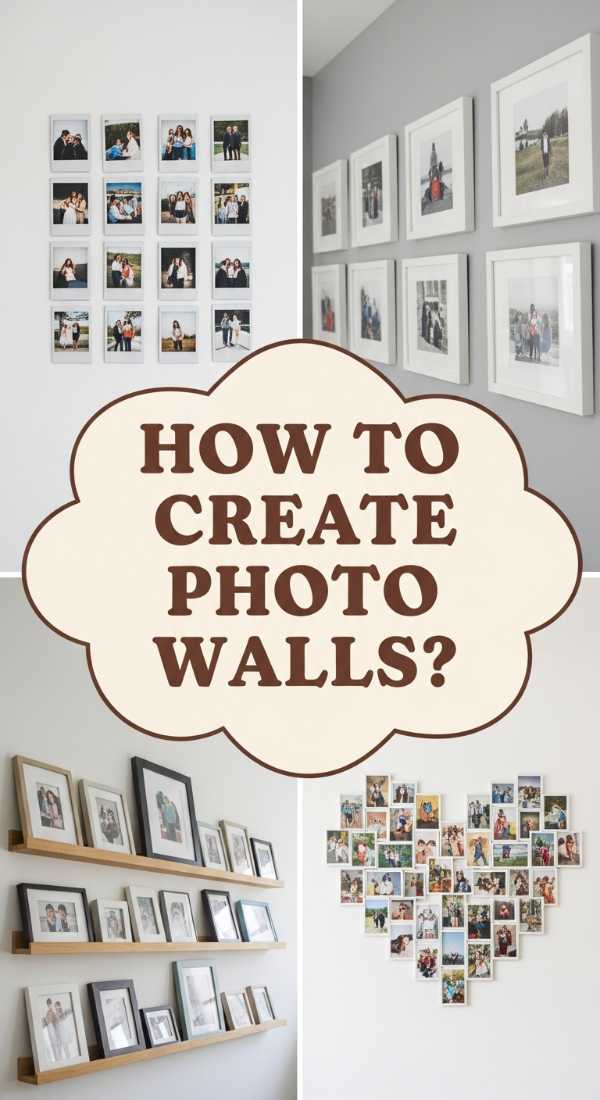
How to Showcase Family Memories for a Heartfelt Home
Why we love this
A home should feel like a hug, and nothing achieves that quite like a gallery wall dedicated to your favorite faces and milestones. By styling family photos with oversized white mats and consistent frames, you elevate personal snapshots into fine art. We love the emotional resonance of this display; it’s a daily reminder of love and connection that adds a warm, lived-in luxury to any hallway or living space. The smooth texture of high-quality photo paper combined with the crisp lines of a grid layout creates a sophisticated rhythm that draws the eye and warms the heart.
Essential Elements:
- Black and white high-resolution prints
- Oversized white or cream mats
- Identical gallery frames
- Precision level tool
- Acid-free mounting corners
How to make it
- Curate your photos and convert them all to a consistent black and white filter to ensure a high-end, editorial look.
- Order frames that are at least two sizes larger than the photos (e.g., an 8×10 photo in a 16×20 frame) to accommodate the dramatic oversized matting.
- Create a paper template for each frame and tape them to the wall using painter’s tape to visualize the grid spacing perfectly.
- Use a laser level to ensure the top edges of each row are perfectly horizontal; even a millimeter of tilt can ruin the ‘expensive’ look.
- Hammer in your hardware through the templates, then tear the paper away for a clean installation.
- Polish the glass with a microfiber cloth to remove fingerprints, ensuring the light reflects cleanly off each memory.
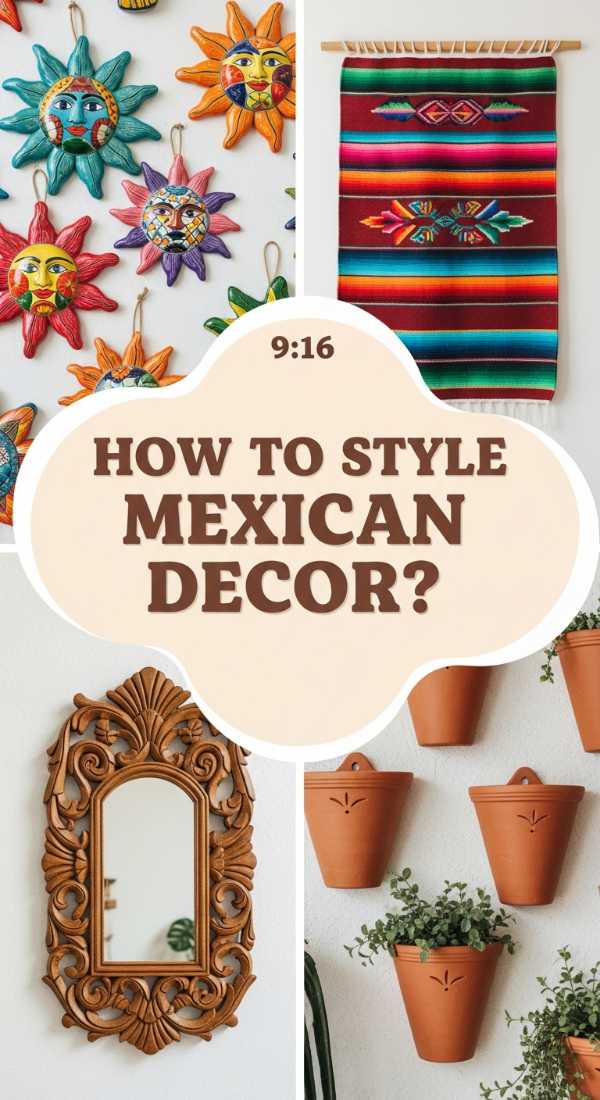
How to Add Vibrant Mexican Flair for a Colorful Life

Why we love this
There is an undeniable joy in the vibrant colors and rich textures of Mexican-inspired decor. This style of gallery wall is a celebration of life, bursting with the aroma of hand-painted ceramics and the tactile warmth of woven textiles. We love how the bold oranges, deep blues, and sunny yellows create a spirited energy that makes a room feel vibrant and full of personality. It is a curated explosion of culture that feels expensive because of the craftsmanship and the unique, artisanal quality of each individual piece.
Essential Elements:
- Hand-painted Talavera tiles
- Woven palm fans
- Milagros (small metal folk art)
- Brightly colored wooden frames
- Embroidered textile fragments
How to make it
- Select a ‘hero’ piece, such as a large colorful textile or a framed oil painting, to serve as the anchor for the entire wall.
- Mix media types; don’t just use frames—incorporate 3D objects like ceramic hearts or woven plates to create a layered, professional look.
- Group items by color story, ensuring that the boldest hues are distributed evenly across the wall to prevent the eye from getting stuck in one spot.
- Use plate hangers for ceramic pieces to keep them flush against the wall and secure.
- Vary the depths of your items, placing flatter frames next to thicker, hand-carved wooden masks for a dynamic shadow line.
- Ensure the lighting is bright and warm to make the pigments of the art truly ‘pop’ and feel more expensive.
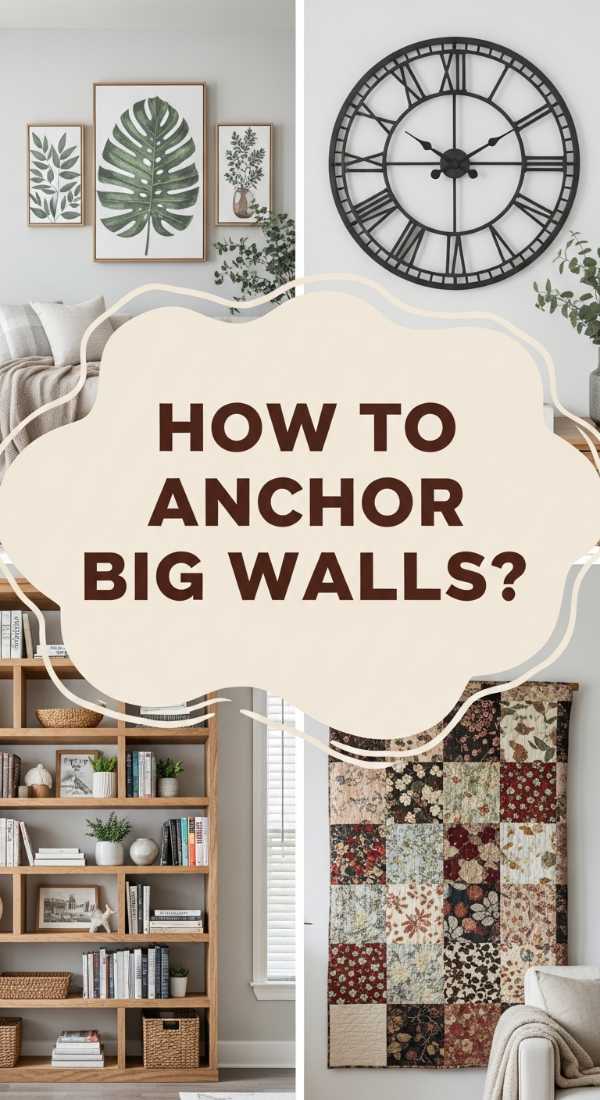
How to Fill Large Walls for a Grand Impression
Why we love this
A massive, empty wall can feel cold, but a grand-scale gallery wall creates a sense of architectural importance. This is about making a statement that is both bold and sophisticated. We love the feeling of awe that a floor-to-ceiling arrangement inspires—it’s like having your own private museum. The sheer scale allows for a mix of textures, from smooth canvas to rough-hewn wood, creating a visual feast that grounds a large room and makes the ceiling feel even higher and more majestic.
Essential Elements:
- Large-scale triptych prints
- Mixed frame widths
- Architectural fragments
- Heavy-duty wall anchors
- A cohesive neutral color palette
How to make it
- Establish a vertical and horizontal axis on your wall to keep the massive collection from looking chaotic.
- Start with your largest pieces in the ‘golden zone’ (direct eye level) and work your way up to the ceiling and down to the baseboards.
- Maintain consistent spacing—usually 2 to 3 inches—between every single piece regardless of size to create a cohesive ‘mesh’ look.
- Incorporate some ‘white space’ within the arrangement by using frames with wide mats to prevent the wall from feeling cluttered.
- For the very high pieces, ensure they are tilted slightly downward or use anti-theft security hardware for a perfectly flush fit.
- Stand back frequently to check the balance; if one side feels ‘heavy,’ add a piece with a thicker frame or darker colors to the opposite side.
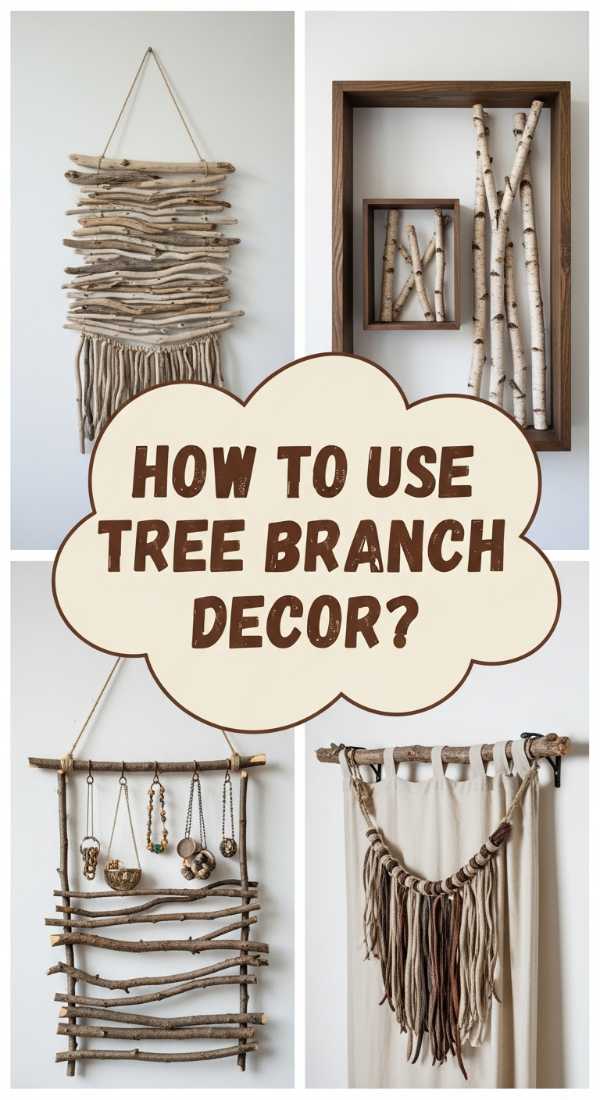
How to Incorporate Nature for a Serene Sanctuary
Why we love this
There is a profound sense of peace that comes from bringing the outdoors in. A nature-inspired gallery wall, featuring pressed ferns, botanical sketches, and organic textures, acts as a visual deep breath. We love the organic, slightly irregular shapes of leaves and wood grain that break up the rigid lines of modern furniture. This style feels expensive because it mimics the curated aesthetic of a historic naturalist’s study, filled with the quiet beauty of the earth and the soothing, earthy aromas of dried botanicals.
Essential Elements:
- Pressed botanical specimens in glass frames
- Raw wood frames (maple or oak)
- Linen-textured mats
- Hand-drawn charcoal sketches of landscapes
- Floating glass frames
How to make it
- Gather natural elements like dried leaves or ferns and press them between heavy books for two weeks until completely flat.
- Place the dried specimens inside floating glass frames to create a modern, high-end look where the wall color shows through the glass.
- Arrange the frames in a loose, organic cluster rather than a strict grid to mimic the way plants grow in nature.
- Mix in a few landscape sketches on textured watercolor paper to add artistic depth.
- Use brass ‘picture rail’ hooks and cord for an old-world, sophisticated hanging method that adds to the sanctuary vibe.
- Keep the surrounding decor minimal to allow the delicate details of the nature-inspired art to take center stage.
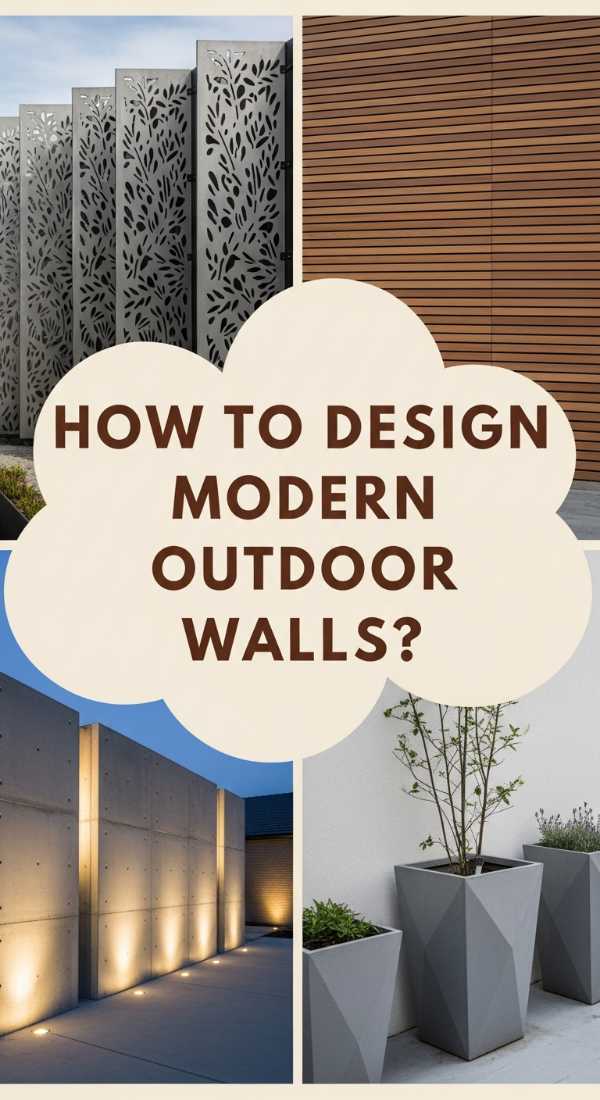
How to Master Modern Garden Walls for an Upscale Vibe
Why we love this
The intersection of architecture and greenery is the height of modern luxury. A ‘garden wall’ gallery takes the concept of wall decor and breathes literal life into it. We love the contrast between sleek, industrial metal frames and the soft, overflowing texture of live trailing plants. It’s a sensory masterpiece—the cool touch of the metal, the vibrant green of the leaves, and the fresh, oxygenated air it provides. This is a gallery wall that feels like a living, breathing piece of high-end art.
Essential Elements:
- Wall-mounted ceramic or metal planters
- Abstract geometric prints
- Minimalist black frames
- Trailing plants like Pothos or String of Pearls
- Moisture-resistant wall backing
How to make it
- Install a moisture-resistant barrier or use planters with internal reservoirs to protect your drywall from dampness.
- Map out a pattern that alternates between framed art and live plant vessels to ensure the greenery doesn’t overwhelm the prints.
- Select plants with varying textures—some upright like snake plants and some trailing to create movement across the wall.
- Ensure the lighting in the room is sufficient for live plants; if not, supplement with stylish LED grow lights disguised as accent lamps.
- Keep the art pieces simple and abstract to complement the complex organic shapes of the plants.
- Prune the plants regularly to maintain the intended ‘gallery’ shape, ensuring the leaves don’t obscure the art beneath them.
How to Arrange Aesthetic Photo Grids for Daily Inspiration
Why we love this
A perfectly symmetrical photo grid is the ultimate way to achieve a high-end, editorial look. It’s crisp, clean, and incredibly satisfying to the eye. We love the rhythmic repetition that creates a sense of calm and order in a busy home. By choosing images that inspire you—moody landscapes, architectural details, or fashion photography—you create a ‘vision board’ that feels like a professional installation. The uniform texture of the frames and the precise alignment whisper of a life that is organized, intentional, and beautifully curated.
Essential Elements:
- Identical square frames
- Consistent photo filters (e.g., all warm sepia or high-contrast B&W)
- Measuring tape and a spirit level
- Even number of frames (9, 12, or 16)
- Template paper
How to make it
- Select a theme for your images so the grid feels like a single cohesive unit rather than a collection of random photos.
- Measure your wall space and calculate the exact distance between frames—2 inches is usually the ‘sweet spot’ for a high-end look.
- Use a laser level to project a perfectly straight line across the wall for your first row.
- Apply small adhesive ‘bumpers’ to the back corners of every frame to keep them perfectly level and prevent them from shifting over time.
- Center the entire grid on the wall so the margins on the left, right, top, and bottom feel balanced and intentional.
- Clean each frame with an anti-static spray to keep the display looking pristine and gallery-ready at all times.
How to Anchor Open Rooms for Better Flow

Why we love this
In large, open-concept homes, spaces can often feel like they are ‘floating’ without purpose. A strategically placed gallery wall acts as an anchor, defining a specific ‘zone’ like a dining area or a reading nook. We love how a tall, vertical arrangement can draw the eye upward, making the most of high ceilings, while a horizontal span can lead the eye from one room to the next. The texture of a large-scale display adds a layer of acoustic softening that makes open rooms feel more intimate and expensive, rather than echoing and cold.
Essential Elements:
- Oversized anchor pieces
- Cohesive color story (matching the room’s accent colors)
- Directional lighting
- Substantial, high-quality framing materials
- Varying frame depths
How to make it
- Identify the ‘dead zone’ in your open floor plan—usually a large wall between the kitchen and living area.
- Choose a layout that mimics the flow of traffic; for example, a horizontal line of art can guide guests toward the seating area.
- Use ‘hero’ frames that are at least 3 inches deep to create a shadow profile that gives the wall more architectural presence.
- Link the art to the furniture below it; if anchoring a sideboard, the gallery wall should be about 75% of the width of the furniture piece.
- Incorporate different textures, like a framed piece of hand-woven fabric, to help absorb sound in the open space.
- Ensure the art is visible from multiple angles of the room, adjusting the height so it looks balanced whether you are sitting or standing.
How to Blend Rustic Textures for a Warm Atmosphere
[IMAGE_10]
Why we love this
There is a specific kind of luxury found in the ‘perfectly imperfect.’ Blending rustic textures—think reclaimed wood, distressed metals, and woven linens—creates a gallery wall that feels storied and soulful. We love the tactile richness of this approach; you can almost smell the faint scent of aged oak and feel the history in the grain. It’s a look that says ‘collected over time’ rather than ‘bought in a box,’ which is the hallmark of truly expensive interior design. It’s warm, inviting, and effortlessly chic.
Essential Elements:
- Reclaimed wood frames
- Antique brass accents
- Woven seagrass baskets
- Matte-finish canvas art
- Vintage-inspired sketches
How to make it
- Mix your frame materials—pair a sleek dark wood frame with a rough-hewn cedar one to create a sophisticated, layered contrast.
- Incorporate non-art objects, like a small vintage wooden oar or a collection of woven wall baskets, to add 3-dimensional texture.
- Use ‘gallery-wrapped’ canvases without frames to allow the texture of the fabric to stand out against the wall.
- Keep the color palette muted—think creams, taupes, and soft browns—to allow the textures of the materials to do the talking.
- Space the items slightly further apart (4-5 inches) to allow each unique texture to have its own moment in the spotlight.
- Add a few small, dimmable picture lights in an antique brass finish to cast long shadows that emphasize the rustic relief of the pieces.
Conclusion: Your Home, Your Masterpiece
Creating an expensive-looking gallery wall isn’t about following a rigid set of rules; it’s about curating a space that reflects the most beautiful parts of your life. Whether you are filling a grand wall with museum-scale prints or tucking a few heartfelt memories into a cozy corner, the key is intentionality. Take your time, feel the textures, play with the light, and remember that your home is a living canvas. With these tips, you are well on your way to creating a sanctuary that feels as luxurious as it is loved. Happy styling!