
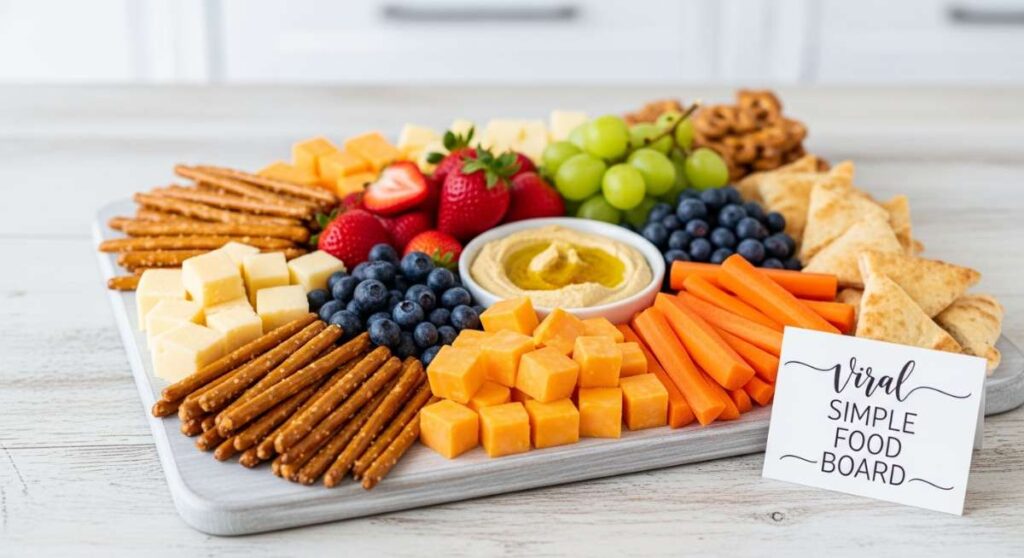
We’ve all been there—scrolling through our feeds at 11 PM, mesmerized by those effortless, aesthetic snack boards that seem to appear out of thin air. You know the ones: overflowing with folds of meat, glistening fruit, and perfectly placed cheeses that look more like art than appetizers. It’s enough to make anyone feel a little ‘hostess-envy,’ but I’m here to tell you a secret: you don’t need a culinary degree or three hours of prep time to master this viral trend.
Creating a TikTok-famous snack board is less about the price tag of your ingredients and more about the soul you put into the arrangement. It’s about that feeling of gathering friends around a table, the sound of laughter over the clinking of wine glasses, and the simple joy of sharing something beautiful. Today, I’m walking you through my foolproof, 10-minute method to recreate that viral magic in your own kitchen, ensuring every guest leaves with a full heart and an even fuller stomach.
How to source the perfect base board?

Why we love this
The foundation of any viral snack board is the wood itself, which provides a rustic, warm backdrop that makes every color pop. We love the tactile feel of a heavy, sanded acacia or marble slab under our fingertips, grounding the experience in something natural and sturdy. The way the light catches the grain of the wood adds an organic elegance that elevates even the simplest crackers into a gourmet display. It’s the canvas for your edible masterpiece, setting the tone for the entire gathering with its earthy, inviting presence.
Ingredients
- One large wooden charcuterie board (Acacia, Walnut, or Bamboo)
- Food-safe mineral oil (for prep)
- A clean microfiber cloth
How to make it
- Begin by selecting a board that is large enough to hold your bounty but small enough to look ‘overflowing’—a 12×18 inch rectangle is usually the sweet spot for a standard party size.
- Inspect the surface for any splinters or rough patches; a high-quality board should be smooth to the touch to prevent any wood fibers from transferring to the food.
- Apply a small amount of food-safe mineral oil to a clean cloth and buff it into the wood in circular motions to bring out the deep, rich colors of the grain and create a moisture barrier.
- Let the oil soak in for at least 30 minutes before placing food on it, then wipe away any excess residue until the board feels dry and looks lustrous.
- Position your board in the exact spot where you plan to serve, as moving a fully loaded, heavy board can be tricky once the styling begins.
How to create the signature salami rose?
Why we love this
There is something incredibly satisfying about the way these meat petals unfurl, offering a rich, savory aroma that immediately makes your mouth water. The silky, slightly oily texture of the premium salami contrasts beautifully with the crispness of a cracker, creating a bite that is as decadent as it is visually stunning. As you peel away a single ‘petal,’ you get that perfect hit of salt and spice that grounds the entire board, turning a simple snack into a gourmet experience that feels like a warm hug for your taste buds.
Ingredients
- 12-15 slices of thinly cut Salami (Genoa or Milano works best)
- One small wine glass or champagne flute
How to make it
- Select a small glass with a thin rim; the diameter of the glass opening will determine the size and tightness of your salami rose.
- Take your first slice of salami and fold it over the rim of the glass so that half is inside and half is hanging over the outside edge.
- Place the second slice overlapping the first by about 50%, pressing it firmly against the rim to ensure it sticks to the previous slice.
- Continue this layering process around the entire circumference of the glass, completing about 3 to 4 full rotations until the hole in the middle is almost completely filled with meat.
- Carefully turn the glass upside down onto your board, hold it firmly for three seconds to let the shape set, and then gently lift the glass to reveal a stunning, bloomed rose.
How to choose the best cheese varieties?

Why we love this
Cheese is the undisputed star of the show, offering a symphony of textures from the velvet-soft interior of a triple-cream brie to the crystalline crunch of an aged cheddar. We love the way the different profiles play off each other: the tangy, sharp notes of a goat cheese cutting through the buttery richness of a crackers, or the nutty finish of a Manchego. It’s an olfactory delight, with scents ranging from mild and milky to bold and earthy, promising a new discovery with every single wedge you slice into.
Ingredients
- 1 wheel of Soft Cheese (Brie or Camembert)
- 1 block of Hard Cheese (Aged White Cheddar or Manchego)
- 1 wedge of Semi-Soft Cheese (Havarti or Gouda)
How to make it
- Remove all cheeses from the refrigerator at least 30 to 45 minutes before serving; cheese is best enjoyed at room temperature to allow its full flavor profile and creamy texture to develop.
- Place the soft brie wheel near the corner of the board, slicing a small wedge out of it to ‘invite’ guests to start eating without feeling like they are ruining the display.
- Slice the hard cheddar into rustic, uneven chunks using a cheese knife to create visual interest and different surface areas for honey or jam to cling to.
- Cut the semi-soft Gouda into uniform triangles or long spears and fan them out in a different section of the board to create a sense of movement and variety.
- Ensure each cheese has its own dedicated serving knife so the flavors don’t mingle—nobody wants brie on their sharp cheddar!
How to style the ‘river’ of crackers?
Why we love this
The cracker ‘river’ is the movement of the board, guiding the eye and the hand from one delicious island of cheese to the next. We love the rhythmic sound of a crisp cracker snapping in half, releasing a subtle toasted aroma that balances the richer flavors of the board. It adds a necessary architectural element, providing a crunchy, salty vehicle that carries all your favorite toppings straight to your mouth. The visual flow of the curving line makes the board feel abundant and professionally styled with minimal effort.
Ingredients
- 1 box of Multi-grain crackers
- 1 box of Water crackers or Sea Salt Crostini
- 1 box of artisanal fruit and nut crisps
How to make it
- Identify two main anchor points on your board, such as a cheese wheel and a bowl of dip, located on opposite sides of the wood.
- Pick your sturdiest cracker and begin stacking them on their sides, slightly overlapping each one like fallen dominoes, starting at one anchor point.
- Slowly curve the line of crackers across the board in an ‘S’ shape, weaving them between the larger items to create a sense of organic flow.
- If the ‘river’ feels unstable, use a heavy item like a bowl of olives or a thick block of cheese to act as a dam, holding the crackers firmly in place.
- Intersperse different types of crackers—like round water crackers followed by square multigrain ones—to vary the texture and keep the eye moving along the path.
How to add pops of color with fruit?
Why we love this
Fruit provides the vibrant, jewel-toned highlights that make a board look truly alive and fresh. We love the burst of sweetness from a ripe grape or the tart, acidic zing of a raspberry that cleanses the palate between bites of heavy cheese and salty meats. The glossy skins of the fruit catch the light, adding a glistening finish that makes the entire spread look like a Dutch still-life painting. It brings a necessary brightness and juiciness that balances the dry, savory elements, making the meal feel balanced and light.
Ingredients
- 2 bunches of red or green grapes (on the vine)
- 1 cup of fresh raspberries or blackberries
- 1 medium pomegranate (halved or seeded)
How to make it
- Wash all fruit thoroughly and pat dry with a paper towel; excess moisture will make your crackers soggy and your cheese slippery.
- Keep the grapes on their vines and snip them into small, manageable clusters of 4-5 grapes each, which allows guests to grab a portion without dismantling the whole bunch.
- Place the largest grape clusters in the ’empty’ corners of the board first, using them to fill large gaps and add height to the display.
- Tuck small handfuls of berries into the tiny crevices between cheeses and meats, ensuring no ‘wood’ is showing in the center of the board for that viral, overflowing look.
- If using pomegranate, break it into large, jagged chunks rather than just seeds; the bright red interior adds a sophisticated, dramatic texture to the center of the board.
How to include a savory crunch with nuts?

Why we love this
Nuts offer that essential, earthy crunch that rounds out the snacking experience with a satisfying, protein-packed finish. We love the toasted, nutty aroma that fills the air, hinting at the smoky or sweet coatings that make each variety unique. The firm texture of a Marcona almond or a candied walnut provides a wonderful contrast to the soft cheeses, creating a complex mouthfeel that keeps you reaching back for more. They are the ‘fillers’ that make the board feel complete, adding depth and a gourmet touch to every corner.
Ingredients
- 1/2 cup Roasted Marcona Almonds (with rosemary and sea salt)
- 1/2 cup Candied Walnuts or Pecans
- 1/2 cup Pistachios (shelled)
How to make it
- Select nuts with varying flavor profiles—one salty/herby, one sweet/candied, and one plain—to provide a range of pairing options for your guests.
- Heat the roasted almonds in a pan for 2 minutes over low heat just before serving to release their natural oils and enhance their aroma.
- Scatter the nuts in small ‘piles’ rather than a single large mound; this encourages guests to try them with different pairings across the board.
- Focus on placing the smallest nuts, like pistachios, into the ‘V’ shapes created where two different cheeses meet, effectively ‘caulking’ the board’s gaps.
- Ensure you have a small discard bowl nearby if you choose to serve nuts with shells, though shelled is always preferred for a streamlined snacking experience.
How to incorporate sweet dips and honey?
Why we love this
Dips and honey are the secret weapons of a snack board, offering a sticky, luscious sweetness that transforms a simple bite into a culinary event. We love the golden glow of honey drizzling off a dipper, catching the light and pooling over a piece of sharp cheese with an irresistible shimmer. The floral scent of honey combined with the fruity notes of a fig jam creates an intoxicating aroma that draws everyone toward the center of the board. It’s the perfect finishing touch that bridges the gap between savory and sweet, making every mouthful feel like a luxury.
Ingredients
- 1 small jar of High-quality Honey (with a honeycomb if possible)
- 1 small jar of Fig Jam or Apricot Preserves
- Small ramekins or glass jars
How to make it
- Spoon your jams and preserves into small, aesthetic ramekins rather than serving them directly from the store-bought jar to maintain the artisanal look.
- Place the honey jar near the softest cheese (like the Brie), as this is the most common and delicious pairing on the board.
- If your honey has a honeycomb, use a small knife to cut a square and place it directly on top of a cheese wheel for a high-end, ‘pro’ blogger appearance.
- Add a dedicated small spoon or honey dipper to each jar to prevent cross-contamination and make serving easy for your guests.
- For an extra viral touch, sprinkle a few dried chili flakes into the honey to create a ‘hot honey’ that adds a surprising and trendy kick to the flavor profile.
How to arrange fresh herbs for garnish?

Why we love this
Herbs are the final flourish that breathes life into the board, providing a fresh, herbaceous scent that cuts through the richness of the meats and cheeses. We love the way a sprig of rosemary or a leaf of sage looks against the wood, adding a pop of deep green that makes the other colors look even more vibrant. It’s the difference between a board that looks ‘thrown together’ and one that looks like it was catered by a professional. The subtle aroma of fresh mint or thyme lingers in the air, making the snacking environment feel like a lush, fragrant garden.
Ingredients
- 3-4 sprigs of Fresh Rosemary
- 1 small bunch of Fresh Thyme
- A few Sage leaves or Mint sprigs
How to make it
- Choose herbs with woody stems, like rosemary and thyme, as they will stay fresh and upright much longer than delicate herbs like cilantro or parsley.
- Gently bruise the leaves of the rosemary between your fingers before placing them on the board to release the fragrant essential oils.
- Tuck the stems of the rosemary underneath the cheeses or meats so that only the leafy ‘fronds’ are visible, creating a natural-looking border.
- Use smaller thyme sprigs to fill in the final tiny ‘black holes’ where the board is still showing through, particularly around the edges of the fruit clusters.
- Ensure the herbs are placed strategically to separate items of similar colors—for example, place a green sage leaf between white cheese and pale crackers to create visual contrast.
How to ensure the board stays fresh for hours?
Why we love this
There is nothing better than a host who is relaxed because they know their food is handled with care and will stay delicious from the first guest to the last. We love the peace of mind that comes from proper prep, ensuring the cheese stays supple and the crackers stay perfectly crisp throughout the night. It allows the flavors to meld without becoming muted, maintaining that fresh-from-the-kitchen aroma that welcomes people into your home. When a board stays fresh, the party can go on as long as the conversation does, without any culinary distractions.
Ingredients
- Cling wrap or beeswax wrap
- A cool, shaded area for serving
- Lemon juice (for preventing oxidation)
How to make it
- If you must prep more than an hour in advance, keep the crackers and nuts in airtight containers and only add them to the board 5 minutes before guests arrive to prevent staleness.
- Lightly brush any sliced fruits that brown easily (like apples or pears) with a mixture of water and a squeeze of lemon juice to maintain their bright color.
- Cover the meat and cheese sections tightly with damp paper towels followed by cling wrap if the board is sitting out for a while before the party starts.
- Keep the board away from direct sunlight or heat sources like ovens or radiators, which will cause the cheese to ‘sweat’ oil and the meat to curl.
- Keep a ‘refill’ stash in the fridge so you can quickly swap out empty spots without having to build a whole new board from scratch during the party.
How to photograph your board for the ‘gram?
Why we love this
Capturing the perfect shot of your creation is the ultimate digital ‘cheers’ to your hard work and creativity. We love the way a well-lit photo showcases the intricate textures of the salami rose and the glistening honey, preserving the beauty of the board before it’s devoured. It’s a way to share the warmth and joy of your hosting experience with the world, inspiring others to create their own moments of connection. The glow of natural light on a perfectly styled board creates a sense of aspirational yet attainable magic that we just can’t get enough of.
Ingredients
- A smartphone or DSLR camera
- A window with indirect natural light
- A small step-stool (for overhead shots)
How to make it
- Always photograph your board in natural light; turn off all overhead kitchen lights to avoid harsh yellow shadows and unnatural glares on the cheese.
- Clear all clutter—like mail, keys, or dirty dish towels—from the background to ensure the focus remains entirely on your edible masterpiece.
- Use the ‘flat lay’ technique by standing on a stool and shooting directly down at the board, ensuring your camera is perfectly parallel to the table.
- Take a few ‘action shots’ by having a friend’s hand reach in to drizzle honey or pick up a cracker; this adds a human element and a sense of story to the photo.
- Use a photo editing app to slightly bump up the saturation and warmth, making the fruits look juicier and the wooden board look richer and more inviting.
The Joy of the Perfect Board
At the end of the day, the TikTok-famous snack board is more than just a trend—it’s a celebration of the simple things. It’s proof that you don’t need hours in the kitchen to create something that feels special, luxurious, and deeply welcoming. Whether you’re hosting a big bash or just a quiet night in with your favorite people, this 10-minute board is your ticket to effortless elegance. So grab a glass, take a seat, and enjoy the beautiful, delicious mess you’ve created.