
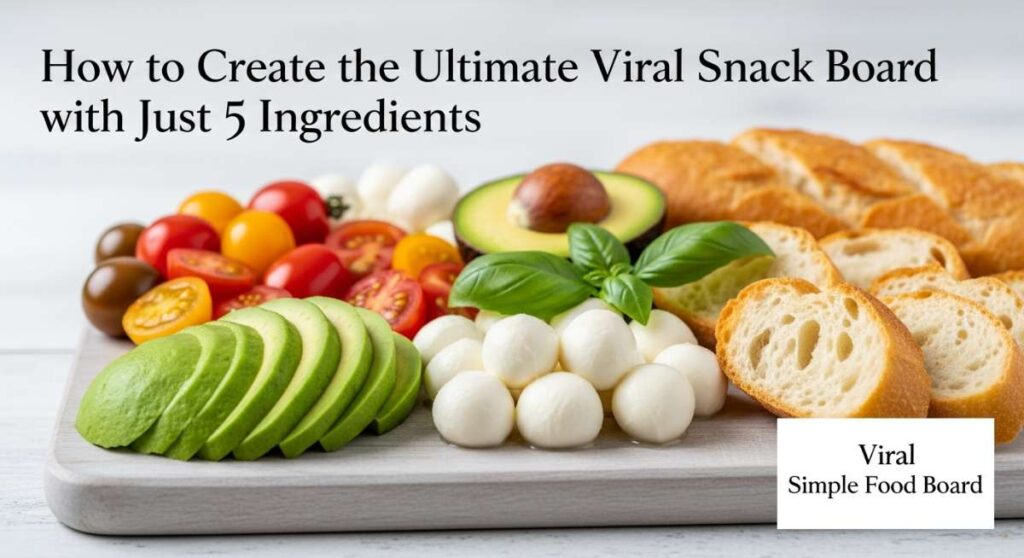
How to Create the Ultimate Viral Snack Board with Just 5 Ingredients
There is something almost magical about the way a perfectly curated snack board brings people together. Whether it’s a Friday movie night with the kids or a last-minute gathering with your best friends, the sight of a beautiful spread immediately sets a tone of warmth and connection. I remember the first time I hosted a party and spent hours in the kitchen, missing all the laughter because I was too busy overcomplicating the menu. That’s when I realized: the best moments happen when the food is simple, delicious, and easy to share.
This ‘Viral Simple Food Board’ concept is all about taking the stress out of hosting while still delivering that ‘wow’ factor. We’re focusing on high-impact, 5-ingredient recipes that look like they took all day but actually come together in a flash. By mastering these foundational elements, you can mix and match textures and flavors to create a board that isn’t just a meal—it’s an experience. Let’s dive into the viral recipes that will make your next board the talk of the town!
How to make rotel dip?
Why we love this
This dip is the ultimate crowd-pleaser, offering a nostalgic, velvety texture that coats every chip perfectly. The aroma of browned meat mingled with the zesty, spiced tomatoes and melting cheese creates an irresistible scent that fills the room instantly. It’s the kind of comfort food that feels like a warm hug, with just enough of a spicy kick from the green chilies to keep you coming back for more. Watching the cheese bubble and pull as you dip a salty tortilla chip is pure culinary satisfaction.
Ingredients
- 1 lb Ground Beef or Breakfast Sausage
- 16 oz Velveeta Cheese (cubed)
- 10 oz Can of Ro-Tel Diced Tomatoes and Green Chilies
- 1 tsp Taco Seasoning (optional for extra kick)
- Fresh Cilantro for garnish
How to make it
- Begin by placing a large skillet over medium-high heat. Add your ground beef or sausage, breaking it apart with a wooden spoon or spatula into small, uniform crumbles. Cook until the meat is completely browned and no pink remains, which usually takes about 7-9 minutes.
- Once browned, tilt the pan to drain off the excess grease. This is a crucial step to ensure your dip isn’t oily. Return the skillet to low-medium heat.
- Stir in the undrained can of Ro-Tel tomatoes. The juice from the can helps deglaze the pan and adds a punch of acidity. If using taco seasoning, sprinkle it in now.
- Add the cubed Velveeta cheese to the pan. Reduce the heat to low to prevent the cheese from scorching or separating. Stir constantly using a folding motion until the cheese is completely melted and the mixture is silky smooth.
- Transfer the dip immediately to a small slow cooker on the ‘warm’ setting or a pre-heated ceramic bowl to keep it dip-able for your guests. Top with fresh cilantro before serving.
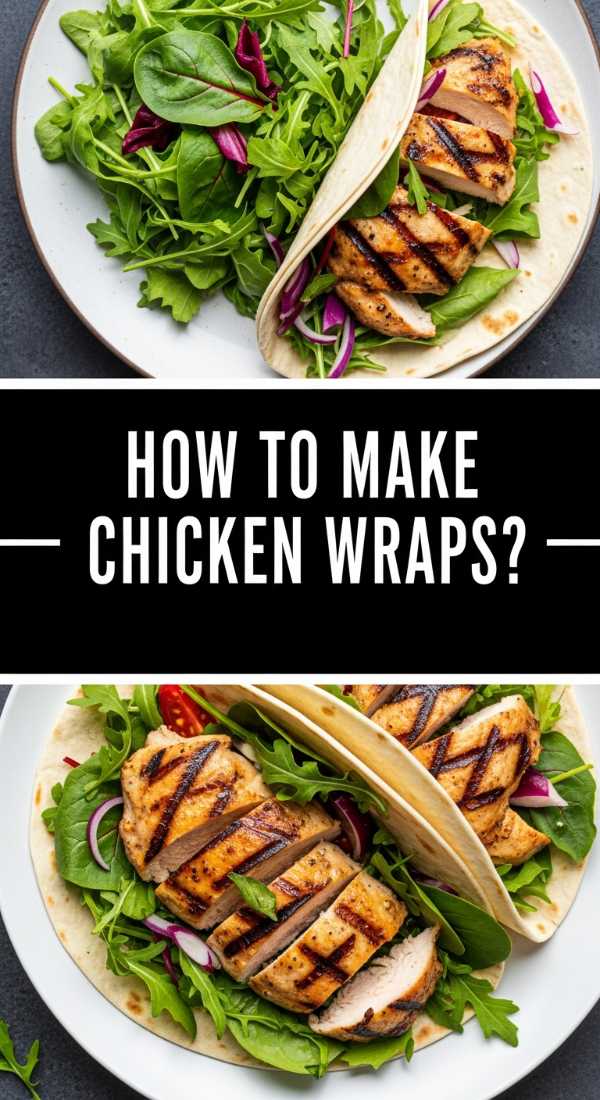
How to make chicken wraps?

Why we love this
There is a refreshing crunch to a well-made chicken wrap that provides a wonderful contrast to heavier board items. We love the way the cool, crisp lettuce or soft flour tortilla yields to a savory, tender chicken filling and creamy dressing. It’s a portable, mess-free way to enjoy a full range of flavors, from the smoky char of the chicken to the bright, tangy notes of the sauce. These wraps are light enough for a summer afternoon but satisfying enough to stand as a centerpiece on your snack board.
Ingredients
- 2 cups Shredded Rotisserie Chicken
- 4 Large Flour Tortillas or Butter Lettuce leaves
- 1/2 cup Shredded Cheddar Cheese
- 1/4 cup Ranch Dressing or Buffalo Sauce
- 1 cup Shredded Romaine Lettuce
How to make it
- Prepare your chicken by shredding it into bite-sized pieces while it is still warm, as this helps it absorb the flavors of your chosen sauce better. In a medium mixing bowl, toss the shredded chicken with your ranch or buffalo sauce until every strand is evenly coated.
- Lay your tortillas flat on a clean work surface. If using flour tortillas, you can microwave them for 10 seconds under a damp paper towel to make them more pliable and prevent tearing.
- Place a generous layer of shredded romaine lettuce in the center of the tortilla, leaving about two inches of space from the edges. This creates a barrier that keeps the tortilla from getting soggy.
- Top the lettuce with the saucy chicken and a sprinkle of shredded cheddar cheese. Be careful not to overfill, or the wrap will burst during the rolling process.
- To fold, tuck the sides of the tortilla inward towards the center, then tightly roll from the bottom up. Use a sharp knife to slice the wrap diagonally, which creates a beautiful presentation for your board.
How to make strawberry pie?
Why we love this
This strawberry pie is a visual masterpiece on any snack board, boasting a glossy, ruby-red sheen that looks like jewels under the light. The scent of macerated berries is intoxicatingly sweet, reminding us of peak summer days and garden parties. When you bite into it, the contrast between the buttery, flaky crust and the burst of fresh, cool fruit is a sensation you won’t soon forget. It’s a bright, refreshing dessert that balances out the savory elements of a board with its natural, vibrant acidity.
Ingredients
- 1 Pre-baked 9-inch Pie Crust
- 6 cups Fresh Strawberries (hulled and sliced)
- 1 cup Granulated Sugar
- 3 tbsp Cornstarch
- 1/2 cup Water
How to make it
- Start by preparing your glaze. In a medium saucepan, crush about 1 cup of the strawberries using a potato masher or fork. Stir in the sugar, water, and cornstarch until the mixture is well combined and no white streaks of starch remain.
- Place the saucepan over medium heat and bring the mixture to a gentle boil, stirring constantly. You will notice the liquid transform from cloudy to a translucent, thick, bright red glaze. This usually takes about 3-5 minutes of boiling.
- Once thickened, remove the glaze from the heat and let it cool slightly for about 10 minutes. This prevents the fresh berries from wilting or becoming mushy when mixed.
- Arrange the remaining 5 cups of fresh, whole or sliced strawberries into your pre-baked and cooled pie crust. Ensure they are packed tightly to create a full, high-domed appearance.
- Pour the warm glaze evenly over the berries, using a spatula to ensure it seeps into all the crevices. Refrigerate the pie for at least 3-4 hours to allow the glaze to set firmly before slicing.
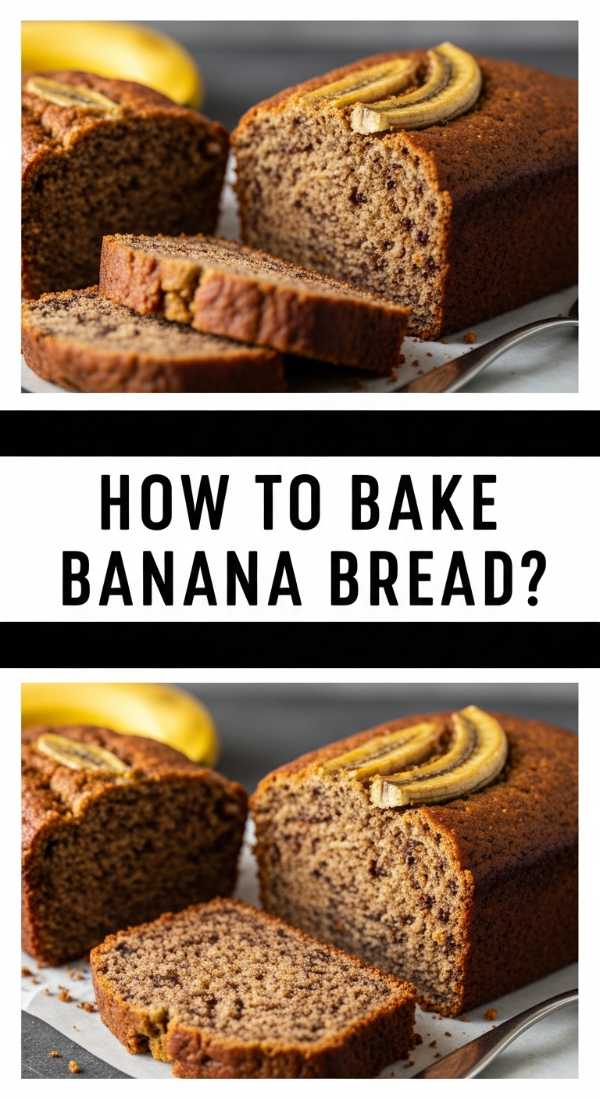
How to bake banana bread?
Why we love this
The smell of banana bread wafting through the house is perhaps the most welcoming aroma in existence, instantly making any space feel like home. We love the dense, moist crumb of this bread, which feels incredibly indulgent without being overly sugary. The deep, caramelized notes of overripe bananas paired with a golden-brown crust provide a sophisticated sweetness that pairs beautifully with a cup of coffee or a smear of salted butter. It’s a rustic, hearty addition to a snack board that guests will keep picking at until every crumb is gone.
Ingredients
- 3 Very Ripe Bananas (mashed)
- 1/3 cup Melted Butter
- 3/4 cup Sugar
- 1 Large Egg (beaten)
- 1 1/2 cups All-Purpose Flour
How to make it
- Preheat your oven to 350°F (175°C) and grease a 4×8-inch loaf pan with butter or non-stick spray. Using parchment paper to line the pan with a slight overhang can make removal much easier later.
- In a large mixing bowl, mash the ripe bananas using a fork or whisk until they are smooth with only small lumps remaining. The riper the bananas (brown spots are good!), the sweeter and more moist your bread will be.
- Stir the melted butter into the mashed bananas until fully incorporated. Add the sugar and the beaten egg, whisking until the mixture is light and well-blended.
- Gently fold in the flour using a spatula. It is critical not to over-mix at this stage; stop as soon as you see no more dry flour streaks. Over-mixing leads to a tough, rubbery loaf rather than a tender one.
- Pour the batter into the prepared pan and smooth the top. Bake for 50 to 60 minutes. To check for doneness, insert a toothpick into the center; it should come out clean or with just a few moist crumbs. Let the bread cool in the pan for 10 minutes before transferring to a wire rack.
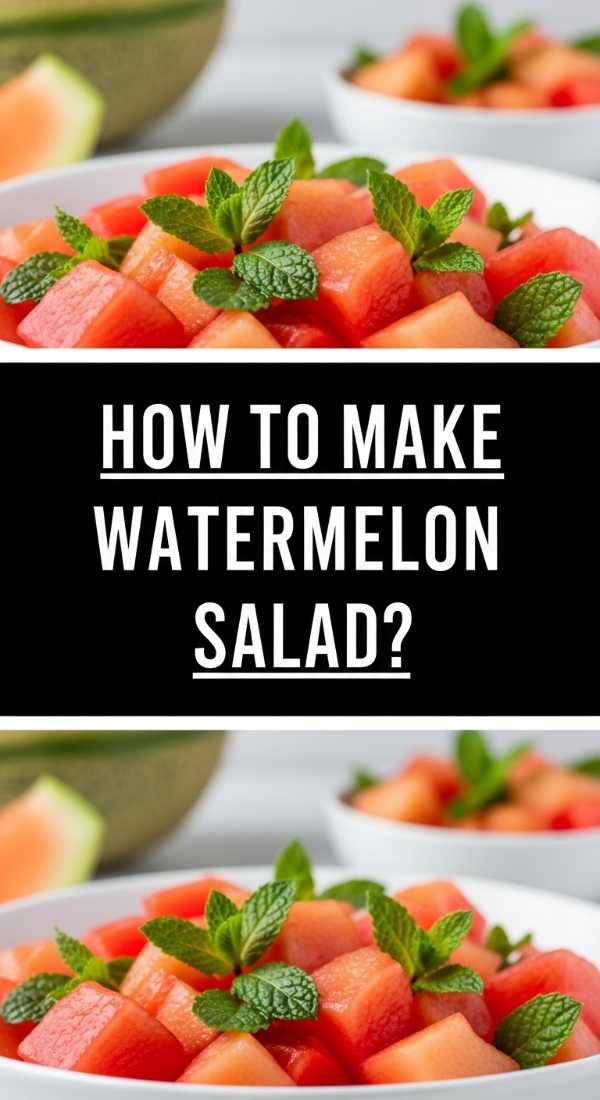
How to make watermelon salad?
Why we love this
This salad is the ultimate palate cleanser, offering a burst of hydration and a complex play between salty and sweet. The cool, crisp texture of the watermelon is elevated by the creamy, tangy crumbles of feta cheese, creating a sophisticated flavor profile that surprises the senses. It looks stunning on a board, with the vibrant pink fruit contrasted against deep green herbs and white cheese. Each bite feels like a splash of summer, making it the perfect light accompaniment to grilled meats or heavier dips.
Ingredients
- 4 cups Cubed Seedless Watermelon
- 1/2 cup Crumbled Feta Cheese
- 1/4 cup Fresh Mint Leaves (torn or chiffonade)
- 1 tbsp Extra Virgin Olive Oil
- 1 tsp Lime Juice
How to make it
- Begin by dicing a cold, seedless watermelon into uniform 1-inch cubes. Keeping the watermelon chilled until the very last moment is the secret to a refreshing salad that doesn’t release too much water.
- Place the watermelon cubes in a large, shallow serving bowl. Shallow bowls are better than deep ones as they prevent the weight of the fruit from crushing the bottom pieces.
- In a small jar or bowl, whisk together the olive oil and fresh lime juice. The acid from the lime will brighten the sweetness of the fruit, while the oil helps the flavors coat the palate evenly.
- Drizzle the dressing over the watermelon and gently toss using clean hands or a large spoon. Sprinkle the crumbled feta cheese over the top; don’t over-mix once the feta is added, or the cheese will turn the watermelon juice cloudy.
- Finish by scattering the fresh mint leaves over the top. For the best flavor, tear the mint by hand just before serving to release its essential oils without bruising the leaves.
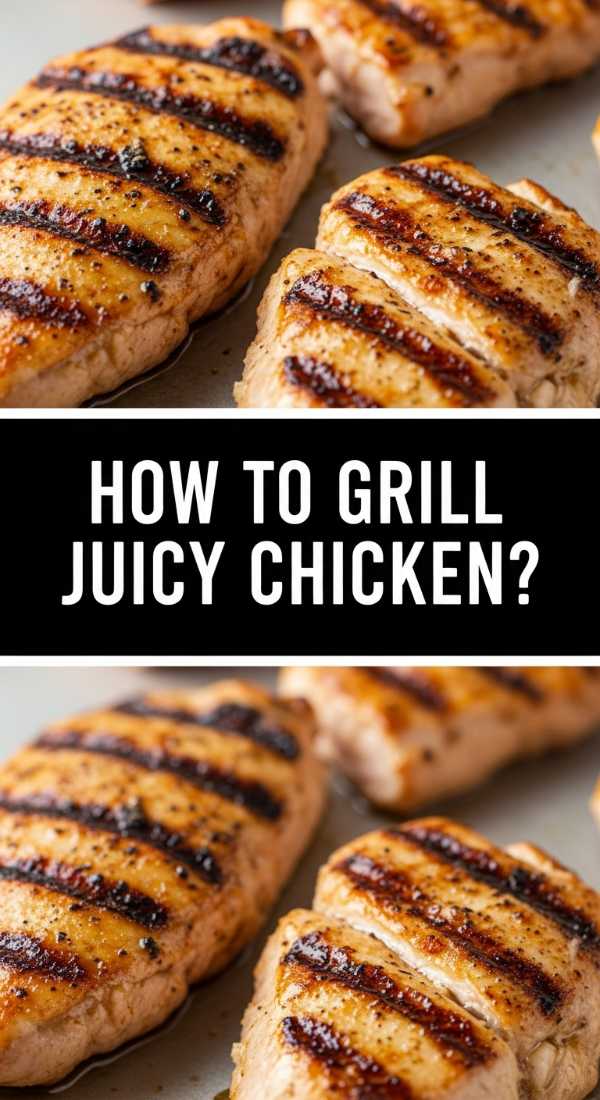
How to grill juicy chicken?

Why we love this
There is nothing quite like the smoky, charred aroma of chicken hitting a hot grill to get everyone’s appetite going. When done right, the exterior has a beautiful golden crust with distinct grill marks, while the interior remains incredibly tender and bursts with savory juices. It’s the versatile protein every snack board needs, providing a satisfying, protein-packed element that can be sliced thin for dipping or eating plain. The combination of heat, smoke, and simple seasoning makes this a timeless favorite that feels both rustic and refined.
Ingredients
- 1.5 lbs Chicken Breasts or Thighs
- 2 tbsp Olive Oil
- 1 tbsp Smoked Paprika
- 1 tsp Garlic Powder
- Salt and Black Pepper to taste
How to make it
- Start by patting your chicken completely dry with paper towels. Removing surface moisture is the most important tip for achieving a golden-brown sear rather than steaming the meat.
- In a bowl, whisk together the olive oil, paprika, garlic powder, salt, and pepper. Rub this mixture over every inch of the chicken. For the best results, let the chicken marinate at room temperature for about 20 minutes before grilling to ensure even cooking.
- Preheat your grill to medium-high heat (about 400°F). Clean the grates thoroughly and lightly oil them to prevent sticking.
- Place the chicken on the grill. For breasts, cook for 6-7 minutes per side. For thighs, go for 5-6 minutes. Resist the urge to move the chicken once it hits the grates; letting it sit undisturbed for the first few minutes is what creates those professional-looking grill marks.
- Use a meat thermometer to ensure the internal temperature reaches 165°F (74°C). Once reached, remove the chicken from the grill and let it rest on a cutting board for at least 5-8 minutes. Resting allows the juices to redistribute so they don’t run out when you slice it.
How to make pasta salad?

Why we love this
Pasta salad is the ultimate canvas for color and texture, bringing a bouncy, chewy element to your viral food board. We love how the nooks and crannies of the pasta trap the zingy dressing, ensuring every forkful is a bright explosion of herb-infused flavor. It’s a resilient dish that actually tastes better as it sits, making it the perfect make-ahead component for stress-free hosting. The combination of cold noodles, crunchy vegetables, and sharp cheese creates a satisfying complexity that keeps guests reaching for just one more scoop.
Ingredients
- 16 oz Rotini or Penne Pasta
- 1 cup Italian Vinaigrette Dressing
- 1 cup Cherry Tomatoes (halved)
- 1/2 cup Black Olives (sliced)
- 1 cup Cubed Mozzarella or Mozzarella Pearls
How to make it
- Bring a large pot of salted water to a rolling boil. Add your pasta and cook according to the package directions, but aim for ‘al dente’—usually 1 minute less than the box suggests. The pasta will soften slightly once it absorbs the dressing, so starting firm is key.
- Drain the pasta and immediately rinse it under cold running water. This stops the cooking process instantly and washes away excess starch, preventing the noodles from sticking together in a clump.
- Transfer the cooled pasta to a large mixing bowl. Add the halved cherry tomatoes, sliced olives, and mozzarella pearls. These ingredients provide different textures—bursting juice, salty bite, and creamy softness.
- Pour the Italian vinaigrette over the mixture. Toss thoroughly to ensure every piece of pasta is coated. If the salad looks dry, add a splash more dressing just before serving.
- Cover and refrigerate for at least one hour. This ‘marination’ period allows the pasta to soak up the herb flavors from the dressing. Give it a final toss before placing it on your board.
How to bake pound cake?
Why we love this
The pound cake is the elegant anchor of the dessert side of your board, offering a dense, velvety crumb and a rich, buttery flavor that feels truly decadent. There is a specific, golden-crusted beauty to a sliced pound cake that looks stunning alongside fresh fruit and whipped cream. Its tight grain makes it perfect for dipping into chocolate fondues or fruit sauces without falling apart. We love the way it melts on the tongue, leaving behind a lingering taste of high-quality butter and vanilla that feels like the ultimate indulgence.
Ingredients
- 1 cup Unsalted Butter (softened)
- 1 cup Granulated Sugar
- 4 Large Eggs (room temperature)
- 1 1/2 cups All-Purpose Flour
- 1 tsp Vanilla Extract
How to make it
- Preheat your oven to 325°F (165°C). A lower temperature is vital for pound cake to ensure the center cooks through without the exterior burning, given the high fat and sugar content.
- In a large bowl, cream together the softened butter and sugar using an electric mixer on medium-high speed. Continue for at least 3-5 minutes until the mixture is pale yellow and has a light, fluffy, almost whipped texture. This aeration is what gives pound cake its lift since there is no chemical leavener.
- Add the eggs one at a time, beating well after each addition. If the batter looks slightly curdled, don’t worry—it will smooth out once the flour is added. Stir in the vanilla extract.
- Reduce the mixer speed to low and gradually add the flour. Mix only until the flour is just incorporated. Over-beating at this stage will develop the gluten and result in a tough cake.
- Pour the thick batter into a greased loaf pan and smooth the top. Bake for 55-65 minutes, or until a skewer inserted into the center comes out clean. Allow it to cool in the pan for 20 minutes before unmolding.
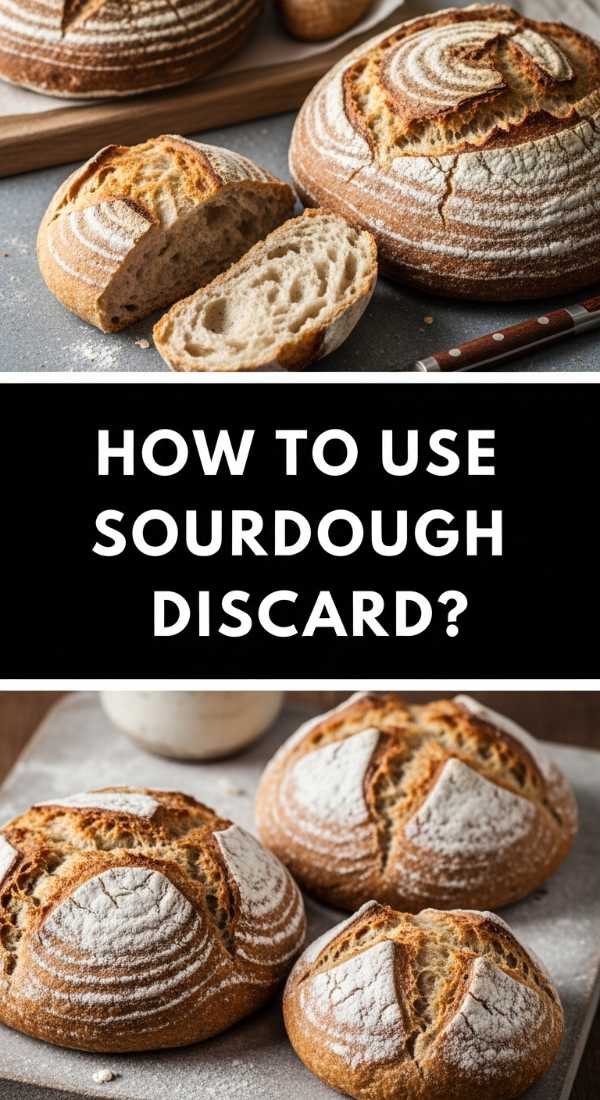
How to use sourdough discard?
Why we love this
Using sourdough discard for crackers or flatbread adds a sophisticated, tangy depth of flavor that store-bought options simply can’t match. We love the artisanal, rustic look these crackers bring to a snack board, with their uneven edges and golden, bubbly surface. The crisp, shatter-like crunch is incredibly satisfying, and the subtle fermented notes of the sourdough pair perfectly with sharp cheeses or creamy hummus. It’s a sustainable and delicious way to ensure none of your precious starter goes to waste while impressing your guests with your baking prowess.
Ingredients
- 1 cup Sourdough Discard (unfed)
- 1/4 cup All-Purpose Flour (plus more if needed)
- 2 tbsp Melted Butter or Olive Oil
- 1/2 tsp Sea Salt
- 1 tsp Dried Herbs (like Rosemary or Everything Bagel Seasoning)
How to make it
- In a medium bowl, combine the sourdough discard, melted butter (or oil), and herbs. Stir until well combined. Gradually add the flour until a soft, slightly tacky dough forms. You want it to be rollable but not sticky.
- Preheat your oven to 350°F (175°C). Place a large piece of parchment paper on your counter and lightly flour it.
- Place the dough on the parchment and roll it out as thin as possible—ideally about 1/16th of an inch. The thinner the dough, the crispier the cracker. If the dough is too thick, it will be chewy rather than crunchy.
- Transfer the parchment and dough onto a baking sheet. Lightly brush the top with a tiny bit more oil and sprinkle with sea salt. Use a pizza cutter or knife to score the dough into squares or diamonds (this makes them easy to break apart after baking).
- Bake for 15-20 minutes, or until the edges are golden brown and the center feels firm. If the edges brown too quickly, you can remove the outer crackers and return the center ones to the oven for a few more minutes. Let them cool completely to reach maximum crispness.
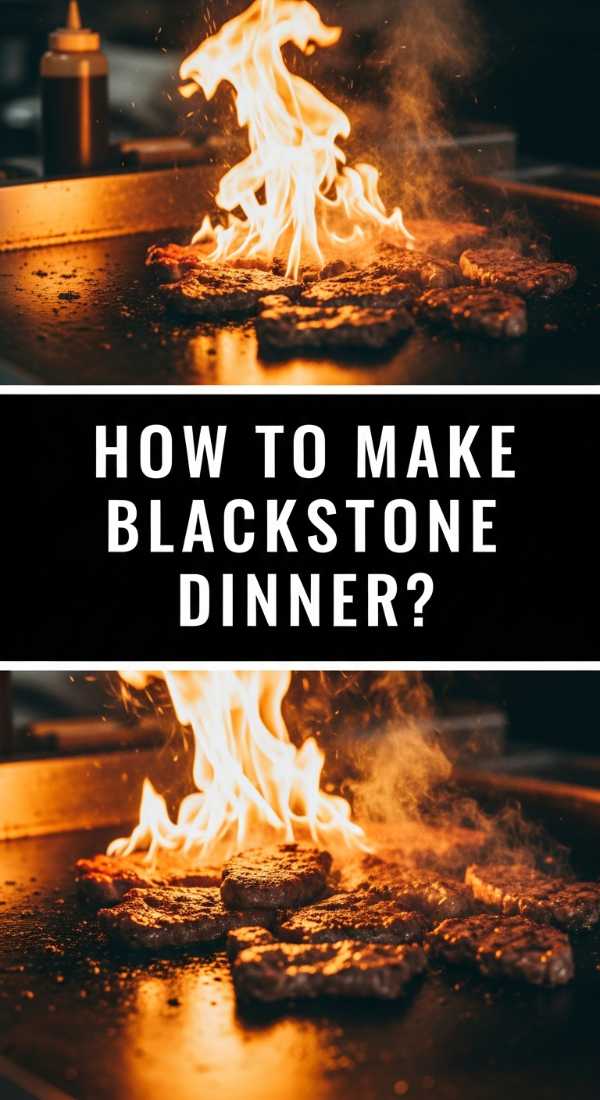
How to make blackstone dinner?
[IMAGE_10]
Why we love this
The Blackstone griddle experience is all about the ‘theatrics’ of cooking—the sizzle of the hot metal, the steam rising as you deglaze, and the rapid-fire chopping of spatulas. We love this method for snack boards because it allows you to cook multiple components at once, infusing everything with a deep, seared flavor that a traditional stovetop can’t replicate. The ‘hibachi’ style of dinner brings a fun, interactive energy to the meal, with perfectly caramelized vegetables and tender meats that are ready to serve directly from the griddle to the board.
Ingredients
- 1 lb Flank Steak or Chicken Strips
- 2 cups Mixed Vegetables (Peppers, Onions, Zucchini)
- 2 tbsp Vegetable Oil (high smoke point)
- 2 tbsp Soy Sauce or Hibachi Ginger Sauce
- 1 tbsp Butter
How to make it
- Preheat your Blackstone griddle on medium-high heat. You want it screaming hot so the food sears rather than steams. Apply a thin layer of vegetable oil over the entire surface using a long-handled spatula.
- Create two ‘heat zones’ by turning one side of the griddle to medium and the other to high. Start by placing your sliced vegetables on the medium-heat side. Sauté them with a little oil and a splash of water, covering them with a griddle dome if you have one to steam-soften them quickly.
- Once the vegetables have some color, move the meat onto the high-heat zone. Spread it out in a single layer to ensure a deep brown crust. Let it sear for 2-3 minutes before flipping.
- Add the butter to the center of the meat and vegetables, letting it melt and coat everything. Drizzle the soy sauce or ginger sauce over the entire mixture, using your spatulas to toss and combine the flavors quickly.
- The entire process should take less than 10 minutes once the griddle is hot. Scrape the finished meal onto a large platter or directly onto the center of your board for an impressive, steaming hot presentation.
The Secret to a Successful Viral Snack Board
Creating the ultimate snack board isn’t about spending a fortune or having professional chef skills; it’s about the harmony of textures, colors, and ease of access. By using these 5-ingredient wonders, you’ve ensured that the flavors are bold and the preparation is manageable. Remember to fill the gaps between your main items with small handfuls of nuts, grapes, or berries to give the board that lush, ‘overflowing’ look that performs so well on social media. Most importantly, keep it relaxed—the best part of a viral board is the memories you make while everyone is gathered around it, reaching for their favorite bite.
Frequently Asked Questions
Can I make these components ahead of time?
Absolutely! The pasta salad, strawberry pie, and banana bread are actually better when made a few hours or even a day in advance. This allows the flavors to meld and the textures to set, leaving you only the warm items to prep right before guests arrive.
How do I keep the hot items warm on the board?
For items like the Rotel dip, use a small, decorative crockpot or a fondue pot. For meats like the grilled chicken or Blackstone dinner, try pre-heating the serving platter in a low oven before placing the food on it. This helps retain heat for much longer.
What is the best way to arrange the board for photos?
Start with your largest items first (the bowls of dip or salad) to create ‘anchor points.’ Then, build out from there with your proteins and breads. Use contrasting colors next to each other—like the red strawberry pie next to the golden banana bread—to make the visual pop!