

There is a unique kind of magic that happens when we gather around a table overflowing with abundance. I remember the first time I hosted a ‘Big Board’ night; the air was thick with the scent of roasted garlic and the sound of laughter as my friends reached across each other to grab a slice of something delicious. It wasn’t about being perfect; it was about the communal joy of sharing a feast that looked as good as it tasted.
Today, I’m showing you how to turn simple supermarket staples into a viral-worthy showstopper. Whether it’s a holiday, a game day, or just a Tuesday that needs some extra sparkle, these dishes are designed to be the stars of your spread. Let’s dive into the ultimate guide to creating a food board that your followers (and your stomach) will absolutely obsess over.
How to roast juicy turkey?

Why we love this
Nothing says ‘centerpiece’ like a perfectly roasted turkey, boasting a skin so golden and crisp it looks like it’s been kissed by the sun. When you carve into it, the aroma of fresh rosemary and melted herb butter fills the room, signaling a time of celebration and gratitude. The meat itself remains incredibly tender and succulent, dripping with natural juices that pair perfectly with the earthy notes of sage and thyme. It’s a nostalgic, comforting experience that brings everyone to the table with an eager appetite and a sense of home.
Ingredients
- 12-14 lb whole turkey (thawed completely)
- 1 cup unsalted butter, softened
- 3 tablespoons chopped fresh herbs (rosemary, sage, thyme)
- 2 lemons, halved
- 1 head of garlic, sliced horizontally
- Salt and cracked black pepper
- 2 cups chicken stock
How to make it
- Preparation is key: Remove the turkey from the fridge at least 45 minutes before roasting to bring it to room temperature, ensuring even cooking. Pat the skin completely dry with paper towels; moisture is the enemy of crispiness.
- The Herb Butter: In a small bowl, mash the softened butter with your chopped herbs, salt, and pepper until it forms a fragrant paste.
- The Skin Lift: Gently loosen the skin over the breast meat using your fingers and spread half of the herb butter directly onto the meat under the skin. Rub the remaining butter all over the outside of the turkey.
- Stuffing the Cavity: Season the inside with salt, then tuck the lemons and garlic inside to infuse the meat from within.
- Roasting Process: Place the turkey on a rack in a roasting pan. Pour the chicken stock into the bottom. Roast at 325°F (165°C). Use a meat thermometer to check the thickest part of the thigh; you are looking for 165°F (74°C).
- The Rest: Once done, tent the turkey with foil and let it rest for at least 30-40 minutes. This allows the juices to redistribute, ensuring every slice is dripping with flavor.
How to bake festive cookies?

Why we love this
Festive cookies are the ultimate edible ornaments, bringing a pop of color and a rush of sugary bliss to any board. The scent of vanilla and high-quality butter wafting from the oven is enough to make anyone feel like a child again. These cookies offer a satisfying snap followed by a melt-in-your-mouth texture that makes them dangerously addictive. Topped with a smooth, sweet glaze, they are as much a delight for the eyes as they are for the palate, turning a simple snack into a work of art.
Ingredients
- 3 cups all-purpose flour
- 1 cup unsalted butter, softened
- 1 cup granulated sugar
- 1 large egg
- 1.5 teaspoons vanilla extract
- 1/2 teaspoon almond extract
- 1 teaspoon baking powder
- Pinch of salt
How to make it
- Creaming the Base: In a large stand mixer, beat the softened butter and sugar together for at least 3-5 minutes until the mixture is pale, light, and fluffy.
- Incorporate Wet Ingredients: Add the egg, vanilla, and almond extract, beating until just combined. Do not overmix here or you’ll lose that delicate texture.
- Sifting Dry Goods: In a separate bowl, whisk the flour, baking powder, and salt. Gradually add this to the wet ingredients on low speed until a dough forms.
- The Chill Phase: Wrap the dough in plastic and refrigerate for at least 1 hour. This prevents the cookies from spreading too much in the oven.
- Roll and Cut: Roll the dough to a 1/4 inch thickness on a floured surface. Use your favorite festive cutters to create shapes.
- Baking: Arrange on a parchment-lined sheet and bake at 350°F (175°C) for 8-10 minutes. The edges should be just barely golden; they will firm up as they cool.
How to make crispy samosas?
Why we love this
There is a profound satisfaction in the shattering crunch of a perfectly fried samosa, revealing a steaming, fragrant interior of spiced potatoes and peas. The contrast between the bubbly, golden pastry shell and the soft, savory filling is a sensory masterpiece. Aromas of toasted cumin, coriander, and garam masala burst forth with every bite, offering a warm heat that lingers pleasantly on the tongue. It’s the ultimate hand-held comfort food that adds a rustic, global flair to your viral food board.
Ingredients
- 2 cups all-purpose flour
- 4 tablespoons vegetable oil (for dough)
- 1/2 teaspoon carom seeds (ajwain)
- 3 large potatoes, boiled and mashed
- 1/2 cup green peas
- 2 green chilies, minced
- 1 tablespoon ginger paste
- Spices: Cumin seeds, turmeric, garam masala, amchur (mango powder)
- Oil for deep frying
How to make it
- The Pastry Dough: Mix flour, carom seeds, salt, and oil. Add water gradually to knead a very stiff dough. Rest it for 30 minutes under a damp cloth.
- The Filling Sizzle: Heat a teaspoon of oil, add cumin seeds until they crackle, then stir in the ginger, chilies, and peas. Fold in the mashed potatoes and dry spices. Sauté for 5 minutes until the mixture is fragrant and dry.
- Shaping Technique: Divide the dough into small balls. Roll each into an oval, then cut in half to create two semi-circles.
- The Cone Fold: Lightly moisten the straight edge with water. Fold it to form a cone, overlapping the edges to seal. Stuff with the potato mixture.
- Final Seal: Pinch the top edges together firmly to ensure no filling escapes during frying.
- Frying for Crunch: Heat oil over medium-low heat. Fry the samosas slowly—this is the secret to a bubbly, crispy crust. It should take about 10-12 minutes to reach a deep golden brown.
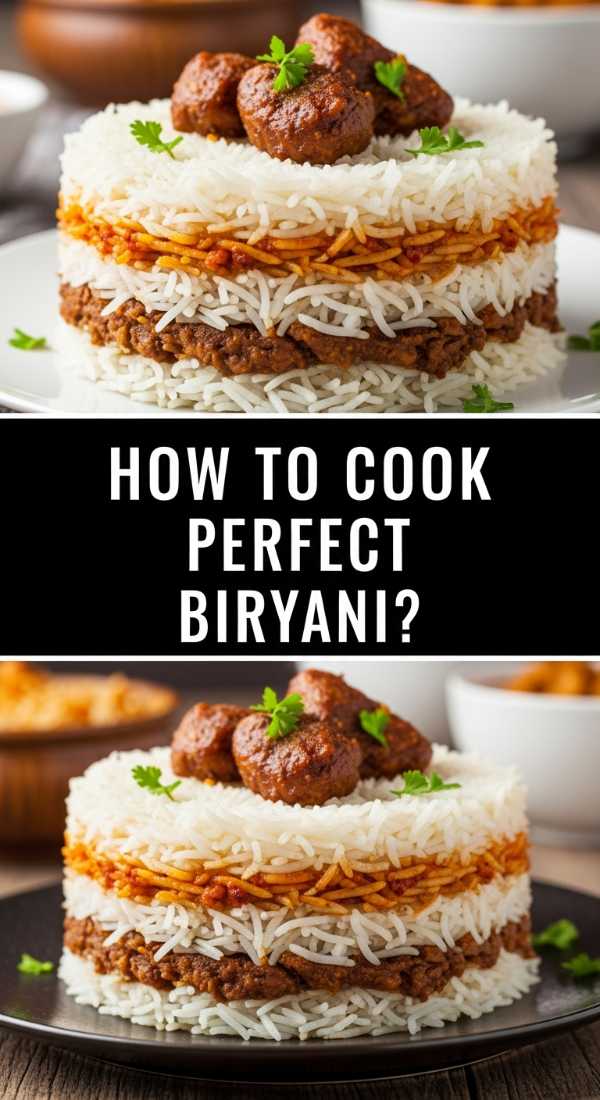
How to cook perfect biryani?
Why we love this
Biryani is more than a dish; it is a celebration in a pot, characterized by long, elegant grains of basmati rice that have been infused with the ‘soul’ of spices. Opening the lid of a finished biryani releases a cloud of aromatic steam scented with saffron, cardamom, and caramelized onions. Each forkful offers a complex layering of flavors—tender meat marinated in yogurt and spices tucked between fluffy, multi-colored rice. It is rich, regal, and guaranteed to be the conversation starter of your gathering.
Ingredients
- 2 cups long-grain Basmati rice
- 1 lb chicken or lamb, cut into pieces
- 1 cup plain yogurt
- 2 large onions, thinly sliced and fried until brown (Birishta)
- Whole spices: Cinnamon stick, cloves, star anise, bay leaf
- 1/2 cup fresh mint and cilantro, chopped
- Pinch of saffron soaked in 2 tablespoons warm milk
- 3 tablespoons ghee
How to make it
- Rice Preparation: Wash the basmati rice until the water runs clear. Soak for 30 minutes. Par-boil the rice in heavily salted water with whole spices until it is 70% cooked (it should still have a slight bite). Drain immediately.
- Marination: Coat your meat in yogurt, ginger-garlic paste, chili powder, turmeric, and half of the fried onions. Let this sit for at least an hour.
- The Layering Art: In a heavy-bottomed pot, spread the marinated meat at the bottom. Layer the par-boiled rice over it.
- Flavor Boosters: Sprinkle the remaining fried onions, chopped herbs, and the saffron-infused milk over the rice. Drizzle ghee around the edges.
- The ‘Dum’ Method: Seal the pot with a tight-fitting lid (or use foil/dough to seal the edges). Cook on very low heat for 30-40 minutes. This slow-steaming process allows the meat to tenderize while the rice absorbs every ounce of spice.
- Serving: Gently fluff with a fork from the bottom to mix the layers without breaking the delicate rice grains.
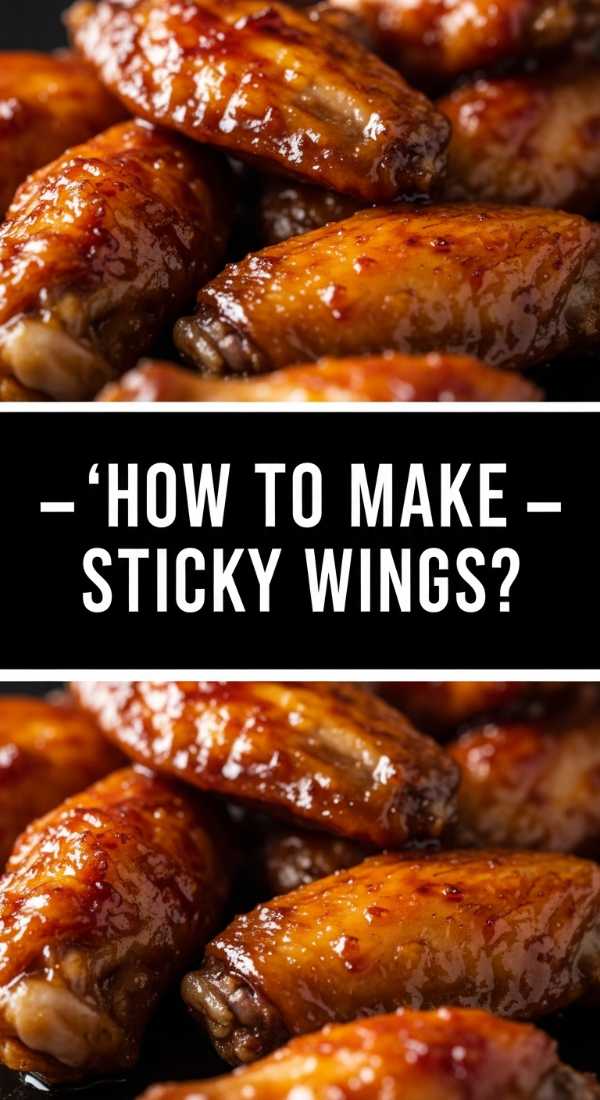
How to make sticky wings?

Why we love this
Sticky wings are the ultimate indulgence, offering a messy, finger-licking experience that defines casual comfort. The skin is rendered down to a satisfying chew, coated in a thick, glossy glaze that balances sweet, salty, and a hint of spicy heat. As you take a bite, the meat pulls effortlessly away from the bone, while the sticky sauce clings to your lips in the best way possible. They bring a fun, high-energy vibe to any food board, especially when garnished with bright green scallions and toasted sesame seeds.
Ingredients
- 2 lbs chicken wings (flats and drumettes)
- 1/2 cup soy sauce
- 1/4 cup honey
- 2 tablespoons brown sugar
- 1 tablespoon Sriracha or chili paste
- 1 tablespoon grated ginger
- 2 cloves garlic, minced
- 1 tablespoon rice vinegar
How to make it
- Oven Prep: Preheat your oven to 400°F (200°C). Place a wire rack over a baking sheet; this allows hot air to circulate under the wings for maximum crispiness without deep frying.
- Initial Bake: Pat the wings dry and season lightly with salt. Bake for 45-50 minutes, turning halfway through, until the skin is golden and the fat has rendered.
- The Glaze Reduction: While the wings bake, combine soy sauce, honey, sugar, Sriracha, ginger, garlic, and vinegar in a small saucepan. Simmer over medium heat for 8-10 minutes until the sauce reduces and becomes thick and syrupy.
- The Toss: Remove the wings from the oven and immediately toss them in a large bowl with the hot glaze. Ensure every nook and cranny is coated.
- The Final Char: Return the glazed wings to the rack and bake for another 5 minutes. This ‘sets’ the glaze, creating that iconic, tacky, sticky texture.
- Garnish: Serve immediately with a sprinkle of sesame seeds for an extra pop of texture.
How to bake lava cake?

Why we love this
The chocolate lava cake is the undisputed queen of desserts, promising a dramatic moment of pure decadence. There is nothing quite like the sight of a warm, firm cake exterior giving way to a molten, velvety chocolate center that flows out like liquid gold. The aroma is intensely cocoa-rich, and the taste is a sophisticated balance of sweetness and dark chocolate bitterness. Served warm, it provides a temperature contrast that feels like a warm hug for your taste buds, making it the perfect grand finale for your board.
Ingredients
- 6 oz high-quality dark chocolate (60% cacao or higher)
- 1/2 cup unsalted butter
- 2 large eggs plus 2 egg yolks
- 1/4 cup granulated sugar
- Pinch of salt
- 2 tablespoons all-purpose flour
How to make it
- The Chocolate Melt: Gently melt the chocolate and butter together in a double boiler or in 30-second bursts in the microwave. Stir until completely smooth and glossy.
- Egg Aeration: In a separate bowl, beat the eggs, yolks, sugar, and salt with a whisk or electric mixer for about 2 minutes until the mixture is thick and pale yellow.
- The Fold: Carefully fold the melted chocolate into the egg mixture using a spatula. Sift the flour over the top and fold gently until just combined—do not overwork the batter.
- Ramekin Prep: Generously grease your ramekins with butter and dust with cocoa powder. This is crucial for the cake to slide out perfectly.
- The Bake: Pour the batter into ramekins and bake at 425°F (218°C) for exactly 10-12 minutes. The sides should be firm, but the center should still look soft and slightly jiggly.
- The Reveal: Let them stand for 1 minute, then run a knife around the edge and invert onto a plate. Serve immediately while the center is still liquid.
How to make loaded fries?

Why we love this
Loaded fries are a riot of textures and flavors, a mountain of golden, crispy potatoes buried under a blanket of gooey, melted cheese and savory toppings. We love the contrast between the hot, salty fries and the cool, tangy dollops of sour cream, punctuated by the smoky crunch of bacon bits. Every bite is a different adventure—sometimes you get a spicy kick of jalapeño, other times a fresh burst of green onion. It’s the ultimate crowd-pleaser that invites everyone to dig in and get a little messy.
Ingredients
- 1 bag (24 oz) frozen extra-crispy fries
- 2 cups shredded sharp cheddar cheese
- 1/2 cup cooked bacon crumbles
- 1/4 cup pickled jalapeños
- 1/2 cup sour cream
- 2 tablespoons chopped chives or green onions
- Optional: Drizzle of ranch dressing
How to make it
- The Base: Bake your fries according to the package instructions, but add an extra 5 minutes to ensure they are extra sturdy and crispy. They need to hold up under the weight of the toppings.
- The First Layer: While the fries are piping hot, spread them out on a baking sheet and sprinkle half of the cheese over them.
- The Toppings Layer: Add the bacon crumbles and jalapeños, then cover with the remaining cheese.
- The Melt: Return to the oven (or under the broiler) for 2-3 minutes until the cheese is bubbly and starting to brown in spots.
- The Finish: Remove from the oven and immediately dollop with sour cream. Drizzle with ranch if you’re feeling extra, and shower the whole thing with fresh chives.
- Serving: Serve directly on the baking sheet or transfer carefully to your food board to keep that ‘mountain’ effect.
How to prep fluffy pancakes?
Why we love this
A stack of fluffy pancakes is the universal symbol of a slow, beautiful morning. There’s something so comforting about the pale golden surface and the way a pat of butter slowly slides down the side, melting into the nooks and crannies. The texture is airy and cloud-like, with a subtle sweetness that acts as the perfect canvas for maple syrup or fresh berries. The gentle scent of malt and vanilla fills the air, creating an atmosphere of cozy relaxation that makes any brunch board feel complete.
Ingredients
- 1.5 cups all-purpose flour
- 3.5 teaspoons baking powder
- 1 teaspoon salt
- 1 tablespoon white sugar
- 1.25 cups milk
- 1 egg
- 3 tablespoons melted butter
- 1 teaspoon vanilla extract
How to make it
- Mixing Dry Ingredients: Sift together the flour, baking powder, salt, and sugar in a large bowl. Making a ‘well’ in the center helps with mixing.
- Wet Integration: Pour the milk, egg, melted butter, and vanilla into the well. Whisk until mostly smooth, but—and this is vital—leave some small lumps. Over-mixing leads to tough pancakes.
- The Rest: Let the batter sit for 5-10 minutes. You’ll see small bubbles forming on the surface; this means the baking powder is activating, which ensures the fluffiness.
- Heat Control: Heat a non-stick griddle over medium-low heat. Lightly grease with butter.
- The Pour: Use a 1/4 cup measure to pour batter onto the griddle.
- The Flip Cue: Wait until bubbles form on the surface and the edges look set and matte. Flip carefully and cook for another 1-2 minutes until golden brown on both sides.
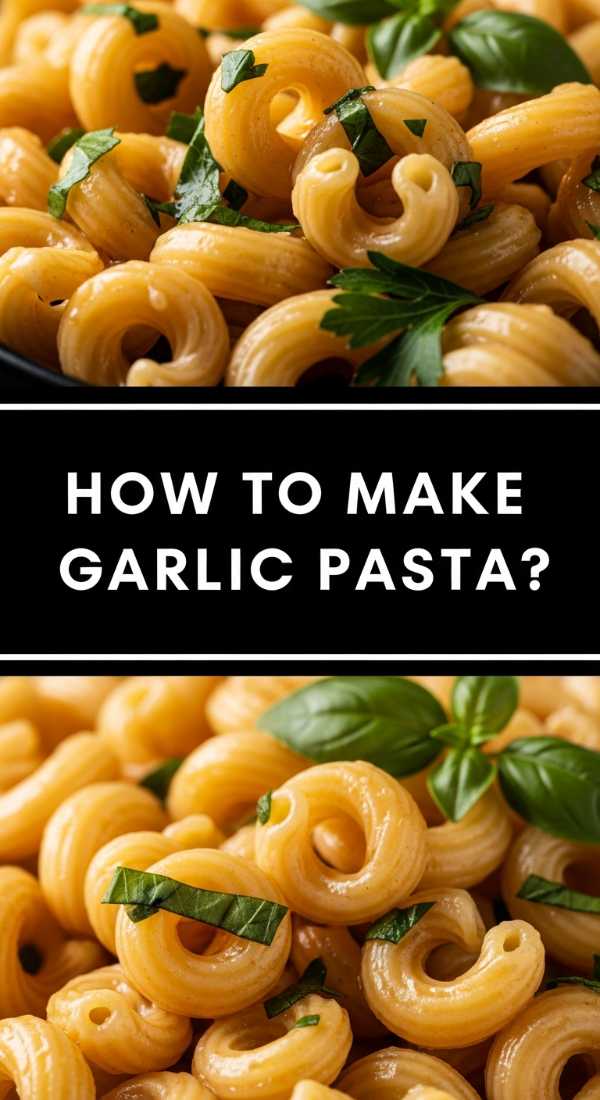
How to make garlic pasta?
Why we love this
Garlic pasta, or Aglio e Olio, is the epitome of how simple ingredients can create a masterpiece of flavor. The aroma of thinly sliced garlic gently infusing into golden olive oil is one of the most intoxicating scents in the culinary world. The pasta is silky and glossy, coated in a sauce that is light yet punchy, with a hit of red pepper flakes for warmth and fresh parsley for a bright, herbaceous finish. It’s elegant, rustic, and incredibly satisfying, proving that you don’t need a heavy sauce to make an impact.
Ingredients
- 1 lb spaghetti or linguine
- 1/2 cup high-quality extra virgin olive oil
- 8 cloves garlic, very thinly sliced
- 1 teaspoon red pepper flakes
- 1/2 cup fresh Italian parsley, chopped
- 1 cup freshly grated Parmesan cheese
- Salt and black pepper
How to make it
- Pasta Al Dente: Boil your pasta in a large pot of heavily salted water. Cook it for 1-2 minutes less than the package directions; it will finish cooking in the sauce. Reserve 1 cup of pasta water before draining.
- The Garlic Infusion: In a large skillet, combine the olive oil and sliced garlic. Turn the heat to medium-low. You want to slowly ‘toast’ the garlic until it turns a pale golden brown. Do not burn it, or it will turn bitter.
- Adding Spice: Stir in the red pepper flakes for 30 seconds to release their oils.
- Emulsifying the Sauce: Add 1/2 cup of the reserved pasta water to the oil and whisk vigorously. This creates a silky emulsion that will cling to the pasta.
- The Marriage: Add the pasta to the skillet. Toss constantly over medium heat, adding more pasta water if it looks too dry, until the sauce thickens and coats every strand.
- The Finish: Turn off the heat. Stir in the parsley and a generous amount of Parmesan. Serve with an extra drizzle of oil.
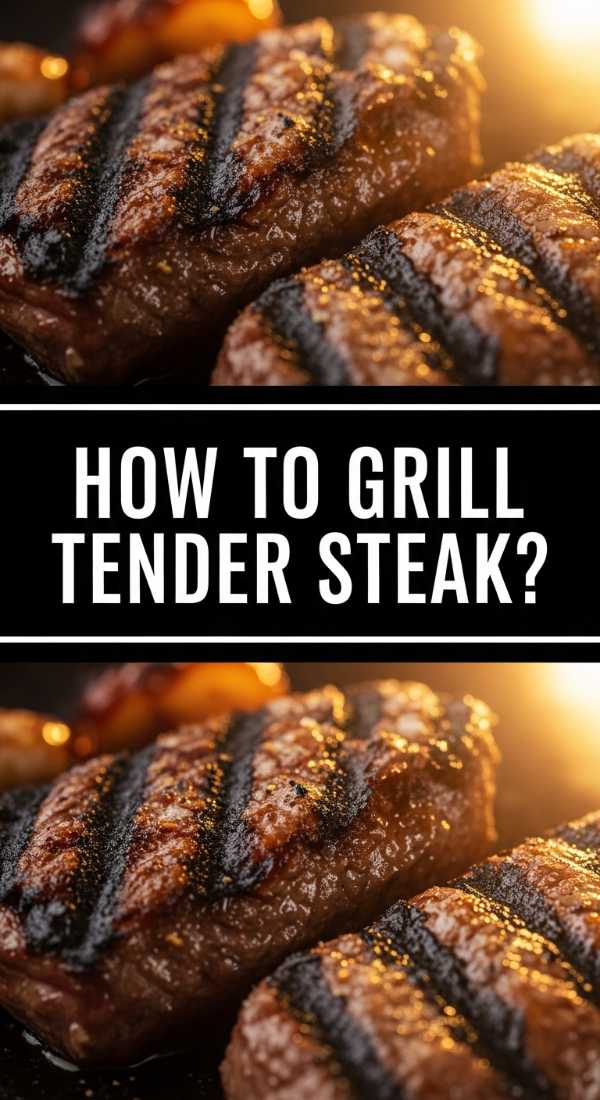
How to grill tender steak?
[IMAGE_10]
Why we love this
A perfectly grilled steak is a sensory powerhouse, featuring a dark, salty crust that yields to a tender, ruby-red interior. The smell of high-heat char and rendered fat is primal and deeply appetizing. When you slice into it, the meat is buttery and rich, needing little more than a sprinkle of flaky sea salt to shine. It brings a sophisticated, masculine energy to a food board, acting as a high-protein anchor that feels both indulgent and impressively chef-made. It’s the ultimate reward for any meat lover.
Ingredients
- 2 thick-cut steaks (Ribeye or New York Strip, at least 1.5 inches thick)
- 2 tablespoons avocado oil (high smoke point)
- 4 tablespoons unsalted butter
- 3 cloves garlic, smashed
- 2 sprigs of fresh rosemary or thyme
- Flaky sea salt and cracked black pepper
How to make it
- The Warm-Up: Remove steaks from the fridge 1 hour before cooking. Season very generously with salt and pepper on all sides, including the edges. A cold steak will not cook evenly.
- The Sear: Heat a cast-iron skillet over high heat until it is smoking slightly. Add the oil. Place the steaks in the pan and don’t touch them for 3-4 minutes to develop a deep, dark crust.
- The Flip: Turn the steaks over. Lower the heat to medium-high.
- Butter Basting: Add the butter, garlic, and herbs to the pan. As the butter melts and foams, use a large spoon to continuously pour the flavored butter over the steaks. This adds incredible flavor and ensures tenderness.
- Visual Cues: Use an instant-read thermometer. Pull the steak at 130°F (54°C) for medium-rare.
- The Critical Rest: Transfer the steak to a cutting board and let it rest for at least 10 minutes. If you cut it too soon, all the delicious juices will run out, leaving the meat dry.
The Art of the Final Board
Building a viral food board is about more than just the recipes; it’s about the composition. Start by placing your larger items—the turkey, the bowl of biryani, and the stack of pancakes—at different points to act as anchors. Fill the gaps with the smaller items like samosas, wings, and cookies. Use fresh herbs, sliced fruits, and small bowls of dipping sauces to bridge the spaces. Remember, the ‘viral’ look comes from the appearance of abundance. Don’t be afraid to let things overlap. When you present this to your guests, you’re not just serving food; you’re serving a curated experience that celebrates the diversity of flavor and the joy of being together.