
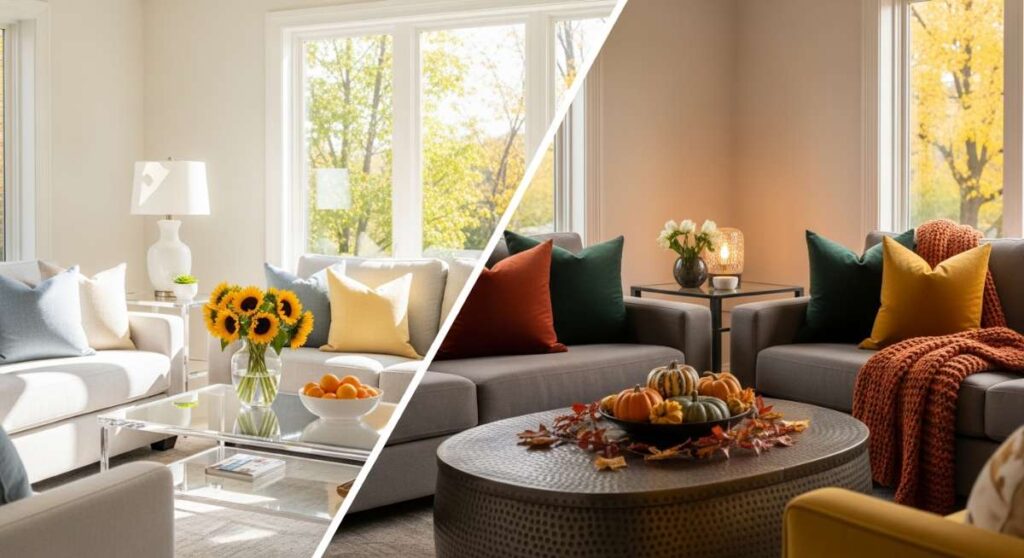
There is a specific, magical moment when the golden haze of August begins to ripple with the first crisp whispers of September. It’s the time when our lives naturally migrate from the sun-drenched poolside to the cozy, candle-lit corners of our living rooms. This transition isn’t just about swapping out a wardrobe; it’s about curating an atmosphere that honors the lingering warmth of summer while embracing the sophisticated elegance of the coming harvest. I’ve always found that our homes act as a canvas for these seasonal shifts, reflecting the changing light and the slower pace of life.
In this guide, we are diving deep into the art of the seasonal pivot. Whether you are still squeezing every drop of joy out of your backyard oasis or you’re already sketching out the perfect autumn table setting, these elevated lifestyle tips will help you bridge the gap with grace. We’re exploring everything from urban patio retreats to the meticulous details of a Mother’s Day brunch, ensuring every corner of your world feels intentional, curated, and undeniably chic.
How to Style a Pool Deck for Total Summer Relaxation
Why we love this
There is nothing quite like the feeling of sun-warmed wood beneath your feet and the rhythmic sound of water lapping against the tiles. A well-styled pool deck creates a private sanctuary that rivals any luxury resort, blending the tactile softness of oversized linen towels with the structural beauty of teak loungers. Imagine the scent of coconut-infused sunblock mingling with the crisp aroma of a chilled cucumber spritz as you recline under a fringed umbrella. It is a sensory experience that celebrates the height of summer leisure, turning a simple backyard into a high-end escape where time seems to stand perfectly still.
Essential Elements:
- Weather-resistant oversized floor poufs
- Natural fiber outdoor rugs (jute or seagrass)
- Coordinating Turkish cotton towels in muted earth tones
- Tiered side tables for refreshments and books
- Large-scale potted palms or birds of paradise
- UV-resistant outdoor lanterns with LED flickering candles
How to make it
- Begin by power-washing the deck surface to remove any winter grime, ensuring a pristine base; look for a uniform light gray or honey hue in the wood as a visual cue of cleanliness.
- Map out your zones by placing your largest furniture pieces first, ensuring there is a clear walking path of at least three feet between the pool edge and the seating for safety and flow.
- Layer your outdoor rug beneath the primary seating group, tucking the front legs of the loungers onto the fabric to anchor the space visually.
- Position umbrellas at a 45-degree angle relative to the mid-day sun; check the shadow cast to ensure the headrest of your lounger is fully shaded.
- Accessorize with textiles, folding towels into thirds and draping them over the foot of each chair for a professional, boutique-hotel aesthetic.
- Set up a ‘refreshment station’ on a side table using a weighted tray to prevent wind-drift, and add a small bowl of citrus slices for both visual pop and functional use.
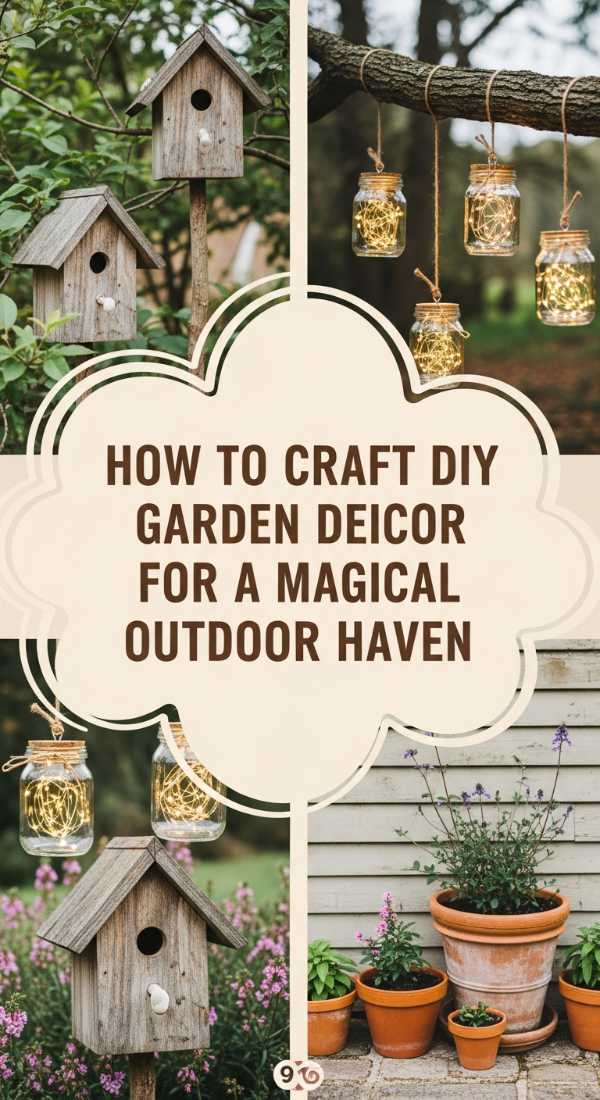
How to Craft DIY Garden Decor for a Magical Outdoor Haven

Why we love this
A garden should feel like a storybook come to life, a place where hidden details reward the curious observer. DIY decor allows you to infuse your personality into the soil, creating a whimsical atmosphere that feels both organic and intentional. We love the way vintage glass bottles catch the afternoon light, casting kaleidoscopic patterns across the flower beds, or how hand-painted stone markers provide a rustic charm among the mint and lavender. The aroma of damp earth and blooming jasmine is heightened by these personal touches, making your garden not just a plot of land, but a curated haven of peace and inspiration.
Essential Elements:
- Upcycled glass bottles in various hues
- Flat river stones for hand-painted markers
- Copper wire and glass beads for suncatchers
- Reclaimed wood for birdhouses or trellis frames
- Weatherproof acrylic paints and sealants
- Solar-powered fairy lights in mason jars
How to make it
- Select your glass bottles and clean them thoroughly with a mixture of warm water and vinegar to ensure the glass is streak-free and ready to catch the light.
- For suncatchers, cut copper wire into 12-inch lengths using wire cutters, twisting one end into a small loop to act as a stopper for your beads.
- Thread glass beads onto the wire, alternating colors and sizes; check the weight to ensure it doesn’t bend the copper too severely, aiming for a gentle, elegant curve.
- When painting stones, apply a base coat of outdoor-grade primer and let it dry for at least 2 hours; the surface should feel matte and non-tacky before you add details.
- Use a fine-tipped brush to letter your herb names; if the paint drags, add a single drop of water to your palette to reach a ‘heavy cream’ consistency.
- Seal all painted items with a clear, UV-resistant spray fixative, applying three thin coats rather than one thick one to avoid drips and ensure a professional, long-lasting finish.
How to Enhance Apartment Patio Decor for a Chic Urban Retreat
Why we love this
Urban living often means limited outdoor space, but a small patio can be transformed into a high-impact retreat with the right design choices. We adore the way vertical greenery softens the harsh lines of city brick and steel, creating a private cocoon amidst the hustle and bustle. There is a specific joy in sipping a morning espresso surrounded by the lush textures of velvet outdoor pillows and the soft glow of bistro lights overhead. It turns a tiny concrete slab into a sophisticated extension of your home, where the evening breeze feels cooler and the city lights seem like a personal backdrop for your relaxation.
Essential Elements:
- Vertical wall planters or a tiered herb ladder
- Bistro-style folding table and chairs
- Outdoor-rated velvet or high-density foam cushions
- Battery-operated Edison bulb string lights
- Privacy screens (bamboo or lattice)
- Small-scale outdoor mirror to expand the visual space
How to make it
- Measure your square footage precisely, then select a bistro set that leaves at least 18 inches of clearance around the chairs for easy movement.
- Install your privacy screen using heavy-duty zip ties or brackets; ensure the screen is perfectly level by using a bubble level tool—a visual cue of professional installation.
- Mount vertical planters at eye level to draw the gaze upward; fill them with trailing plants like ivy or creeping jenny to create a ‘waterfall’ of greenery.
- String your Edison lights in a ‘zigzag’ pattern across the ceiling or railing, using adhesive hooks designed for outdoor use; ensure the bulbs are tightened until they just resist, indicating a solid electrical connection.
- Layer an outdoor rug that covers at least 70% of the floor space to hide unsightly concrete and provide a soft texture underfoot.
- Place a weather-resistant mirror on the main wall to reflect the plants and light, instantly doubling the perceived depth of the patio.
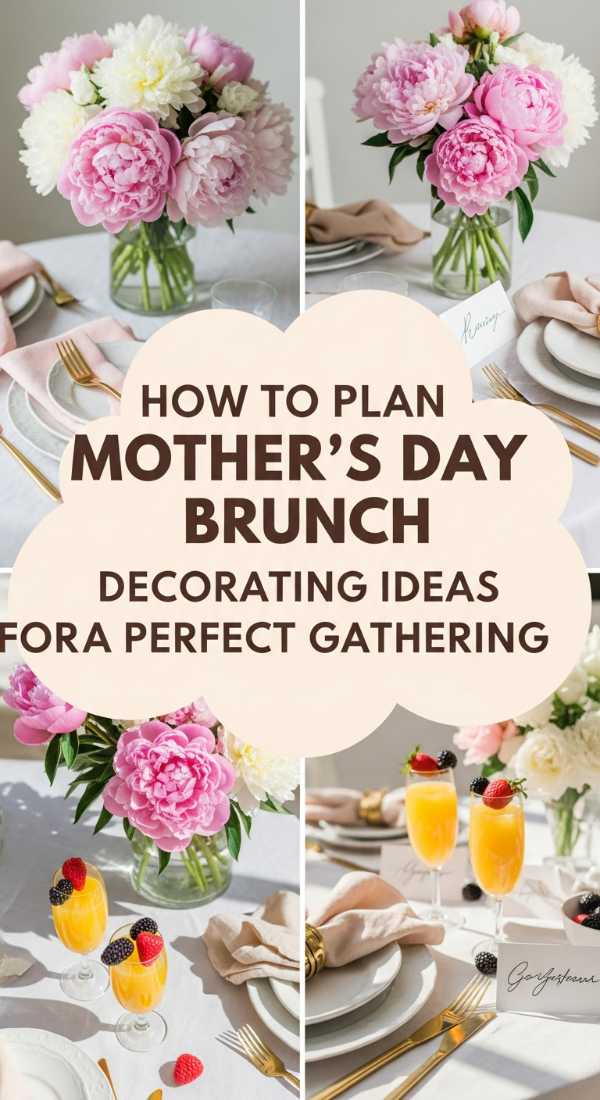
How to Plan Mother’s Day Brunch Decorating Ideas for a Perfect Family Gathering

Why we love this
Mother’s Day brunch is an exercise in soft aesthetics and heartfelt details, where the decor should feel as warm as the guest of honor. We love the juxtaposition of delicate lace runners against modern stoneware, creating a table that feels both nostalgic and fresh. The air is filled with the scent of fresh-cut peonies and the sweet aroma of maple syrup and citrus. Every detail, from the hand-lettered place cards to the sprig of rosemary tucked into the napkins, serves as a silent ‘thank you,’ making the meal feel less like a routine and more like a celebrated milestone in a beautiful, sunlit room.
Essential Elements:
- Linen or lace table runner
- Fresh floral centerpieces (peonies, ranunculus, or tulips)
- Mismatched vintage teacups or elegant glassware
- Hand-lettered cardstock place cards
- Woven placemats for organic texture
- Champagne buckets with floral-infused ice cubes
How to make it
- Iron your linen runner on a high-steam setting while damp to achieve a crisp, professional finish, then drape it centered across the table.
- Build your floral centerpiece by using a floral frog or grid of clear tape across the vase opening; this ensures stems stay upright and perfectly spaced.
- Place your largest ‘focal’ blooms (like peonies) at the center and work outward with smaller ‘filler’ flowers, checking the arrangement from all 360 degrees.
- Set the table following formal etiquette: forks on the left, knives and spoons on the right, with the knife blade facing inward toward the plate.
- Create floral ice cubes by boiling water first (for clarity), letting it cool, then freezing small edible pansies inside the molds for 4-6 hours.
- Position the place cards at the top center of each plate; ensure the ink is completely dry by waiting 10 minutes after writing before handling to avoid smudging.
How to Design Graduation Cap Decoration for a Standout Celebration Look
Why we love this
The graduation cap is a tiny, wearable canvas that represents years of hard work and the thrill of what’s next. We love the creative freedom this project offers—using glitter, 3D florals, and meaningful quotes to stand out in a sea of polyester gowns. There’s a tactile satisfaction in layering textures like cardstock and rhinestones, creating a piece of art that catches the stadium lights as you walk across the stage. It’s more than just an accessory; it’s a personalized monument to a major life transition, making those photos from the ceremony feel deeply personal and uniquely yours.
Essential Elements:
- Heavyweight glitter or patterned cardstock
- High-temp glue gun and extra glue sticks
- 3D silk flowers or butterfly decals
- Adhesive rhinestones or pearls
- Alphabet stickers or a metallic paint pen
- Double-sided permanent mounting tape
How to make it
- Trace the top of your graduation cap onto the back of your cardstock and cut out the square, then cut a small circle in the exact center for the button.
- Layout your design ‘dry’ first without any adhesive; this allows you to adjust the balance of text and floral elements before they become permanent.
- Heat your glue gun for at least 5 minutes; test it on a scrap piece of paper—if the glue flows smoothly and clear, it is at the optimal temperature.
- Adhere your base cardstock to the cap using double-sided tape; press firmly from the center outward to eliminate any air bubbles or wrinkles.
- Glue your larger 3D elements (like silk flowers) in the corners first to frame the space, then fill in with smaller rhinestones for detail.
- Use a ruler to ensure your lettering is perfectly straight; if using a paint pen, let the ink dry for 20 minutes before moving the cap to prevent any accidental smears.
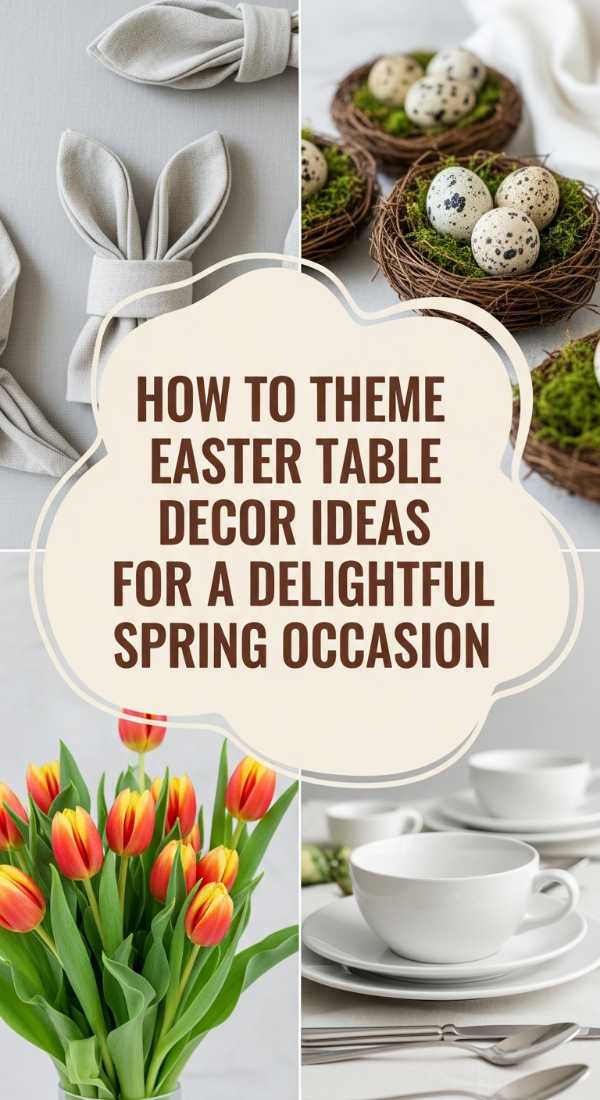
How to Theme Easter Table Decor Ideas for a Delightful Spring Occasion
Why we love this
Easter decor is all about the rebirth of the season, characterized by a palette of soft pastels and natural textures that feel incredibly uplifting. We love the charm of nest-inspired centerpieces filled with speckled eggs, which bring a touch of the forest to the dining room. The scent of fresh lilies and the sight of delicate moss runners create a sensory bridge to the outdoors. It’s a theme that encourages slow living and conversation, where the brightness of the table reflects the increasing daylight and the playful spirit of a spring morning spent with family.
Essential Elements:
- Preserved moss table runner
- Miniature woven nests and ceramic eggs
- Pastel-colored cloth napkins (mint, lavender, or blush)
- Crystal or etched glass water goblets
- Spring bulb plants (hyacinths or daffodils) in terracotta pots
- Thin silk ribbons for tying around cutlery
How to make it
- Unroll your moss runner and gently pull apart any dense sections to create a more natural, uneven edge that mimics a forest floor.
- Place three terracotta pots of varying heights in the center of the table; ensure the soil is covered with a thin layer of decorative moss for a finished look.
- Fold your napkins into ‘bunny ears’ or a simple rectangular fold, securing them with a silk ribbon tied into a floppy, romantic bow.
- Scatter the miniature nests and ceramic eggs along the length of the moss runner, grouping them in odd numbers (3 or 5) for a more pleasing visual composition.
- Ensure each place setting has 12 inches of space to prevent crowding; use a ‘thumb-rule’—the bottom of the plate should be one thumb-length from the table edge.
- Check the scent level of your flowers; if hyacinths are too pungent, move them to a sideboard and replace with scentless tulips for the main table to avoid competing with the food.
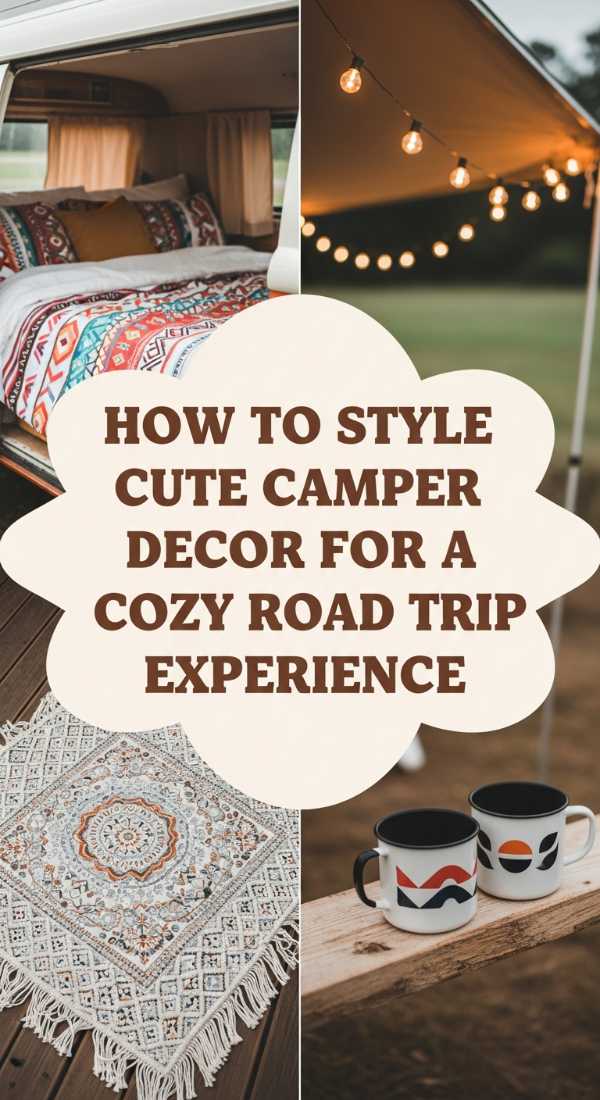
How to Style Cute Camper Decor for a Cozy Road Trip Experience
Why we love this
A camper is a small space with a big personality, and styling it is all about maximizing coziness without sacrificing functionality. We love the way chunky knit throws and flannel accents can turn a metallic shell into a warm, inviting cabin on wheels. There’s something deeply comforting about the aroma of brewing coffee in a confined space, illuminated by the soft glow of copper string lights. It’s about creating a ‘hygge’ environment that travels with you, making every campsite feel like a home-away-from-home where you can unplug and reconnect with nature in total style.
Essential Elements:
- Custom-fit bench cushions in durable canvas
- Faux fur or chunky knit throw blankets
- Magnetic spice tins and wall-mounted organizers
- Battery-powered fairy lights or copper lanterns
- Melamine dinnerware with a vintage camping motif
- Small, plush throw pillows in forest or sunset tones
How to make it
- Secure all loose decor items using ‘museum putty’ or heavy-duty Velcro; give each item a gentle shake—if it doesn’t budge, it’s road-ready.
- Layer your bed or bench seating with at least two different textures; a smooth cotton sheet paired with a heavy knit blanket creates a high-end, cozy look.
- Hang fairy lights along the ceiling line using small command hooks; keep the wires taut to prevent sagging during travel, which ensures a clean, ‘built-in’ appearance.
- Utilize vertical space by installing a pegboard for mugs and tools; arrange items by weight, placing heavier pieces at the bottom to maintain the camper’s center of gravity.
- Incorporate a ‘scent profile’ using essential oil diffusers rather than candles (for safety); pine or cedar oils enhance the outdoor experience beautifully.
- Organize your kitchenette with clear bins; label each one so everything has a dedicated ‘home,’ preventing clutter from building up in the small square footage.
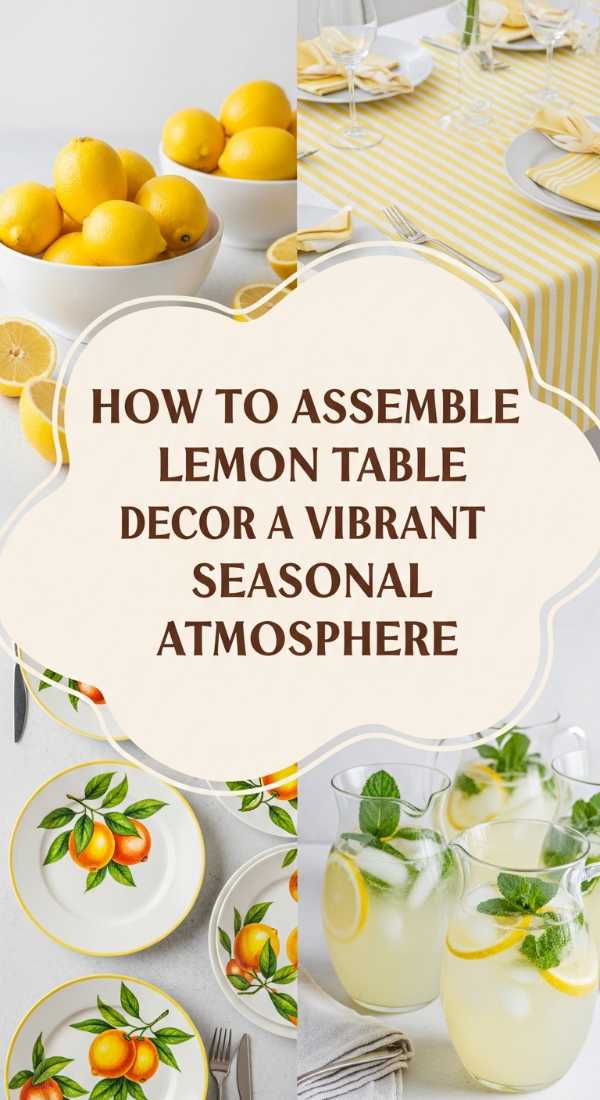
How to Assemble Lemon Table Decor for a Vibrant Seasonal Atmosphere
Why we love this
Lemon-themed decor is the ultimate ‘pick-me-up’ for any dining space, offering a zest for life that is both visually stunning and aromatically refreshing. We love the punchy contrast of bright yellow citrus against crisp white linens or deep navy accents—it’s an instant hit of Mediterranean sunshine. The scent of freshly sliced lemons combined with sprigs of eucalyptus creates an energizing environment that is perfect for summer brunches or al fresco dinners. It feels clean, vibrant, and effortlessly chic, bringing a burst of energy to the table that keeps guests feeling bright and engaged.
Essential Elements:
- Large bowls of real or high-quality faux lemons
- Fresh eucalyptus or bay leaf garlands
- Yellow striped or solid linen napkins
- White ceramic pitchers for water or lemonade
- Yellow-tinted glassware or amber bottles
- Unscented white pillar candles
How to make it
- Lay a neutral white tablecloth as your base; ensure it hangs at least 8 inches off the side for a formal, elegant drape.
- Place a eucalyptus garland down the center of the table, weaving it slightly to create ‘pockets’ where your lemons will sit.
- Tuck whole lemons into the garland, focusing on clusters of three; ensure the ‘brightest’ side of the lemon faces upward to maximize color impact.
- For a sensory boost, slice two lemons into thin rounds and place them inside your water pitchers; the visual of floating citrus instantly elevates the drink presentation.
- Coordinate your napkins by using a simple ring or folding them into a crisp square; place them to the left of the forks or directly in the center of the plate.
- Check the lighting; warm-toned candles (around 2700K) will make the yellow of the lemons pop brilliantly without looking neon or harsh.
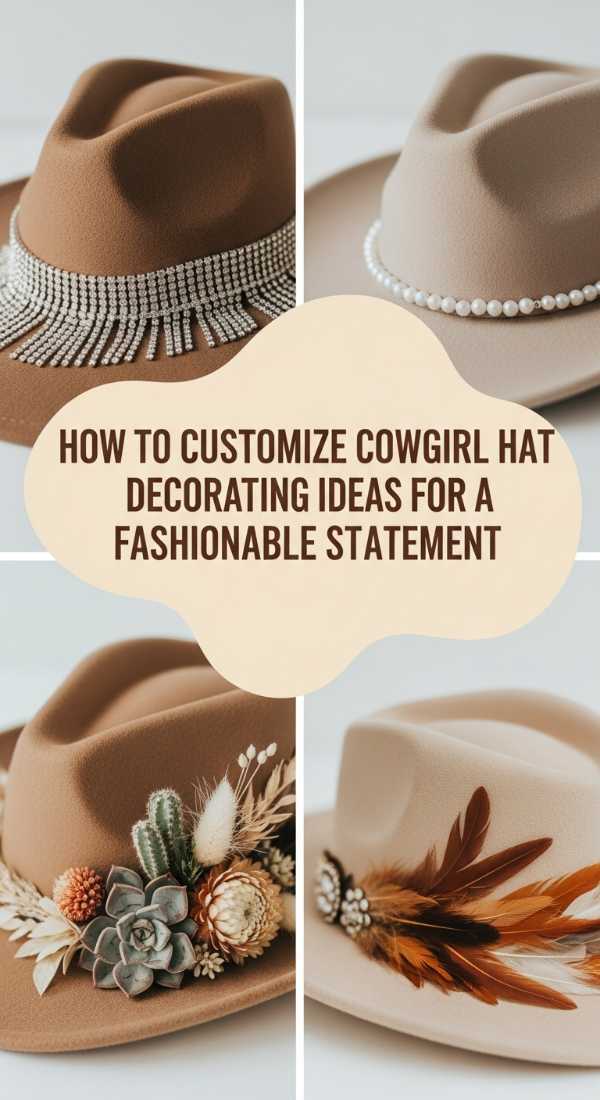
How to Customize Cowgirl Hat Decorating Ideas for a Fashionable Party Statement

Why we love this
The cowgirl hat has evolved from rugged utility to a high-fashion statement piece, and customizing your own is the ultimate way to express your style. We love the fusion of traditional western shapes with glamorous elements like rhinestone fringe, delicate dried flowers, or velvet ribbons. There is a weight and texture to a well-decorated hat that makes you stand taller the moment you put it on. It’s the perfect accessory for bachelorette parties, festivals, or autumn photo shoots, offering a blend of playful spirit and sophisticated craftsmanship that turns heads every time.
Essential Elements:
- Felt or straw cowgirl hat base
- Rhinestone trim or silver chain fringe
- Dried flowers (baby’s breath or mini roses)
- Wide velvet or grosgrain ribbon for the band
- E6000 industrial strength adhesive or hot glue
- Small metal charms or turquoise accents
How to make it
- Clean the hat base with a lint roller to ensure no dust interferes with the adhesive; the felt should look smooth and uniform in color.
- Wrap your ribbon around the base of the crown, pulling it tight until there are no puckers; secure the overlap with a small dab of glue at the back.
- Apply rhinestone fringe to the underside of the brim using E6000; work in 2-inch sections, holding the trim in place for 30 seconds until the bond begins to set.
- If using dried flowers, group them into a ‘mini bouquet’ first and wrap the stems in floral wire before tucking them into the ribbon band.
- Balance the weight of your decorations; if you add heavy charms to one side, add a similar visual weight (like a larger floral cluster) to the opposite side.
- Allow the hat to dry undisturbed for a full 24 hours in a cool, dry place; the glue is ‘done’ when it is completely hard to the touch and no longer smells of solvent.
How to Refresh Front Yard Decor for a Welcoming Home Entrance
[IMAGE_10]
Why we love this
Your front yard is your home’s first impression, and refreshing it for the transition of seasons is the best way to welcome guests and yourself. We love the layering of textures—the scratchy warmth of a coir doormat, the smooth glaze of ceramic planters, and the soft movement of ornamental grasses in the breeze. There is a deep satisfaction in seeing a well-lit path and a vibrant wreath that signals a home that is loved and cared for. It creates a ‘curb appeal’ that feels both prestigious and approachable, making the simple act of coming home feel like a special occasion every day.
Essential Elements:
- Oversized ceramic or stone planters
- Layered doormats (a patterned rug under a coir mat)
- Seasonal wreath (eucalyptus for summer, dried wheat for autumn)
- Solar-powered path lights with a warm glow
- Updated house numbers in a modern font
- New hardware (doorknob or knocker) in matte black or brass
How to make it
- Sweep and spray down the porch or entryway; look for the removal of all cobwebs and dust as the ‘doneness’ cue for a fresh start.
- Layer a 3×5 outdoor rug underneath your standard size coir doormat; the rug should peek out at least 4 inches on all sides to create a ‘framed’ look.
- Select plants for your containers using the ‘thriller, filler, spiller’ method: a tall grass in the center, mounded flowers around it, and trailing vines over the edge.
- Install house numbers using a template to ensure they are perfectly level; drill pilot holes first to prevent the siding or wood from splitting.
- Hang your wreath at eye level (roughly 57 inches from the ground); use a magnetic or over-the-door hanger to avoid damaging the door’s finish.
- Check your solar lights at dusk; ensure they are spaced 2-3 feet apart along the walkway to provide a continuous ‘guide’ of light without looking like a runway.
Conclusion: Embracing the Shift
Transitioning your space from the breezy freedom of summer to the curated elegance of autumn is more than a chore; it’s a celebration of the seasons of our lives. By focusing on sensory details—the scent of citrus, the texture of a knit throw, or the glow of a well-placed lantern—you create a home that breathes with you. Take these ideas and make them your own, allowing your personal style to shine through every DIY project and decor choice. Here’s to a season of beauty, warmth, and elevated living.