
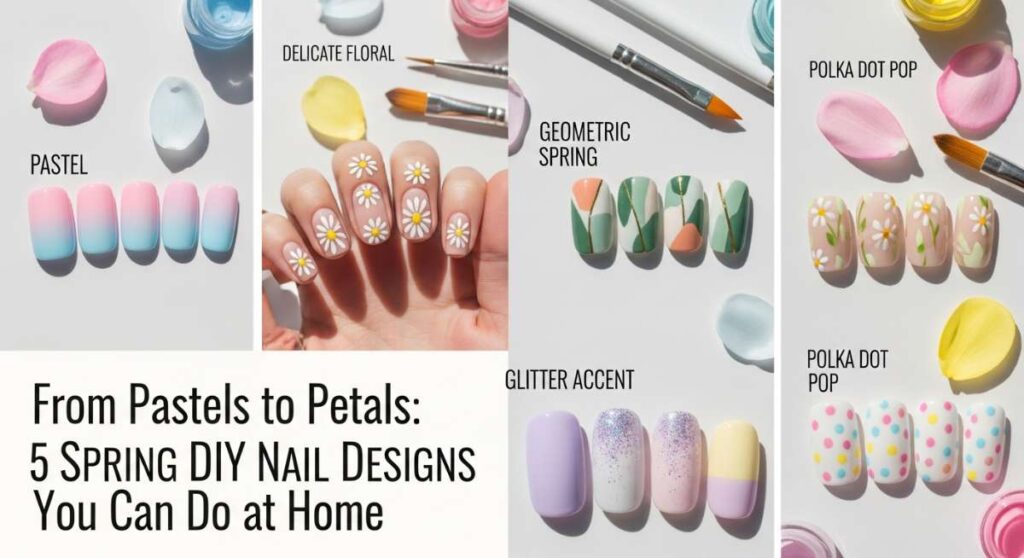
From Pastels to Petals: 5 Spring DIY Nail Designs You Can Do at Home
Hello, my beautiful souls. As the frost melts away and the first blossoms begin to peek through the soil, I can’t help but feel a sense of renewal deep within. Spring isn’t just a season; it’s a gentle reminder from the earth that we can all bloom again. There is something so incredibly therapeutic about sitting down in a sun-drenched corner of your home, tea in hand, and taking a moment for yourself to create something beautiful.
Lately, I’ve been obsessed with how our fingertips can reflect the joy of the changing weather. DIY nail art has become my favorite way to practice mindfulness. It’s not about perfection, loves—it’s about the process of playing with color and expressing your inner light. Today, I’m sharing my favorite spring and summer inspirations to help you turn your home manicure into a cloud-soft embrace of creativity.
4 Steps to Funky Spring Nails
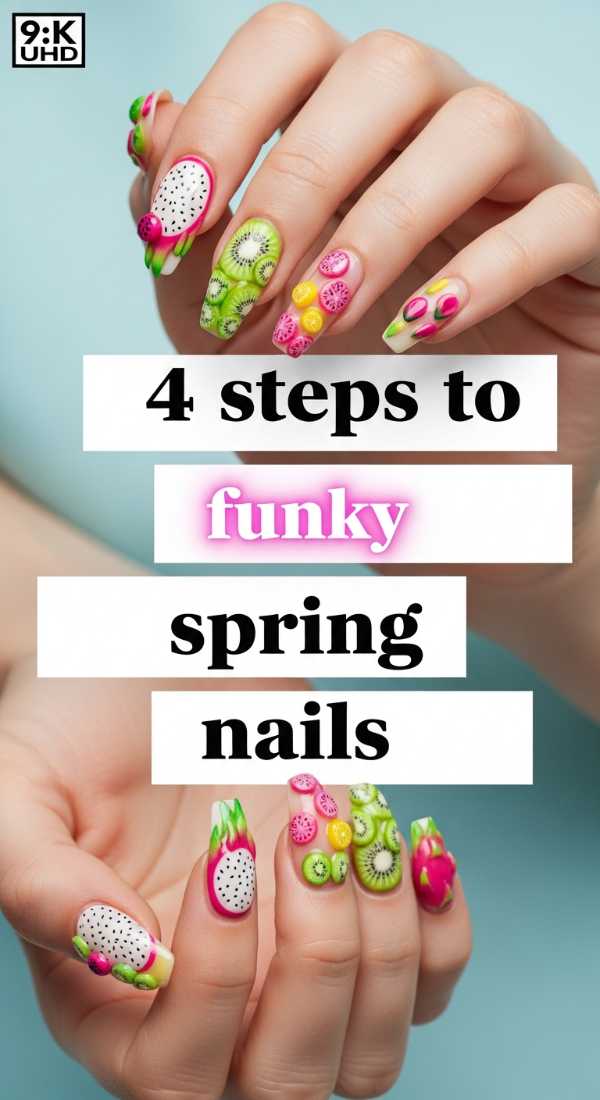
Why to love this Design:
These funky spring nails are all about breaking the rules and embracing your whimsical side. It’s a design that feels like a party on your fingertips, perfect for those days when you need an extra boost of sunshine and confidence.
Essential Elements:
- Mismatched pastel shades
- Abstract swirl patterns
- A high-shine top coat
- Precision detailing brush
How to Prepare:
- Apply a clear base coat to protect your natural nails.
- Paint each nail a different pastel base color (think lavender, mint, and baby blue).
- Using a thin brush, paint ‘funky’ wavy lines in a contrasting bright color.
- Seal the look with a gel-like top coat for durability.
Budget Range
- Essie Pastel Collection ($9.00)
- Nail Art Brush Set ($6.00)
- Seche Vite Dry Fast Top Coat ($10.00)
5 Ways to Style Red Prom Nails
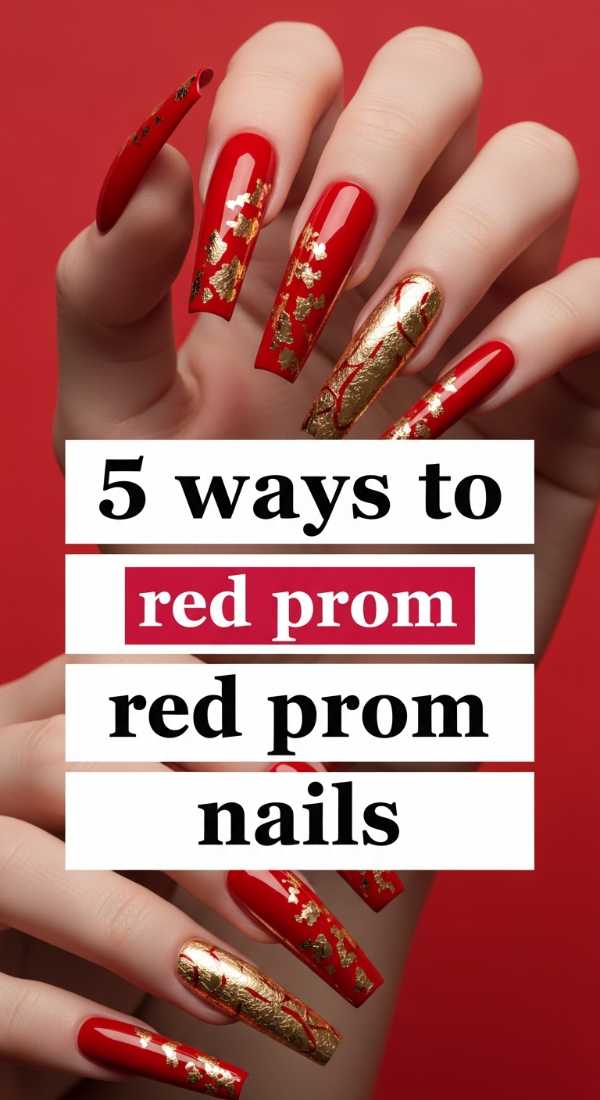
Why to love this Design:
Red is a timeless statement of power and elegance. For prom season, styling red nails allows you to channel classic Hollywood glamour while adding a modern, youthful twist that complements almost any dress color.
Essential Elements:
- Deep crimson or bright cherry polish
- Gold foil accents
- Matte top coat (optional)
- Swarovski crystals
How to Prepare:
- The Classic: A high-gloss solid red for ultimate sophistication.
- The Sparkle: Add a gold glitter gradient starting from the cuticle.
- The Modern Edge: Use a matte top coat over a deep burgundy.
- The Accent: Leave the ring finger for a full-on rhinestone statement.
- The French Twist: A red tip instead of the traditional white.
Budget Range
- OPI ‘Big Apple Red’ ($11.00)
- Gold Leaf Nail Foil ($5.00)
- Nail Rhinestone Kit ($8.00)
Paint Sunflower Nail Art in 3 Minutes
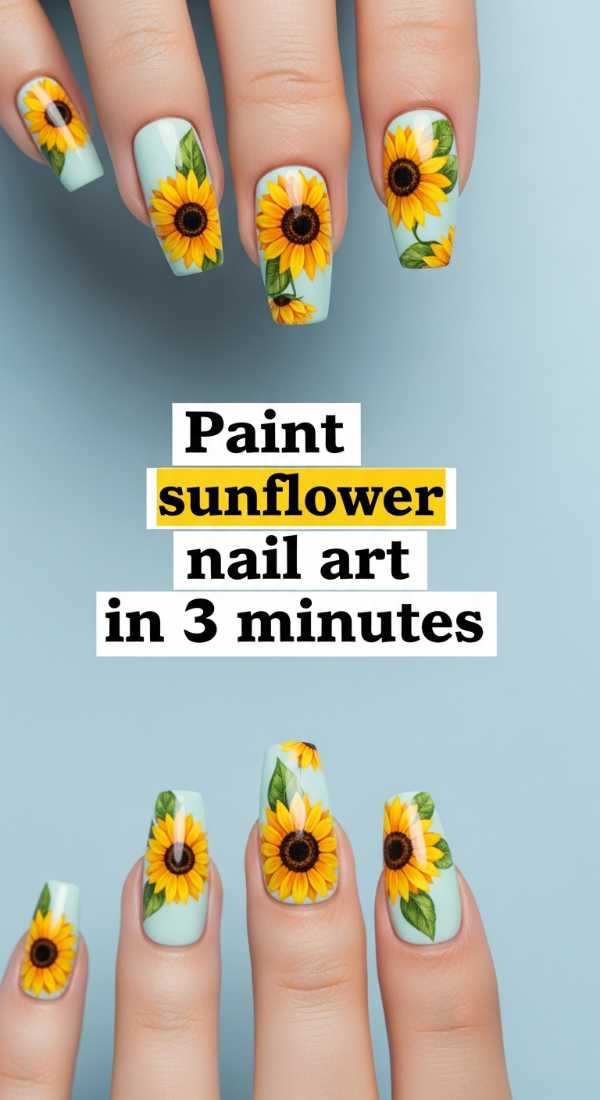
Why to love this Design:
Sunflowers are the ultimate symbol of happiness and loyalty. This design is surprisingly quick to master, giving you a professional, hand-painted look without the hours of frustration. It’s pure joy in a bottle!
Essential Elements:
- Butter yellow polish
- Chocolate brown polish
- Dotting tool
- Clear top coat
How to Prepare:
- Place a large brown dot in the center or corner of your nail using a dotting tool.
- Using a thin brush or toothpick, pull yellow ‘petals’ outward from the brown center.
- Add tiny black or dark brown dots inside the center for texture and let dry before sealing.
Budget Range
- Sally Hansen Insta-Dri Yellow ($5.00)
- Revlon ColorStay Brown ($8.00)
- Wooden Dotting Tools ($3.00)
6 Simple Funky Nails Ideas
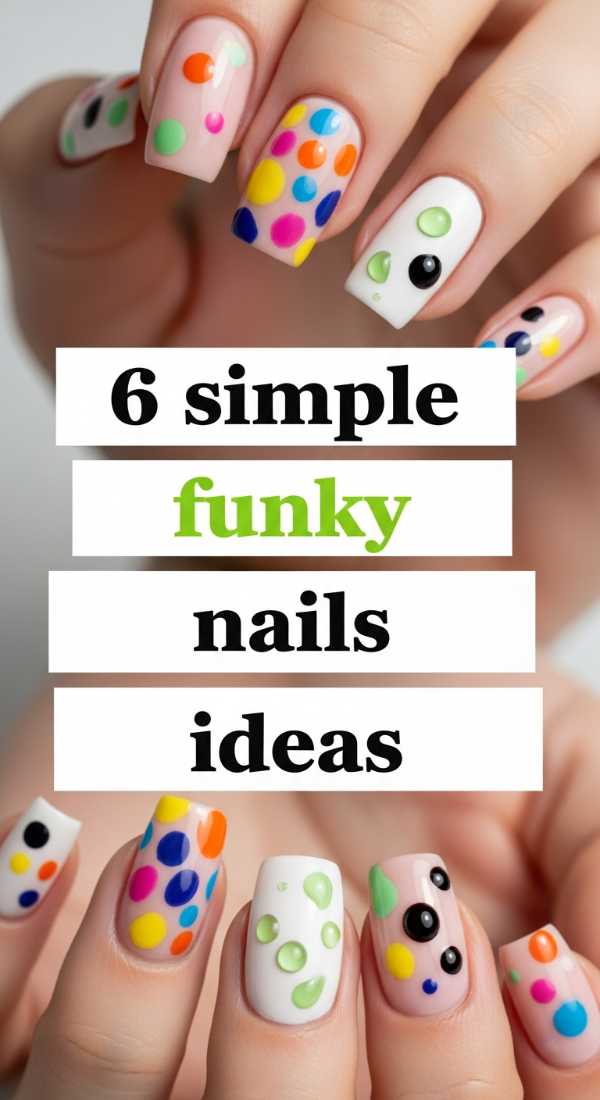
Why to love this Design:
Sometimes we want ‘funky’ without the fuss. These simple ideas are designed for the girl on the go who still wants her nails to tell a story of creativity and playfulness.
Essential Elements:
- Neon accents
- Negative space designs
- Matte and gloss mix
- Geometric stickers
How to Prepare:
- Dotty Delight: Simple neon dots over a nude base.
- Checkerboard: Small squares on just the ring finger.
- Side Stripes: Two vertical lines on the edge of the nail.
- Half-Moon: Painting only the bottom half of the nail.
- Cow Print: Organic black blobs over a white base.
- Micro-French: A tiny, thin neon line at the very tip.
Budget Range
- Neon Polish Set ($12.00)
- Nail Stripping Tape ($4.00)
- Nude Base Coat ($7.00)
Apply Hot Coral Nails in 5 Steps

Why to love this Design:
Hot coral is the bridge between spring sweetness and summer heat. It looks incredible on every skin tone and instantly makes you feel like you’re sitting poolside with a cold drink in your hand.
Essential Elements:
- Vibrant coral lacquer
- Buffing block
- Cuticle oil
- Long-wear top coat
How to Prepare:
- Buff the nail surface gently to ensure a smooth application.
- Apply a sticky base coat to prevent the pigment from staining.
- Apply one thin layer of coral, let dry, and then apply a second thicker layer.
- Clean the edges with a brush dipped in acetone for a salon finish.
- Apply cuticle oil once the top coat is dry to make the color pop.
Budget Range
- Zoya Coral Polish ($12.00)
- SolarOil Cuticle Care ($9.00)
- Professional Buffing Block ($2.00)
8 Almond Nail Inspo Spring Styles
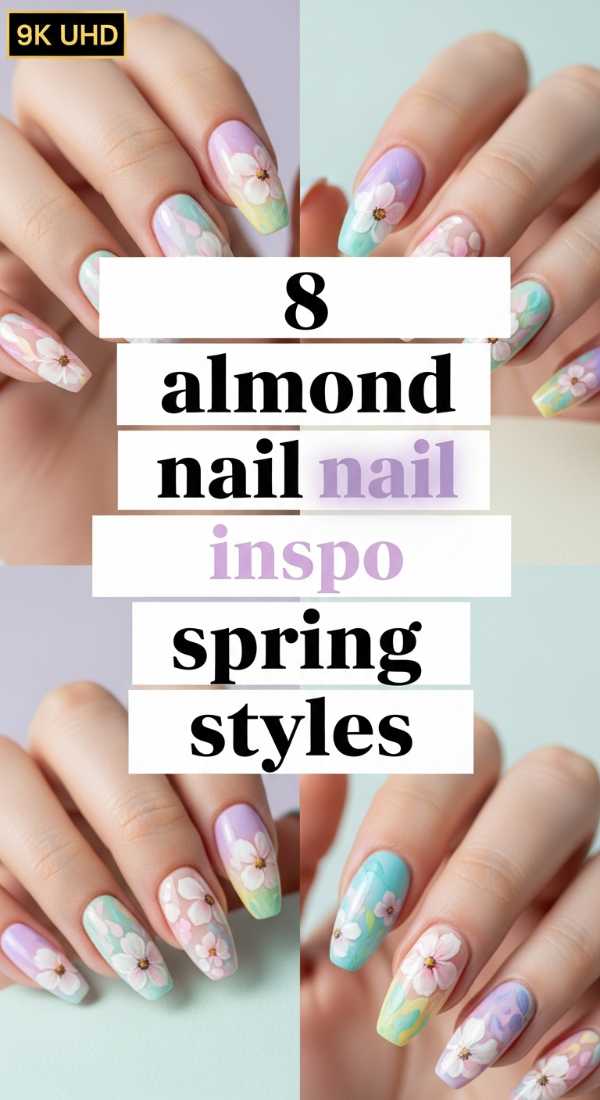
Why to love this Design:
Almond shapes are incredibly flattering as they elongate the fingers. Combining this elegant shape with soft spring aesthetics creates a look that is both sophisticated and ethereal.
Essential Elements:
- Almond-shaped tips or files
- Soft lavender and peach hues
- Pearl pigments
- Floral decals
How to Prepare:
- Shape the nails into a tapered point with a rounded tip.
- Styles to try: 1. Lavender Ombre, 2. Peach Fuzz Matte, 3. Tiny Daisies, 4. Pearl Glaze, 5. Mint Tips, 6. Sky Blue Marble, 7. Gold Leaf Veins, 8. Sheer Pink Minimalist.
Budget Range
- Glass Nail File ($10.00)
- Pearl Chrome Powder ($7.00)
- Floral Nail Stickers ($5.00)
4 Baseball Nails Design Mom Tutorials
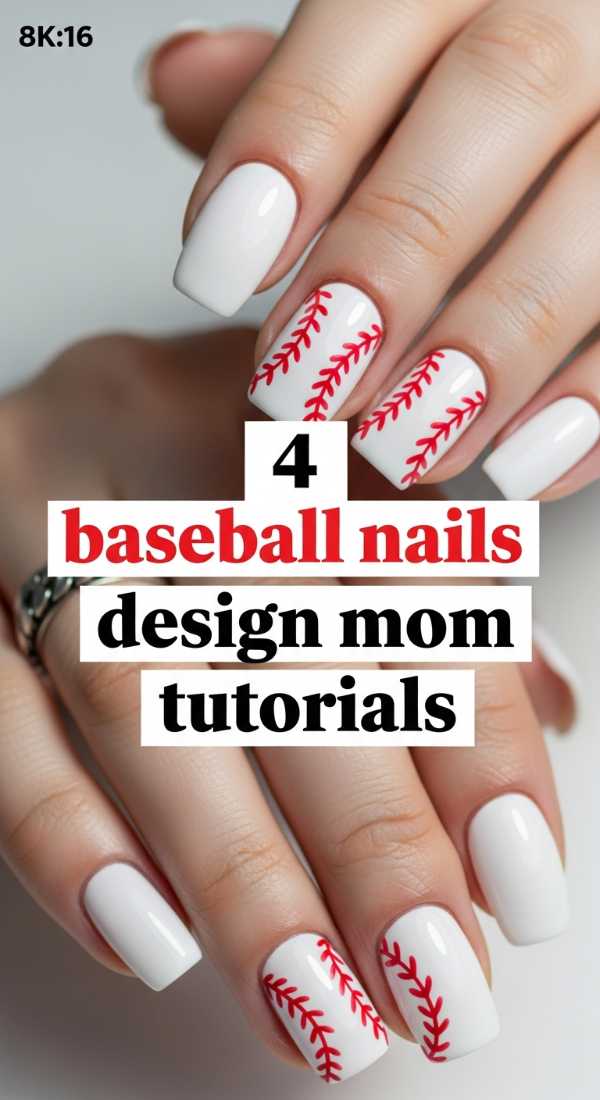
Why to love this Design:
For my sports moms out there, this is for you! It’s a sweet way to show support for your little athletes while keeping your mani stylish and themed for game day.
Essential Elements:
- True white polish
- Red detailing pen
- Team color accents
- Strength-building base coat
How to Prepare:
- The Stitch: Paint a white base and draw two curved red lines with tiny ‘V’ stitches.
- The Jersey: Use team colors to create a ‘half and half’ design.
- The Bling Ball: A silver glitter nail with red baseball stitches.
- The Mascot: A simple accent nail in the team’s primary color with a ‘Go Team’ dot.
Budget Range
- Nail Art Pens ($8.00)
- Pure White Polish ($6.00)
- Glitter Polish Accent ($9.00)
Get 10 Summer Nail Inspo Looks
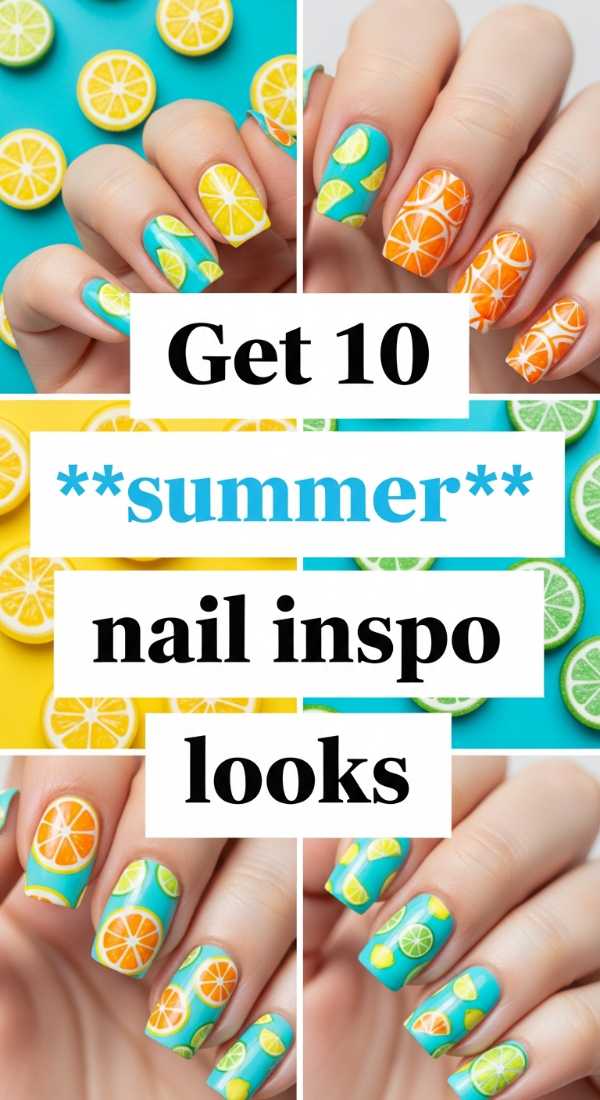
Why to love this Design:
Summer is the season of adventure! These looks are inspired by sunsets, tropical fruits, and the sparkling ocean, designed to keep your vibe high all vacation long.
Essential Elements:
- Fruit decals (watermelons/lemons)
- Ocean blue gradients
- Sunset orange and pinks
- Jelly polish finishes
How to Prepare:
- Try designs like: Watermelon tips, Sunset gradients, Ocean waves, Lemon slices, Palm tree silhouettes, Gingham patterns, Shell textures, Abstract neons, Jelly tints, and Iridescent chrome.
Budget Range
- Summer Decal Mega-Pack ($10.00)
- Jelly Polish Set ($15.00)
- Sponge for Ombre ($3.00)
Create 7 Stunning Nail Designs
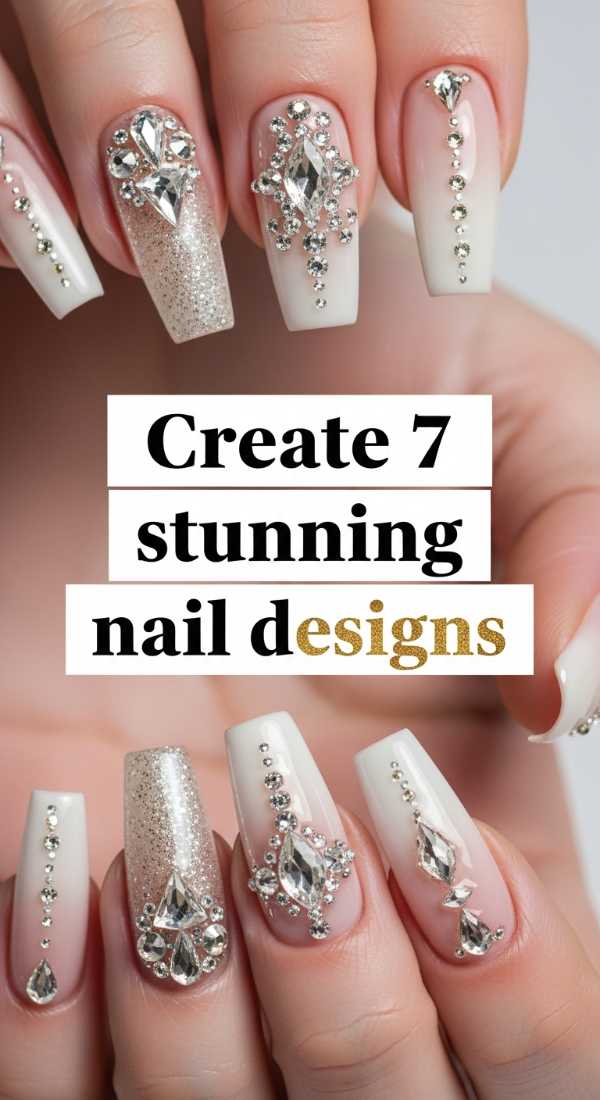
Why to love this Design:
These are the ‘showstoppers.’ If you have a special event or just want to feel extra glamorous, these seven designs use textures and light to create a stunning visual impact.
Essential Elements:
- Velvet magnetic polish
- Cat-eye magnets
- Chrome powders
- Geometric stencils
How to Prepare:
- Choose from: 1. Velvet Magnetic, 2. Holographic Chrome, 3. Geometric Foil, 4. Deep Marble, 5. 3D Gel Flowers, 6. Encapsulated Glitter, 7. Tortoiseshell.
Budget Range
- Magnetic Polish Wand ($13.00)
- Holographic Powder ($8.00)
- Geometric Stencil Kit ($6.00)
3 Steps for Butter Yellow Nails Chrome
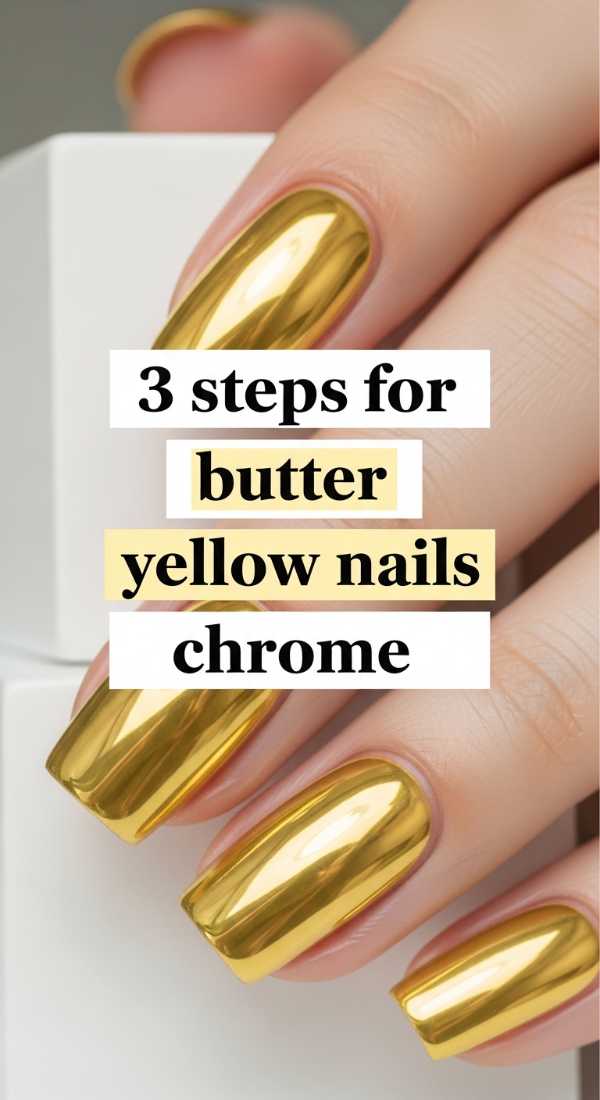
Why to love this Design:
Butter yellow is the ‘it’ color of the year. Adding a chrome finish turns a soft, cozy color into something futuristic and chic. It’s like a sunbeam captured on your nails.
Essential Elements:
- Butter yellow gel or polish
- Yellow or silver chrome powder
- No-wipe top coat
How to Prepare:
- Apply two coats of butter yellow polish and let dry (or cure if gel).
- Use a sponge applicator to rub chrome powder over the surface until it shines.
- Seal with a no-wipe top coat to lock in the metallic mirror effect.
Budget Range
- Butter Yellow Polish ($9.00)
- Chrome Mirror Powder ($6.00)
- No-Wipe Gel Top Coat ($10.00)
Bloom Where You Are Planted
I hope these designs inspire you to take a little time for yourself this week, my loves. Whether you go for the funky pastels or the soft butter yellow chrome, remember that your hands do so much for you every day—they deserve to be treated with love and a splash of color. Happy painting!