
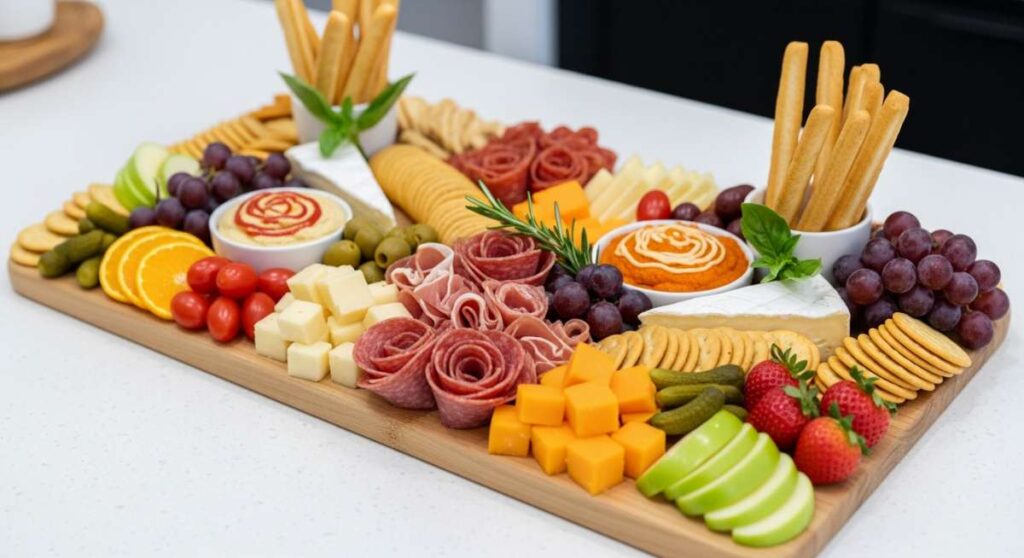
We’ve all been there—the doorbell is about to ring, your friends are parking their cars, and you realize you haven’t even started the appetizers. There’s a specific kind of panic that sets in when you want to be the ‘host with the most’ but your kitchen looks more like a disaster zone than a Pinterest board. That’s exactly how the Viral Simple Food Board hack was born in my kitchen; it was a desperate attempt to make a random assortment of pantry staples look like a curated masterpiece.
The magic of this hack isn’t just about the food; it’s about the feeling of abundance and the effortless joy of grazing. By transforming individual dishes into a communal board experience, we strip away the formality of dinner parties and replace it with laughter, shared plates, and a sense of cozy togetherness. It turns the most basic ingredients—even those tucked away in the back of your cupboard—into a feast for the eyes and the soul.
Today, I’m showing you how to take this viral concept and apply it to every single craving you might have. Whether you’re hosting a backyard bash or just looking to elevate your Tuesday night dinner, these boards are your secret weapon for stress-free, beautiful entertaining. Let’s dive into the ultimate guide to building boards that will have your guests reaching for their phones to snap a photo before they even take a bite.
How to grill juicy bbq?

Why we love this
There is nothing quite like the intoxicating aroma of woodsmoke mingling with the sweet, tangy scent of caramelized sugar from a thick BBQ glaze. When you pull that perfectly grilled meat off the grates, the exterior should have a slight, satisfying char—a crisp bark that gives way to an incredibly tender, melt-in-your-mouth interior. The heat of the grill transforms the fats into liquid gold, ensuring every bite is a succulent explosion of savory flavors that remind us of long summer evenings and the crackle of an open flame.
Ingredients
- Prime cuts of brisket or pork ribs
- Dry rub (brown sugar, smoked paprika, garlic powder, onion powder, cayenne)
- High-quality apple cider vinegar for spritzing
- Signature thick BBQ sauce
- Hickory or mesquite wood chips
How to make it
- Prepare your meat by trimming excess fat but leaving enough for flavor; then, apply a generous layer of dry rub, pressing it firmly into the fibers at least two hours before grilling.
- Set up your grill for two-zone cooking: pile the coals on one side for high direct heat and leave the other side for indirect, low-and-slow cooking.
- Place the meat on the cool side of the grill, maintaining a steady temperature between 225°F and 250°F. Add soaked wood chips to the coals to initiate the smoking process.
- Every 45 minutes, lightly spritz the meat with apple cider vinegar to keep the surface moist and help develop a deep, rich smoke ring.
- Once the internal temperature reaches 165°F, wrap the meat tightly in butcher paper or heavy-duty foil to preserve juices during the final tenderizing phase.
- Continue cooking until the internal temperature hits 203°F (the ‘sweet spot’ where collagen breaks down completely); then, let it rest in a cooler or warm oven for at least one hour before slicing.
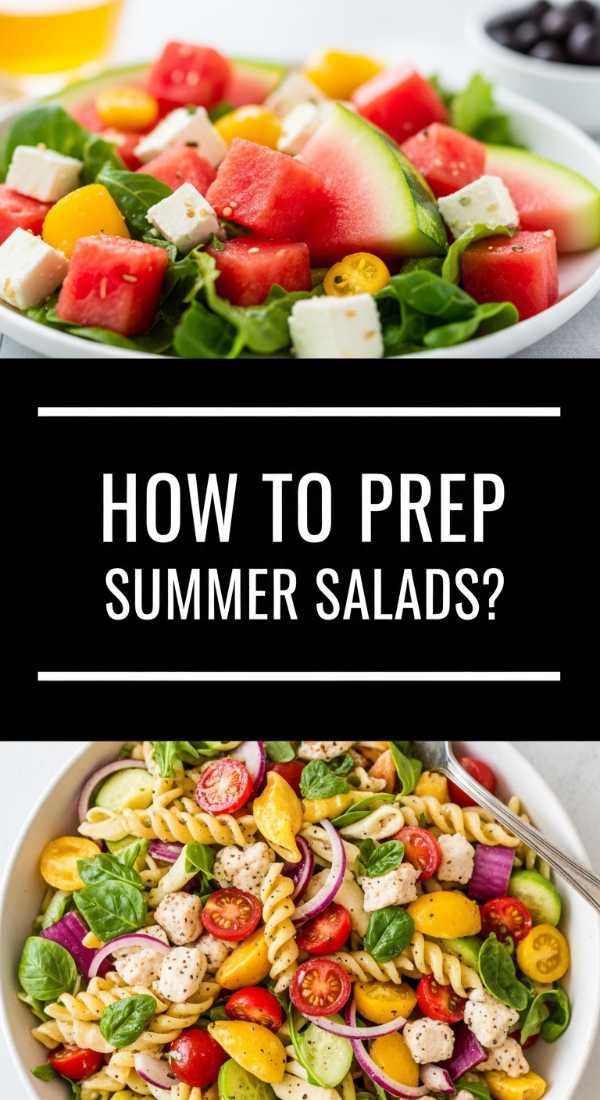
How to prep summer salads?
Why we love this
A true summer salad is a symphony of textures and temperatures, bringing together the icy crunch of garden-fresh cucumbers with the velvet softness of ripened heirloom tomatoes. We love the way a bright, zesty vinaigrette awakens the palate, cutting through the heat of a July afternoon with notes of lemon and fresh basil. It feels like eating sunshine; the colors are vibrant, the flavors are clean, and there’s a refreshing lightness that leaves you feeling energized rather than weighed down.
Ingredients
- Mixed baby greens and arugula
- Heirloom tomatoes and Persian cucumbers
- Feta cheese or goat cheese crumbles
- Toasted pine nuts or sunflower seeds
- Dressing: Extra virgin olive oil, fresh lemon juice, Dijon mustard, and honey
How to make it
- Start by washing your greens in ice-cold water and using a salad spinner to ensure they are bone-dry; dressing will not adhere to wet leaves, leading to a soggy salad.
- Slice your tomatoes and cucumbers into uniform, bite-sized pieces and place them in a separate bowl with a pinch of sea salt to draw out a bit of their natural juices.
- Whisk your dressing ingredients in a small jar until fully emulsified; the Dijon acts as a binder to keep the oil and acid from separating.
- In a large wide-rimmed bowl, toss the dry greens with just enough dressing to lightly coat them—do not over-saturate.
- Layer the salted vegetables and cheese over the greens, rather than mixing them in, to keep the presentation clean and prevent the cheese from becoming muddy.
- Finish with a final drizzle of dressing, a crack of black pepper, and the toasted nuts for that essential textural contrast.
How to make japanese ramen?

Why we love this
Ramen is the ultimate comfort food, a deep bowl of umami-rich liquid gold that feels like a warm hug for the soul. The broth should be complex and layered, with the richness of the bones and aromatics lingering on the tongue, while the noodles offer a bouncy, springy resistance that is incredibly satisfying to slurp. The addition of a jammy, marinated egg with its creamy yolk adds a luxurious fattiness that ties the whole experience together in a perfect balance of salty, savory, and silk.
Ingredients
- Fresh ramen noodles (alkaline noodles)
- Pork or chicken bones for broth, combined with kombu and dried shiitake
- Tare: Soy sauce, mirin, and sake base
- Toppings: Chashu pork belly, soft-boiled marinated eggs (Ajitsuke Tamago), nori, and scallions
- Aromatic oil: Garlic or black garlic oil (Mayu)
How to make it
- Boil the bones for 10 minutes, then drain and scrub them to remove impurities; this ensures your final broth is clean and not cloudy or bitter.
- Simmer the cleaned bones with aromatics like ginger, garlic, and leeks for at least 6-12 hours on a very low flame to extract all the collagen and flavor.
- Prepare the ‘Tare’ by simmering soy sauce, mirin, and sake together until slightly reduced, providing the concentrated seasoning for the bowl.
- Cook the noodles in a separate pot of rapidly boiling water for exactly the time indicated on the package (usually 1-2 minutes) to maintain an ‘al dente’ texture.
- Assemble the bowl by placing 2 tablespoons of tare at the bottom, pouring in 12 ounces of piping hot broth, and whisking gently to combine.
- Carefully fold the noodles into the broth, then artfully arrange your toppings on top, finishing with a drizzle of aromatic oil for a professional sheen.
How to cook high protein?

Why we love this
Focusing on high-protein cooking doesn’t mean sacrificing flavor; it’s about celebrating the natural richness of high-quality meats and plant-based sources. We love the golden-brown crust of a perfectly seared chicken breast or the hearty, earthy bite of seasoned lentils. These dishes are deeply satisfying, providing a slow release of energy that keeps you feeling full and focused, all while delivering a savory punch that makes healthy eating feel like a gourmet indulgence.
Ingredients
- Lean proteins: Chicken breast, wild-caught salmon, or extra-firm tofu
- Legumes: Chickpeas, black beans, or lentils
- Greek yogurt for high-protein sauces
- Quinoa or edamame for side components
- Fresh herbs: Parsley, cilantro, and mint
How to make it
- For chicken or tofu, pat the surface completely dry with paper towels to ensure a crisp sear; moisture is the enemy of the Maillard reaction.
- Season aggressively with salt and spices, allowing them to sit for 15 minutes to penetrate the protein.
- Heat a cast-iron skillet over medium-high heat until a drop of water sizzles and evaporates instantly; add a high-smoke-point oil like avocado oil.
- Lay the protein in the pan away from you and leave it undisturbed for 4-5 minutes until a deep golden crust forms and the meat releases naturally from the pan.
- Flip and cook until the internal temperature reaches the safe zone (165°F for chicken, 145°F for fish), then let it rest for 5 minutes to allow the juices to redistribute.
- Serve alongside a protein-packed dip made of Greek yogurt blended with lemon and herbs to add moisture and even more nutritional value.
How to make shower snacks?

Why we love this
The ‘shower snack’ is the ultimate ritual of self-care and unexpected luxury. There is a wild, sensory contrast between the hot, billowing steam of the shower and the icy, crisp snap of cold fruit or a refreshing beverage. We love the way a chilled grape or a slice of sharp cheese tastes when your senses are heightened by the humidity and the sound of falling water; it’s a moment of pure, unadulterated indulgence that makes a daily routine feel like a spa getaway.
Ingredients
- Frozen grapes or chilled citrus slices
- Hard cheeses (like aged cheddar or manchego) that won’t melt easily
- Icy cold sparkling water or a light kombucha
- A waterproof or suction-cup ledge/tray
- Dried nuts or crackers in a sealed container
How to make it
- Select snacks that are ‘finger-friendly’ and won’t crumble or create a mess when handled with wet hands; avoid anything with a delicate pastry or loose salt.
- Place your grapes in the freezer for 30 minutes prior to your shower to give them an icy, sorbet-like texture.
- Use a heavy-bottomed glass or a specialized shower-safe cup holder to prevent your beverage from tipping over on slippery surfaces.
- Position your snack tray away from the direct spray of the showerhead to keep your crackers crisp and your cheese dry.
- Keep portions small and manageable, focusing on high-flavor items that provide a quick burst of energy and refreshment.
- Focus on the temperature play: ensure your food is as cold as possible to contrast with the steam for the maximum sensory effect.
How to pack picnic foods?

Why we love this
Picnic food is all about the romance of the outdoors and the practicality of portable, handheld delights. We love the way a well-packed basket holds the promise of an afternoon spent under the shade of an oak tree, with jars filled with colorful layers and sandwiches that have pressed together to create a unified, flavorful bite. It’s food designed to be shared on a blanket, where the fresh air makes everything taste just a little bit better and the casual nature of the meal invites hours of conversation.
Ingredients
- Sturdy bread (baguette or sourdough) for sandwiches
- Cured meats and hard cheeses
- Mason jar salads (dressing at the bottom!)
- Fresh berries and grapes
- Individual quiches or savory tarts
How to make it
- When making sandwiches, apply a thin layer of butter or cream cheese to both slices of bread; this creates a moisture barrier that prevents the bread from getting soggy from fillings.
- For jarred salads, pour the dressing in first, followed by hard vegetables like carrots or chickpeas, then the softer veggies, and finally the greens at the very top.
- Wrap individual portions in parchment paper and tie with twine; this looks beautiful and acts as a built-in plate when you’re sitting on the grass.
- Use frozen water bottles as ice packs in your cooler; they keep the food cold and provide chilled water to drink as they melt throughout the day.
- Pack heavy items at the bottom of the basket and delicate items like berries or chips at the top to prevent crushing during transport.
- Don’t forget a small cutting board and a multi-tool knife for any on-site slicing of cheese or fruit to keep the flavors fresh.
How to bake tea treats?

Why we love this
Baking tea treats is an exercise in elegance and subtle sweetness. We love the way the kitchen fills with the warm, comforting scent of butter and vanilla, signaling that it’s time to slow down and enjoy a cup of Earl Grey. The perfect tea treat should be delicate—a crumbly shortbread that dissolves on the tongue or a light-as-air sponge cake topped with a hint of floral glaze. They are bite-sized moments of joy that perfectly complement the tannins in a well-brewed tea.
Ingredients
- High-quality European butter (higher fat content)
- Fine pastry flour or cake flour
- Fresh lemon zest or lavender buds
- Powdered sugar for delicate glazes
- Clotted cream and jam for scones
How to make it
- Ensure all your ingredients, especially butter and eggs, are at room temperature to allow for a smooth, homogenous batter that rises evenly.
- When making shortbread or scones, use a light hand; over-mixing the dough develops gluten, which will make your treats tough rather than tender and flaky.
- Cream the butter and sugar for at least 5 minutes until the mixture is pale and fluffy; this incorporates air which helps the treats stay light.
- Bake at a slightly lower temperature (around 325°F) for a longer period to ensure the treats are cooked through without browning too much, preserving their delicate color.
- Let your treats cool completely on a wire rack before applying any glaze or icing to prevent it from melting and running off the sides.
- Serve on a tiered stand with plenty of small napkins and individual spreaders for cream and jam to elevate the ritual of tea time.
How to make healthy bowls?

Why we love this
Healthy bowls are a celebration of the ‘rainbow’ on your plate, offering a satisfying mix of grains, greens, and vibrant toppings. We love the versatility of a bowl; you can layer nutty quinoa with roasted sweet potatoes, creamy avocado, and a punchy fermented element like kimchi or sauerkraut. Every bite is different, keeping your taste buds engaged while providing a balanced profile of nutrients that leave you feeling nourished and glowing from the inside out.
Ingredients
- Base grain: Quinoa, farro, or brown rice
- Roasted vegetables: Sweet potatoes, broccoli, or cauliflower
- Fresh greens: Kale, spinach, or shredded cabbage
- Healthy fats: Avocado, hemp seeds, or tahini
- Protein: Chickpeas, soft-boiled egg, or grilled tempeh
How to make it
- Start by seasoning your grains while they are still hot with a splash of rice vinegar or lemon juice to infuse them with flavor from the base up.
- Roast your vegetables at a high heat (400°F) with a drizzle of olive oil and sea salt until they have caramelized edges; this adds a depth of sweetness and texture.
- Massage your kale with a little olive oil and salt for 2 minutes to break down the tough fibers, making it much more tender and easier to digest.
- Arrange the components in ‘sectors’ around the bowl rather than mixing them; this allows you to choose your own adventure with every forkful.
- Make a ‘hero sauce’—like a lemon-tahini or a ginger-miso dressing—and drizzle it generously over the top to tie all the disparate flavors together.
- Finish with ‘sprinkles’ of toasted seeds, microgreens, or red pepper flakes to add visual appeal and a final layer of crunch.
How to prep party foods?

Why we love this
Party food is the ultimate icebreaker, designed to be eaten with one hand while holding a drink in the other. We love the variety of textures and bold flavors that come with a well-prepped spread—the crunch of a crostini, the creaminess of a warm dip, and the salty hit of an olive. It’s about creating a festive atmosphere where guests feel comfortable hovering over the table, trying a little bit of everything, and coming back for seconds (and thirds).
Ingredients
- Assorted crackers and toasted baguette slices
- Dips: Spinach artichoke, hummus, and spicy feta
- Skewers: Caprese, antipasto, or fruit
- Warm appetizers: Pigs in a blanket or mini quiches
- Garnishes: Fresh herbs, pomegranate seeds, and nuts
How to make it
- Prep as much as possible 24 hours in advance; chop vegetables, make cold dips, and skewer your appetizers so you aren’t stuck in the kitchen during the party.
- Focus on ‘high-low’ styling: pair expensive cheeses with simple store-bought crackers, but present them on a beautiful marble or wooden board.
- Keep your warm appetizers in the oven on a ‘warm’ setting (170°F) until the first guest arrives, ensuring they are served at the optimal temperature.
- Use various heights on your food table—use books or small boxes under your tablecloth to create levels for your platters, making the spread look more abundant.
- Include a ‘DIY’ element, like a taco bar or a crostini station, which engages guests and takes the pressure off you to plate everything individually.
- Always over-estimate the amount of napkins and small plates needed; people tend to grab a new one every time they revisit the table.
How to cook dinner foods?

Why we love this
Dinner food is the anchor of the day, a time to transition from the busyness of life to the warmth of the home. We love the classic, savory notes of a roasting chicken or a slow-simmered ragu that fills the house with a sense of peace and anticipation. It’s about hearty portions, rich sauces, and the simple pleasure of a meal that feels complete. Whether it’s a one-pan roast or a labor-of-love pasta, dinner is where we find our most profound sense of comfort and connection.
Ingredients
- Quality protein: Whole chicken, chuck roast, or pasta
- Aromatics: Onion, celery, and carrots (the classic mirepoix)
- Fresh herbs: Rosemary, thyme, and sage
- Deglazing liquid: Dry white wine or high-quality stock
- Starch: Yukon gold potatoes or artisanal pasta
How to make it
- Start by browning your meat in a heavy Dutch oven; the brown bits stuck to the bottom (the fond) are the secret to a professional-tasting sauce.
- Remove the meat and sauté your aromatics in the rendered fat until softened and translucent, scraping the bottom of the pan to release that flavor.
- Deglaze the pan with a splash of wine or stock, using a wooden spoon to incorporate all the savory bits into the liquid before returning the meat to the pot.
- For roasts, cook ‘low and slow’ at 300°F until the meat is fork-tender; for pasta, always finish the noodles in the sauce with a splash of starchy pasta water to create a silky emulsion.
- Taste your food constantly and adjust the seasoning at every stage; a final squeeze of lemon or a pinch of salt can transform a dish from good to extraordinary.
- Serve dinner family-style in the middle of the table to encourage sharing and a casual, welcoming atmosphere.
The Final Board Flourish
Whether you’re building a board for a fancy celebration or just trying to survive a hectic weeknight, the Viral Simple Food Board hack is all about intentionality. It’s taking the time to present food in a way that says, “I care about this moment.” I hope these recipes and tips inspire you to clear off your counter, grab your favorite platter, and start building something beautiful. Remember, there are no rules in board-building—only delicious possibilities. Tag me in your creations so I can see how you’re turning your pantry into a party!