

There is something truly magical about the way food brings people together, especially when it looks as good as it tastes. I remember the first time I hosted a dinner party; I was a nervous wreck, worrying if the decor was right or if the house was clean enough. But then I laid out a giant, messy, beautiful board of snacks, and suddenly, the tension evaporated. The room filled with the sound of laughter and the clinking of glasses as everyone gathered around the center of the table, picking at delicious morsels and sharing stories.
Creating a viral-worthy food board isn’t about spending hours in the kitchen or having a culinary degree; it’s about the art of the assembly and the love you put into every bite. In this guide, I’m sharing my secrets for turning ordinary pantry staples into a show-stopping feast that will have your guests reaching for their phones before they even take a bite. From perfectly melted cheeses to the smokiest steaks, we are going to build a board that defines the ‘lifestyle’ in lifestyle blogging.
How to melt perfect cheese?

Why we love this
There is nothing quite like the sight of molten, velvety cheese cascading over a piece of crusty bread or a crisp apple slice. The aroma is comforting and rich, filling the room with a nutty, savory scent that promises pure indulgence. When you hit that perfect temperature, the texture becomes a luxurious, gooey dream that stretches endlessly, making every bite feel like a warm hug for your soul. It is the ultimate centerpiece for any gathering, inviting everyone to dip, swirl, and savor the decadence together.
Ingredients
- 8 oz Wheel of Brie or Camembert
- 2 tablespoons Honey
- 1 teaspoon Fresh Thyme leaves
- 1/4 cup Chopped Walnuts
- Pinch of Sea Salt
How to make it
- Preheat your oven to 350°F (175°C). Ensure the rack is in the center position for even heat distribution.
- Place the cheese wheel in a small oven-safe skillet or a dedicated ceramic brie baker. If using Brie, you can lightly score the top rind in a crosshatch pattern to help the heat penetrate.
- Bake for 12 to 15 minutes. You are looking for the sides to feel soft and bulging; the cheese should feel like a water balloon when lightly pressed.
- Remove from the oven and immediately drizzle with honey, thyme, and walnuts while the surface is still hot.
- Let it rest for 2 minutes before serving to allow the internal temperature to stabilize, ensuring a smooth, flowing consistency rather than a runny mess.
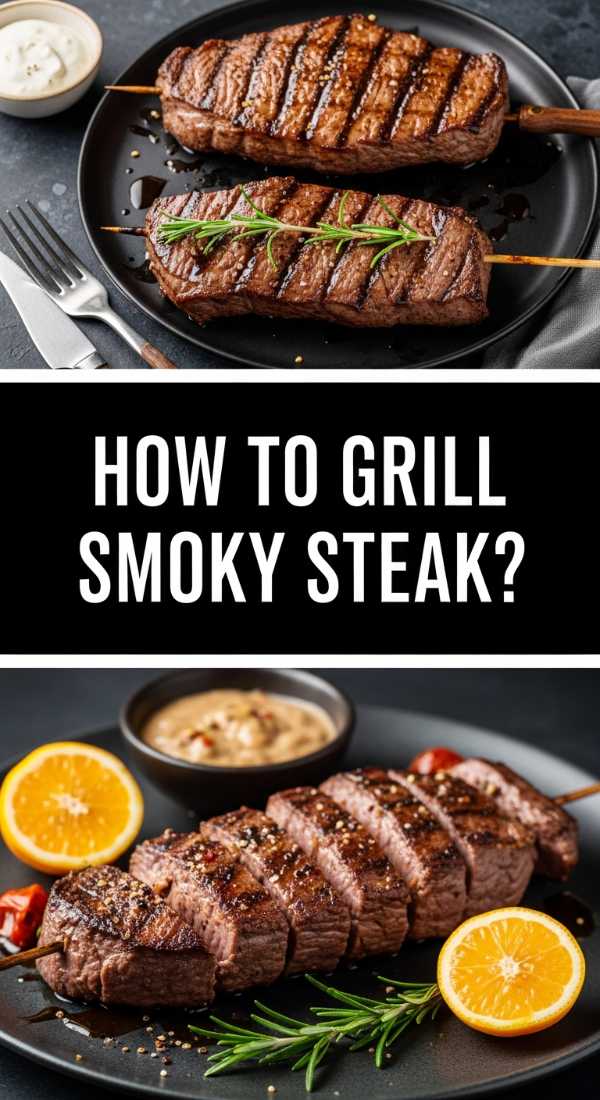
How to grill smoky steak?
Why we love this
A perfectly grilled steak is the crown jewel of any meat-heavy food board, offering a deep, primal satisfaction that only comes from fire and high-quality protein. The exterior develops a dark, salty crust that crackles slightly between your teeth, giving way to a tender, ruby-red center that melts in your mouth. The smokiness from the grill lingers on the palate, elevated by the rich marbling of the fat that has been rendered into liquid gold. It’s an experience that engages all the senses, from the sizzling sound of the sear to the intoxicating scent of charred wood and peppercorns.
Ingredients
- 2 Ribeye or New York Strip steaks (1.5 inches thick)
- 2 tablespoons Coarse Kosher Salt
- 1 tablespoon Cracked Black Pepper
- 3 cloves Garlic, smashed
- 2 sprigs Fresh Rosemary
- 2 tablespoons Unsalted Butter
How to make it
- Take the steaks out of the fridge at least 45 minutes before cooking to bring them to room temperature, ensuring even cooking throughout.
- Pat the meat extremely dry with paper towels; moisture is the enemy of a good crust. Season aggressively with salt and pepper on all sides.
- Preheat your grill to high heat (about 450°F-500°F). Clean and oil the grates to prevent sticking.
- Place steaks on the hottest part of the grill. Sear for 3-4 minutes without moving them to develop a deep crust. Flip and cook for another 3-4 minutes for medium-rare (internal temp of 130°F-135°F).
- During the last minute of grilling, place a small foil pan on the grill with butter, garlic, and rosemary. Once melted, brush this mixture over the steaks.
- Transfer steaks to a cutting board and let them rest for at least 10 minutes. This allows the juices to redistribute so they don’t run out when sliced.
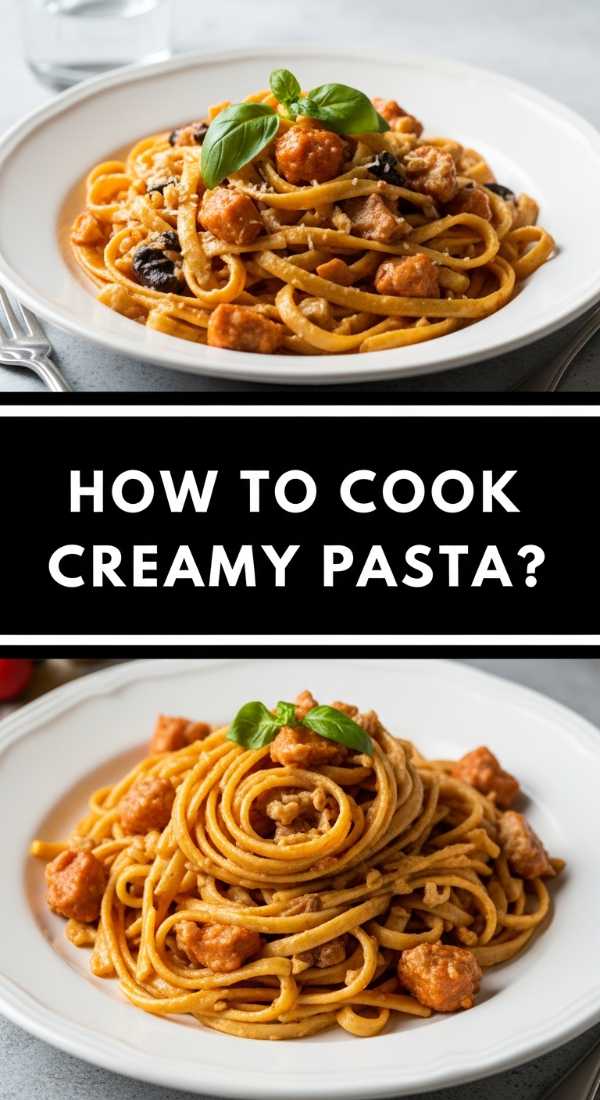
How to cook creamy pasta?
Why we love this
Creamy pasta is the ultimate comfort food, providing a silky, elegant base that ties a variety of board elements together. The texture should be smooth and coating, never clumpy, clinging to every curve of the noodle like a velvet ribbon. The aroma of garlic sautéed in butter combined with the sharp tang of Parmesan creates a fragrance that is both sophisticated and nostalgic. Each forkful offers a balance of rich dairy and perfectly al dente pasta, leaving a lingering warmth that makes you want to go back for seconds and thirds.
Ingredients
- 1 lb Fettuccine or Pappardelle
- 1 cup Heavy Cream
- 1/2 cup Grated Parmesan Cheese
- 4 tablespoons Butter
- 2 cloves Garlic, minced
- Fresh Parsley for garnish
How to make it
- Bring a large pot of heavily salted water to a rolling boil. Cook the pasta for 1-2 minutes less than the package directions suggest to ensure it remains ‘al dente’.
- While the pasta boils, melt butter in a large skillet over medium-low heat. Add minced garlic and cook for 1 minute until fragrant but not browned.
- Whisk in the heavy cream and bring to a gentle simmer. Do not let it boil vigorously, or the cream may break and become oily.
- Before draining the pasta, reserve 1 cup of starchy pasta water. This is the secret to a smooth sauce.
- Add the undercooked pasta directly into the skillet with the cream. Add the Parmesan cheese and 1/4 cup of the reserved pasta water.
- Toss constantly over low heat for 2 minutes. The starch in the water and the cheese will emulsify with the cream, creating a glossy, thick coating. Add more water if it looks too dry.
How to make juicy burgers?

Why we love this
A burger on a board is a playful, interactive element that appeals to the child in everyone, especially when it’s dripping with juice and topped with melted cheese. The contrast between the soft, toasted brioche bun and the savory, charred beef patty is a textural masterpiece. There is a specific joy in seeing the steam rise from a freshly assembled slider, the fat glistening under the light, promising a burst of umami flavor with every bite. It’s messy, it’s fun, and it’s the heartbeat of a casual social gathering.
Ingredients
- 1 lb Ground Beef (80/20 fat ratio)
- Slider Buns
- Cheddar Cheese slices
- Salt and Pepper
- 1 tablespoon Vegetable Oil
- Dill Pickle slices
How to make it
- Portion the beef into 2-ounce balls for sliders. Do not overwork the meat; handle it gently to keep the texture light and airy.
- Heat a cast-iron skillet over high heat until it starts to smoke slightly. Add a tiny bit of oil.
- Place the beef balls in the pan and immediately press them down flat with a heavy spatula until they are about 1/2 inch thick. This creates maximum surface area for the Maillard reaction (the crust).
- Season the tops generously with salt and pepper while the bottom sears for about 2 minutes.
- Flip the patties. They should have a dark, crispy brown crust. Immediately place a square of cheese on each patty.
- Cover the pan with a lid for 30 seconds to steam-melt the cheese. Remove the patties and place them on toasted buns immediately to catch the juices.
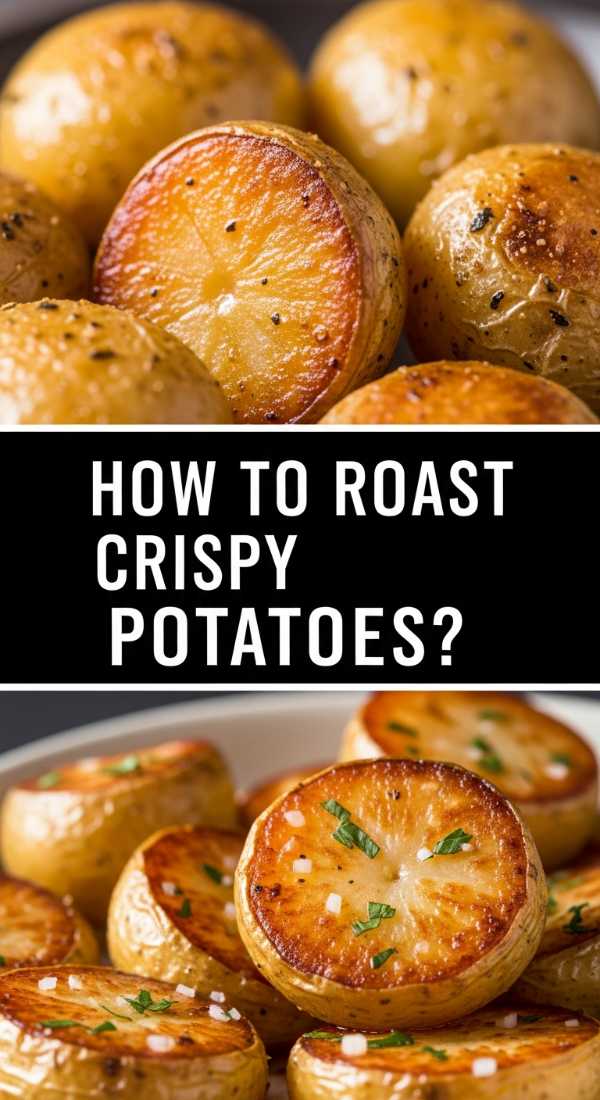
How to roast crispy potatoes?
Why we love this
Crispy roasted potatoes are the essential ‘crunch’ factor for any food board, offering a satisfying snap that gives way to a fluffy, cloud-like interior. They carry the scents of rosemary and garlic beautifully, filling the kitchen with an earthy, rustic aroma that signals a home-cooked meal. The golden-brown edges provide a deep, toasted flavor that acts as the perfect vessel for dipping into sauces or enjoying on their own. They are the humble heroes of the plate, turning a simple side into the most sought-after item on the board.
Ingredients
- 2 lbs Yukon Gold potatoes, cubed
- 1/3 cup Extra Virgin Olive Oil
- 1 teaspoon Dried Rosemary
- 1 teaspoon Garlic Powder
- 1 teaspoon Smoked Paprika
- Flaky Sea Salt
How to make it
- Place the cubed potatoes in a pot of cold salted water. Bring to a boil and cook for only 5-7 minutes. They should be tender on the outside but firm in the middle.
- Drain the potatoes and let them steam dry in the colander for 2 minutes. Shake the colander vigorously to ‘rough up’ the edges; those fuzzy bits become the crispy bits in the oven.
- Preheat your oven to 425°F (220°C). Pour the olive oil onto a large baking sheet and place it in the oven for 5 minutes to get the oil shimmering hot.
- Carefully toss the potatoes in a bowl with the rosemary, garlic powder, and paprika.
- Spread the potatoes onto the hot baking sheet in a single layer. You should hear a sizzle.
- Roast for 25-30 minutes, flipping halfway through, until they are deep golden and audibly crunchy when tapped with a spatula.
How to bake fire pizza?

Why we love this
Pizza is a universal language of love, especially when it features a charred, bubbly crust and strings of molten mozzarella. The smell of fermenting dough hitting a hot stone is intoxicating, evoking the feeling of a professional wood-fired pizzeria right in your own kitchen. There is something deeply satisfying about the ‘leopard spotting’ on the bottom of the crust—those tiny charred bubbles that provide a bitter contrast to the sweet tomato sauce and creamy cheese. It adds a rustic, artisanal touch to your board that guests can’t resist.
Ingredients
- 1 ball of Pizza Dough (room temperature)
- 1/2 cup San Marzano Tomato Sauce
- 4 oz Fresh Mozzarella
- Fresh Basil leaves
- Cornmeal for dusting
How to make it
- Place a pizza stone or an inverted baking sheet in the oven and preheat to its highest setting (usually 500°F-550°F) for at least 45 minutes.
- On a floured surface, stretch the dough gently using your hands, avoiding a rolling pin to keep the air bubbles intact in the crust.
- Dust a pizza peel or a flat piece of cardboard with cornmeal. Place the stretched dough on top and give it a shake to ensure it slides.
- Spread a thin layer of sauce, leaving an inch for the crust. Add torn pieces of mozzarella.
- Slide the pizza onto the hot stone. Bake for 7-10 minutes until the crust is blistered and the cheese is bubbling and slightly browned.
- Remove from the oven and top with fresh basil and a drizzle of olive oil immediately before slicing.
How to fry crunchy chicken?

Why we love this
Fried chicken brings a dramatic, golden crunch to your food board that is impossible to ignore. The craggy, irregular surface of the breading creates tiny pockets of flavor that hold onto spices and salt, providing a massive sensory payoff with every crunch. Inside, the meat remains incredibly moist and tender, a result of the high-heat sealing process. The scent of hot oil and savory spices like cayenne and garlic is a siren song for hungry guests, making this the ultimate ‘viral’ food item that people will be talking about for days.
Ingredients
- 1 lb Chicken Thighs, cut into bite-sized pieces
- 2 cups Buttermilk
- 2 cups All-purpose Flour
- 1 tablespoon Garlic Powder
- 1 teaspoon Cayenne Pepper
- Peanut oil for frying
How to make it
- Marinate the chicken pieces in buttermilk for at least 4 hours (or overnight) in the fridge. The acidity tenderizes the meat perfectly.
- In a large bowl, whisk together flour, garlic powder, cayenne, salt, and pepper. Drizzle 2 tablespoons of the buttermilk marinade into the flour and mix with a fork to create ‘shags’ or little clumps. These create the extra-crunchy bits.
- Dredge each piece of chicken in the flour, pressing firmly to ensure the coating sticks. Let the coated chicken rest on a wire rack for 10 minutes to set.
- Heat 2 inches of oil in a heavy pot to 350°F (175°C). Use a thermometer to maintain this temperature.
- Fry the chicken in batches for 5-7 minutes until the internal temperature reaches 165°F and the exterior is a deep, golden brown.
- Drain on a wire rack (not paper towels!) to keep the bottom from getting soggy.
How to make fresh tacos?

Why we love this
Tacos are a vibrant explosion of color and flavor, adding a fresh, zesty dimension to any food spread. The warmth of a toasted corn tortilla, the acidity of a squeeze of lime, and the crunch of fresh radish or onion create a perfectly balanced bite. They are inherently social—guests can customize their own, passing around bowls of salsa and cilantro. The visual appeal of bright greens, deep reds, and charred proteins makes them a photographer’s dream, ensuring your board looks as lively as it tastes.
Ingredients
- 12 Small Corn Tortillas
- 1 lb Flank Steak or Chicken breast
- 1 cup Diced White Onion
- 1/2 cup Chopped Cilantro
- 3 Limes, cut into wedges
- Salsa Verde
How to make it
- Cook your protein of choice over high heat until charred and tender, then dice it into very small, uniform cubes to ensure it fits comfortably in a small tortilla.
- Heat a dry cast-iron skillet over medium-high heat. Warm each tortilla for 30 seconds per side until they develop slight charred spots and become pliable.
- Immediately wrap the warm tortillas in a clean kitchen towel to steam; this keeps them soft and prevents cracking.
- Assemble by placing a generous spoonful of meat in the center, followed by a sprinkle of onions and cilantro.
- Finish with a dollop of salsa verde and a heavy squeeze of fresh lime juice. The lime is crucial as it ‘cuts’ through the fat of the meat and brightens the entire dish.
How to grill flavorful kebabs?

Why we love this
Kebabs offer a beautiful, linear aesthetic to a food board, with alternating colors of charred vegetables and succulent meats. The aroma of caramelized onions and peppers mingling with seasoned meat over an open flame is the quintessential scent of summer and outdoor living. Each skewer is a self-contained meal, offering a variety of textures from the snap of a bell pepper to the tender give of a marinated piece of lamb or chicken. They are easy to grab, easy to eat, and look incredibly professional when piled high on a wooden platter.
Ingredients
- 1 lb Sirloin or Chicken Breast, cubed
- 1 Red Bell Pepper, cut into chunks
- 1 Red Onion, cut into wedges
- 1/2 cup Olive Oil
- 2 tablespoons Lemon Juice
- 2 teaspoons Dried Oregano
How to make it
- If using wooden skewers, soak them in water for at least 30 minutes to prevent them from burning on the grill.
- Whisk together olive oil, lemon juice, oregano, salt, and pepper. Marinate the meat cubes in this mixture for at least 1 hour.
- Thread the skewers, alternating between meat, onion, and pepper. Do not pack them too tightly; leave a tiny bit of space between items so the heat can circulate and cook everything evenly.
- Preheat the grill to medium-high heat. Oil the grates thoroughly.
- Grill the skewers for 10-12 minutes, turning every 3 minutes. Look for the vegetables to soften and slightly char at the edges while the meat reaches your desired doneness.
- Remove and let rest for 5 minutes. The residual heat will finish cooking the centers while the juices settle.
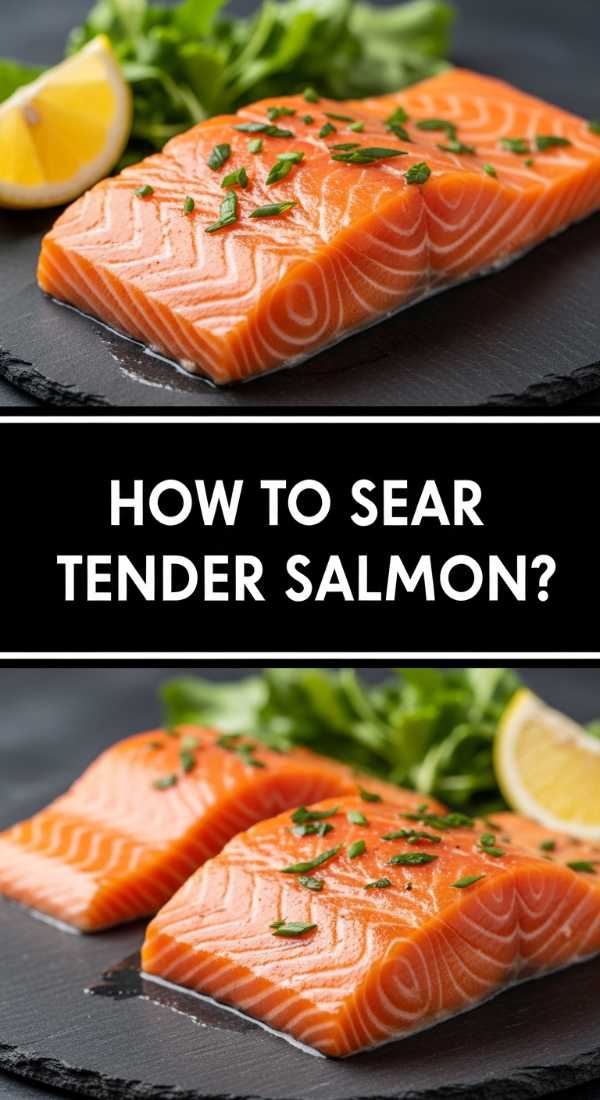
How to sear tender salmon?
Why we love this
Searing salmon is an art form that results in a stunning contrast: a glass-like, crispy skin on one side and a buttery, flake-apart interior on the other. The pink hue of the fish adds a touch of elegance and health-conscious appeal to your board, while the rich omega-3 fats provide a satisfying mouthfeel. When done correctly, the aroma is delicate and sweet, rather than ‘fishy,’ enhanced by a simple finish of lemon and herbs. It is the perfect sophisticated protein to balance out the heavier, fried elements of a party spread.
Ingredients
- 2 Salmon Fillets (skin-on)
- 2 tablespoons Grapeseed Oil (high smoke point)
- 2 tablespoons Butter
- 1 Lemon, sliced
- Fresh Dill for garnish
- Salt and Pepper
How to make it
- Pat the salmon skin extremely dry with paper towels. Any moisture will prevent the skin from becoming crispy. Season both sides with salt and pepper.
- Heat the oil in a non-stick or stainless steel skillet over medium-high heat until the oil is shimmering and just starting to smoke.
- Place the salmon fillets in the pan, skin-side down. Press down firmly with a spatula for 30 seconds to prevent the skin from curling.
- Lower the heat to medium and cook, undisturbed, for 5-6 minutes. You will see the cooked color creeping up the side of the fish.
- Flip the fish gently. Add the butter and lemon slices to the pan. Cook for only 1-2 more minutes for a medium center.
- Baste the skin with the lemon-butter mixture during the final minute of cooking. Remove and serve immediately to maintain the skin’s crunch.
Conclusion
Building a food board is more than just a culinary task; it’s an act of creativity and hospitality. Whether you’re melting cheese or searing the perfect salmon, the key is to focus on textures, colors, and the joy of sharing. These ‘viral’ techniques are designed to make you the star of your next gathering, but remember that the best ingredient is always the company you keep. So grab a board, start cooking, and watch as your pantry staples turn into a party your friends will never forget!