
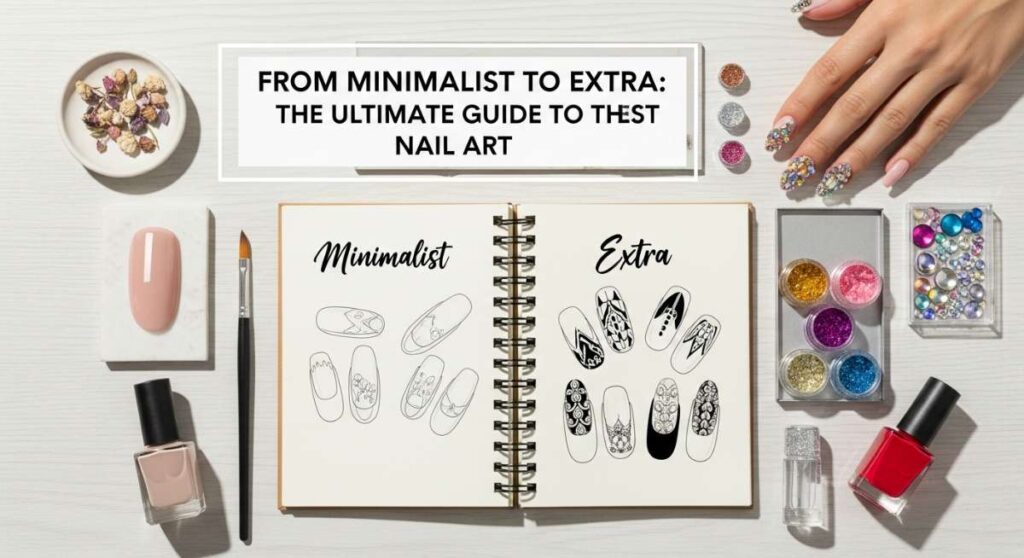
From Minimalist to Extra: The Ultimate Guide to the Best Nail Art
Hello, my beautiful loves. Take a deep breath with me—can you smell that? It’s the scent of a fresh start, a clean slate, and perhaps a little bit of high-shine top coat. I’ve always believed that our hands tell the story of our lives. They hold the coffee mugs that warm our mornings, they stroke the cheeks of the ones we love, and they deserve to be adorned like the masterpieces they truly are.
Lately, I’ve been leaning into the magic of the ‘Best Nails Design’ as a form of soul-care. Whether you’re feeling like a quiet, ‘clean girl’ minimalist or an ultra-extra coquette princess, there is a design waiting to hold your hand through the week. Let’s dive into this cloud-soft journey of color and creativity together.
Grab your favorite tea, find a sunny spot, and let’s explore these ten dreamy ways to transform your fingertips into tiny canvases of joy.
Design perfect heart nails in 3 simple steps
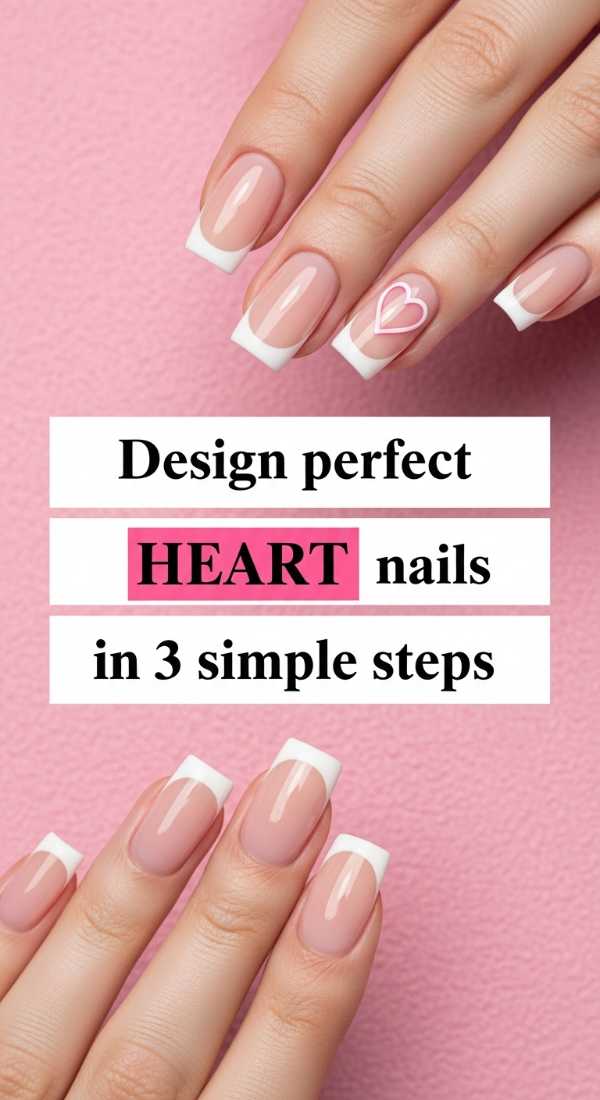
Why to love this Design:
There is something so tender about wearing your heart on your sleeves—or rather, your fingertips. This design is a sweet, romantic whisper that reminds you to be kind to yourself every time you look down at your keyboard.
Essential Elements:
- A soft nude or sheer pink base polish
- A vibrant red or creamy white for the hearts
- A double-sided dotting tool or a simple toothpick
How to Prepare:
- Apply two coats of your favorite sheer base and let it dry completely.
- Using your dotting tool, place two small dots side-by-side where you want the top of the heart to be.
- Slowly drag the polish from each dot downward to a center point, forming a tiny ‘V’ shape to complete the heart.
Budget Range
- Essie ‘Sugar Daddy’ ($10)
- OPI ‘Big Apple Red’ ($11)
- Nail Art Dotting Tool Set ($5)
Paint cute polka dots in 4 quick steps
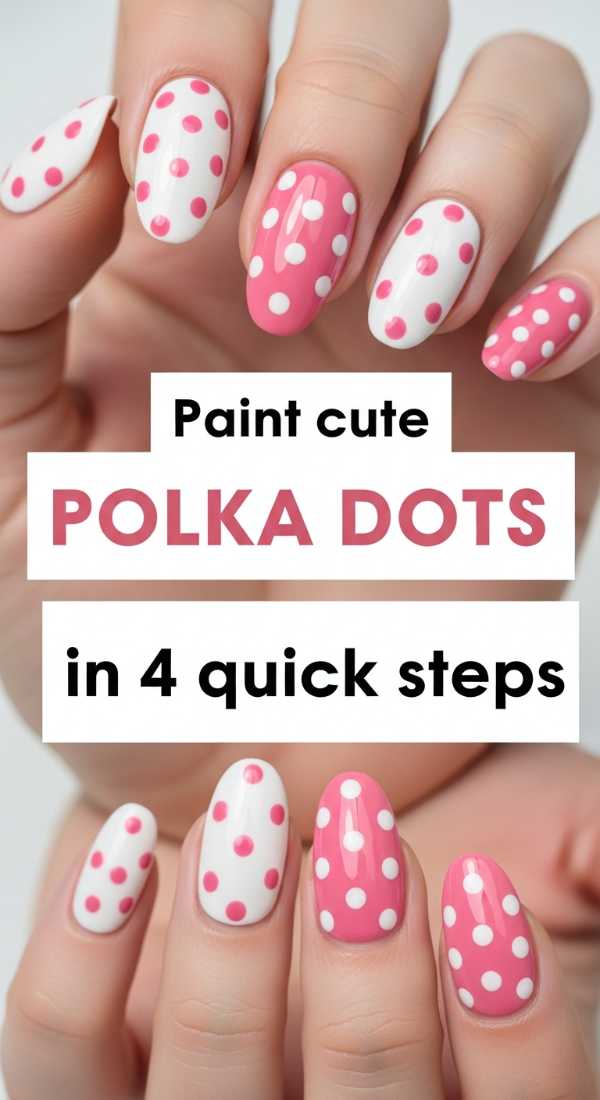
Why to love this Design:
Polka dots are like confetti for your hands! They bring an instant sense of playfulness and nostalgia to your day. It’s impossible to feel anything but bubbly when you’re sporting these classic, cheery spots.
Essential Elements:
- A high-contrast base color (like navy or white)
- A bright accent color
- A medium-sized dotting tool
How to Prepare:
- Paint your nails with two smooth coats of your chosen base color.
- Dip the tip of your dotting tool into the accent color.
- Starting from the center of the nail, place dots in a staggered pattern to create a balanced look.
- Finish with a glossy top coat to seal in the fun.
Budget Range
- Zoya ‘Pippa’ ($12)
- Sally Hansen ‘Black to Black’ ($6)
- Wedge Makeup Sponges ($3)
Create chic striped nails in 5 minutes
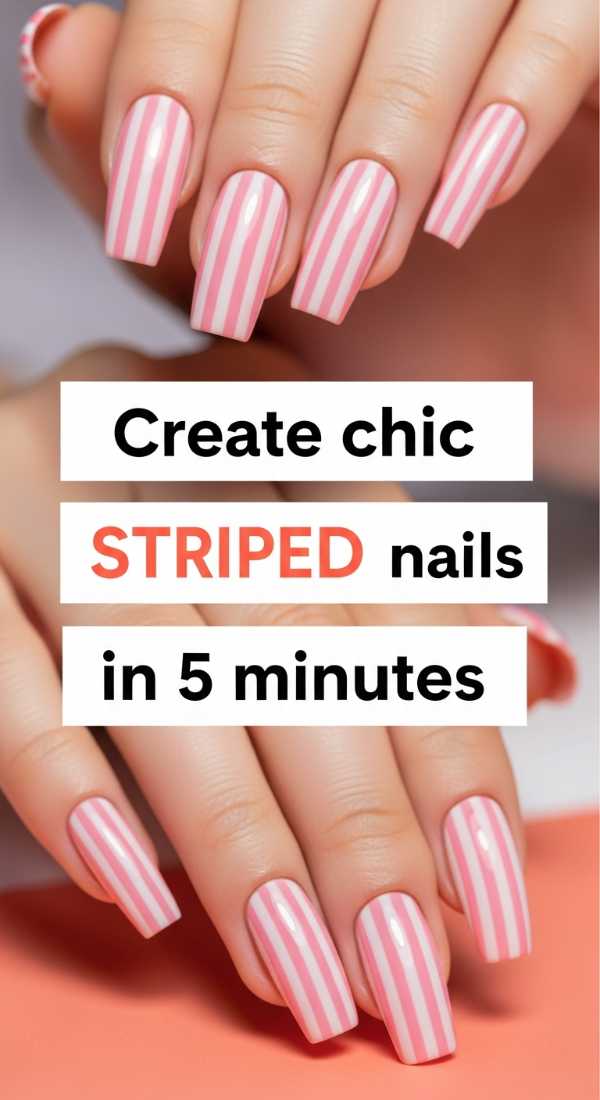
Why to love this Design:
For my loves who adore a modern, architectural vibe, stripes are the ultimate chic statement. They elongate the fingers and add a touch of sophisticated edge to even the softest outfit.
Essential Elements:
- Striping tape or a very fine detail brush
- A steady hand and a comfortable seat
- Two complementary polish shades
How to Prepare:
- Apply your base color and ensure it is 100% dry (this is the most important part!).
- Lay down thin strips of nail tape in vertical or horizontal lines.
- Paint your second color over the entire nail, covering the tape.
- Peel the tape away immediately while the polish is still wet to reveal crisp lines.
- Apply a top coat to level the surface.
Budget Range
- Holo Taco ‘One-Coat Black’ ($14)
- Nail Art Striping Tape ($4)
- Seche Vite Dry Fast Top Coat ($9)
Master the ombre French in 6 easy steps
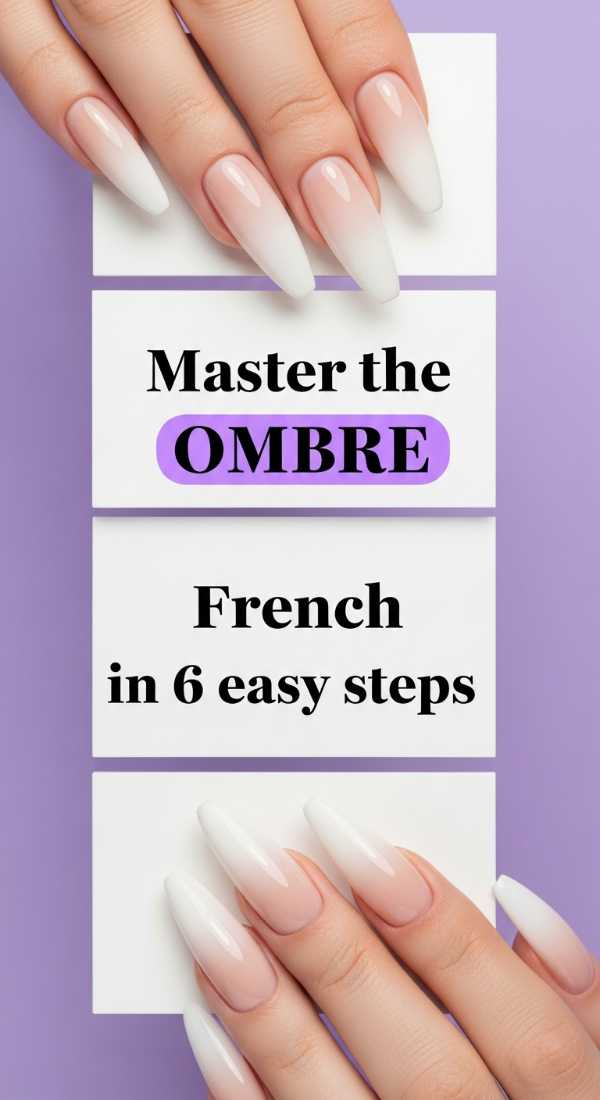
Why to love this Design:
Imagine a sunset fading into the clouds; that’s the ombre French. It’s a softer, more ethereal version of the classic French manicure. It’s perfect for weddings, brunches, or just feeling like a dream.
Essential Elements:
- A makeup sponge
- White polish and a soft nude polish
- Liquid latex or tape for easy cleanup
How to Prepare:
- Apply your nude base color.
- Apply liquid latex around your cuticles to save time on cleaning up.
- Paint a stripe of nude and a stripe of white directly onto the edge of a makeup sponge.
- Gently dab the sponge onto your nail, moving it slightly up and down to blend the colors.
- Repeat for a second layer once the first is dry for more opacity.
- Seal with a thick top coat to smooth out the sponge texture.
Budget Range
- Cirque Colors ‘Rose Jelly’ ($12.50)
- Essie ‘Marshmallow’ ($10)
- Liquid Latex Barrier ($7)
Apply cute 3D bows in 2 simple ways
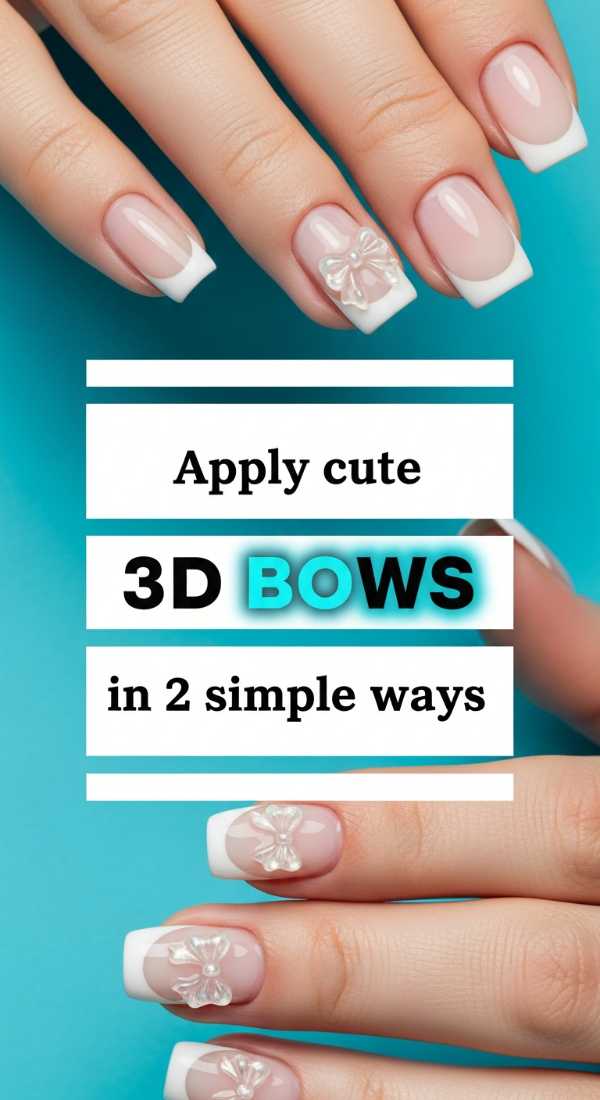
Why to love this Design:
The coquette aesthetic is all about embracing your most feminine, whimsical self. Adding 3D bows makes your nails feel like a gift you get to unwrap every single day. It’s tactile, fun, and so very ‘extra’ in the best way.
Essential Elements:
- Resin or acrylic bow charms
- Strong nail glue or a thick gel top coat
- Tweezers for precise placement
How to Prepare:
- Method 1: Place a small drop of nail glue on your finished manicure and press the bow down for 10 seconds.
- Method 2: Use a ‘bead’ of builder gel, set the bow, and cure under a UV lamp for a permanent hold.
Budget Range
- 3D Bow Charms Variety Pack ($8)
- Kiss Maximum Speed Nail Glue ($4)
- Makartt Rhinestone Glue ($10)
Paint elegant pastel swirls in 4 steps
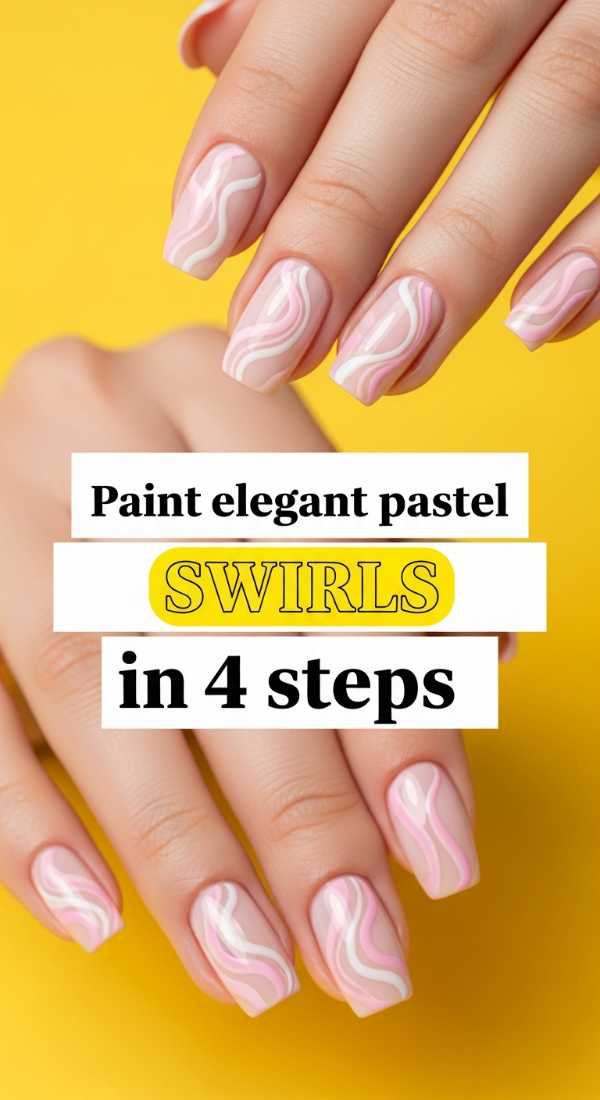
Why to love this Design:
Swirls have a way of flowing with your energy. They aren’t rigid or perfect; they are organic and relaxing. Using pastels makes this look feel like a watercolor painting come to life on your hands.
Essential Elements:
- A long, thin liner brush
- 3-4 pastel polish shades
- A palette (or a piece of tin foil) to mix colors
How to Prepare:
- Paint a neutral base coat.
- Dip your liner brush into your first pastel shade and draw a long, flowing ‘S’ curve.
- Follow the curve with your second and third colors, nesting the lines close together.
- Clean your brush between colors to keep the pastels bright and crisp.
Budget Range
- Olive & June ‘Pastel Set’ ($40)
- Long Liner Nail Art Brush ($6)
- Lights Lacquer ‘Paper Snow’ ($13)
Do micro French tips in 3 easy steps
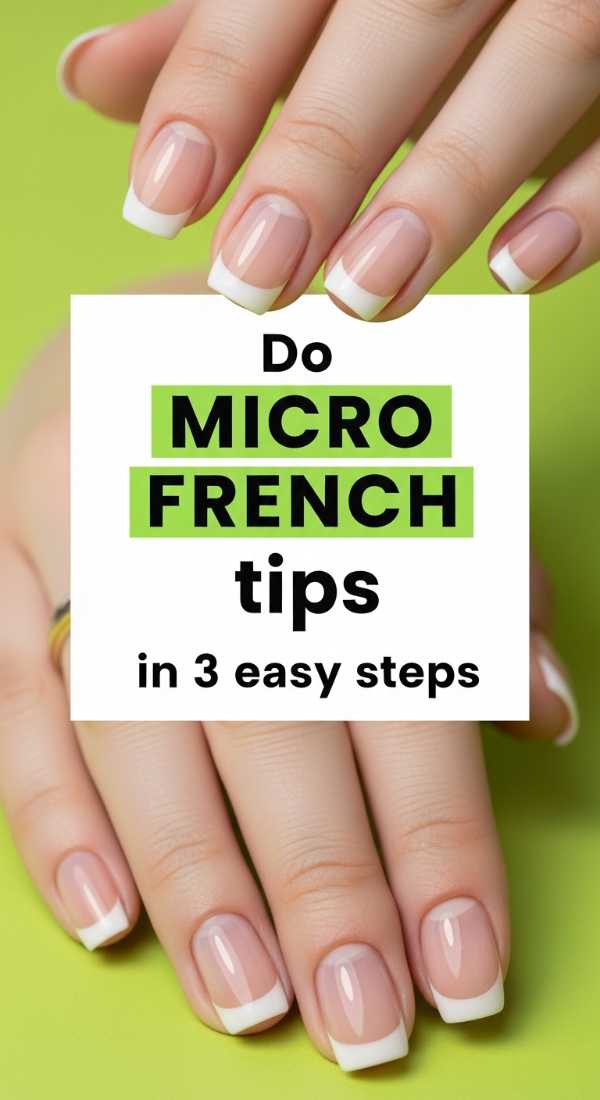
Why to love this Design:
This is for the minimalist who wants just a ‘kiss’ of color. It’s incredibly subtle but makes your hands look polished and put-together. It’s the ‘no-makeup makeup’ of the nail world.
Essential Elements:
- An ultra-fine detail brush
- Your favorite ‘your-nails-but-better’ base
- A bright or neon color for the tip
How to Prepare:
- Apply a sheer, glowy base coat.
- Using the very tip of your fine brush, trace a hairline-thin stroke along the very edge of your nail.
- Apply a high-shine top coat to make that tiny line pop.
Budget Range
- Orly ‘Bare Rose’ ($15)
- Manucurist ‘Green’ Polish ($14)
- Detailer Brush Set ($10)
Apply velvet nail effects in 5 minutes
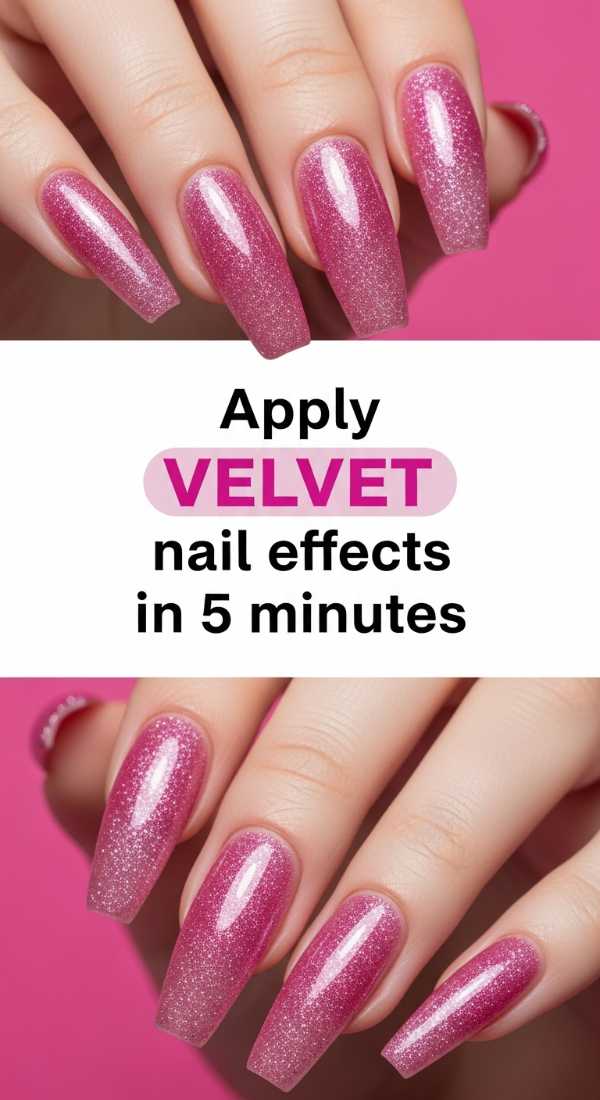
Why to love this Design:
Velvet nails (or ‘cat-eye’ nails) are pure magic. They react to light and movement, giving your nails a soft, fuzzy texture that looks like expensive fabric. It’s a sensory experience you won’t be able to stop staring at.
Essential Elements:
- Magnetic gel polish
- A strong handheld magnet
- UV/LED lamp
How to Prepare:
- Apply one coat of magnetic polish and cure it.
- Apply a second, slightly thicker coat.
- Immediately hold the magnet close to the nail for 10-15 seconds without moving.
- Watch the metallic particles shift into a velvet shimmer.
- Cure immediately to ‘lock’ the velvet effect in place.
Budget Range
- Mooncat ‘Magnetic Polish’ ($16)
- Dual-end Nail Magnet ($5)
- SunUV LED Lamp ($25)
Draw dainty spring flowers in 4 steps
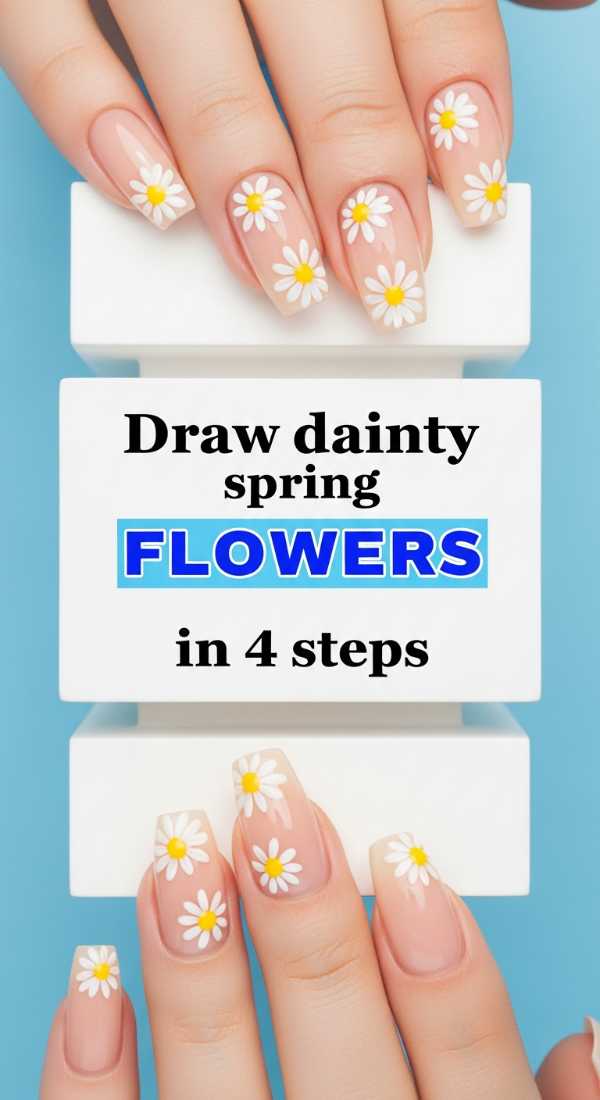
Why to love this Design:
Carry a garden with you wherever you go! Dainty flowers are a timeless way to celebrate growth and new beginnings. They are surprisingly easy to do and look like they took hours of effort.
Essential Elements:
- A small dotting tool
- Yellow polish for centers
- White or lavender for petals
How to Prepare:
- Place a single yellow dot where you want the center of your flower.
- Place five dots around the center in a circle to create petals.
- Use a toothpick to gently pull the petal dots toward the center for a more realistic shape.
- Add a tiny green leaf if you’re feeling extra creative!
Budget Range
- ILNP ‘Daisy’ ($10)
- Essie ‘Mint Candy Apple’ ($10)
- Nail Art Palette ($5)
Get glitter gradients in 3 simple steps

Why to love this Design:
When in doubt, add glitter! A gradient is the perfect way to wear sparkle without it feeling overwhelming. It’s like a little celebration at your fingertips, catching the light with every move you make.
Essential Elements:
- A dense glitter polish
- A makeup sponge
- A clear top coat
How to Prepare:
- Paint your base color and let it dry.
- Apply glitter polish to the edge of a makeup sponge.
- Dab the sponge onto the tips of your nails, concentrated at the edge and fading as you move toward the cuticle.
Budget Range
- KBShimmer ‘Glitter Polish’ ($12)
- Sally Hansen ‘Strobe Light’ ($6)
- Makeup Sponges ($3)
Embrace Your Inner Artist
My loves, remember that nail art isn’t about perfection; it’s about the joy of creation. Whether your lines are perfectly straight or a little bit ‘perfectly imperfect,’ they are a reflection of your unique light. Taking those twenty minutes for yourself to paint, breathe, and create is a beautiful act of self-love. Wear your designs with pride, and let them remind you that you are a work of art in progress. Stay soft, stay bright, and keep shining!