
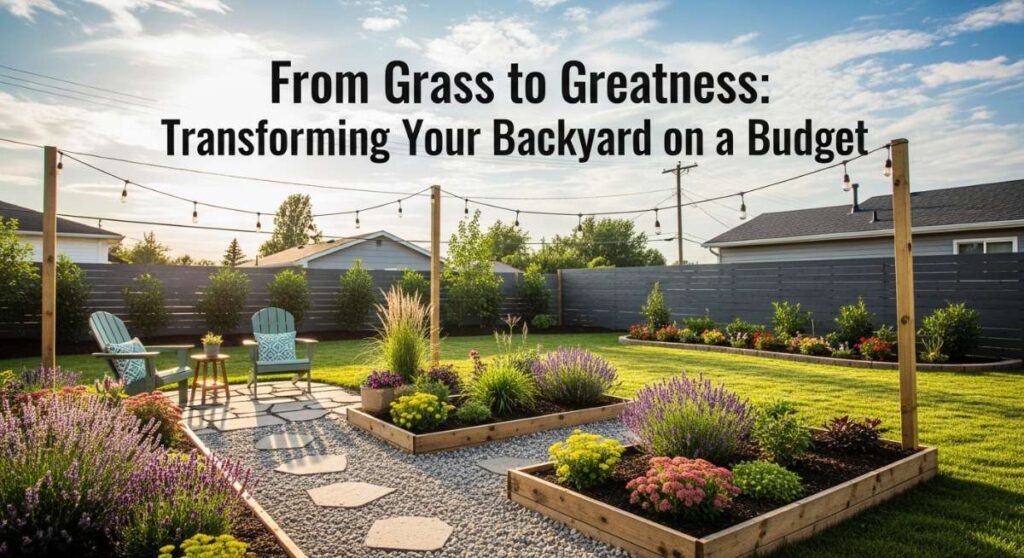
From Grass to Greatness: Transforming Your Backyard on a Budget
There is a specific kind of magic that happens when you look out your back window and see potential instead of just patches of brown grass. For years, I treated my outdoor space as a chore—something to be mowed and forgotten—until I realized that our yards are truly the largest rooms in our homes. They are the canvases for our summer memories, the stage for our children’s wildest adventures, and the sanctuary we retreat to when the world gets a little too loud.
Transforming your space doesn’t require a professional crew or a massive bank account; it just takes a bit of vision and some sweat equity. I remember the first time I sat on my DIY porch swing with a glass of iced tea, the scent of fresh mulch in the air and the sun dipping below the fence line. That feeling of ‘I built this’ is better than any store-bought luxury. Let’s dive into how you can turn your own patches of green into a personal paradise.
How to Design a Lush Front Porch for Instant Curb Appeal

Why we love this
A well-styled front porch is like a warm hug for anyone who pulls into your driveway. It sets the tone for the rest of your home, blending the tactile softness of outdoor textiles with the vibrant, living energy of seasonal flora. We love the way a few curated layers can make a house feel lived-in and loved, creating a sensory experience where the smell of blooming jasmine meets the visual rhythm of symmetrical planters, all bathed in the golden glow of updated lighting.
Essential Elements:
- Weather-resistant rocking chairs or a porch swing
- Layered door mats (a pattern over a larger jute rug)
- Large-scale ceramic planters in varying heights
- Seasonal greenery (ferns, petunias, or boxwoods)
- Modern black or brass house numbers and lighting fixtures
How to make it
- Begin by deep-cleaning the entire area; use a pressure washer on a medium setting to remove years of grit from the siding and floorboards without damaging the wood fibers.
- Select a focal point, usually the front door, and paint it a bold, welcoming color like navy or sage; apply thin, even coats with a high-quality foam roller to avoid unsightly brush marks, allowing four hours of drying time between layers.
- Frame your entrance with symmetry by placing two identical tall planters on either side of the door; fill the bottom third with empty plastic bottles to save on heavy soil costs while ensuring excellent drainage.
- Layer your textiles by placing a 3×5 outdoor rug beneath a standard coir doormat to add visual depth and a ‘designer’ touch that grounds the space.
- Install warm-toned LED bulbs (2700K) in your sconces to create an inviting amber glow that highlights the textures of your plants without the harsh glare of cool-white security lights.
How to Build a Budget Grill Station for the Ultimate Summer Cookout
Why we love this
There is nothing quite like the sizzle of a steak hitting a hot grate, but having a dedicated space to prep makes the experience so much more refined. This budget-friendly station brings a professional ‘chef’s kitchen’ feel to the outdoors, where the aroma of charcoal and rosemary fills the air. It’s about more than just cooking; it’s about having a sturdy, organized hub where you can snap open a cold drink and engage with your guests instead of running back and forth to the kitchen.
Essential Elements:
- Pressure-treated 4×4 posts and 2×4 framing timber
- Food-safe butcher block or concrete paver countertop
- Stainless steel hooks for tongs and spatulas
- Magnetic strip for knife or tool storage
- Built-in bottle opener and towel rack
How to make it
- Construct a basic rectangular frame using pressure-treated lumber, ensuring all joints are secured with 3-inch exterior-grade deck screws to prevent wobbling under the weight of the grill and prep items.
- Level the ground where the station will sit using a mix of sand and gravel, tamping it down firmly until there is no movement when you step on it; this prevents the station from sinking over time.
- Install a countertop made of thick concrete pavers for a heat-resistant surface; use a construction adhesive specifically rated for masonry to bond the pavers to the wooden frame for a permanent, rock-solid finish.
- Sand all wooden surfaces with 120-grit sandpaper to remove splinters, then apply a dark walnut outdoor stain to provide a rich contrast against the gray stone.
- Attach a heavy-duty magnetic bar to the side of the frame; this allows you to keep your metal grill scrapers and tongs within reach, keeping the workspace clear for platters and bowls.
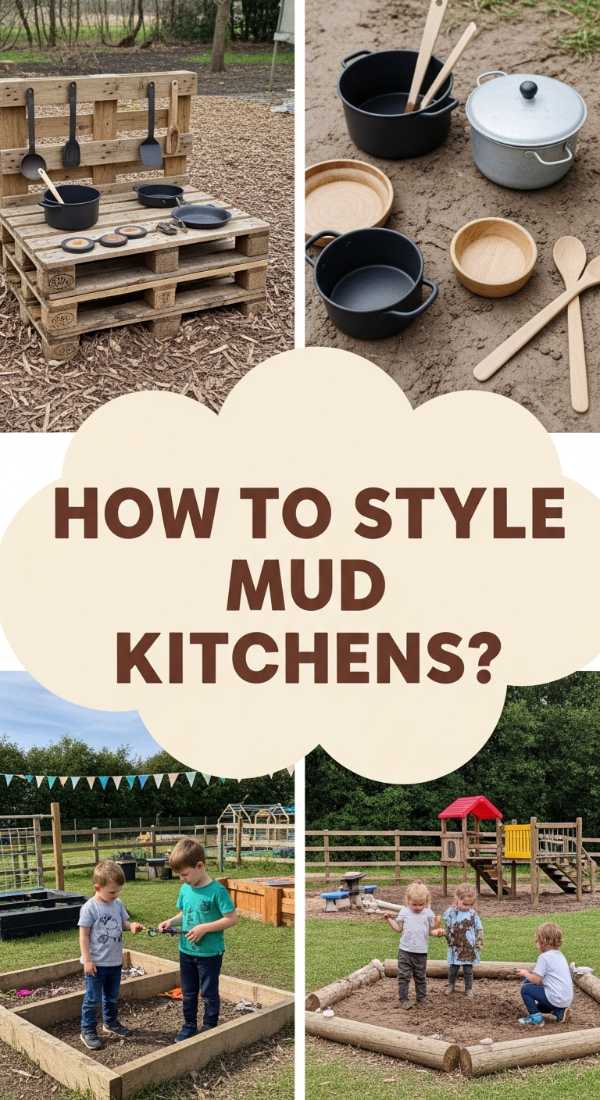
How to Style a Dreamy Pallet Mud Kitchen for Creative Outdoor Play
Why we love this
A mud kitchen is a portal to a world of imagination, where the earthy scent of wet soil and the tactile squelch of ‘mud pies’ become the highlight of a child’s afternoon. It’s a beautifully rustic addition to any backyard that encourages messy, screen-free play. We adore how the weathered wood of recycled pallets provides a sturdy, vintage aesthetic that only looks better as it gets splashed with water and decorated with dandelions and stones.
Essential Elements:
- Two heat-treated (HT) wooden pallets
- Old stainless steel sink or plastic washbasin
- Discarded kitchen utensils (whisks, spoons, muffin tins)
- Hand-painted chalkboard for the ‘Daily Menu’
- Small hooks and a shelf for ‘ingredients’ like pinecones and acorns
How to make it
- Source pallets marked with ‘HT’ (Heat Treated) to ensure they are free of harmful chemicals; disassemble one pallet to use the slats for a backboard and shelving.
- Cut a circular or rectangular hole in the top pallet using a jigsaw, measuring the basin or sink carefully so the lip of the sink rests securely on the wood without falling through.
- Sand every inch of the wood with a power sander, starting with 80-grit and moving to 150-grit, until the surface is buttery smooth to the touch, preventing any splinters during play.
- Seal the wood with a clear, non-toxic outdoor water-proofer; you’ll know it’s dry when the wood no longer feels tacky and water beads on the surface.
- Screw the ‘backboard’ pallet to the base unit at a 90-degree angle and install small shelves and hooks for hanging pots and pans, creating a functional mini-chef environment.
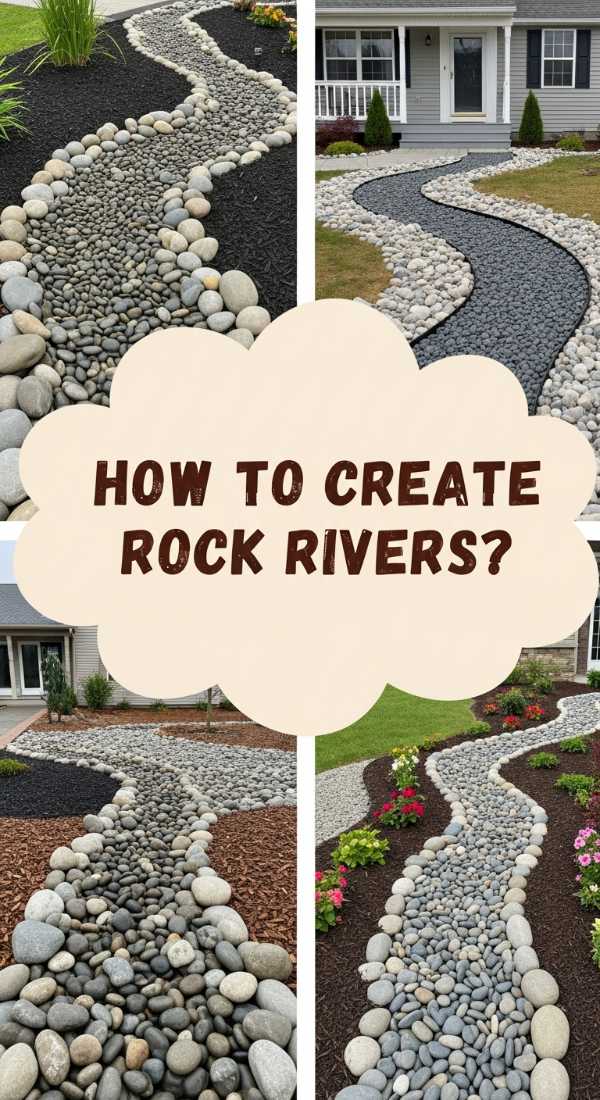
How to Create a Serene Rock River Bed for a Zen Garden Vibe

Why we love this
A rock river bed provides a visual flow that mimics the calming movement of water, even in the driest of landscapes. The contrast between the smooth, cool surfaces of river stones and the soft textures of surrounding ornamental grasses creates a sophisticated, Zen-like atmosphere. It’s a low-maintenance way to add structural interest to your yard, offering a sensory delight as the stones change color when wet, turning from dusty grays to deep, shimmering charcoals.
Essential Elements:
- Heavy-duty landscape fabric
- Assorted river rocks (ranging from 1 inch to 5 inches)
- Large ‘anchor’ boulders for focal points
- Edging material (metal or plastic)
- Low-light creeping plants like Hostas or Japanese Forest Grass
How to make it
- Mark out a curved, meandering path using a garden hose to visualize the ‘river’ flow; aim for organic shapes rather than straight lines to mimic nature.
- Dig a trench about 4-6 inches deep along the path, sloping the sides slightly toward the middle to create a natural basin that helps with drainage during heavy rains.
- Lay down high-quality landscape fabric, securing it with garden staples every 12 inches to ensure no weeds can penetrate the stone layer later on.
- Place your largest ‘anchor’ boulders first in groups of three; bury them slightly into the ground so they look like they’ve been there for centuries rather than just sitting on top.
- Fill the rest of the path with smaller river rocks, varying the sizes and colors to create a natural texture; use a rake to level them out so they sit just below the edge of your surrounding grass.
How to Decorate a Retro Teen Room for Nostalgic Artistic Inspiration
Why we love this
There is a vibrant, electric energy in a retro-inspired room that fuels creativity and self-expression. We love the juxtaposition of fuzzy textures like velvet and faux fur against the sleek lines of mid-century furniture and the warm, neon glow of a sunset lamp. It’s a space that feels like a time capsule yet remains perfectly modern, where the tactile experience of flipping through a vinyl record collection meets a cozy, curated nook for dreaming and sketching.
Essential Elements:
- Neon wall signs or LED light strips
- Vintage-style record player and vinyl display shelves
- Shag rugs or colorful checkered patterns
- Gallery wall with retro posters and polaroids
- Bean bag chairs or a papasan chair
How to make it
- Choose a color palette based on ’70s earth tones (mustard, terracotta, sage) or ’80s pastels; apply a matte finish paint to the walls to allow the neon lights to pop without creating harsh reflections.
- Create a ‘Music Zone’ by mounting floating shelves at eye level to display vinyl covers as art; ensure the shelves are anchored into studs to support the weight of the records.
- Install ‘smart’ LED strips behind a headboard or under the desk; use an app to set the color temperature to a warm orange-pink to mimic a permanent golden hour.
- Layer a high-pile shag rug over a neutral carpet to define the lounging area, providing a soft, tactile space for floor-sitting and hanging out.
- Curate a gallery wall using a mix of thrifted frames and washi tape for a relaxed, artistic vibe; arrange them on the floor first to find the perfect balance before hammering a single nail.
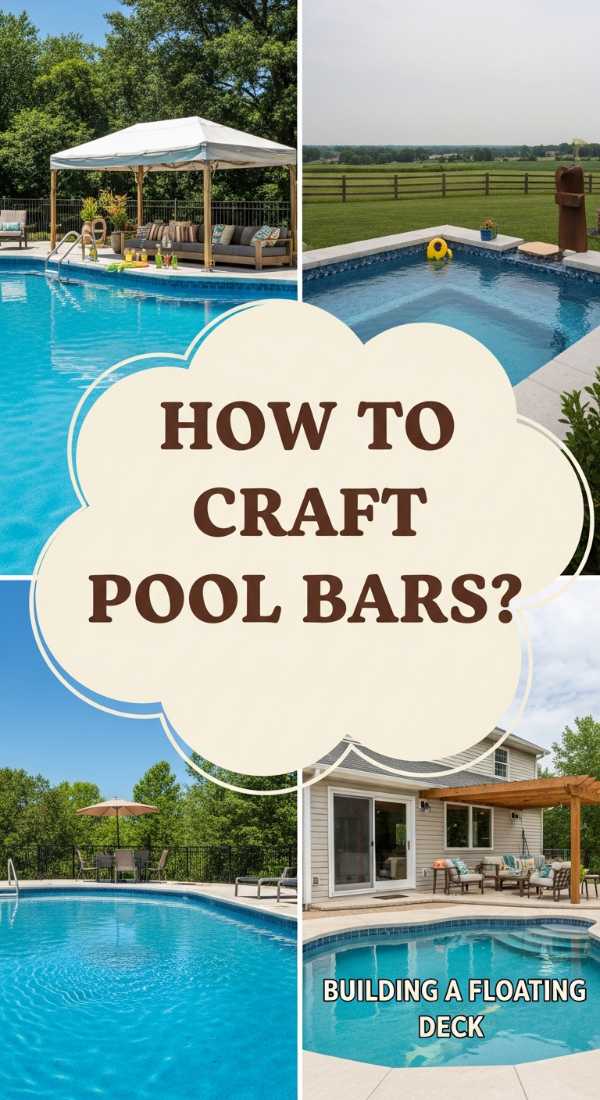
How to Craft a Private Pool Bar for a Backyard Tropical Oasis
Why we love this
Bringing the vacation to your doorstep is the ultimate lifestyle upgrade, and a private pool bar is the crown jewel of that dream. We love the way the scent of cedar and the sound of ice clinking in a glass instantly lower the heart rate. It’s a space that feels secluded and luxurious, where you can lean against a cool wooden ledge and feel the tropical breeze, transforming a standard pool deck into an elite island retreat.
Essential Elements:
- Pressure-treated wood or cedar planks
- Corrugated metal roofing for a ‘shack’ look
- Built-in ice chest or cooler insert
- Bar stools with weather-resistant cushions
- Tiki torches or string ‘Edison’ lights
How to make it
- Frame the bar using 2×4 lumber, building it to a standard ‘bar height’ of 42 inches to accommodate standard outdoor bar stools comfortably.
- Clad the exterior with cedar pickets or corrugated metal sheets; if using metal, pre-drill holes and use rubber-washer screws to prevent rust and leaks at the attachment points.
- For the bar top, use 2×10 cedar boards; sand them meticulously with 220-grit paper and apply three coats of marine-grade spar urethane for a waterproof, glossy finish that survives splashes.
- Incorporate an ‘ice well’ by cutting a hole in the bar top to fit a drop-in stainless steel hotel pan; this keeps beverages cold and accessible without a bulky separate cooler.
- Finish the look by draping heavy-duty outdoor string lights from the bar roof to a nearby tree, creating a canopy of light that defines the ‘oasis’ zone after dark.
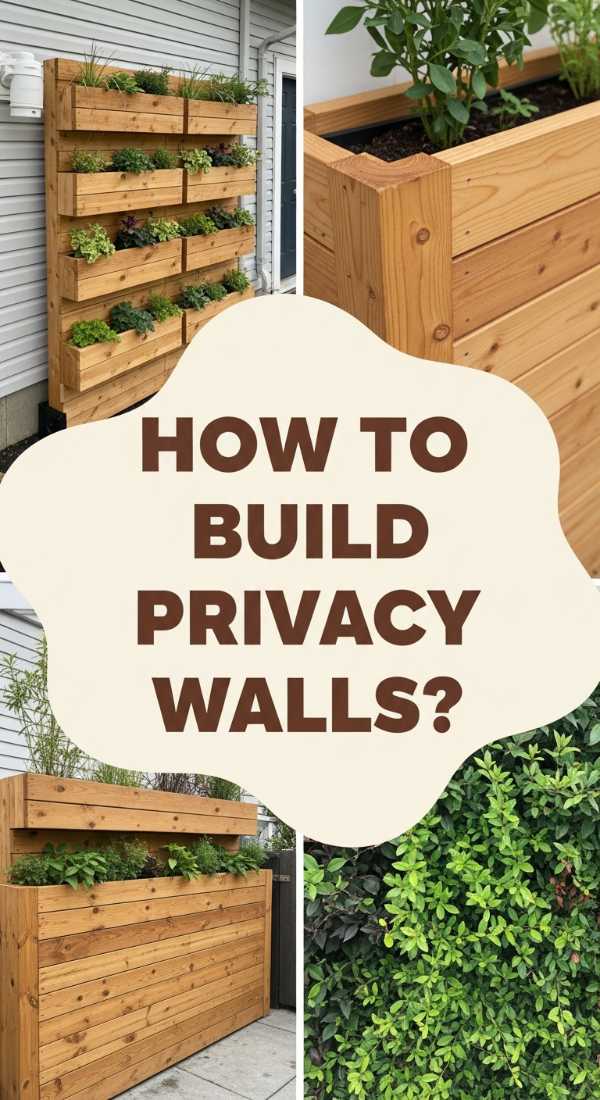
How to Build a Planter Privacy Wall for a Secluded Garden Retreat

Why we love this
Privacy doesn’t have to look like a boring fence; it can look like a living, breathing tapestry of green. This planter wall offers a lush sense of seclusion that smells like fresh herbs and damp earth. We love how it creates a ‘secret garden’ feeling, muffling neighborhood noise and providing a vertical sanctuary where the rhythmic patterns of cascading vines and upright grasses offer a visual rest for the eyes.
Essential Elements:
- Cedar 4×4 posts and horizontal 1×6 slats
- Integrated planter boxes at various heights
- Vertical trellis wire or lattice
- Climbing plants (Clematis, Star Jasmine, or Ivy)
- Drip irrigation system for easy maintenance
How to make it
- Secure 4×4 cedar posts into the ground using post spikes or concrete footings, ensuring they are perfectly plumb with a level to prevent the wall from leaning over time.
- Attach horizontal slats with a 1-inch gap between them; this allows wind to pass through the structure (preventing it from acting like a sail) while still providing 90% privacy.
- Construct deep planter boxes at the base using rot-resistant cedar; line the interiors with plastic pond liner, poking small drainage holes in the bottom to protect the wood from constant moisture.
- Install a simple vertical trellis using eye-hooks and galvanized wire in a diamond pattern between the slats to give climbing plants a sturdy ‘ladder’ to grow on.
- Fill with a high-quality potting mix blended with perlite for aeration; plant your climbers at the base and use soft garden ties to guide the first few tendrils onto the wire.
How to Create Whimsical Chalk Designs for Endless Neighborhood Fun
Why we love this
There is a fleeting, beautiful joy in sidewalk art that brings a community together. We love the dusty, pastel textures of chalk against the rough gray pavement and the way a simple driveway can be transformed into a vibrant gallery. It’s an invitation for neighbors to stop, smile, and perhaps add a stroke of color themselves, turning the ground we walk on into a source of whimsical inspiration and shared artistic delight.
Essential Elements:
- High-pigment ‘sidewalk’ chalk or DIY chalk paint
- Painter’s tape for crisp geometric edges
- Sponges and blending brushes
- Buckets of water for ‘watercolor’ effects
- Stencils for intricate patterns
How to make it
- Clean the pavement thoroughly with a broom to remove all loose pebbles and dust, which ensures the chalk pigments adhere deeply into the pores of the concrete.
- Lay down painter’s tape to create a large geometric frame or a ‘stained glass’ pattern; press the edges of the tape firmly with your thumb to prevent chalk dust from bleeding underneath.
- Create a ‘gradient’ effect by rubbing a heavy layer of two colors side-by-side and then using a damp sponge to swirl the middle together where they meet, creating a professional-looking transition.
- For deep, vibrant colors that look like paint, dip the chalk sticks in water for 5 seconds before drawing; the moisture allows the pigment to lay down thick and opaque.
- Once finished, carefully peel back the tape at a 45-degree angle to reveal crisp, clean lines that make the colors pop against the natural gray of the driveway.
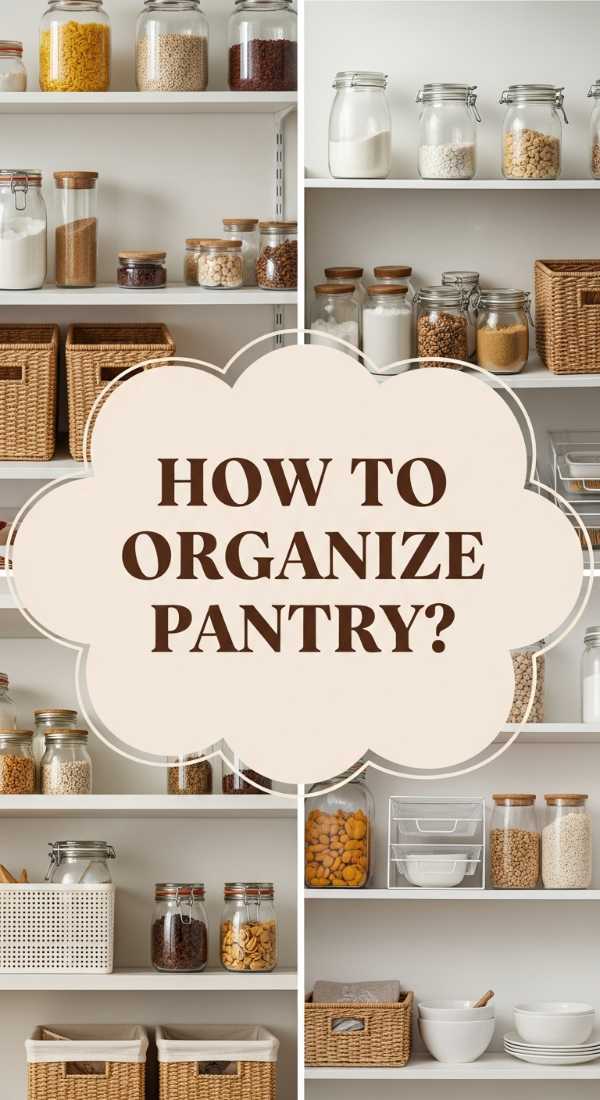
How to Achieve Realistic Pantry Organization for a Stress Free Home
Why we love this
A perfectly organized pantry is a balm for the busy soul. The visual serenity of uniform jars, the tactile snap of airtight lids, and the orderly rows of labels create a sense of control in a chaotic world. We love how this transformation turns a cluttered corner into a boutique-like experience, where the colors of grains, pastas, and spices become a decorative element of the home while making meal prep an effortless joy.
Essential Elements:
- Glass or BPA-free plastic airtight canisters
- Uniform labels (minimalist or handwritten style)
- Tiered ‘stadium’ shelving for canned goods
- Woven baskets for ‘ugly’ packaging or bulk items
- Lazy Susans for oils and vinegars
How to make it
- Empty the entire pantry and check expiration dates; wipe down all shelves with a microfiber cloth and a mild vinegar solution to ensure a fresh, dust-free start.
- Group items by category (baking, breakfast, snacks, dinner) and measure your shelf heights to ensure your largest containers will fit with at least two inches of clearance.
- Decant dry goods like flour, sugar, and pasta into clear containers; this not only looks better but keeps food fresh longer and allows you to see exactly when you’re running low.
- Apply labels at the same height on every jar using a ‘template’ (like a piece of tape) to ensure they are perfectly aligned horizontally across the shelf.
- Place frequently used items at eye level and heavy bulk items on the floor or bottom shelf; use a Lazy Susan in the corners to prevent ‘dead zones’ where jars get lost and forgotten.
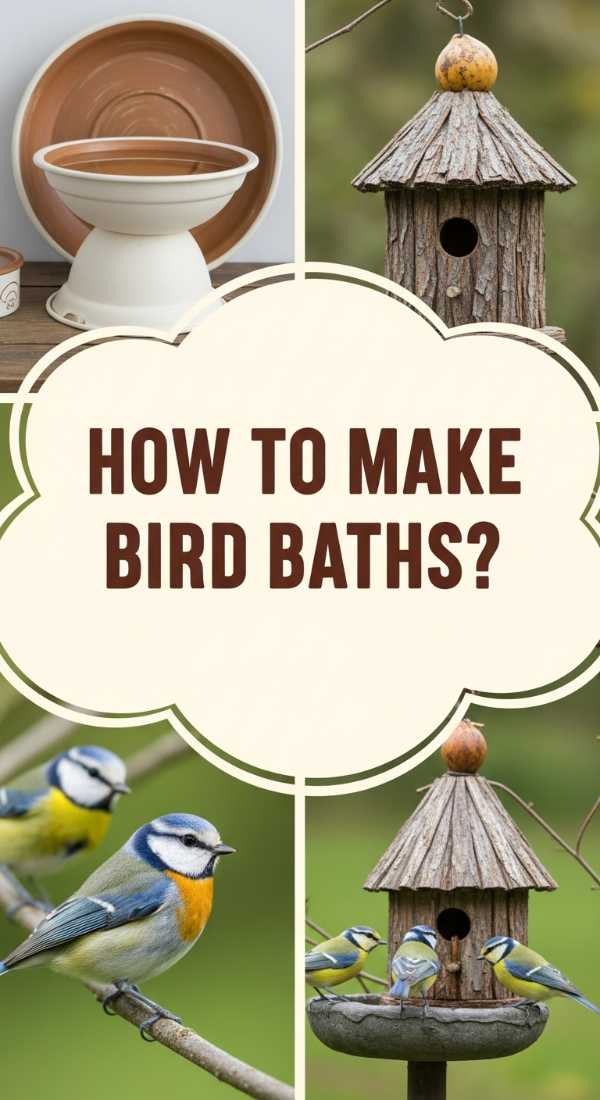
How to Make a Rustic Bird Bath for an Enchanting Wildlife Sanctuary
[IMAGE_10]
Why we love this
Adding a water feature is the fastest way to invite life into your garden, turning a quiet patch of grass into a bustling sanctuary. We love the sound of gentle splashing and the sight of sunlight dancing on the water’s surface. A rustic bird bath, made from natural materials, feels like an ancient part of the landscape, providing a cooling station for feathered friends and a peaceful focal point that connects us to the rhythms of nature.
Essential Elements:
- Large, shallow terracotta saucer or flat stone
- Stacked flat rocks or an old wooden stump for a base
- River stones for ‘perching’ spots
- Solar-powered fountain pump (optional)
- Non-toxic sealant for the interior
How to make it
- Select a location that is visible from your window but near a ‘safety’ bush or tree where birds can hide if they feel threatened.
- Create a stable base by stacking three to four large, flat fieldstones, using a small amount of exterior construction adhesive between the layers to prevent tipping.
- Seal the interior of a large terracotta saucer with a clear, bird-safe masonry sealer; this prevents the porous clay from absorbing all the water and keeps it easier to clean.
- Place the saucer on the base and add a few clean river stones to the center; these act as ‘landing pads’ so smaller birds can drink without feeling like they might drown in deep water.
- Fill with fresh water, ideally no more than 2 inches deep, and add a small solar-powered ‘bubbler’ to keep the water moving, which prevents mosquitoes and attracts birds with the sound of ripples.
Conclusion: Your Sanctuary Awaits
Transforming your home and backyard is a journey of a thousand small, beautiful steps. Whether you’re building a massive grill station or simply organizing a pantry, each project adds a layer of ‘you’ to your space. These DIYs are about reclaiming your time and your environment, creating a life that feels as good as it looks. So grab your tools, get your hands a little dirty, and start building the greatness you deserve.