

From Drab to Fab: Easy DIY Hacks for Your Home and Yard
We’ve all had those moments where we pull into the driveway, look at our home, and think, “When did things get so… tired?” It’s easy to let the exterior of our homes fall to the bottom of the to-do list while we focus on the chaos of life inside. But there is something truly magical about transforming your personal sanctuary. It’s not just about the property value; it’s about that deep breath of relief you feel when your surroundings finally reflect the beauty and vibrance you feel on the inside.
In this post, I’ve rounded up my absolute favorite viral DIY hacks that will take your yard and home from ‘drab’ to ‘absolutely fab’ without breaking the bank. Whether you’re dreaming of a peaceful retreat to sip your morning coffee or a lively space to host the neighborhood’s best barbecues, these projects are designed to be approachable, fun, and high-impact. Let’s roll up our sleeves and turn those house goals into a reality!
How to Create a Rock Flower Bed for Low Maintenance Curb Appeal
Why we love this
There is something incredibly sophisticated about the contrast between smooth, earthy river rocks and the vibrant green of perennial shrubs. Walking past a rock flower bed feels like visiting a high-end spa; it’s clean, intentional, and exudes a sense of permanent beauty. Beyond the aesthetics, the sound of rain trickling through the stones is therapeutic, and the best part is the sensory relief of never having to smell rotting mulch or deal with the back-breaking chore of re-mulching every single spring. It provides a crisp, architectural frame for your home that stays perfect year-round.
Essential Elements:
- Landscape fabric (heavy-duty)
- Landscaping pins or staples
- Edging material (metal, plastic, or stone)
- River rocks, lava rocks, or pea gravel
- Low-maintenance plants (like Hostas or Lavender)
- Shovel and rake
How to make it
- Begin by clearing the area of all grass, weeds, and old mulch using a sharp spade. Dig down about 3 to 4 inches to ensure you have a deep enough pocket for the rocks to sit flush with the lawn.
- Install your edging material along the perimeter. If using metal edging, ensure the stakes are driven deep into the ground to prevent frost heave. This border is critical for keeping your rocks from migrating into the grass.
- Lay down high-quality, professional-grade landscape fabric. Do not skip this step! Overlap the seams by at least 6 inches and secure the fabric tightly with landscape staples every 12 inches to prevent any future weed growth.
- Cut ‘X’ shapes into the fabric where you want your plants to go. Dig your holes, amend the soil with compost, and plant your greenery. Tuck the fabric back around the base of the plants snugly.
- Pour your chosen rocks over the fabric. Use a rake to spread them evenly to a depth of 2-3 inches. Rinse the rocks with a hose to wash away dust and reveal their true colors and textures.
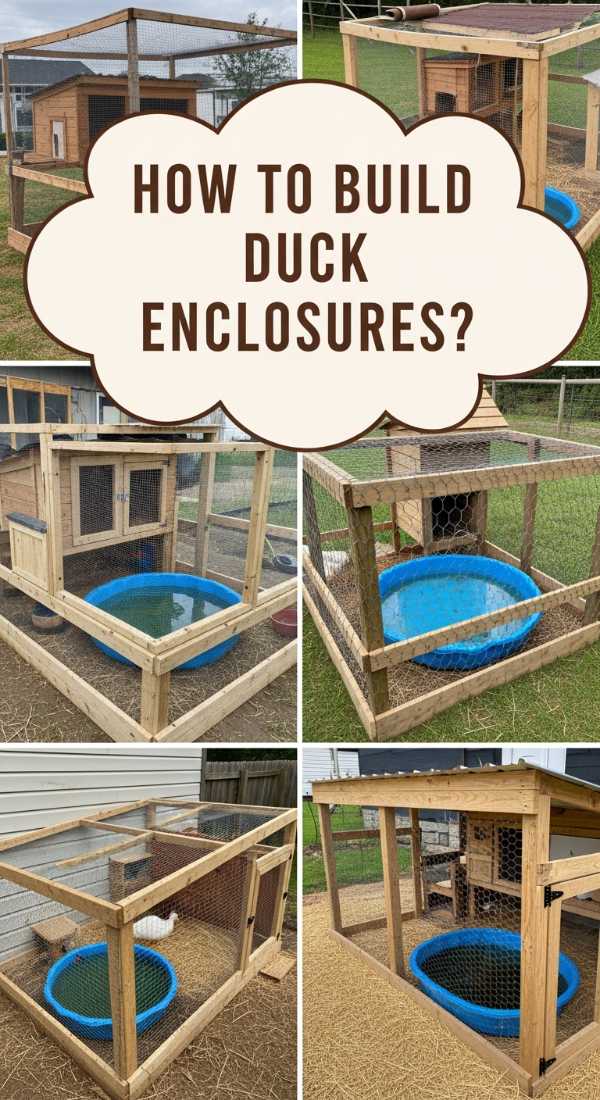
How to Build a Duck Enclosure for a Happy Backyard Habitat
Why we love this
Imagine waking up to the soft, rhythmic quacking of happy ducks and the sight of them splashing in clean water—it’s pure cottage-core bliss. A well-built enclosure doesn’t just house animals; it creates a miniature ecosystem that feels alive and buzzing with purpose. The aroma of fresh straw combined with the earthy scent of a garden makes your backyard feel like a true homestead. There is a profound sense of satisfaction in providing a safe, beautiful sanctuary for creatures that give so much joy back to your family.
Essential Elements:
- Pressure-treated lumber for the frame
- Hardware cloth (not chicken wire, for predator protection)
- Corrugated roofing panels
- Secure locking latches
- Straw or wood shavings for bedding
- A pre-formed pond or large basin
How to make it
- Design a footprint that allows for at least 4 square feet of house space and 10 square feet of run space per duck. Level the ground where the structure will sit to prevent pooling water.
- Construct the frame using 2×4 pressure-treated lumber. Build a raised ‘house’ section that is at least 2 feet off the ground to keep the ducks dry and away from ground-chilled earth.
- Wrap the entire run in 1/2-inch hardware cloth. Bury the cloth at least 12 inches into the ground or create a ‘skirt’ that extends outward to prevent predators like foxes or raccoons from digging underneath.
- Install the corrugated roofing at a slight angle to allow for rain runoff. Ensure there are no gaps where the roof meets the walls to keep the interior draft-free but well-ventilated at the top.
- Add a sturdy ramp leading to the house and fill the base with a thick layer of pine shavings. Place your water basin in the run area, ensuring it’s easy to drain and refill daily, as ducks need constant access to fresh water to stay healthy.
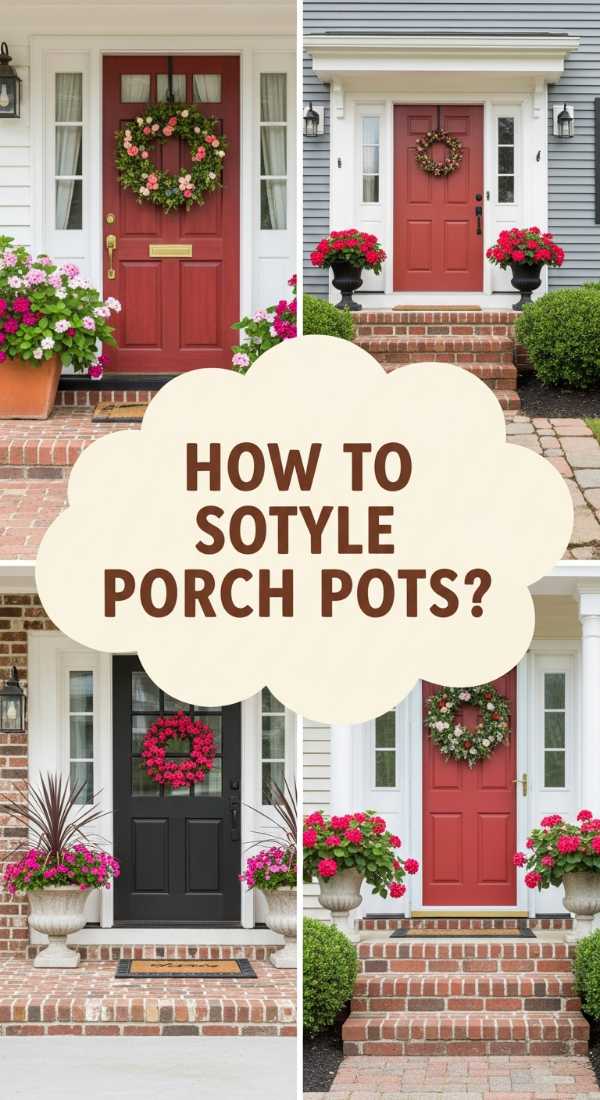
How to Arrange Front Porch Flower Pots for a Welcoming Entrance
Why we love this
Your front porch is the smile of your home, and perfectly arranged flower pots are the dimples that make it irresistible. The fragrance of petunias or jasmine wafting toward you as you unlock the door creates an immediate sense of ‘home.’ We love the visual layers—the way a tall, structural grass catches the light, while trailing vines soften the edges of the pot like a silk ribbon. It’s an easy, tactile way to celebrate the seasons, allowing you to play with textures from fuzzy dusty miller to the waxy sheen of tropical hibiscus.
Essential Elements:
- Varying sizes of decorative planters
- High-quality potting mix
- ‘Thrillers’ (tall focal plants)
- ‘Fillers’ (mounding plants)
- ‘Spillers’ (trailing plants)
- Slow-release fertilizer
How to make it
- Select three pots of varying heights but in a cohesive color palette. Ensure every pot has a drainage hole; if not, drill one carefully using a masonry bit.
- Fill the pots two-thirds full with premium potting soil. Mix in a handful of slow-release fertilizer granules to ensure your blooms stay vibrant throughout the heat of the summer.
- Place your ‘Thriller’ in the center (or the back if the pot will sit against a wall). This should be your tallest plant, like a Canna Lily or Dracaena spike, to draw the eye upward.
- Surround the thriller with ‘Fillers.’ These are mid-sized plants like Geraniums or Lantana that add bulk and color. Space them closely enough that the pot looks full from day one, but leave an inch or two for growth.
- Plant your ‘Spillers’ around the very edge. Sweet Potato Vine or Lobelia work beautifully to drape over the sides, breaking the hard lines of the container and adding a sense of lush abundance. Water deeply until liquid runs out the bottom.
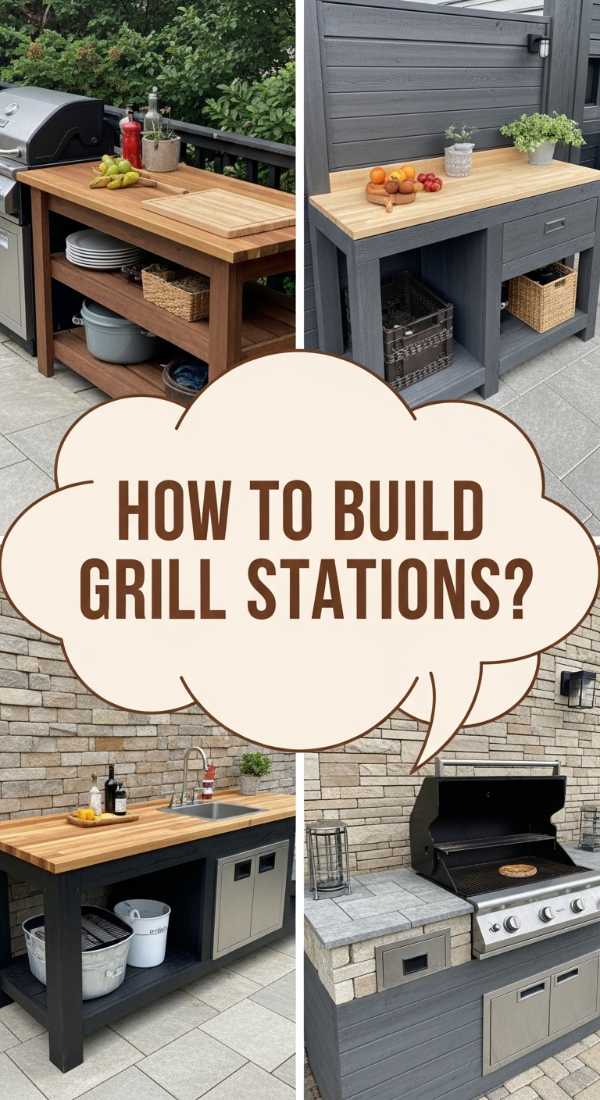
How to Build a DIY Grill Station for Easy Backyard Entertaining

Why we love this
There is nothing quite like the sizzle of a steak hitting a hot grate while you stand at a custom-built station, everything you need right at your fingertips. A dedicated grill station transforms cooking from a chore into a performance art. The smell of cedar wood and charcoal fire mingles with the fresh air, creating an atmosphere of ultimate relaxation. Having a smooth, wide countertop to prep veggies and set down a cold drink makes the host feel like a pro, turning any Tuesday night into a gourmet outdoor event.
Essential Elements:
- 4×4 cedar posts for the base
- Stone or concrete pavers for the countertop
- Stainless steel hooks for tools
- Built-in shelving or cabinets
- Weatherproof wood sealant
- Exterior-grade screws
How to make it
- Measure your grill and design the station to wrap around it or sit adjacent. Allow for at least 24 inches of counter space on one side for food prep and plating.
- Build the frame using 4×4 cedar posts for the legs and 2x4s for the horizontal supports. Use a level at every step; a lopsided grill station is a recipe for uneven cooking and rolling sausages!
- Apply a high-quality, UV-resistant wood sealer to the frame to protect it from grease splatters and rain. Let it dry for at least 24 hours before proceeding.
- Install the countertop. Using large-format porcelain tiles or concrete pavers provides a heat-resistant surface that is easy to wipe down. Secure them with outdoor construction adhesive.
- Add the finishing touches: screw in heavy-duty stainless steel hooks for your tongs and spatulas, and install a bottle opener on the side post. If possible, add a lower shelf to store your charcoal or propane tank out of direct sight.
How to Design an Outdoor Play Area for Endless Summer Fun

Why we love this
A dedicated play area is a sanctuary for imagination, filled with the scent of cedar mulch and the sounds of pure, unbridled joy. We love how a well-designed space encourages kids to ditch the screens and engage with the physical world. The texture of smooth wooden swings, the cool touch of a metal slide, and the soft landing of rubber mats create a sensory playground that feels safe and adventurous all at once. It’s about creating a ‘yes’ space—a part of the yard where they are free to climb, jump, and explore to their heart’s content.
Essential Elements:
- Play-grade cedar mulch or rubber nuggets
- Timber landscape borders
- Swing set or climbing structure
- Sun shades or a pergola
- Outdoor chalkboard or mud kitchen
- Weed barrier fabric
How to make it
- Identify a flat, shaded area of the yard. Use stakes and string to mark out a perimeter that extends at least 6 feet beyond any play equipment to create a ‘fall zone.’
- Excavate the area to a depth of 6 inches. This ensures your safety surfacing will be deep enough to actually cushion falls. Lay down heavy-duty weed fabric to keep the area clean.
- Install timber borders around the edge, securing them with rebar driven through pre-drilled holes. This keeps the mulch contained and gives the area a polished, intentional look.
- Assemble your play equipment—whether it’s a pre-built set or a DIY climbing wall—ensuring all anchors are set firmly into the ground or concrete footings as per the manufacturer’s safety specs.
- Fill the bordered area with 6 inches of certified play-grade mulch. Add ‘stations’ like a mud kitchen made from old pallets or an outdoor chalkboard mounted to the fence to encourage varied types of play.
How to Install a Planter Privacy Wall for a Secluded Backyard Retreat
Why we love this
There is a specific kind of peace that comes from being ‘hidden’ in plain sight. A planter privacy wall offers a living, breathing barrier that feels much more welcoming than a harsh wooden fence. We love the way the wind whistles through the leaves of tall grasses or bamboo, creating a natural sound machine that drowns out neighborhood noise. The visual of a vertical garden—overflowing with jasmine or clematis—turns a simple patio into a secluded jungle oasis where you can truly let your guard down and relax.
Essential Elements:
- Large rectangular planter boxes
- Wooden or metal lattice panels
- Tall privacy plants (Bamboo, Thuja, or tall grasses)
- Caster wheels (optional, for mobility)
- Heavy-duty potting soil
- Irrigation tubing
How to make it
- Line up your large planter boxes in the area where you want to create the barrier. If you want to be able to move the wall, install heavy-duty locking casters to the bottom of the boxes before filling them.
- Attach lattice panels or vertical trellises to the back of the planters using ‘L’ brackets. Ensure the panels are tall enough to provide the desired level of privacy—usually 6 feet is the sweet spot.
- Fill the bottom third of the planters with empty plastic milk jugs or wood chips to reduce the amount of heavy soil needed and improve drainage. Top with high-quality potting mix.
- Plant your ‘walls.’ For instant privacy, use clumping bamboo (ensure it is non-invasive) or tall Feather Reed Grass. For a flowering wall, plant fast-growing vines like Honeysuckle or Star Jasmine at the base of the lattice.
- Set up a simple drip irrigation line running through the planters. Since these containers will be exposed to wind and sun on all sides, they will dry out faster than garden beds, and consistent moisture is the key to maintaining your ‘living wall.’
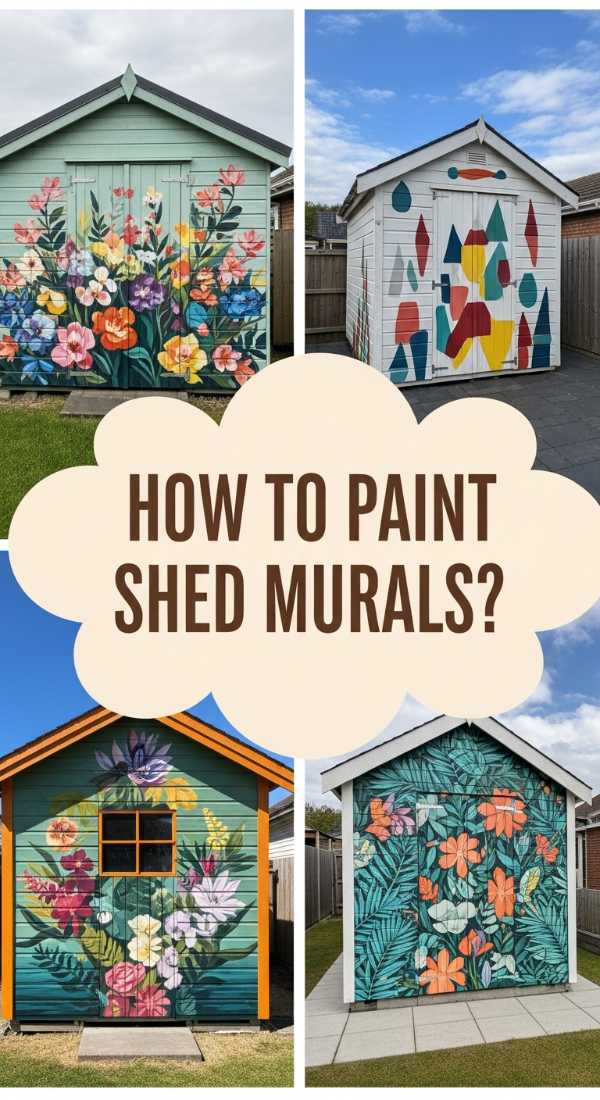
How to Paint Shed Murals for an Artistic Garden Workspace
![]()
Why we love this
Turning a boring backyard shed into a canvas is the ultimate expression of home-owner creativity. We love the way a mural can completely change the energy of a garden; a drab utility building suddenly becomes a focal point of inspiration and color. The feeling of the brush gliding over the wood, the smell of the fresh exterior paint, and the sight of a giant sunflower or an abstract landscape emerging from the gray walls is incredibly rewarding. it transforms a storage space into a ‘she-shed’ or a studio that fuels your soul every time you look out the window.
Essential Elements:
- Exterior primer and high-quality outdoor paints
- Varying sizes of brushes and rollers
- Painter’s tape and drop cloths
- A chalk pencil for sketching
- Clear UV-resistant topcoat
How to make it
- Clean the shed walls thoroughly with a power washer or a stiff brush and soapy water to remove dirt, cobwebs, and peeling paint. Let it dry completely for 48 hours.
- Apply a high-adhesion exterior primer. This is the most important step; it ensures your artwork won’t flake off after the first winter. Use a roller for large areas and a brush for the trim.
- Sketch your design lightly using a chalk pencil. Chalk is better than graphite because it wipes away easily with a damp cloth if you make a mistake. Think big—large shapes and bold colors read better from across the yard.
- Paint your design using exterior-grade latex paint. Start with the largest background shapes first, then layer the smaller details on top once the base is dry. Use high-quality brushes to get crisp lines around doors and windows.
- Once the mural is dry, apply two coats of a clear, non-yellowing UV-resistant sealer. This protects your masterpiece from fading in the sun and prevents moisture from damaging the paint.
How to Refresh a Ranch Exterior for a Modern Home Transformation
Why we love this
The classic ranch home is a mid-century gem, but it can often feel stuck in a ‘beige’ time warp. Refreshing the exterior is like giving your home a modern tailored suit. We love the dramatic impact of high-contrast colors—think dark charcoal siding paired with crisp white trim and a natural wood front door. The tactile shift from old, oxidized hardware to sleek, matte black fixtures provides a sense of luxury that you can feel every time you grab the door handle. It’s a total identity shift for your property that feels fresh, clean, and intentional.
Essential Elements:
- Modern exterior paint (Matte or Satin finish)
- New house numbers (Modern font)
- Upgraded light fixtures
- A bold front door color or wood stain
- Paint sprayer (for a professional finish)
How to make it
- Prep the surface by scraping away old paint and caulking gaps around windows and doors with a high-quality exterior sealant. A clean, sealed surface is the difference between a DIY job and a professional look.
- Use a paint sprayer to apply your main body color. For a modern look, consider ‘greige,’ deep navy, or charcoal. Sprayers provide a smooth, factory-like finish that brushes simply can’t match on large siding areas.
- Paint the trim in a contrasting color. If you went dark on the house, go crisp white or light gray on the trim to make the architectural lines pop. Don’t forget the soffits and fascia!
- Swap out dated, small light fixtures for oversized, modern lanterns. This one change has a massive impact on the home’s scale and perceived value.
- Update the ‘jewelry’ of the house: install new, large-scale house numbers in a vertical arrangement and replace the old door handle with a modern handset. Finally, paint the front door a ‘pop’ color like mustard yellow or a deep sage green to draw the eye to the entrance.
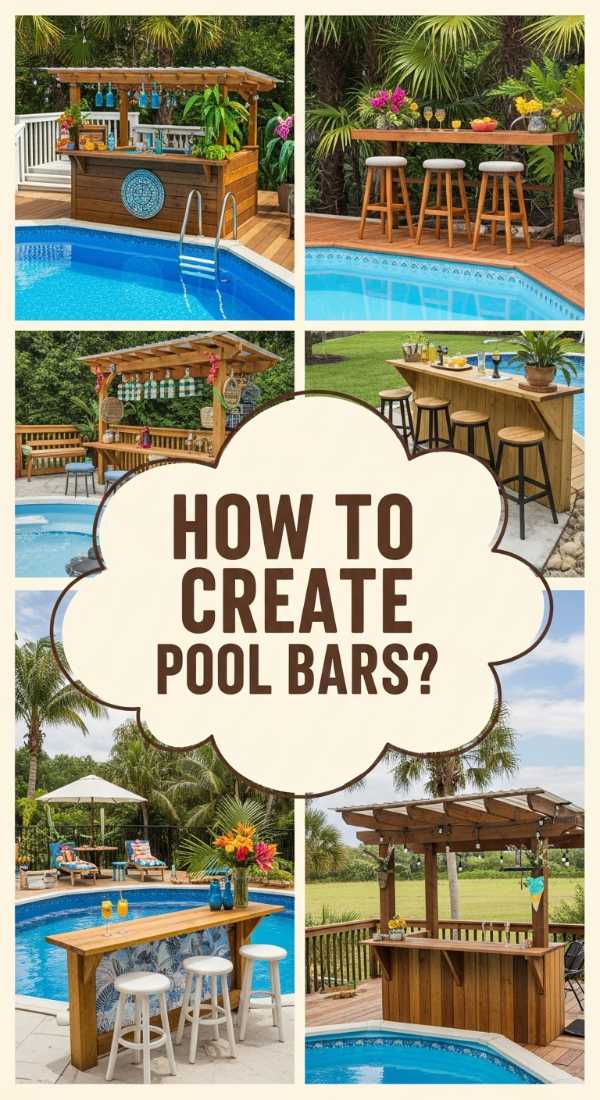
How to Create an Above Ground Pool Bar for the Perfect Summer Hangout
Why we love this
There is nothing that says ‘summer’ quite like a poolside bar. It’s the ultimate hack for making an above-ground pool feel like a custom-built resort. We love the social aspect—the way friends can lean against the cool counter with their feet in the water while a cold drink sits securely nearby. The smooth texture of a sealed wooden bar top and the sound of ice clinking in a glass create an instant vacation vibe in your own backyard. It turns your pool area into a functional living space where memories are made over sunset cocktails and laughter.
Essential Elements:
- Pressure-treated lumber or pallets
- Bar-height outdoor stools
- Exterior-grade polyurethane
- L-brackets and heavy-duty screws
- Outdoor string lights
How to make it
- Measure the height of your pool’s top rail. You want your bar to sit just slightly above or flush with the rail so people in the pool can reach it easily.
- Construct a ‘U’ shaped or straight frame using 2×4 lumber. If your pool has a deck, you can anchor the frame directly to the deck joists. If not, build a free-standing bar with a wide, stable base.
- For the bar top, use 2×6 boards or a large piece of exterior-grade plywood. Sand it down until it’s buttery smooth to prevent splinters for guests in swimsuits.
- Apply several coats of exterior-grade spar urethane to the bar top. This provides a thick, waterproof barrier that can handle spilled drinks and chlorinated pool water splashes without warping.
- Add a ‘kick rail’ at the bottom of the stools’ side for comfort. Finish the look by wrapping the base in bamboo fencing or cedar slats and hanging solar-powered string lights underneath the bar lip for a magical evening glow.
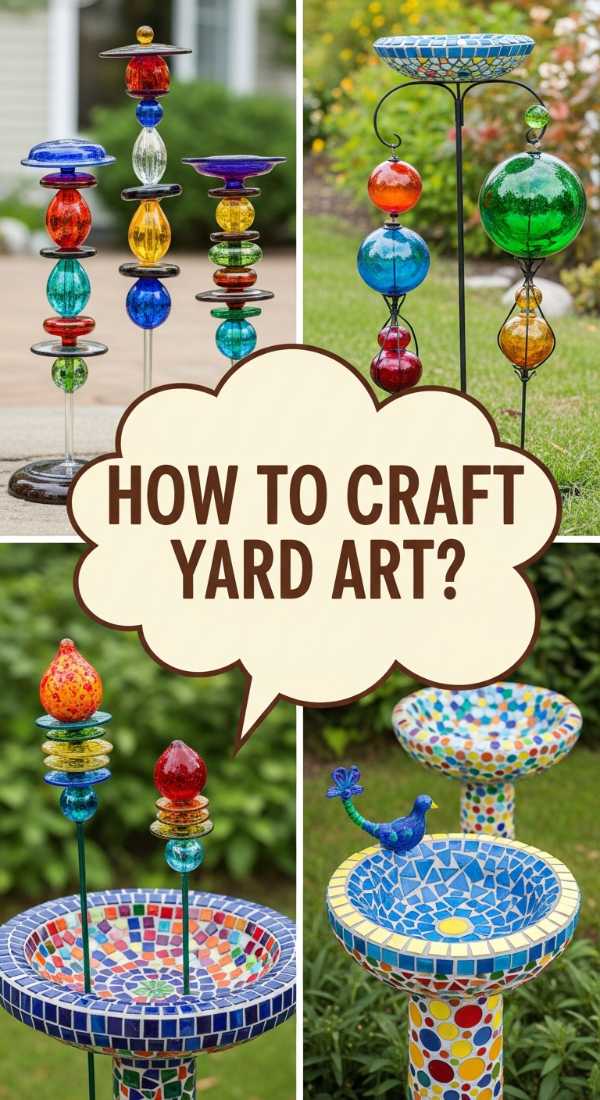
How to Craft Glass Yard Art for a Sparkly Botanical Garden
[IMAGE_10]
Why we love this
Glass yard art adds a whimsical, kaleidoscopic layer to your garden that changes with the light of the day. We love the way a simple glass ‘flower’ catches the afternoon sun, casting dancing patterns of cobalt blue, emerald green, and ruby red across the lawn. It’s like jewelry for your flower beds. The smooth, cool touch of the glass against the organic texture of the plants creates a beautiful juxtaposition. It’s a wonderful way to repurpose vintage glassware, giving forgotten heirlooms a new life where they can sparkle and shine in the open air.
Essential Elements:
- Vintage glass plates, bowls, and vases
- GE Silicone II sealant (Clear)
- Copper plumbing pipe or sturdy rebar
- Drill with a diamond-tipped bit (optional)
- Copper end caps
How to make it
- Scour thrift stores for colorful glass pieces. Look for plates with interesting textured edges, small bowls for the centers, and bud vases to act as the back connector.
- Clean all glass thoroughly with rubbing alcohol. This ensures the silicone creates a permanent, weatherproof bond.
- Stack your pieces to create a ‘flower’ shape. Usually, a large plate forms the petals, a smaller bowl forms the center, and a glass marble or gem is glued into the very middle.
- Apply a generous bead of GE Silicone II to the back of the center bowl and press it firmly into the large plate. Let it cure for 24 hours. Then, glue a small glass vase or a copper end cap to the back of the large plate—this will be the ‘socket’ for your stake.
- Push a piece of copper pipe or rebar into the ground in your garden. Once the glass glue has cured for at least 48 hours, slide the vase/socket over the pipe. Position it where it will catch the most sunlight for maximum sparkle!
Conclusion
Transforming your home and yard doesn’t require a professional crew or a massive budget; it just takes a little imagination and the willingness to get your hands a bit dirty. Each of these projects adds a layer of personality and comfort to your space, making it a place where you truly want to linger. From the architectural beauty of a rock bed to the whimsical charm of glass yard art, your home is a canvas waiting for your touch. So, pick one project this weekend, grab your tools, and start your journey from drab to fab. You’ll be amazed at how much a few DIY hacks can change not just your house, but the way you feel every time you walk through the front door.