

From Butter to Brunch: The Best Simple Food Boards Taking Over Social Media
There is something undeniably magical about the way a simple wooden board can transform a humble meal into a communal celebration. I remember the first time I set out a DIY grazing platter for my closest friends; the room immediately filled with laughter and the sound of wine glasses clinking, as everyone reached in to grab a bite. It wasn’t just about the food; it was about the shared experience, the vibrant colors, and the effortless beauty of a meal that looks as good as it tastes.
The food board trend has evolved far beyond the classic charcuterie. Today, we are seeing everything from deconstructed taco boards to elegant tea sandwich spreads taking over our feeds. These boards invite us to slow down, appreciate fresh ingredients, and enjoy the process of assembly. Whether you’re hosting a sun-drenched brunch or a cozy evening in, these viral board ideas are designed to bring people together through the universal language of delicious, accessible food.
HOW TO GRILL ASPARAGUS?

Why we love this
There is nothing quite like the snap of a perfectly grilled asparagus spear, its tips charred to a delicate crisp while the stalk remains tender and vibrant. As they hit the hot grates, the aroma of smoky wood and olive oil wafts through the air, signaling the true arrival of outdoor dining season. Each bite offers a harmonious balance of earthy sweetness and a hint of salt, making it the ultimate sophisticated addition to any spring-themed vegetable board. It feels elegant yet rustic, providing a refreshing crunch that cuts through richer elements on your platter.
Ingredients
- 1 bunch of fresh asparagus (medium thickness is best)
- 2 tablespoons extra-virgin olive oil
- 1 teaspoon flaky sea salt
- 1/2 teaspoon freshly cracked black pepper
- 1 lemon (cut into wedges)
- Optional: Shaved parmesan cheese or balsamic glaze
How to make it
- Begin by prepping your asparagus; wash the spears thoroughly in cold water and pat them completely dry with a kitchen towel to ensure they char rather than steam. Snap off the woody bottom ends by bending each spear until it breaks naturally, or trim the bottom two inches with a sharp knife.
- Preheat your grill to medium-high heat, aiming for a temperature between 400°F and 450°F. While the grill warms, place the asparagus in a large bowl or on a rimmed baking sheet and drizzle generously with olive oil, tossing by hand to ensure every inch is coated.
- Sprinkle the spears with sea salt and black pepper. Once the grill is hot, lay the asparagus across the grates perpendicular to the bars so they don’t fall through. Listen for that immediate sizzle—it’s the sound of the natural sugars caramelizing.
- Grill the spears for 3 to 5 minutes, using tongs to roll them occasionally. Look for deep brown char marks and a bright green color; the spears should be tender-crisp, meaning they have some give but still maintain a slight bite.
- Remove the asparagus from the grill immediately and arrange them on your board. Squeeze fresh lemon juice over the top to brighten the flavors, and finish with an extra sprinkle of salt or shaved parmesan if desired.
HOW TO MAKE STRAWBERRY CAKE?

Why we love this
A slice of homemade strawberry cake is like capturing sunshine on a plate, offering a nostalgic sweetness that reminds us of garden parties and warm afternoons. The texture is incredibly moist and light, with a delicate crumb that practically melts in your mouth, infused with the concentrated fragrance of sun-ripened berries. As you bake it, your kitchen will be filled with a heavenly, sugary aroma that draws everyone to the counter. It is the perfect centerpiece for a dessert board, surrounded by fresh cream and even more berries for a lush, monochromatic aesthetic.
Ingredients
- 2 cups all-purpose flour
- 1 1/2 cups granulated sugar
- 1/2 cup unsalted butter, softened
- 2 large eggs, room temperature
- 1/2 cup whole milk
- 1 cup fresh strawberry puree (strained)
- 1 1/2 teaspoons baking powder
- 1/2 teaspoon salt
- 1 teaspoon vanilla extract
- Optional: Fresh strawberries for garnish
How to make it
- Preheat your oven to 350°F (175°C) and grease a 9-inch round cake pan or line it with parchment paper for easy removal. Start by preparing your strawberry puree: blend fresh berries until smooth and simmer the liquid in a small saucepan over medium heat for 10 minutes to reduce moisture and concentrate the flavor, then let it cool.
- In a large mixing bowl, cream together the softened butter and granulated sugar using an electric mixer on medium speed. Beat for about 3-4 minutes until the mixture looks pale, light, and incredibly fluffy, which incorporates the air needed for a soft cake.
- Add the eggs one at a time, beating well after each addition to ensure they are fully emulsified. Stir in the vanilla extract and your cooled strawberry concentrate.
- In a separate bowl, whisk together the flour, baking powder, and salt. Gradually add the dry ingredients to the wet ingredients, alternating with the milk. Start and end with the flour mixture, mixing only until just combined—over-mixing at this stage will lead to a tough cake.
- Pour the batter into the prepared pan and smooth the top with a spatula. Bake for 30-35 minutes, or until a wooden skewer inserted into the center comes out clean. Let the cake cool in the pan for 10 minutes before transferring it to a wire rack to cool completely before slicing for your board.
HOW TO COOK SUMMER PASTA?

Why we love this
Summer pasta is the epitome of effortless elegance, focusing on the purity of seasonal produce rather than heavy, simmering sauces. There is a beautiful lightness to this dish, where the silken strands of pasta are coated in a shimmering veil of golden olive oil and the juices of bursting cherry tomatoes. The scent of freshly torn basil leaves hitting the warm noodles is intoxicating, creating a sensory experience that feels like a trip to the Italian coast. It’s a versatile base for a pasta-themed board, allowing guests to customize their bowls with extra herbs, cheeses, or red pepper flakes.
Ingredients
- 12 oz spaghetti or linguine
- 1 pint cherry tomatoes, halved
- 3 cloves garlic, thinly sliced
- 1/2 cup extra-virgin olive oil
- 1/4 cup fresh basil leaves, torn
- 1/2 teaspoon red pepper flakes
- 1/2 cup grated Pecorino Romano or Parmesan
- Salt and pepper to taste
How to make it
- Bring a large pot of heavily salted water to a rolling boil. Use about one tablespoon of salt per gallon of water; it should taste like the sea, as this is the only chance you have to season the pasta itself.
- Cook your pasta according to the package directions, but aim for ‘al dente’—usually 1-2 minutes less than the full cooking time. Before draining, reserve at least 1 cup of the starchy pasta water; this is the secret ingredient for a glossy, emulsified sauce.
- While the pasta cooks, heat the olive oil in a large skillet over medium-low heat. Add the thinly sliced garlic and red pepper flakes, sautéing gently for 2-3 minutes until the garlic is fragrant and just barely golden. Be careful not to burn it, as bitter garlic will ruin the delicate flavor.
- Increase the heat to medium and add the cherry tomatoes. Sauté them for about 5 minutes, tossing occasionally, until they begin to soften and release their juices into the oil, creating a light, natural sauce.
- Add the cooked pasta directly into the skillet with the tomatoes. Pour in half of the reserved pasta water and toss vigorously with tongs. Add the cheese and basil, continuing to toss over the heat until the water and oil emulsify into a creamy coating that clings to every strand. Serve immediately on a large platter or board.
HOW TO MAKE SPRING SOUP?

Why we love this
A bright spring soup is a celebration of rebirth, featuring the tender greens and sweet legumes that emerge as the frost thaws. Imagine a silky, vibrant green puree that feels light on the palate yet deeply satisfying, carrying the earthy sweetness of peas and the zing of fresh mint. The aroma is clean and herbaceous, providing a comforting warmth that doesn’t feel heavy like winter stews. It serves as a stunning visual anchor for a soup and bread board, especially when garnished with edible flowers or a swirl of crème fraîche.
Ingredients
- 2 cups fresh or frozen sweet peas
- 1 large leek, white and light green parts only, cleaned and sliced
- 2 tablespoons unsalted butter
- 3 cups high-quality vegetable or chicken broth
- 1/4 cup fresh mint leaves
- 1/2 cup heavy cream or coconut milk
- Salt and lemon juice to taste
How to make it
- In a large heavy-bottomed pot, melt the butter over medium heat. Add the sliced leeks and a pinch of salt, sautéing them for 5-7 minutes until they are soft and translucent but not browned. This slow sweat develops a sweet, mild base for the soup.
- Pour in the broth and bring the mixture to a gentle simmer. Once simmering, add the sweet peas. If using fresh peas, simmer for about 5 minutes; if using frozen, 2-3 minutes is sufficient to cook them through while maintaining their bright green color.
- Remove the pot from the heat and stir in the fresh mint leaves. The residual heat will wilt the mint and release its oils without making it taste bitter or overcooked.
- Using an immersion blender, or working in batches with a traditional blender, puree the soup until it is completely smooth and velvety. If using a traditional blender, be careful with the hot liquid—don’t fill it more than halfway and hold the lid down with a towel.
- Return the soup to the pot over low heat and stir in the cream or coconut milk to add a luxurious richness. Finish with a squeeze of fresh lemon juice to highlight the green flavors and adjust salt to your preference. Serve in small bowls on your board with crusty bread.
HOW TO GRILL HEALTHY CHICKEN?

Why we love this
Perfectly grilled healthy chicken is all about achieving that elusive combination of a crisp, seasoned exterior and an incredibly juicy, tender interior. When done right, the meat carries a subtle smokiness from the fire that enhances the natural savory notes of the poultry. It’s a lean, protein-packed powerhouse that anchors a healthy dinner board, surrounded by grilled vegetables and zesty dipping sauces. The sight of golden-brown sear marks across a well-marinated breast is enough to make anyone’s mouth water, promising a clean and satisfying meal.
Ingredients
- 1.5 lbs boneless, skinless chicken breasts or thighs
- 3 tablespoons olive oil
- 2 cloves garlic, minced
- 1 teaspoon dried oregano
- 1 teaspoon smoked paprika
- Zest and juice of 1 lemon
- 1/2 teaspoon salt and black pepper
How to make it
- Start by evening out the thickness of your chicken breasts; place them between two sheets of plastic wrap and gently pound the thicker parts with a meat mallet until they are a uniform thickness (about 3/4 inch). This ensures they cook evenly on the grill without the edges drying out.
- Whisk together the olive oil, minced garlic, oregano, paprika, lemon zest, lemon juice, salt, and pepper in a bowl. Place the chicken in a resealable bag, pour the marinade over it, and massage to coat. Let it marinate in the refrigerator for at least 30 minutes, but no longer than 4 hours to prevent the lemon juice from changing the meat’s texture.
- Preheat your grill to medium heat (about 375°F). Clean the grates thoroughly and lightly oil them to prevent sticking. Place the chicken on the grill and close the lid to maintain a steady temperature.
- Grill the chicken for 5-7 minutes per side. Resist the urge to move them too early; let the chicken sear undisturbed until it naturally releases from the grates. Use a meat thermometer to ensure the internal temperature reaches exactly 165°F (74°C).
- Once finished, transfer the chicken to a clean plate and cover loosely with foil. Let the meat rest for at least 5 minutes before slicing. This allows the juices to redistribute throughout the meat, ensuring every bite is succulent.
HOW TO BAKE SOURDOUGH DISCARD?

Why we love this
Baking with sourdough discard is a rustic, soul-satisfying practice that turns potential waste into golden, tangy treasures. There is a deep, fermented complexity to the flavor that regular flour simply cannot match—a subtle sour note that dances on the tongue. Whether you’re making crackers or a quick bread, the texture is often remarkably chewy and substantial. It brings a sense of artisanal charm to your food board, offering a homemade element that feels both grounded and sophisticated, perfectly paired with salted butter or local honey.
Ingredients
- 1 cup sourdough discard (unfed)
- 1/2 cup all-purpose flour
- 2 tablespoons melted butter or olive oil
- 1/2 teaspoon sea salt
- 1 tablespoon dried herbs (rosemary or thyme)
- Extra sea salt for topping
How to make it
- Preheat your oven to 325°F (160°C). This lower temperature allows the discard to crisp up without burning the delicate fermented sugars. Line a large baking sheet with parchment paper or a silicone baking mat.
- In a medium bowl, combine the sourdough discard, flour, melted butter (or oil), sea salt, and your choice of dried herbs. Stir until a smooth, slightly sticky dough forms. The consistency should be spreadable but thick.
- Transfer the dough to the center of your prepared baking sheet. Using an offset spatula or the back of a spoon, spread the mixture as thinly and evenly as possible. The thinner you spread it, the crispier your final crackers will be. Aim for a translucent layer where possible.
- Sprinkle the top with an extra pinch of flaky sea salt. Place the tray in the oven and bake for 10 minutes. At this point, remove the tray and use a pizza cutter or sharp knife to score the dough into squares or rectangles; this makes them easy to snap apart later.
- Return the tray to the oven and bake for another 15-25 minutes. Keep a close eye on them during the final minutes; you want them to be golden brown and firm to the touch. Let them cool completely on the tray to reach maximum crunch before adding them to your board.
HOW TO MAKE TEA SANDWICHES?

Why we love this
Tea sandwiches are the ultimate expression of culinary daintiness, turning the simple act of eating into a refined ritual. There is something so satisfying about the precision of these crustless triangles, with their soft, pillowy bread and cool, creamy fillings. The crunch of a thin cucumber slice against herbed cream cheese provides a textural contrast that feels incredibly refreshing. They are the perfect finger food for a brunch board, inviting guests to sample a variety of flavors in small, elegant bites that look like edible art.
Ingredients
- 1 loaf of high-quality white or whole wheat sandwich bread
- 1/2 cup softened cream cheese
- 1 tablespoon fresh dill, chopped
- 1 English cucumber, sliced paper-thin
- 4 oz smoked salmon or thinly sliced ham
- Butter, softened
- Salt and white pepper
How to make it
- Start with the freshest bread possible. Lay out your slices in pairs. On one side of each pair, spread a thin, even layer of softened butter; this acts as a moisture barrier to prevent the bread from getting soggy from the fillings.
- For a classic cucumber sandwich, mix the softened cream cheese with the fresh dill and a pinch of white pepper. Spread a generous layer of this mixture over the buttered bread. Layer the paper-thin cucumber slices in an overlapping pattern like fish scales to ensure every bite has crunch.
- For a savory smoked salmon version, layer the salmon over a base of plain cream cheese and add a tiny squeeze of lemon. Once filled, place the second slice of bread on top and press down very gently to seal the sandwich.
- Using a very sharp serrated knife, carefully trim away the crusts from all four sides of the sandwich. This is the most crucial step for the classic aesthetic; the edges must be clean and straight.
- Slice the sandwiches into your desired shape: traditional triangles, narrow fingers, or small squares. To prevent the bread from drying out while you assemble the rest of your board, keep them covered with a slightly damp (not wet) paper towel until the moment of serving.
HOW TO MAKE SUMMER MOCKTAILS?
Why we love this
A well-crafted summer mocktail is far more than just juice; it is a sophisticated, layered beverage that celebrates the bounty of the season. The visual appeal alone—vibrant liquids swirling with fresh herbs and floating fruit—brings a festive energy to any board. Each sip offers a complex profile of tart citrus, aromatic herbs, and effervescent bubbles that cleanse the palate and refresh the spirit. It’s a thoughtful way to ensure everyone at the table feels included in the toast, providing a cooling escape from the summer heat.
Ingredients
- 1 cup fresh berries (strawberries or raspberries)
- 1/4 cup fresh lime juice
- 1 tablespoon agave nectar or simple syrup
- 6-8 fresh mint leaves
- Sparkling water or club soda
- Ice cubes
- Garnish: Extra berries and lime wheels
How to make it
- Begin by creating the flavorful base of your mocktail through a process called muddling. In a sturdy glass or a cocktail shaker, combine the fresh berries, agave nectar, and mint leaves. Use a muddler or the end of a wooden spoon to gently crush the ingredients together, releasing the juices from the fruit and the aromatic oils from the mint.
- Add the fresh lime juice to the muddled mixture. The acidity of the lime is essential for balancing the sweetness of the fruit and syrup, giving the drink a professional, balanced finish.
- Fill a highball glass or a large wine glass with plenty of ice. Strain the fruit mixture into the glass if you prefer a clean drink, or pour it in as-is (seeds and all) for a more rustic, textured appearance on your board.
- Top the glass with chilled sparkling water or club soda. Use a long spoon to stir gently from the bottom up, ensuring the syrup is distributed evenly through the bubbles without losing the carbonation.
- Garnish with a fresh sprig of mint (slap it against your hand first to release the scent) and a wheel of lime. Arrange these drinks in the center or corners of your board to create a refreshing focal point.
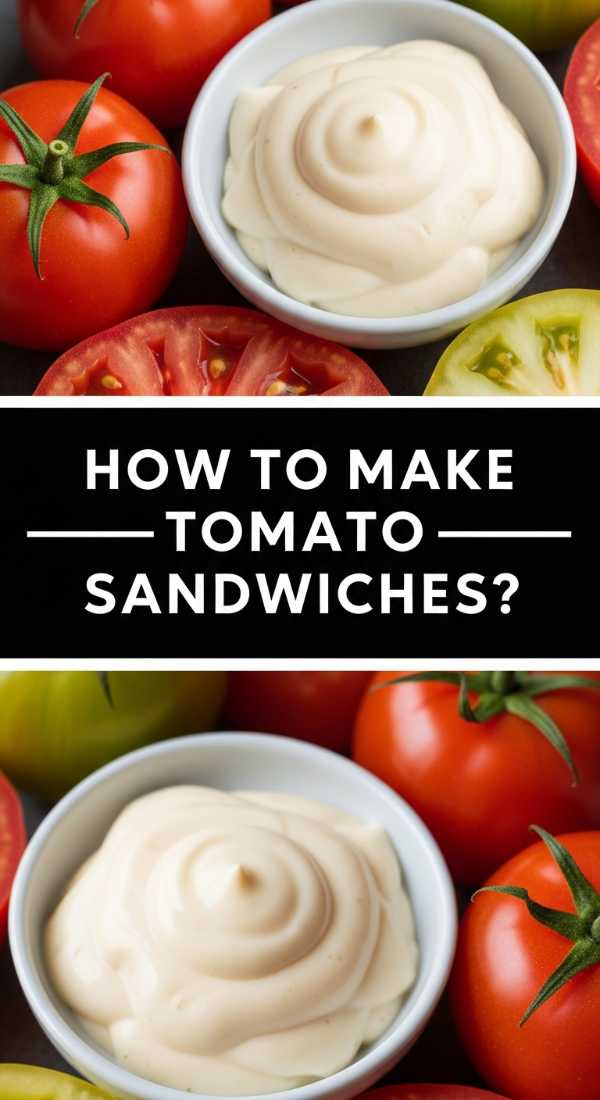
HOW TO MAKE TOMATO SANDWICHES?

Why we love this
The tomato sandwich is a humble masterpiece, a seasonal rite of passage that relies entirely on the quality of its simple components. There is an unmatched joy in the way the salty, acidic juices of a thick heirloom tomato slice mingle with a rich, creamy layer of mayonnaise. The bread softens just slightly from the moisture, creating a texture that is both tender and substantial. It is the taste of August on a board—unpretentious, deeply satisfying, and vibrating with the flavor of sun-warmed earth and flaky sea salt.
Ingredients
- 2 thick slices of high-quality white bread (brioche or sourdough work well)
- 1 large, ripe heirloom tomato
- 2 tablespoons high-quality mayonnaise (like Duke’s or homemade)
- Flaky sea salt
- Freshly cracked black pepper
- Optional: Fresh basil or chives
How to make it
- Select the most fragrant, heavy-for-its-size tomato you can find. Slice it into thick, sturdy rounds—about half an inch thick. Place the slices on a paper towel and sprinkle them lightly with salt; let them sit for 5 minutes. This ‘sweats’ the tomato, intensifying the flavor and preventing the sandwich from becoming overly watery.
- Take your bread slices and spread an unapologetically thick layer of mayonnaise on both pieces, going all the way to the edges. The mayo acts as a rich, savory cushion for the tomatoes.
- Layer the tomato slices generously on one piece of bread. Don’t be afraid to overlap them; the tomato is the star of the show here. Add a final, heavy sprinkle of flaky sea salt and a good amount of cracked black pepper directly onto the tomatoes.
- If using herbs, scatter torn basil or chopped chives over the tomatoes now. Close the sandwich with the second slice of bread.
- Using a sharp knife, cut the sandwich diagonally. For a board, you can cut them into smaller quarters. Serve these immediately while the bread is fresh and the tomatoes are at room temperature for the best flavor profile.
HOW TO MAKE AUTHENTIC TACOS?
[IMAGE_10]
Why we love this
Authentic tacos bring a vibrant explosion of flavor and texture to a food board, offering a deconstructed feast that is as fun to assemble as it is to eat. There is something primal and wonderful about the smell of toasted corn tortillas and the savory, spiced aroma of slow-cooked meat. Each taco is a perfect bite: the warmth of the tortilla, the richness of the protein, the sharp bite of raw onions, and the cooling brightness of fresh cilantro and lime. It’s a communal, hands-on dining experience that encourages guests to linger and customize their perfect meal.
Ingredients
- 1 lb protein (flank steak, chicken thighs, or pork shoulder)
- 1 pack small corn tortillas
- 1 small white onion, finely diced
- 1 bunch fresh cilantro, chopped
- 2-3 limes, cut into wedges
- 1 tablespoon vegetable oil
- Taco seasoning (cumin, chili powder, garlic powder, salt)
- Optional: Radish slices and salsa verde
How to make it
- Prepare your protein by cutting it into small, bite-sized pieces or leaving it whole for shredding later. Rub the meat thoroughly with your taco seasoning blend. Heat the vegetable oil in a heavy cast-iron skillet over high heat until it’s shimmering.
- Sear the meat in batches to avoid overcrowding the pan. For steak, cook for 3-4 minutes per side for a medium-rare char. For chicken or pork, ensure it is cooked through and has developed a deep, crispy exterior. Let the meat rest for 5-10 minutes before slicing or shredding.
- While the meat rests, prepare your tortillas. The secret to an authentic taco is a properly heated tortilla. Heat a dry skillet or ‘comal’ over medium-high heat. Place the corn tortillas on the heat for about 30 seconds per side until they are soft, pliable, and show small charred spots. Keep them warm by wrapping them in a clean kitchen towel.
- Prepare the ‘classic trio’ of toppings: the finely diced white onion, the chopped cilantro, and the lime wedges. In authentic street tacos, these are the essential components that balance the richness of the meat.
- Arrange the components on your board: a pile of warm meat, a stack of steaming tortillas, and small bowls of the onion, cilantro, and radishes. Instruct your guests to double-stack the tortillas for stability, add the meat, top with onions and cilantro, and always finish with a heavy squeeze of lime juice.
The Art of the Board: Bringing It All Together
Whether you’re crafting a board filled with smoky grilled asparagus or a sweet spread featuring homemade strawberry cake, the key is in the presentation and the passion you put into each component. These boards are more than just a trend; they are a lifestyle choice that prioritizes connection and the beauty of simple ingredients. By following these detailed steps and focusing on sensory details, you can create a viral-worthy spread that will be the talk of your next gathering. Remember, there are no hard rules—only the joy of good food and great company.
Frequently Asked Questions
What is the best type of board to use for food displays?
A large, food-safe wooden cutting board or a marble slab is ideal. Wood adds a rustic, warm feel, while marble keeps cool items like cheese and mocktails at a better temperature.
How can I keep my food board looking fresh for hours?
Keep ‘wet’ items like tomatoes or sliced fruits in small separate bowls on the board. You can also cover bread and sandwiches with a slightly damp cloth until guests arrive to prevent them from drying out.
Can I prepare these components in advance?
Absolutely! Most of the proteins and baked goods like the sourdough discard or strawberry cake can be made ahead. However, items like tomato sandwiches and mocktails should be assembled right before serving for the best texture and flavor.