
10 Budget-Friendly Ideas for the Viral Simple Food Board
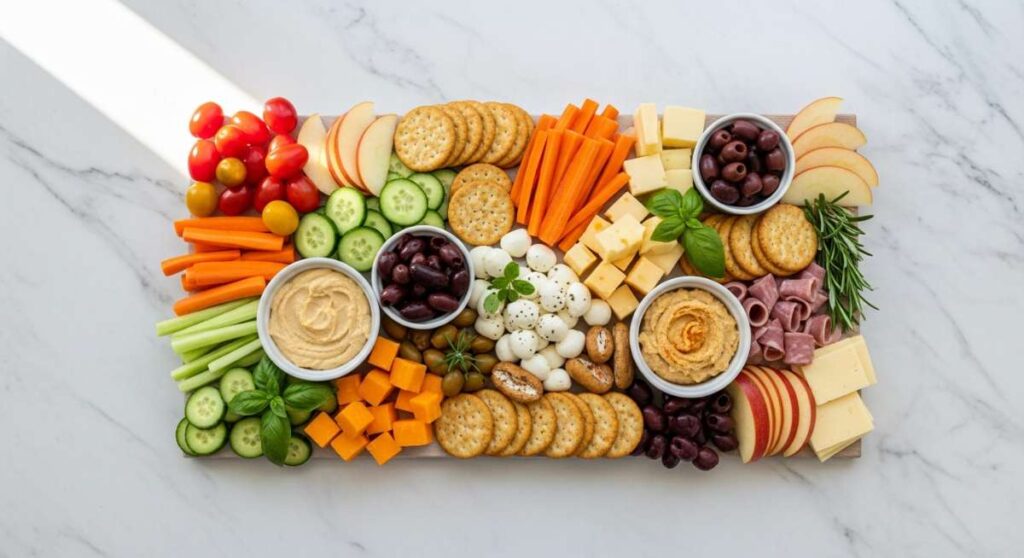
There is something inherently magical about gathering friends and family around a table where the food isn’t just a meal, but an experience. In the age of aesthetic grazing platters, the ‘Simple Food Board’ has taken the internet by storm because it strips away the pretension and focuses on what we actually crave: comfort, warmth, and shared joy. It is about those slow Sunday afternoons where the light hits the wooden board just right, and everyone reaches for a bite of something homemade and heartfelt.
I remember the first time I ditched the individual plates for one big, beautiful board. The energy in the room shifted instantly; the conversation flowed faster, and the pressure of a ‘perfect’ dinner party evaporated into the steam rising from the roasted potatoes. Today, I’m sharing ten of my favorite budget-friendly staples that will make your next food board go viral—not just for the photos, but for the memories you’ll create while eating them.
How to Make Crispy Potatoes
Why we love this
Nothing says comfort quite like the satisfying crunch of a perfectly roasted potato yielding to a fluffy, cloud-like center. These golden gems catch the light beautifully on a board, offering a rustic charm that appeals to everyone from kids to gourmands. The aroma of toasted rosemary and garlic wafting from the oven creates an instant sense of home, making these the ultimate crowd-pleaser that costs pennies to prepare. They are the salty, savory anchor that every viral food board needs to feel complete and substantial.
Ingredients
- 2 lbs Yukon Gold potatoes
- 3 tbsp extra virgin olive oil
- 2 tsp sea salt
- 1 tsp cracked black pepper
- 2 sprigs fresh rosemary, minced
- 4 cloves garlic, smashed
How to make it
- Begin by peeling your potatoes or scrubbing them well if you prefer the skin on, then chop them into uniform 1-inch cubes to ensure they cook at the same rate.
- Place the cubes in a large pot of cold, salted water and bring to a rolling boil; parboil them for exactly 8 minutes until the outsides are slightly tender but the centers are still firm.
- Drain the potatoes and give them a vigorous shake in the colander to roughen up the edges; this creates those tiny starchy bits that turn into the ultimate crispy crust.
- Preheat your baking sheet in a 425°F (220°C) oven for 5 minutes, then carefully toss the potatoes with olive oil, rosemary, and garlic directly on the hot tray.
- Spread them in a single layer with plenty of space between each piece—if they are too crowded, they will steam rather than crisp.
- Roast for 35-40 minutes, flipping halfway through with a metal spatula, until they are deep mahogany gold and audibly crunchy when tapped.
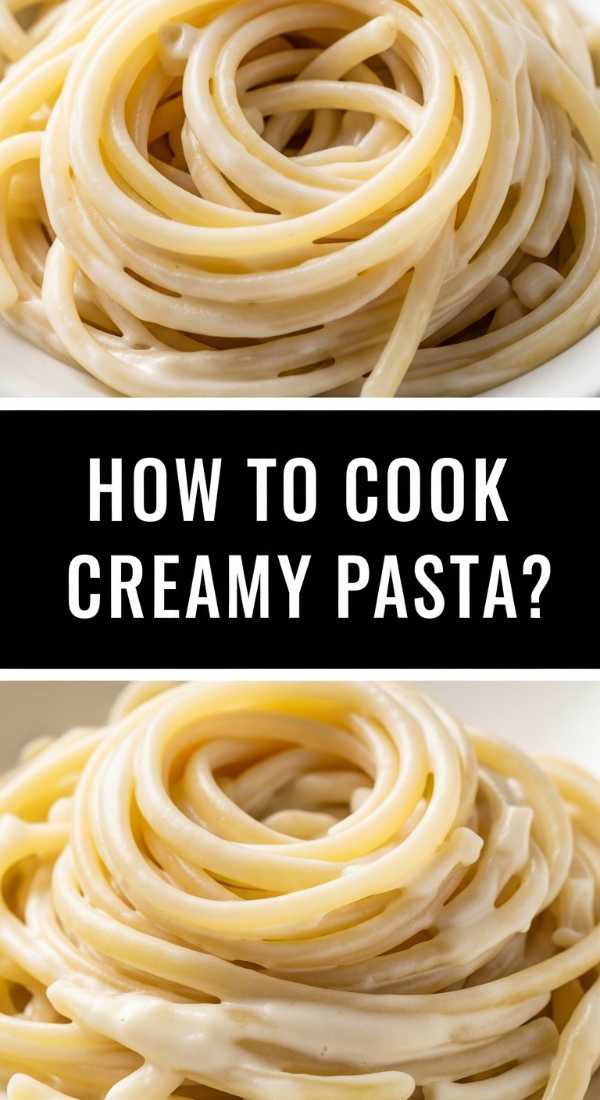
How to Cook Creamy Pasta
Why we love this
There is a luxurious, silky elegance to a pile of creamy pasta nestled in the center of a board, waiting to be twirled onto a fork. The way the sauce clings to every strand, glistening under the kitchen lights, invites guests to dive in immediately for that rich, buttery mouthfeel. It’s the kind of dish that feels like a warm hug, balancing the sharp bite of parmesan with the mellow sweetness of heavy cream and garlic. Adding this to your board elevates the entire spread from a snack tray to a decadent, cohesive meal.
Ingredients
- 12 oz fettuccine or linguine
- 1 cup heavy cream
- 1/2 cup unsalted butter
- 1 cup freshly grated Parmesan cheese
- 2 cloves garlic, minced
- Salt and white pepper to taste
- Fresh parsley for garnish
How to make it
- Bring a large pot of heavily salted water to a boil—it should taste like the sea—and cook your pasta until it is just shy of al dente, about 2 minutes less than the package instructions.
- While the pasta cooks, melt the butter in a large skillet over medium-low heat, adding the minced garlic and sautéing just until fragrant but not browned.
- Slowly pour in the heavy cream, whisking constantly as it comes to a gentle simmer; let it reduce slightly for about 3-4 minutes until it coats the back of a spoon.
- Before draining the pasta, reserve 1 cup of the starchy pasta water; this is the secret ‘liquid gold’ that binds the sauce to the noodles.
- Transfer the pasta directly into the skillet with the cream, then sprinkle the Parmesan cheese over the top while tossing vigorously with tongs.
- Slowly splash in the reserved pasta water a little at a time while stirring until the sauce transforms into a glossy, emulsified coating that clings perfectly to every strand.
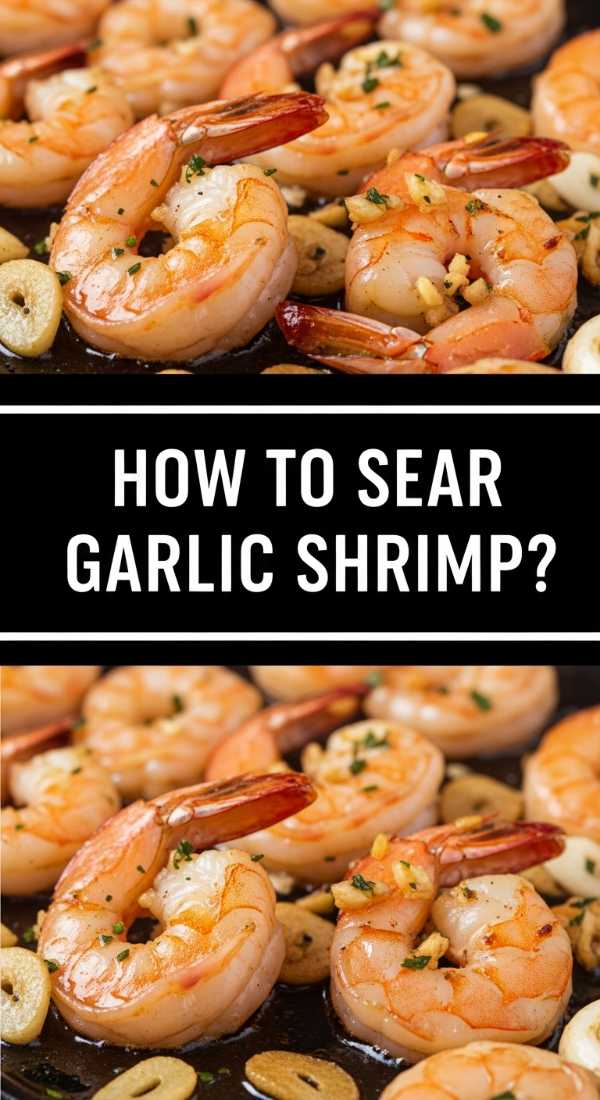
How to Sear Garlic Shrimp

Why we love this
Shrimp brings a touch of coastal sophistication to any board, offering a bright, snappy texture that cuts through heavier elements. When seared correctly, the garlic becomes toasted and sweet, creating an addictive butter sauce that guests will want to soak up with extra bread. The vibrant pink hue of the shrimp adds a stunning pop of color to your arrangement, making the entire board look professionally styled. It’s a high-protein, low-fuss addition that feels incredibly indulgent without requiring hours in the kitchen.
Ingredients
- 1 lb large shrimp, peeled and deveined
- 4 tbsp butter
- 1 tbsp olive oil
- 5 cloves garlic, thinly sliced
- 1/2 tsp red pepper flakes
- Fresh lemon wedges
- Handful of chopped cilantro
How to make it
- Pat the shrimp completely dry with paper towels; any moisture on the surface will cause them to steam rather than develop a beautiful golden sear.
- Heat a large cast-iron or heavy-bottomed skillet over medium-high heat until it is shimmering, then add the olive oil and 2 tablespoons of the butter.
- Place the shrimp in the pan in a single layer, ensuring they aren’t touching, and let them sear undisturbed for 90 seconds until the bottom edges turn pink and opaque.
- Flip the shrimp and immediately add the remaining butter, sliced garlic, and red pepper flakes to the center of the pan.
- Tilt the pan slightly and use a spoon to continuously baste the shrimp with the melting garlic butter for another 60 seconds.
- Remove from heat the moment the shrimp form a ‘C’ shape—if they curl into an ‘O’, they are overcooked—and finish with a generous squeeze of fresh lemon juice.
How to Bake Soft Cookies

Why we love this
A tray of soft-baked cookies provides that essential sweet finish that balances out the savory components of a food board. The scent of vanilla and caramelized sugar acts as a siren song, drawing everyone in for a treat that feels nostalgic and comforting. We love the contrast of a slightly crisp outer edge against a center that is so gooey it almost melts on the tongue. Scattering these across your board adds a whimsical, lived-in feel that encourages guests to linger over dessert and coffee.
Ingredients
- 1 cup unsalted butter, softened
- 3/4 cup brown sugar, packed
- 3/4 cup granulated sugar
- 2 large eggs
- 2 tsp vanilla extract
- 2 1/4 cups all-purpose flour
- 1 tsp baking soda
- 1/2 tsp sea salt
- 2 cups semi-sweet chocolate chips
How to make it
- In a large bowl, cream together the softened butter and both sugars using a hand mixer on medium-high speed for at least 3 minutes until the mixture is pale and fluffy.
- Add the eggs one at a time, beating well after each addition, then stir in the vanilla extract until fully incorporated.
- In a separate bowl, whisk the flour, baking soda, and salt, then gradually add the dry ingredients to the wet mixture, mixing on low speed only until the white streaks disappear.
- Gently fold in the chocolate chips with a spatula, then cover the dough and chill in the refrigerator for at least 30 minutes to prevent the cookies from spreading too thin.
- Scoop rounded tablespoons of dough onto a parchment-lined baking sheet and bake at 350°F (175°C) for 9-11 minutes.
- The key is to remove them when the edges are barely golden but the centers still look slightly ‘underdone’ and soft; they will firm up on the hot pan as they cool to create that perfect texture.
How to Roast Juicy Chicken

Why we love this
Succulent roasted chicken is the ultimate versatile protein, offering both crispy, seasoned skin and tender, moist meat that pairs with almost anything. It brings a wholesome, rustic energy to the board, making it feel like a true centerpiece rather than just a collection of snacks. The way the juices pool slightly around the meat adds an element of richness that enhances the surrounding vegetables and breads. It’s an affordable way to feed a crowd while providing a deeply satisfying, savory experience that smells absolutely divine.
Ingredients
- 4 lbs bone-in, skin-on chicken thighs or a whole broken-down chicken
- 3 tbsp melted butter
- 1 tbsp smoked paprika
- 1 tsp dried thyme
- 1 tsp onion powder
- Kosher salt and black pepper
- 1 lemon, sliced
How to make it
- Preheat your oven to 400°F (200°C) and prepare a roasting pan with a wire rack to allow heat to circulate entirely around the chicken pieces.
- Use paper towels to pat the chicken skin extremely dry; this is the most critical step for achieving a professional-grade, crackling skin.
- Rub the melted butter under the skin and all over the exterior, then generously coat with the salt, pepper, paprika, thyme, and onion powder mixture.
- Place the chicken on the rack and tuck the lemon slices underneath the pieces to infuse the meat with bright citrus notes as it roasts.
- Bake for 35-45 minutes, or until a meat thermometer inserted into the thickest part reaches 165°F (74°C) and the skin is a deep, vibrant amber color.
- Crucially, let the chicken rest for at least 10 minutes before slicing or placing on the board; this allows the internal juices to redistribute so the meat stays incredibly moist.
How to Make Street Tacos

Why we love this
Street tacos bring a vibrant, festive energy to a food board, offering guests a customizable and interactive eating experience. We love the explosion of flavors—the char of the tortilla, the zing of the lime, and the fresh crunch of raw onions and cilantro. They are visually stunning when lined up in a row, creating a colorful focal point that feels trendy and casual at the same time. It’s a fun, handheld way to enjoy complex flavors without the formality of a sit-down dinner.
Ingredients
- 12 small corn tortillas
- 1 lb flank steak or chicken breast, finely diced
- 1 white onion, finely chopped
- 1 bunch fresh cilantro, chopped
- 3 limes, cut into wedges
- 2 tbsp vegetable oil
- 1 tbsp cumin and chili powder mix
How to make it
- Toss your finely diced meat with the cumin, chili powder, and a generous pinch of salt, letting it marinate at room temperature for 15 minutes.
- Heat a heavy skillet or griddle over high heat with the vegetable oil until it starts to smoke slightly, then add the meat in a single layer.
- Sear the meat quickly for 3-5 minutes, stirring only occasionally to ensure you get those dark, flavorful charred bits on the edges.
- While the meat rests, heat a separate dry skillet over medium-high and toast each corn tortilla for 30 seconds per side until they develop small charred spots and become pliable.
- Stack two tortillas for each taco to provide structural integrity, then fill with a generous spoonful of the seared meat.
- Top immediately with the raw white onion and cilantro, serving with lime wedges on the side so guests can add that essential hit of acidity right before eating.
How to Pan Sear Salmon

Why we love this
A perfectly seared piece of salmon is the height of elegance on a simple food board, providing a sophisticated pink hue and a delicate, buttery texture. The contrast between the glass-shattering crispy skin and the tender, flaky interior is a sensory delight that makes every bite feel like a special occasion. It’s a healthy, light option that balances the heavier starches on the board, offering a clean and refined flavor profile. When finished with a sprinkle of flaky sea salt, it looks like a piece of culinary art.
Ingredients
- 2 large salmon fillets (6-8 oz each)
- 2 tbsp high-smoke point oil (like grapeseed or avocado oil)
- Flaky sea salt
- 1 tbsp unsalted butter
- Fresh dill for garnish
How to make it
- Remove the salmon from the fridge 20 minutes before cooking to take the chill off, and use a sharp knife to gently score the skin in three shallow lines.
- Season only the skin side with a heavy layer of salt, then pat it dry again with a paper towel to remove any moisture drawn out by the salt.
- Heat your pan over medium-high heat with the oil until it is shimmering and just beginning to wisps of smoke appear.
- Place the salmon skin-side down in the pan and immediately press down firmly with a flexible spatula for 30 seconds to prevent the skin from curling.
- Lower the heat to medium and let the salmon cook skin-side down for about 6-7 minutes, watching the side of the fillet as the opaque color creeps upward.
- Flip the fillet for the final 60 seconds of cooking, adding a knob of butter to the pan to baste the top, then serve immediately for maximum crispness.
How to Bake Fudgy Brownies
Why we love this
Fudgy brownies are the ultimate ‘treat yourself’ addition to a board, offering a dense, cocoa-rich indulgence that satisfies the deepest chocolate cravings. That signature crackly, paper-thin top layer catching the light is a hallmark of a great brownie, signaling a moist and chewy center. They are easy to cut into small, bite-sized squares, making them perfect for grazing as guests move around the table. The deep mahogany color adds a sophisticated earthy tone to your food board’s color palette.
Ingredients
- 1/2 cup unsalted butter, melted and cooled
- 1 cup granulated sugar
- 2 large eggs
- 1 tsp vanilla extract
- 1/3 cup high-quality cocoa powder
- 1/2 cup all-purpose flour
- 1/4 tsp salt
- 1/4 tsp baking powder
How to make it
- Preheat your oven to 350°F (175°C) and grease an 8×8 inch baking pan, lining it with parchment paper for easy removal later.
- In a medium bowl, whisk together the melted butter and sugar vigorously for about 2 minutes; this incorporates air which helps create that coveted shiny, crackly top.
- Add the eggs and vanilla, beating again until the mixture is light and well-combined.
- Sift in the cocoa powder, flour, salt, and baking powder directly over the wet ingredients to ensure there are no lumps in your dense batter.
- Using a rubber spatula, gently fold the dry ingredients into the wet until just combined—do not overmix, or your brownies will become cake-like rather than fudgy.
- Spread the batter into the pan and bake for 20-22 minutes; a toothpick inserted into the center should come out with a few moist crumbs clinging to it, rather than being completely clean.
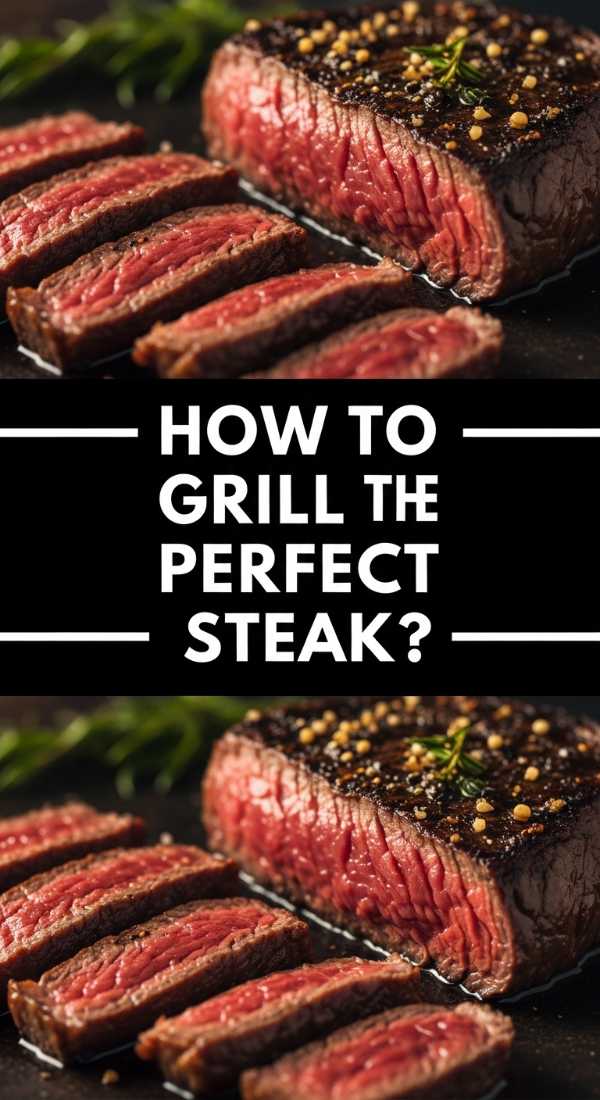
How to Grill Perfect Steak

Why we love this
There is something undeniably primal and satisfying about a perfectly grilled steak, sliced thin and fanned out across a wooden board. The smoky aroma of the char combined with the rich, beefy flavor creates an instant centerpiece that feels masculine yet refined. We love the gradient of colors from the dark, seasoned crust to the tender, pink medium-rare center. Topped with a melting dollop of herb butter, it adds a layer of savory decadence that makes the entire board feel like a premium steakhouse experience.
Ingredients
- 1.5 lb Ribeye or New York Strip (at least 1.5 inches thick)
- 2 tbsp neutral oil
- Kosher salt and coarse black pepper
- 2 tbsp butter
- 2 cloves garlic, smashed
- 1 sprig rosemary
How to make it
- Take the steak out of the refrigerator at least 45 minutes before cooking to ensure it reaches room temperature for even heat distribution.
- Pat the steak extremely dry and season very aggressively with salt and pepper; much of the seasoning will fall off during the high-heat cooking process.
- Heat your grill or cast-iron skillet to high heat until it is screaming hot—you should only be able to hold your hand over it for a second.
- Sear the steak for 3-4 minutes on the first side without moving it to develop a thick, flavorful crust, then flip.
- Add the butter, garlic, and rosemary to the pan, spooning the foaming herb butter over the steak as it finishes cooking (about 3 more minutes for medium-rare).
- Remove the steak when the internal temperature hits 130°F (54°C) and let it rest on a cutting board for a full 10 minutes before slicing against the grain to ensure maximum tenderness.
How to Make Avocado Toast
[IMAGE_10]
Why we love this
Avocado toast has become a viral staple for a reason: it is the perfect marriage of creamy, crunchy, and bright flavors. It serves as a fantastic base on a food board, offering a fresh, green element that feels modern and healthy. We love how the richness of the avocado acts as a canvas for various toppings, from spicy pepper flakes to tangy lemon zest. It’s a versatile addition that works for brunch boards or evening appetizers alike, providing a satisfying bite that everyone recognizes and loves.
Ingredients
- 4 thick slices of sourdough bread
- 2 ripe avocados
- 1 tbsp extra virgin olive oil
- 1/2 lemon, juiced
- Red pepper flakes and flaky sea salt
- Optional: Radish slices or microgreens for garnish
How to make it
- Toast your sourdough slices until they are deeply golden and have a firm, sturdy crunch that can support the weight of the toppings without sagging.
- In a small bowl, mash the avocado flesh with the lemon juice, olive oil, and a pinch of salt using a fork; keep it slightly chunky for a better texture.
- Rub a raw garlic clove over the warm, toasted surface of the bread to infuse it with a subtle, aromatic heat before adding the avocado.
- Spread a thick, generous layer of the avocado mash onto each slice, swirling it with the back of a spoon to create ‘wells’ for the oil to sit in.
- Sprinkle the red pepper flakes and flaky sea salt from a height to ensure even coverage across the entire surface.
- Finish with your choice of garnishes—like thinly sliced radishes or a handful of microgreens—and slice into triangles for easy grabbing from the board.
The Art of the Simple Board
Creating a viral-worthy food board isn’t about expensive ingredients or complicated techniques; it’s about the care you put into each component and the way you bring them together. Whether you’re piling up crispy potatoes or fanning out a perfectly grilled steak, the goal is to create a landscape of food that invites people to linger, talk, and enjoy. So, grab your biggest wooden board, pick a few of these budget-friendly favorites, and watch as your table becomes the heart of the home. Happy hosting!