
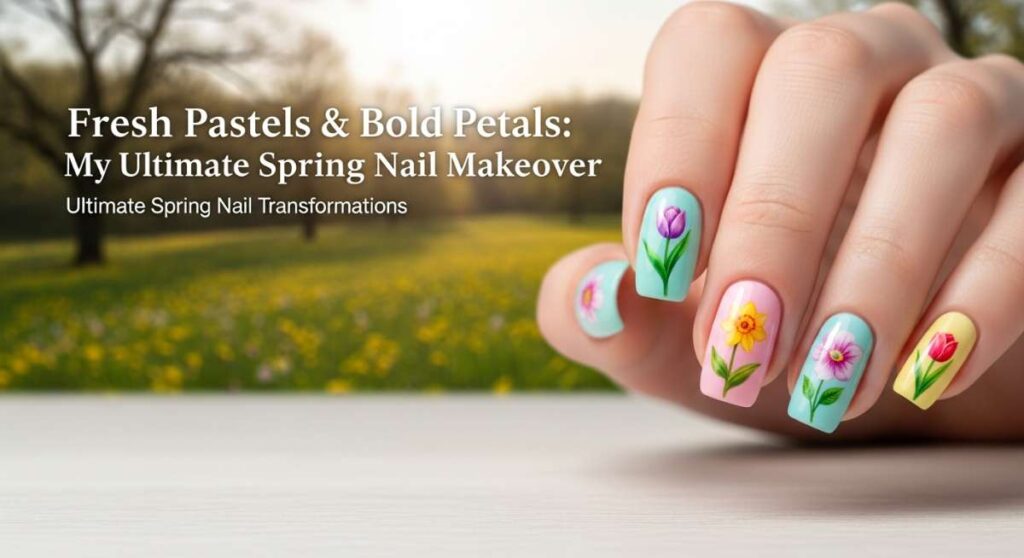
Fresh Pastels & Bold Petals: My Ultimate Spring Nail Makeover
Hello, my lovely souls! As the frost finally retreats and the first crocuses begin to peek through the soil, I can feel a shift in my spirit. There is something so restorative about spring, isn’t there? It’s a time for shedding the heavy layers of winter and stepping into a world that feels light, airy, and full of possibility. For me, that transition always starts at my fingertips. There’s a special kind of magic in looking down at your hands and seeing colors that mirror the blooming world outside.
Lately, I’ve been spending my afternoons in my sun-drenched nook, sipping lavender tea and dreaming up the perfect manicure to welcome the season. I wanted something that felt like a soft embrace but still held that spark of new growth. Whether you are craving the whisper-soft touch of a pastel or the striking contrast of something a bit more daring, I’ve curated these transformations just for you. Let’s dive into this garden of inspiration together.
4 Bold Steps to Get Edgy Spring Nails
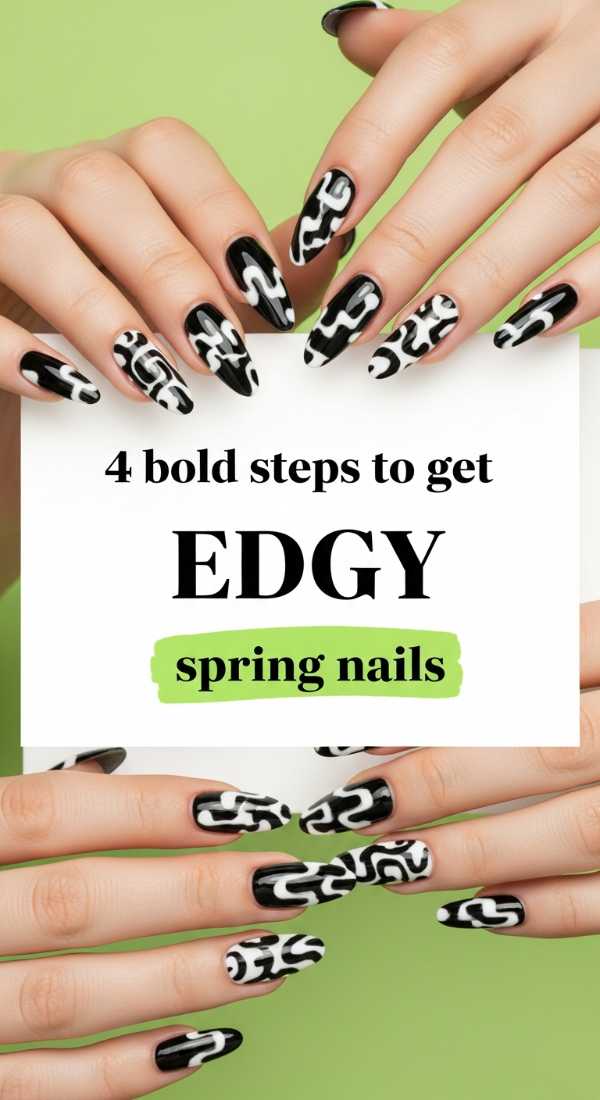
Why to love this Design:
This look is for the girl who loves the freshness of spring but isn’t afraid to keep her cool, mysterious edge. It blends the softness of the season with sharp, modern elements that demand attention in the best way possible.
Essential Elements:
- Charcoal grey or deep lavender base
- Silver metallic studs or foil
- Matte top coat
- Precision detailing brush
How to Prepare:
- Start by shaping your nails into a sharp stiletto or square to set the ‘edgy’ foundation.
- Apply two thin coats of a moody pastel, like a dusty lilac.
- While the polish is tacky, carefully place silver studs along the cuticle line.
- Seal the entire look with a velvet matte top coat for a sophisticated finish.
Budget Range
- Essie ‘For the Twill of It’ ($10)
- Beetles Nail Art Studs ($8)
- OPI Matte Top Coat ($11)
Achieve Perfection in 5 Steps: Spring Nail Inspo Almond
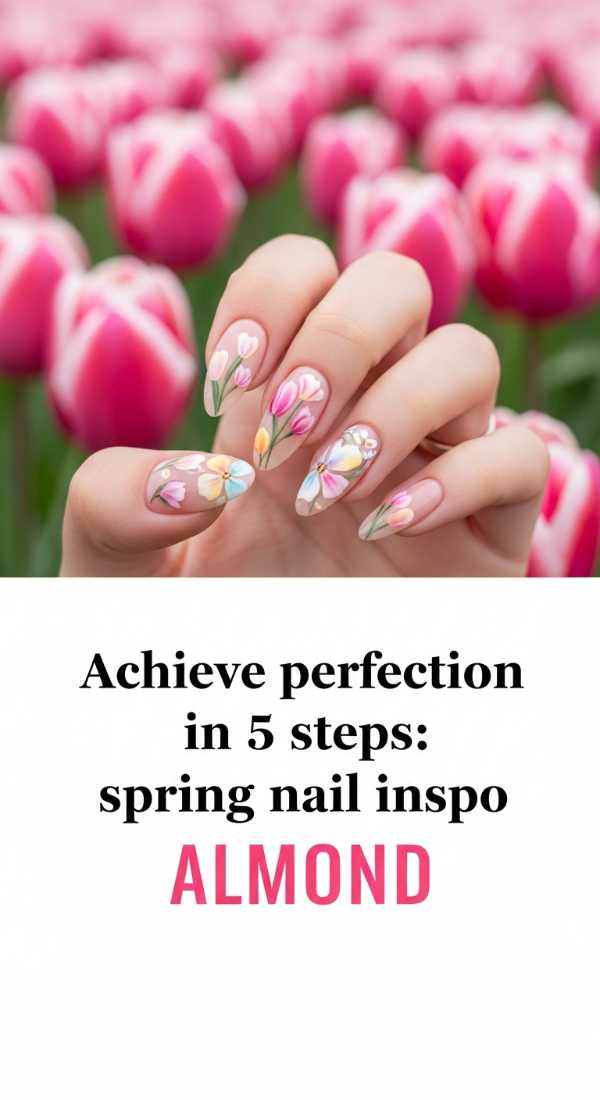
Why to love this Design:
The almond shape is the epitome of elegance. It elongates the fingers and provides the perfect canvas for those delicate, dreamy spring florals we all adore. It’s like wearing a bouquet on your hands.
Essential Elements:
- Sheer peach or blush base
- Fine-tipped dotting tool
- White and yellow acrylic paints
- Glossy high-shine top coat
How to Prepare:
- File nails into a symmetrical almond shape, ensuring the tip is gently rounded.
- Buff the surface to a smooth shine to ensure the sheer polish lays evenly.
- Apply your sheer base and let it dry completely.
- Use your dotting tool to create tiny daisies—five white dots for petals, one yellow for the center.
- Finish with a thick layer of glossy top coat to protect the art.
Budget Range
- Zoya ‘ZP658’ PixieDust ($12)
- Nail Art Brushes Set ($7)
- Sally Hansen Shiny Top Coat ($6)
Master 3 Ways to Wear Spring Nails White
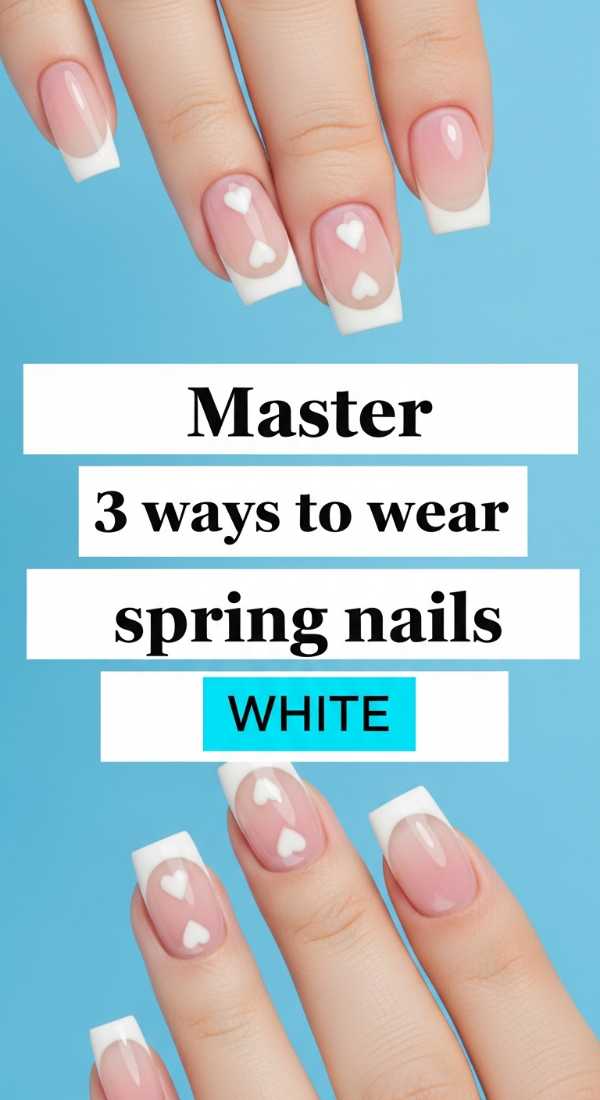
Why to love this Design:
White nails are the ultimate palate cleanser. They are crisp, clean, and provide a high-contrast pop against your favorite spring sundress. It’s the chicest way to signal that winter is officially over.
Essential Elements:
- Opaque marshmallow white polish
- Iridescent shimmer overlay
- Gold striping tape
How to Prepare:
- The Classic: Apply three thin coats of opaque white for a solid, ‘white-out’ look.
- The Glaze: Layer a single coat of iridescent shimmer over your white base for a ‘cloud’ effect.
- The Minimalist: Add a single horizontal gold stripe across the middle of each nail for a modern touch.
Budget Range
- OPI ‘Funny Bunny’ ($11)
- Holo Taco ‘Shimmer’ ($13)
- Gold Nail Tape ($5)
6 Simple Tricks for Glowing Spring Nails Chrome
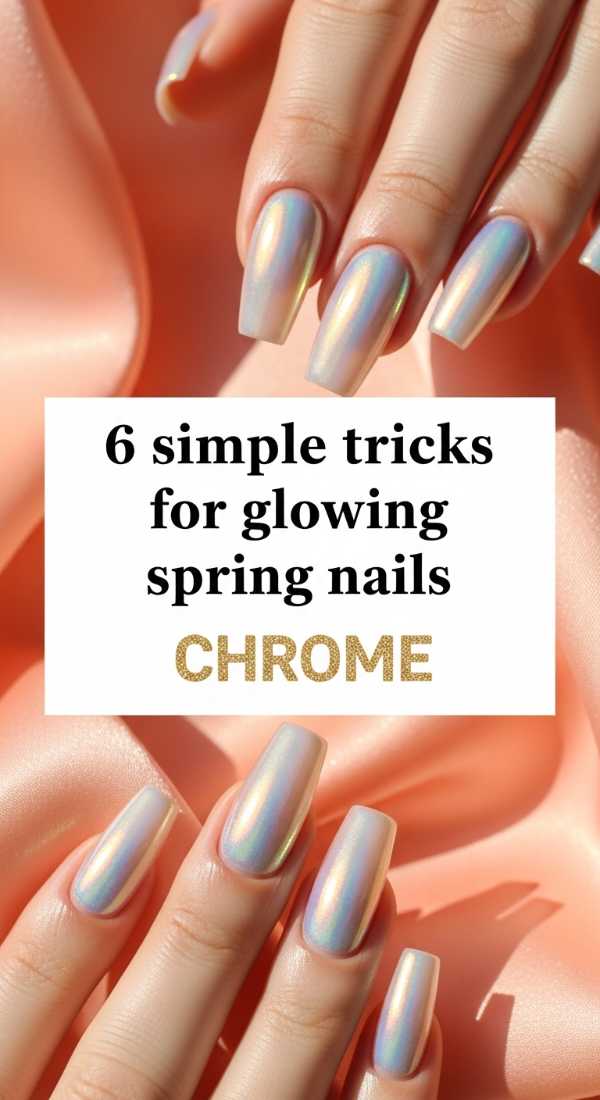
Why to love this Design:
Chrome is the trend that refuses to quit, and for good reason! In the spring sun, these nails glow like pearls. It’s a futuristic take on the classic pastel palette that feels incredibly high-end.
Essential Elements:
- Pearl or aurora chrome powder
- No-wipe gel top coat
- Sponge applicator
- LED Lamp
How to Prepare:
- Apply a base color of pale mint or sky blue and cure.
- Apply a no-wipe top coat and cure for only 30 seconds.
- Use the sponge to rub the chrome powder into the nail until it shines like a mirror.
- Dust off excess powder with a soft brush.
- Seal with another layer of top coat and cure fully.
- Clean the edges with alcohol for a crisp glow.
Budget Range
- Born Pretty Chrome Powder ($9)
- SUNUV LED Lamp ($25)
- Modelones Gel Polish ($7)
Create Dark Vibes in 4 Steps: Goth Spring Nails
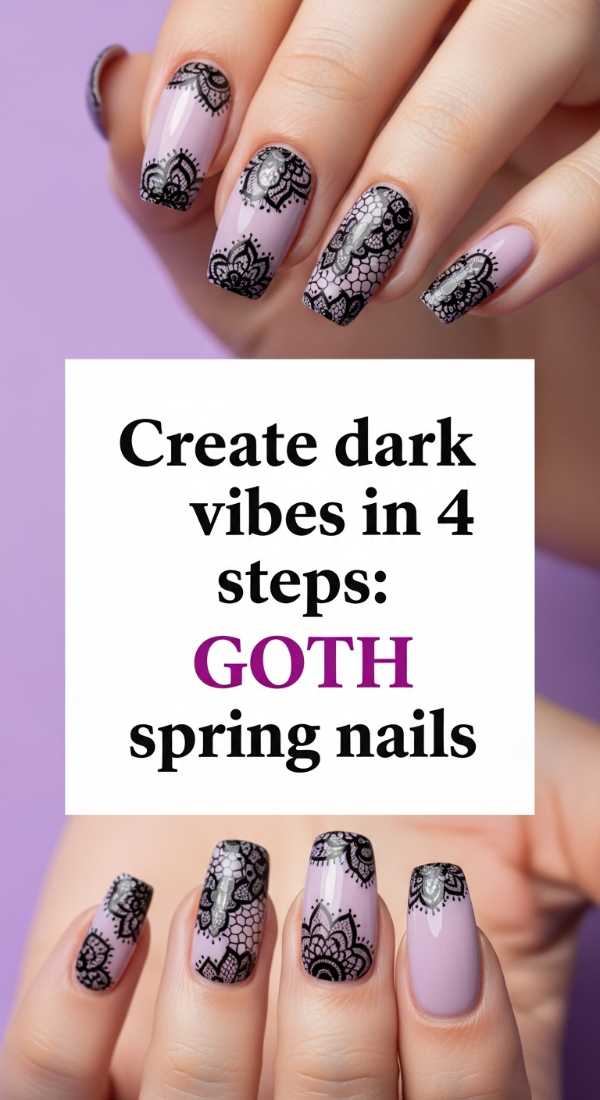
Why to love this Design:
Who says spring has to be all sunshine? This design is for the souls who find beauty in the shadows. It’s a ‘Spring Goth’ aesthetic that uses botanical motifs to soften a darker color palette.
Essential Elements:
- Deep forest green or black polish
- Pressed dried flowers
- Clear builder gel
- Tweezers
How to Prepare:
- Apply two coats of your dark base color.
- While the second coat is wet, use tweezers to place tiny, colorful dried flowers onto the nail.
- Lightly press the flowers down to ensure they lie flat.
- Apply a generous layer of clear builder gel or ‘plumping’ top coat to encapsulate the flowers.
Budget Range
- ILNP ‘Salem’ ($12)
- Tifany Dried Flowers for Nails ($9)
- Orly Builder in a Bottle ($20)
5 Secrets to Maintaining Spring Natural Nails
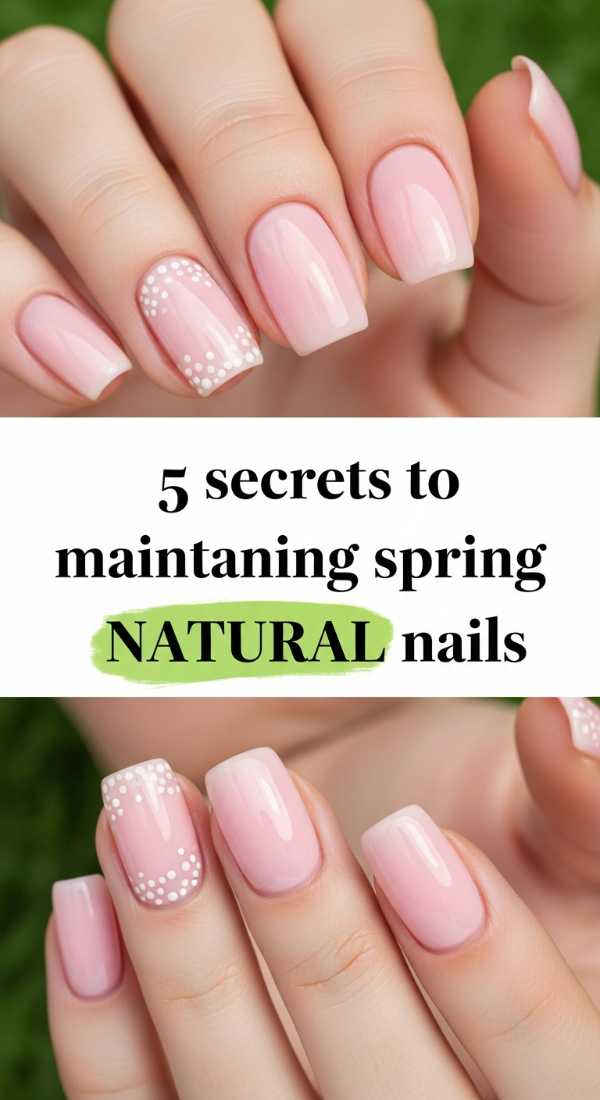
Why to love this Design:
Sometimes the most beautiful look is simply a healthy, natural nail. This ‘quiet luxury’ approach focuses on the health of your nails, giving you a clean, polished look that feels incredibly lightweight.
Essential Elements:
- Glass nail file
- Jojoba-based cuticle oil
- Strengthening base coat
- Buffing block
How to Prepare:
- Use a glass file to prevent peeling and seal the nail edge.
- Apply cuticle oil twice daily—massage it in to stimulate growth.
- Buff the nail surface gently to remove ridges and add natural shine.
- Apply a nutrient-rich strengthener to protect against breakage.
- Keep nails at a manageable length to prevent snagging during spring cleaning!
Budget Range
- CND SolarOil ($9)
- Mont Bleu Glass File ($10)
- Barielle Nail Strengthener ($12)
Refine your look: 3 Steps for Almond Nails Spring
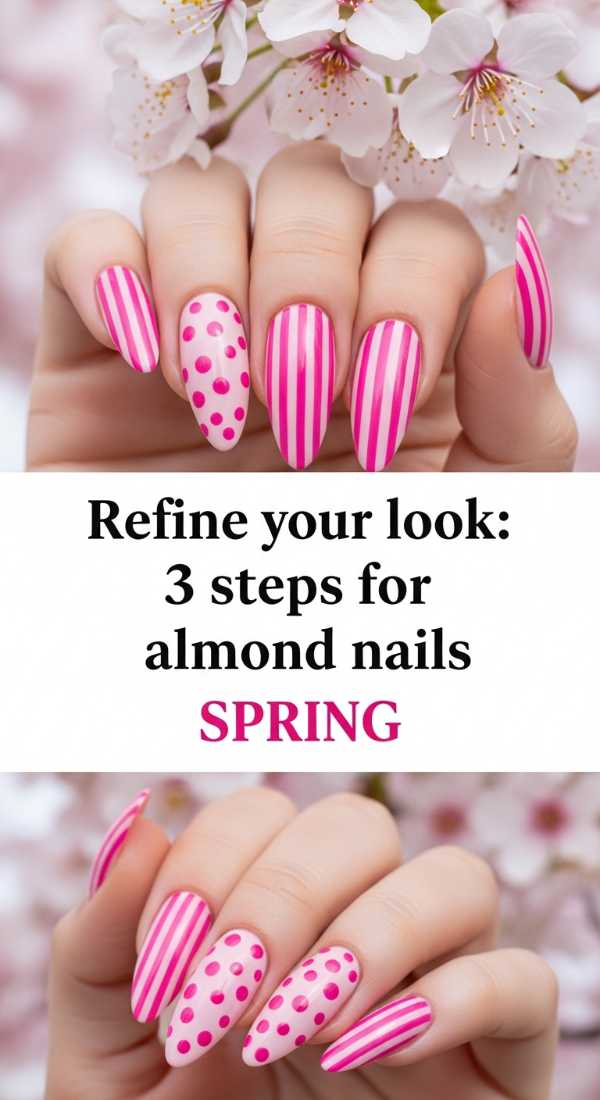
Why to love this Design:
This is all about the ‘Clean Girl’ aesthetic refined for the season. It’s subtle, sophisticated, and makes your hands look incredibly groomed and graceful.
Essential Elements:
- Milky pink polish
- French tip guide stickers
- Micro-fine silver glitter
How to Prepare:
- Apply two coats of milky pink to achieve a semi-translucent base.
- Use guides to paint a very thin ‘micro’ French tip in crisp white.
- Add a tiny dot of silver glitter at the very base of the nail for a hidden sparkle.
Budget Range
- DND ‘Soft White’ ($8)
- Maniology French Guides ($6)
- Gelish ‘Pink Smoothie’ ($13)
Upgrade Your Style: 5 Edgy Spring Nails Tutorials

Why to love this Design:
This is for the creative heart! It combines geometric shapes with negative space, creating a look that is artistic, edgy, and perfectly suited for a gallery opening or a coffee date.
Essential Elements:
- Washi tape or masking tape
- Bright neon pastel yellow
- Black nail art pen
How to Prepare:
- Place tape diagonally across half the nail.
- Paint the exposed half with your neon pastel yellow.
- Peel the tape while the polish is still slightly damp for a sharp line.
- Use the black pen to draw a single thin line where the color meets the natural nail.
- Top with a high-gloss finish.
Budget Range
- China Glaze ‘Electric Nights’ ($8)
- Isadora Nail Art Pen ($10)
- Scotch Magic Tape ($4)
4 Hacks for the Ultimate Spring Nails White Look
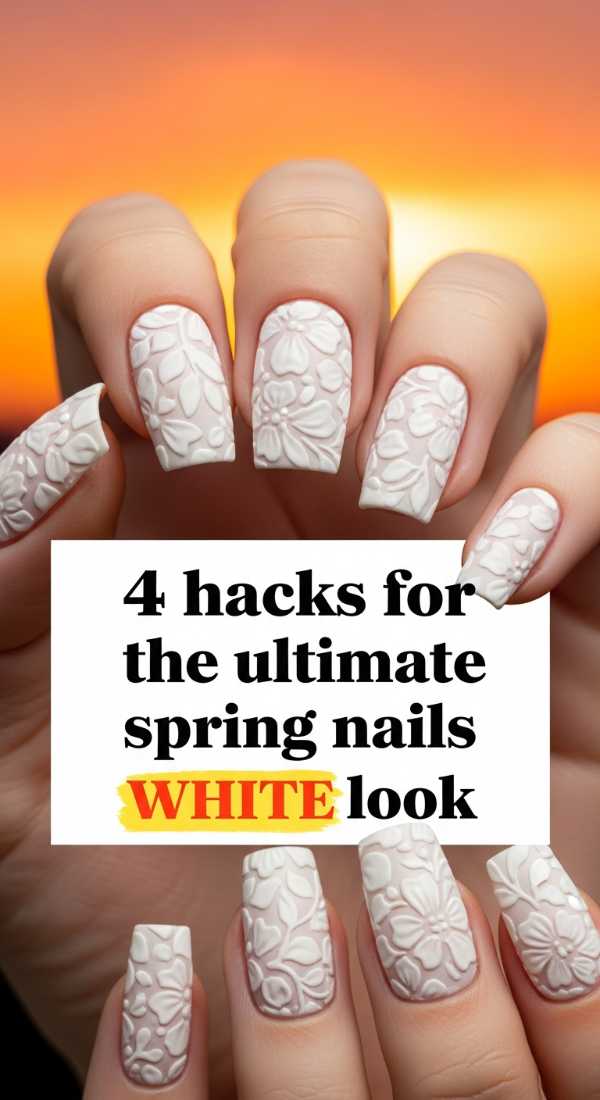
Why to love this Design:
A bright white manicure can be tricky to pull off without looking like correction fluid! These hacks ensure a professional, streak-free finish that looks expensive and fresh.
Essential Elements:
- Ridge filler base coat
- High-quality white lacquer
- Clean-up brush
- Acetone
How to Prepare:
- Hack 1: Always use a ridge filler first to create a perfectly flat canvas for the white pigment.
- Hack 2: Warm the polish bottle between your hands to prevent bubbles.
- Hack 3: Apply three very thin coats rather than one thick one to avoid streaks.
- Hack 4: Use a brush dipped in acetone to ‘carve’ the perfect circle at your cuticle.
Budget Range
- Essie ‘Here to Stay’ Base ($10)
- OPI ‘Alpine Snow’ ($11)
- Pure Acetone ($5)
7 Ideas to Customize Your Spring Nail Inspo Almond
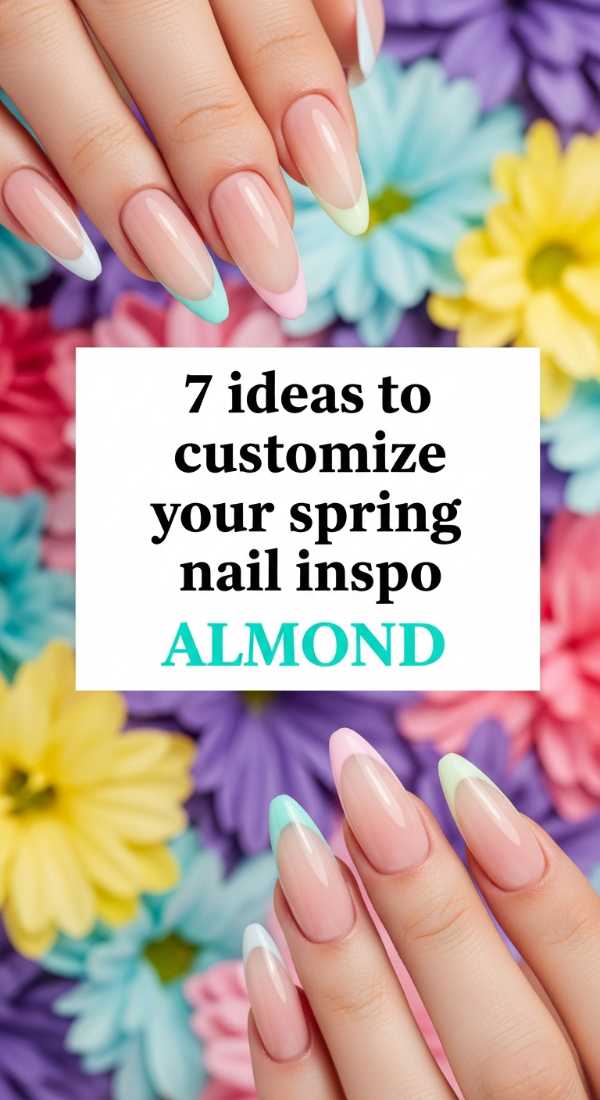
Why to love this Design:
Personalization is the heart of style! These almond-shaped ideas allow you to inject your own personality into the classic spring trend, making your manicure uniquely yours.
Essential Elements:
- 3D nail charms
- Gold leaf flakes
- Matte and gloss contrast
How to Prepare:
- Idea 1: Add a tiny gold bee charm to your ring finger.
- Idea 2: Mix finishes by having matte nails with glossy tips.
- Idea 3: Apply gold leaf sporadically over a lavender base.
- Idea 4: Try a gradient effect from thumb to pinky using different shades of the same color.
- Idea 5: Use a stamping kit for intricate lace patterns.
- Idea 6: Paint tiny vines crawling up the side of the nail.
- Idea 7: Add a single rhinestone at the center of the tip.
Budget Range
- Daily Charme 3D Accents ($15)
- Gold Leaf Sheets ($6)
- Biutee Stamping Plate ($10)
A Garden of Confidence
As you step out into the spring sunshine, I hope these designs make you feel as vibrant and renewed as the flowers themselves. Remember, my loves, your nails are just a small reflection of the beautiful light you carry inside. Whether you chose a bold chrome or a simple natural buff, wear it with your head held high. You are blooming, you are growing, and you are absolutely stunning. Until next time, stay soft and stay colorful!