
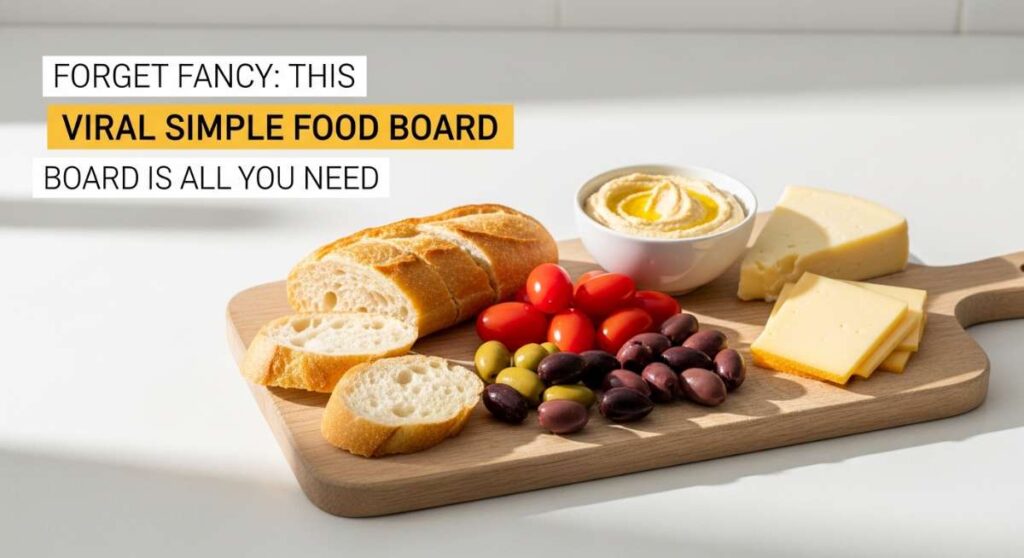
Forget Fancy: This Viral Simple Food Board is All You Need
There’s something almost magical about the way a simple wooden board can transform a meal from a routine Tuesday night into a memory that lingers long after the plates are cleared. I used to spend hours stressing over intricate four-course menus, only to find myself exhausted and stuck in the kitchen while my guests laughed in the living room. Then, the ‘Simple Food Board’ trend hit my feed, and everything changed. It’s not just about the food; it’s about the tactile, communal experience of reaching for a perfectly grilled piece of salmon or a handful of fresh berries while sharing stories.
The beauty of this viral board lies in its approachability. It’s a curated collection of vibrant, seasonal ingredients that look like a work of art but feel like home. You don’t need fancy silver or formal settings—just a large board, some fresh ingredients, and the people you love. Whether it’s the smoky aroma of grilled corn or the sweet, buttery scent of a peach cobbler, every element on this board is designed to evoke comfort. Let’s dive into the ten essential components that will make your board the talk of the neighborhood.
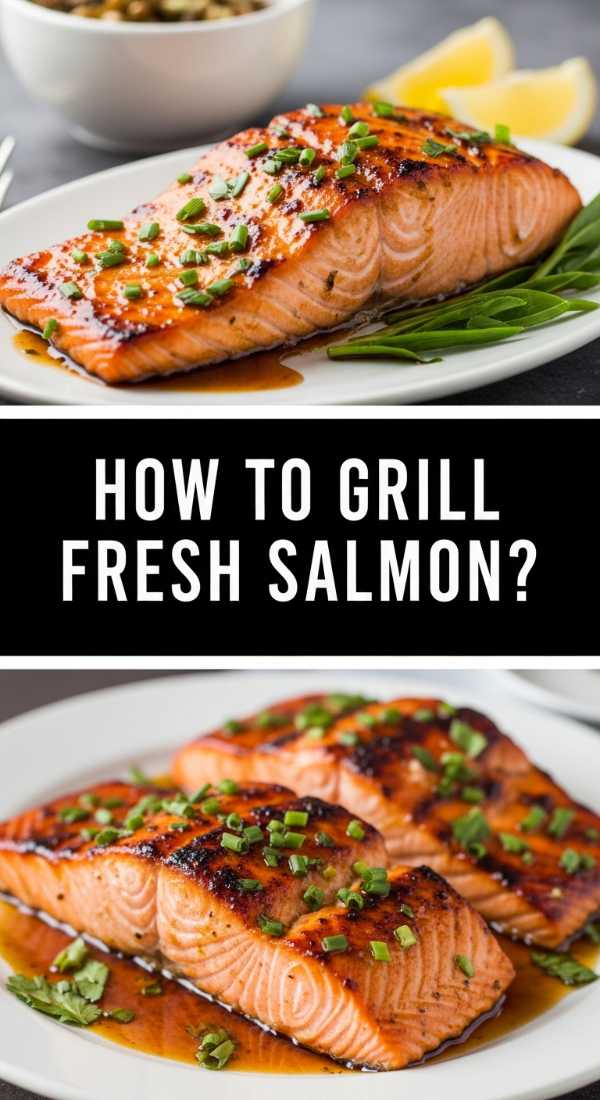
How to grill fresh salmon?
Why we love this
Grilled salmon is the crown jewel of any food board, offering a rich, buttery texture that practically melts on the tongue. When done right, the skin achieves a glass-like crispness that provides a satisfying contrast to the tender, flaky pink meat inside. The aroma of smoky cedar and zesty lemon wafting off the grill creates an instant atmosphere of summer luxury, while the natural oils of the fish provide a savory depth that pairs beautifully with fresh herbs. It is a protein that feels indulgent yet light, making it the perfect centerpiece for a communal feast.
Ingredients
- 2 large salmon fillets (center-cut)
- 2 tablespoons olive oil
- 1 teaspoon sea salt
- 1/2 teaspoon cracked black pepper
- 1 lemon (sliced into rounds)
- 2 sprigs fresh rosemary
How to make it
- Begin by prepping your grill; you want a medium-high heat, roughly 375-400°F. Ensure the grates are meticulously cleaned and lightly oiled to prevent sticking.
- Pat the salmon fillets completely dry with paper towels. This is the secret to achieving that viral crispy skin—moisture is the enemy of a good sear.
- Brush both sides of the salmon with olive oil and season generously with sea salt and cracked black pepper. Place the lemon slices and rosemary directly on the flesh side for a quick infusion of flavor before grilling.
- Place the salmon on the grill, skin-side down first. Leave it undisturbed for about 6 to 7 minutes. You’ll know it’s ready to flip when the skin releases naturally from the grates without tearing.
- Flip the fillets carefully using a wide spatula. Grill for an additional 2 to 4 minutes depending on the thickness. For a perfect medium-rare, look for an internal temperature of 125-130°F; the meat should be opaque on the outside but still slightly translucent in the very center.
How to cook zucchini noodles?

Why we love this
Zucchini noodles, or ‘zoodles,’ bring a refreshing, garden-fresh brightness to the board that balances out heavier proteins. They have a delightful al dente snap when cooked correctly, offering a light crunch that carries sauces and seasonings with ease. The vibrant green hue adds a pop of visual energy to your presentation, while the subtle, earthy sweetness of the squash acts as a versatile canvas for garlic and citrus. It’s a guilt-free way to add volume to your meal while keeping the vibe fresh and energetic.
Ingredients
- 3 large zucchinis
- 1 tablespoon olive oil
- 2 cloves garlic (minced)
- 1/4 teaspoon red pepper flakes
- Salt and pepper to taste
- Freshly grated parmesan (optional)
How to make it
- Use a spiralizer or a julienne peeler to turn your zucchinis into long, noodle-like strands. Avoid the soft, seedy core as it tends to get mushy.
- Place the raw noodles in a colander and sprinkle with a pinch of salt. Let them sit for 10 minutes to draw out excess moisture, then gently pat them dry with a clean kitchen towel.
- Heat olive oil in a large skillet over medium-high heat. Once the oil shimmers, add the minced garlic and red pepper flakes, sautéing for just 30 seconds until the aroma fills the kitchen.
- Add the zucchini noodles to the pan. Use tongs to toss them constantly, ensuring they are evenly coated in the garlic oil.
- Cook for no more than 2 to 3 minutes. The goal is to soften them slightly while retaining a firm ‘bite.’ If you cook them too long, they will release water and become soggy. Serve immediately with a sprinkle of parmesan.
How to make berry salad?

Why we love this
A berry salad is the ultimate palate cleanser, bursting with juicy sweetness and a tang that cuts through savory flavors. Imagine the explosion of flavor as a sun-ripened strawberry meets the tart zing of a blackberry, all tied together with a hint of fresh mint. The textures are a mix of soft, seedy, and firm, making every bite an interesting experience. It smells like a wild meadow in mid-July, and its deep purples and bright reds make it the most photogenic part of your viral food board.
Ingredients
- 1 cup strawberries (hulled and halved)
- 1 cup blueberries
- 1 cup raspberries
- 1 cup blackberries
- 1 tablespoon honey
- 1 tablespoon fresh lime juice
- 6-8 fresh mint leaves (chiffonade)
How to make it
- Rinse all the berries in cold water and lay them out on a paper towel to dry thoroughly. Wet berries will make the salad watery and dilute the dressing.
- In a small glass bowl, whisk together the honey and fresh lime juice until the honey is completely dissolved. This creates a bright, glossy glaze.
- Place all the berries in a large mixing bowl. Add the mint leaves, which provide a cooling aromatic contrast to the sweet fruit.
- Drizzle the honey-lime dressing over the fruit. Use a large rubber spatula to very gently fold the berries, being careful not to crush the delicate raspberries or blackberries.
- Let the salad sit at room temperature for about 10 minutes before serving. This allows the juices to macerate slightly, creating a natural syrup that coats the fruit beautifully.
How to bake peach cobbler?

Why we love this
Peach cobbler is the soul-soothing finish every board needs, characterized by its bubbly, golden-orange fruit filling and its cake-like, buttery topping. The aroma is legendary—a heady mix of caramelized sugar, cinnamon, and the floral scent of baked peaches that fills the entire house. When you dig in, you get the contrast of the soft, jammy fruit against the slightly crisp, sugar-dusted crust. It’s warm, nostalgic, and feels like a hug in a bowl, especially when the juices mingle with a melting scoop of vanilla bean ice cream.
Ingredients
- 6-8 fresh peaches (peeled and sliced)
- 1/2 cup brown sugar
- 1 teaspoon ground cinnamon
- 1 cup all-purpose flour
- 1 cup granulated sugar
- 1 tablespoon baking powder
- 1 cup whole milk
- 1/2 cup unsalted butter (melted)
How to make it
- Preheat your oven to 375°F. While the oven heats, toss the sliced peaches with brown sugar and cinnamon in a bowl; let them sit for 15 minutes to create a thick syrup.
- In a separate mixing bowl, whisk together the flour, granulated sugar, and baking powder. Slowly pour in the milk, whisking until the batter is smooth and free of large lumps.
- Pour the melted butter into a 9×13 inch baking dish, coating the bottom evenly. Do not stir the butter into the other ingredients.
- Pour the batter directly over the melted butter. Again, do not stir. The butter will rise around the edges to create a crispy, fried-crust texture.
- Spoon the peach mixture (including all the juices) evenly over the batter. Bake for 40 to 45 minutes. You are looking for the crust to rise through the peaches and turn a deep golden brown, with the fruit juices bubbling vigorously around the edges.
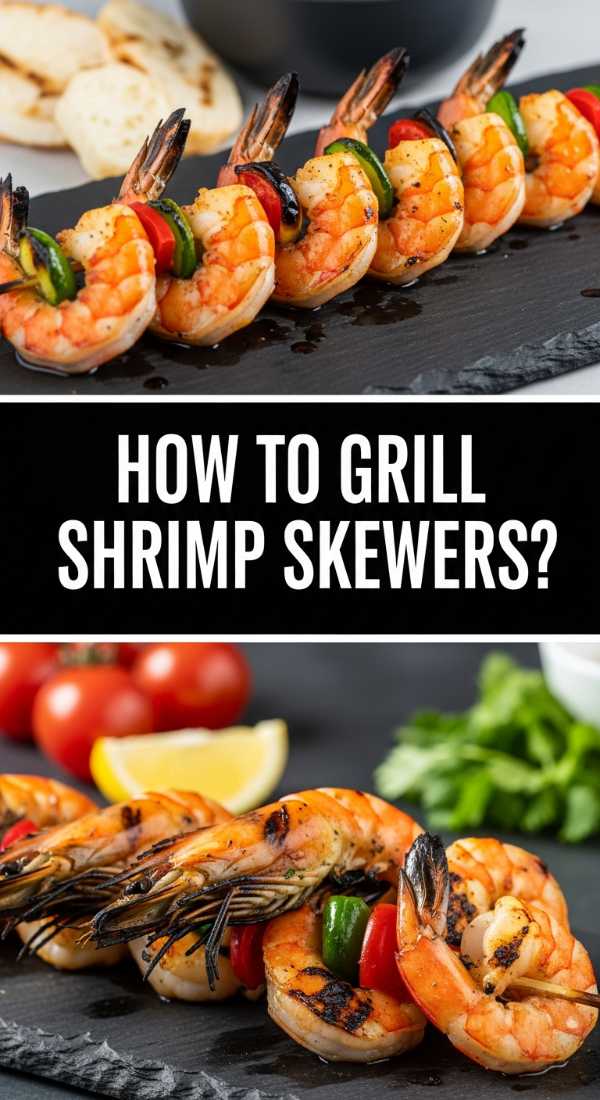
How to grill shrimp skewers?
Why we love this
Shrimp skewers are the perfect finger food for a board, offering a satisfying snap and a charred, savory flavor profile. The high heat of the grill caramelizes the natural sugars in the shrimp, creating a beautiful orange-pink hue with distinct grill marks. When brushed with a garlic-herb butter, they become irresistibly succulent and aromatic. They provide a structural element to the board, adding height and an interactive ‘pick-up-and-eat’ quality that guests absolutely love during a casual gathering.
Ingredients
- 1 lb large shrimp (peeled and deveined)
- 3 tablespoons melted butter
- 3 cloves garlic (pressed)
- 1 tablespoon fresh parsley (chopped)
- 1/2 teaspoon smoked paprika
- Wooden or metal skewers
How to make it
- If using wooden skewers, soak them in water for at least 30 minutes to prevent them from burning on the grill. Preheat your grill to high heat (400-450°F).
- Thread 4 to 5 shrimp onto each skewer, piercing them through the thickest part and near the tail so they stay secure during flipping.
- In a small bowl, combine the melted butter, pressed garlic, chopped parsley, and smoked paprika. This mixture provides both the fat needed for searing and a massive punch of flavor.
- Brush the skewers generously with the garlic butter on both sides. Place them on the hottest part of the grill.
- Grill for 2 to 3 minutes per side. Shrimp cook very fast; they are done as soon as they turn opaque and form a ‘C’ shape. Avoid letting them curl into an ‘O’ shape, as this indicates they are overcooked and will be rubbery.
How to make caprese chicken?

Why we love this
Caprese chicken takes the classic Italian salad and turns it into a hearty, savory masterpiece. The combination of juicy, seared chicken breast topped with thick slices of creamy mozzarella and vine-ripened tomatoes is visually stunning. As the cheese melts, it creates a gooey, rich blanket that traps the moisture in the chicken. Drizzled with a balsamic glaze, the dish hits every note: salty, sweet, acidic, and creamy. It’s a sophisticated addition to the board that feels substantial and deeply satisfying.
Ingredients
- 2 large chicken breasts (halved lengthwise)
- 4 thick slices fresh mozzarella cheese
- 1 large beefsteak tomato (sliced)
- 1/4 cup fresh basil leaves
- 2 tablespoons balsamic glaze
- 1 tablespoon olive oil
How to make it
- Season the chicken halves with salt and pepper. Heat olive oil in a heavy-duty oven-safe skillet (like cast iron) over medium-high heat.
- Sear the chicken for about 5 to 6 minutes on the first side until a deep golden-brown crust forms. Flip the chicken over.
- Immediately place a slice of tomato and a thick slice of mozzarella on top of each seared chicken piece while it’s still in the pan.
- Lower the heat to medium and cover the skillet with a lid for 3 to 4 minutes. This creates a steam chamber that melts the cheese perfectly while finishing the interior of the chicken.
- Once the cheese is bubbly and the chicken reaches 165°F, remove from heat. Top with fresh basil leaves and a heavy drizzle of balsamic glaze just before placing on your board to keep the basil from wilting.
How to roast summer corn?

Why we love this
Roasted summer corn is the definition of sunshine on a plate. There is nothing quite like the smell of corn husks charring over a flame or the sweet, toasted aroma of kernels caramelizing in the oven. The texture is a delightful mix of juicy ‘pop’ and chewy char. When finished with a bit of lime and salt, it becomes a refreshing yet smoky side that rounds out the savory elements of the board. It’s a rustic, hands-on food that encourages everyone to get a little messy and enjoy the simple flavors of the season.
Ingredients
- 4 ears of fresh corn (shucked)
- 2 tablespoons softened butter
- 1 teaspoon chili powder
- 1 lime (cut into wedges)
- 2 tablespoons crumbled cotija cheese (optional)
How to make it
- Preheat your oven to 425°F or prep your grill for direct high-heat cooking. If roasting in the oven, place the corn directly on a baking sheet.
- Rub each ear of corn with softened butter, ensuring every kernel is lightly coated. Sprinkle the chili powder evenly over the buttered corn.
- Roast in the oven for 20 to 25 minutes, turning the ears every 5 minutes. You are looking for the kernels to become tender and develop spots of deep golden brown or even slight charring.
- If using a grill, place the ears directly over the flame for 10 to 12 minutes, rotating frequently until charred to your liking.
- Remove from heat and immediately squeeze fresh lime juice over the hot kernels. Roll the corn in cotija cheese if desired for a salty, creamy finish that sticks to the butter.
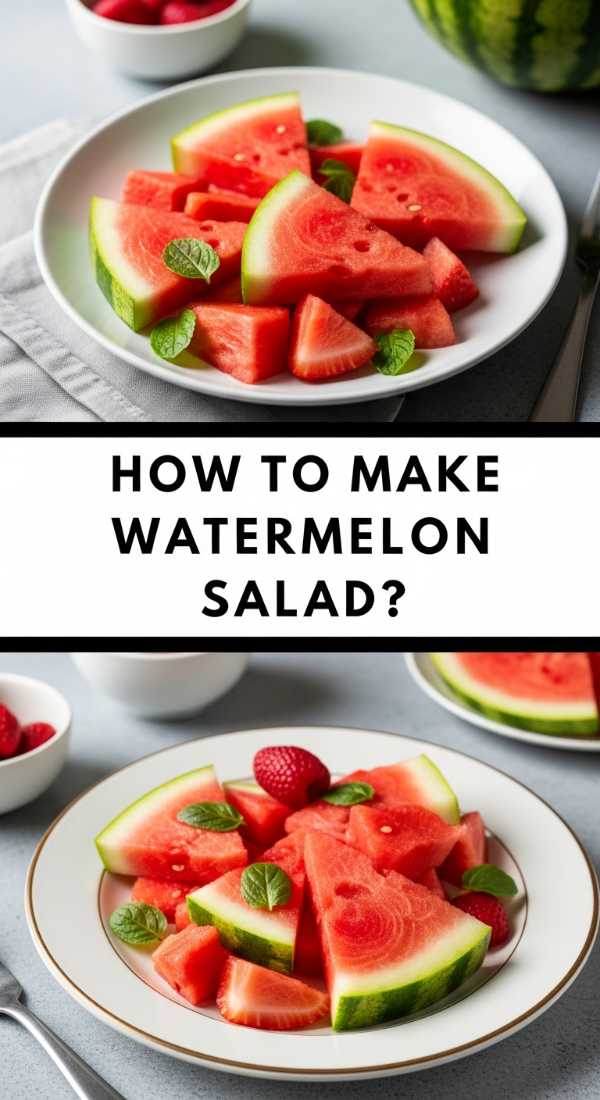
How to make watermelon salad?
Why we love this
Watermelon salad is a masterclass in flavor contrast, bringing together the icy-cold crunch of melon with the creamy, salty bite of feta cheese. It is incredibly hydrating and refreshing, making it the perfect antidote to a hot afternoon. The addition of red onion provides a sharp, crisp bite, while fresh mint or basil adds an herbal top note that makes the fruit taste even sweeter. The vibrant pink and white aesthetic is a showstopper on the board, offering a cool, crisp texture that cleanses the palate between bites of grilled meats.
Ingredients
- 4 cups seedless watermelon (cubed)
- 1/2 cup crumbled feta cheese
- 1/4 cup red onion (thinly sliced)
- 1/4 cup fresh mint leaves
- 1 tablespoon extra virgin olive oil
- 1 tablespoon balsamic vinegar
How to make it
- Cut a fresh, cold watermelon into uniform 1-inch cubes. Keeping the cubes consistent ensures a beautiful presentation and a balanced ratio of ingredients in every forkful.
- Soak the sliced red onions in a bowl of ice water for 10 minutes. This removes the harsh ‘bite’ of the onion, leaving it crisp and mild. Drain and pat dry.
- In a large, shallow platter, layer the watermelon cubes first. Scatter the red onions and crumbled feta evenly over the top.
- Whisk the olive oil and balsamic vinegar together in a small jar until emulsified, then drizzle it lightly over the salad. Do not over-dress, or the watermelon will lose its crispness.
- Tear the mint leaves by hand just before serving and scatter them over the salad. Tearing rather than chopping prevents the edges of the mint from turning black.
How to make lemon chicken?

Why we love this
Lemon chicken is a timeless classic that brings a zesty, aromatic brightness to your food board. The scent of hot lemon zest and sautéed garlic is enough to make anyone’s mouth water. The chicken itself should have a golden-brown, slightly crispy exterior that gives way to a tender, lemon-infused interior. The pan sauce, usually enriched with a bit of butter, creates a silky glaze that makes the chicken glisten under the lights. It’s a clean, sharp, and sophisticated flavor that feels both healthy and decadent at the same time.
Ingredients
- 1 lb chicken thighs (boneless, skin-on)
- 1/4 cup all-purpose flour
- 2 lemons (one juiced, one sliced)
- 3 cloves garlic (minced)
- 1/2 cup chicken broth
- 2 tablespoons butter
How to make it
- Dredge the chicken thighs in flour seasoned with salt and pepper. Shake off any excess; you want a very thin coating that will turn into a crispy crust.
- Heat a large skillet over medium-high heat with a splash of oil. Place the chicken skin-side down and sear for 7 to 8 minutes until the skin is deeply browned and crispy. Flip and cook for 5 more minutes.
- Remove the chicken from the pan and set aside. In the same pan, add the minced garlic and lemon slices. Sauté for 1 minute until the garlic is golden but not burnt.
- Pour in the chicken broth and lemon juice. Use a wooden spoon to scrape the bottom of the pan to release the ‘fond’ (the flavorful brown bits). Let the liquid reduce by half.
- Whisk in the butter until the sauce is glossy and thick. Return the chicken to the pan for 2 minutes to coat it in the sauce and ensure it’s cooked through to 165°F.
How to make strawberry shortcake?

Why we love this
Strawberry shortcake is the quintessential summer dessert, loved for its combination of flaky, buttery biscuits and billowy, sweet whipped cream. The contrast between the cold, macerated strawberries and the warm, crumbly shortcake creates a sensory experience that is hard to beat. As the strawberry juices soak into the biscuit, it creates a tender, cake-like texture that is absolutely heavenly. It’s a nostalgic, rustic treat that looks beautiful on a board, especially when garnished with a few fresh mint leaves and a dusting of powdered sugar.
Ingredients
- 2 cups all-purpose flour
- 1 tablespoon baking powder
- 3 tablespoons sugar
- 1/2 cup cold unsalted butter (cubed)
- 2/3 cup heavy cream (plus more for whipping)
- 2 cups sliced strawberries
How to make it
- Toss the sliced strawberries with a tablespoon of sugar and let them sit for 30 minutes at room temperature. This creates the essential ‘strawberry soup’ that flavors the shortcake.
- Preheat oven to 425°F. Pulse flour, baking powder, and sugar in a food processor. Add cold butter and pulse until the mixture looks like coarse crumbs.
- Add the 2/3 cup heavy cream and pulse just until a dough forms. Do not overwork the dough, or the biscuits will be tough rather than flaky.
- Turn the dough onto a floured surface, pat it to 1-inch thickness, and cut into circles using a biscuit cutter. Bake for 12 to 15 minutes until the tops are golden brown.
- Whip the remaining heavy cream with a touch of sugar until stiff peaks form. To assemble, split the warm biscuits in half, layer with strawberries and a massive dollop of whipped cream.
The Final Touch for Your Simple Food Board
Building a viral food board is about more than just the recipes; it’s about the composition. Start by placing your larger items, like the grilled salmon and caprese chicken, on opposite ends of the board to create balance. Fill the gaps with the vibrant colors of the watermelon salad and berry salad. Use small bowls for the zucchini noodles and peach cobbler to keep their juices from running into the other foods. The goal is a lush, overflowing look that invites people to dig in. When you bring this board to the table, you aren’t just serving a meal; you’re creating an invitation for connection, laughter, and the simple joy of eating well.