
Elevate Your Space: The Top Luxury Wall Design Trends of 2024
Have you ever walked into a room and felt an immediate sense of calm, as if the walls themselves were giving you a warm embrace? For the longest time, I thought of walls as mere boundaries—structural necessities painted in ‘safe’ neutrals. But lately, my perspective has shifted. Our homes are the canvases of our lives, and the walls are the largest part of that canvas, waiting to be infused with personality, texture, and soul.
In 2024, luxury isn’t just about price tags; it’s about the sensory experience of a space. It’s about the way light dances across a textured stone surface or how the earthy aroma of a living moss wall can transport you from a bustling city to a quiet forest clearing. We are moving away from the flat and the mundane, embracing designs that provoke emotion and tell a story of curated comfort and sophisticated living.
Join me as we explore how to turn those blank stretches of drywall into architectural masterpieces. Whether you’re looking for a total renovation or a weekend refresh, these trends are designed to elevate your daily environment into something truly extraordinary. Let’s dive into the world of luxury wall design and discover how to make your home feel as vibrant and textured as your life.
How to Cultivate a Lush Green Wall Design for Serene Indoor Living
Why we love this
There is something profoundly soul-soothing about bringing the outdoors in, and a lush green wall is the ultimate expression of biophilic luxury. Imagine the crisp, oxygenated air filling your lungs while you run your fingers over the velvety texture of vibrant moss and the delicate, waxy leaves of trailing ivy. The earthy scent of damp soil and fresh foliage creates a sensory retreat that dampens noise and softens the hard edges of modern life, turning any room into a tranquil sanctuary of life and growth.
Essential Elements:
- Modular hydroponic planting panels or felt pocket systems.
- A curated selection of low-light indoor plants (Pothos, Ferns, Calatheas).
- Integrated drip irrigation system or a dedicated misting schedule.
- Full-spectrum LED grow lights for consistent photosynthesis.
- Waterproof backing board to protect existing drywall.
How to make it
- Prepare the Foundation: Begin by securing a high-density polyethylene waterproof barrier to your wall. This ensures no moisture seeps into your home’s structure. Use a level to ensure the barrier is perfectly plumb, as the weight of the plants will be significant once watered.
- Install the Mounting Grid: Screw a sturdy metal or plastic grid over the waterproof barrier. Ensure you are hitting the wall studs for maximum support. This grid will hold your planting modules or felt pockets.
- Set Up the Irrigation: Run thin irrigation tubing across the top of the grid, installing small emitters above each planting pocket. Connect this to a timer-controlled pump or a manual hookup. Test the water flow before adding any soil or plants to check for leaks.
- Select and Prep the Greenery: Choose plants with similar light and water requirements. Gently remove them from their nursery pots, shaking off excess soil to expose the roots, and wrap the root balls in moisture-retaining moss or felt.
- Planting the Wall: Start from the bottom and work your way up. Tightly tuck each plant into its designated pocket. Place trailing plants at the edges to hide the frame and larger, bushy plants in the center for volume. Give the entire wall a gentle initial misting to help the plants settle into their new home.
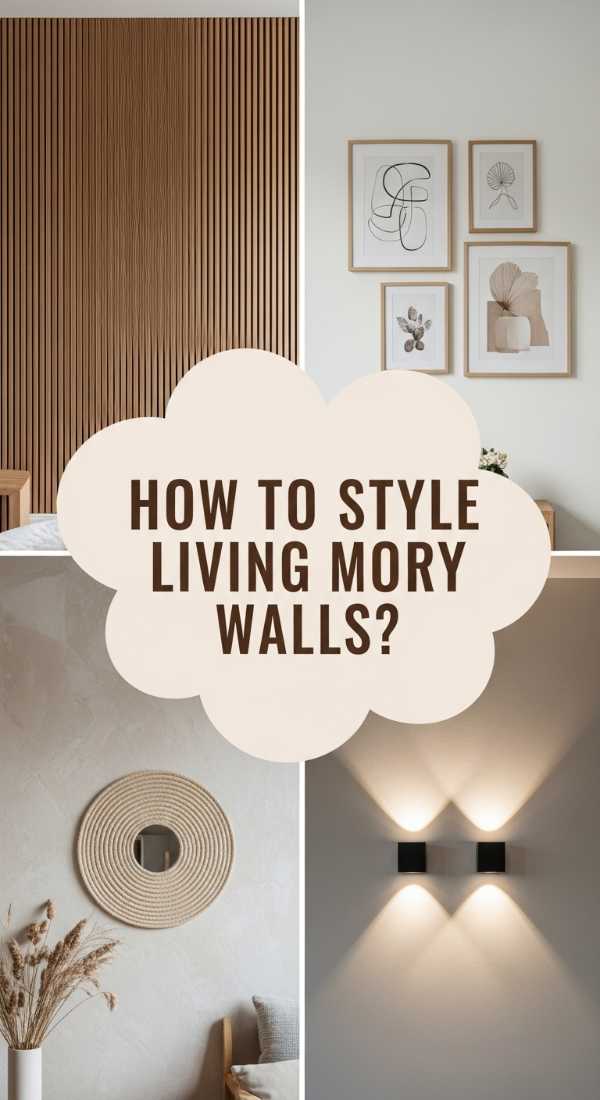
How to Style Living Room Wall Designs for a Warm Atmosphere

Why we love this
Creating a warm atmosphere is about layering textures that invite you to linger and relax. When you walk into a room styled with rich wood tones and soft, ambient lighting, you can almost feel the temperature rise in a comforting way. The visual weight of timber slats paired with the subtle sheen of metallic accents creates a sophisticated depth that feels both expensive and incredibly cozy, perfect for long evenings spent by a fire or intimate conversations with loved ones.
Essential Elements:
- Natural wood slats (Oak, Walnut, or Teak).
- Acoustic felt backing for sound dampening.
- Concealed LED strip lighting.
- Matte finish wood sealant or stain.
- Industrial-strength construction adhesive and finish nails.
How to make it
- Surface Preparation: Clean the wall surface thoroughly and paint it a dark, matte color (like charcoal or deep navy). This provides a shadow effect behind the slats, making the wood pop and giving the wall incredible visual depth.
- Measure and Cut: Measure the height of your wall and cut your wood slats to size. For a modern look, ensure all cuts are precise using a miter saw. Sand the edges until they are buttery smooth to the touch.
- Apply the Finish: Apply a high-quality matte sealant to the wood. This protects the grain and enhances the natural aroma of the timber without adding a dated, glossy shine. Let the slats dry completely in a dust-free environment.
- Installation with Precision: Apply a bead of construction adhesive to the back of the first slat. Start from one corner and use a spacer (a small block of wood) to ensure perfectly even gaps between every slat. Use a finish nailer to secure the slats while the glue sets.
- Add the Glow: Install a thin LED channel behind the top or bottom of the slats. Use a warm-toned LED strip (2700K) to create a soft wash of light that highlights the grain and creates a welcoming, high-end ambiance.
How to Construct a Textured Gabion Wall Design for Architectural Interest
Why we love this
Gabion walls bring a rugged, industrial elegance into the home that is rarely seen in traditional interior design. There is a tactile joy in the cold, solid feel of smooth river stones or jagged granite encased in sleek steel wire. This design offers a fascinating contrast between the organic randomness of nature and the rigid precision of modern architecture, creating a centerpiece that feels grounded, permanent, and undeniably bold.
Essential Elements:
- Galvanized steel wire mesh cages (custom-sized for interior use).
- Decorative filler stones (River rock, basalt, or recycled glass).
- Internal structural anchors to secure the cage to the floor and wall.
- Heavy-duty wire snips and pliers.
- Reinforced floor padding to protect flooring surfaces.
How to make it
- Anchor the Frame: Since stone is incredibly heavy, you must anchor the metal cage directly into the floor joists or wall studs using heavy-duty L-brackets. Ensure the cage is perfectly vertical using a spirit level.
- Prepare the Mesh: Assemble the galvanized mesh panels into a narrow box shape. Use spiral binders or C-rings to join the panels, ensuring every connection is tight and secure. Trim any sharp edges with snips to prevent injury.
- The Layering Process: Begin hand-placing your stones at the bottom of the cage. Do not simply dump them in; carefully arrange the largest, most attractive faces toward the outside of the mesh. This creates a polished, intentional look rather than a pile of rubble.
- Structural Bracing: Every twelve inches of height, install internal cross-ties (wire braces) inside the cage. These prevent the weight of the stones from causing the mesh to bulge or warp outward.
- Finishing the Top: Continue filling until the stones are level with the top of the cage. Secure the top mesh panel tightly. For an extra touch of luxury, top the gabion with a thick piece of live-edge wood to serve as a shelf or bench.
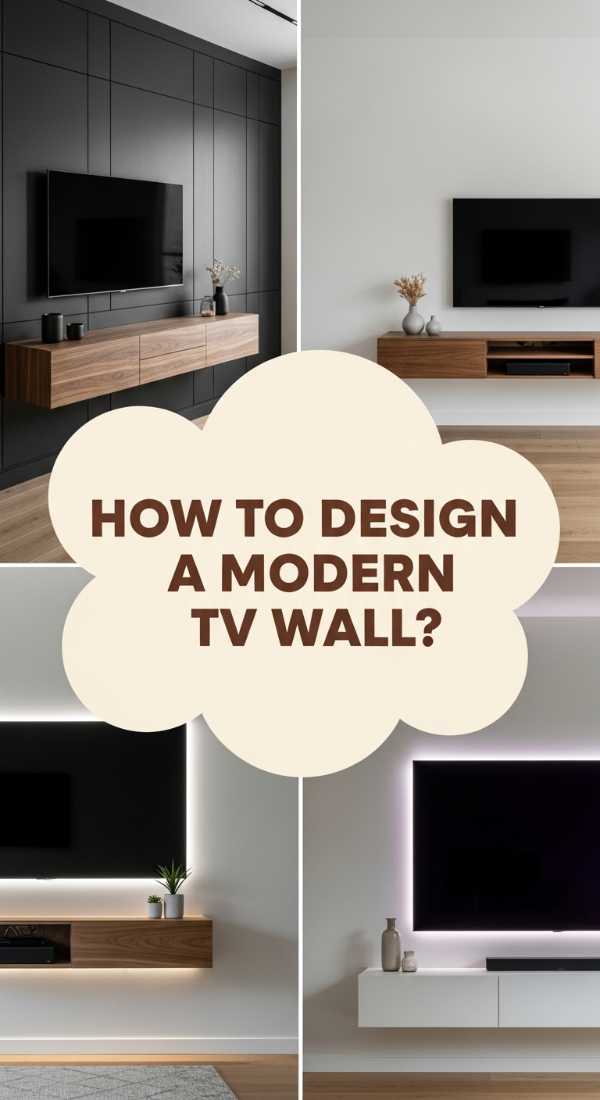
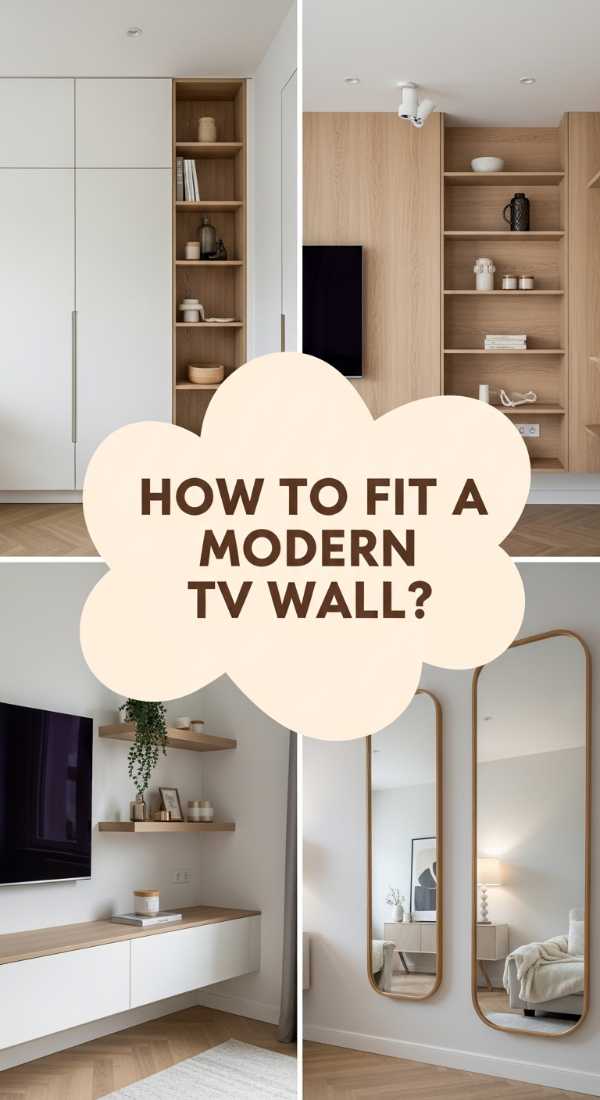
How to Design a Sleek Modern TV Wall Design for Clean Aesthetics

Why we love this
In a world of constant visual clutter, a sleek modern TV wall offers a breath of fresh air. We love the seamless transition where technology disappears into design, leaving behind nothing but clean lines and a sense of order. The cool touch of smooth panels and the absence of tangled wires creates a meditative environment where you can truly focus on the cinema experience without the distraction of household mess.
Essential Elements:
- Full-wall floating cabinetry or flat panels.
- In-wall cable management conduits.
- Ultra-slim recessed TV mount.
- Monochromatic paint or laminate finish.
- Push-to-open hardware for a handle-less look.
How to make it
- Conceal the Chaos: Before finishing the wall, install a plastic conduit behind the drywall to house all HDMI and power cables. This ensures that no wires are visible between the TV and the media components below.
- Install the Recessed Mount: Create a niche in the wall slightly larger than the TV. Mount the bracket inside this niche so that when the TV is attached, it sits perfectly flush with the wall surface, mimicking a piece of framed art.
- Paneling the Surround: Install large-format laminate or veneered panels around the TV. Use a “cleat” mounting system to hang the panels so there are no visible screws or fasteners on the front surface.
- Precision Alignment: Ensure the gaps between panels are tight and consistent (usually 1/8 inch). Use a laser level to maintain perfect horizontal and vertical lines across the entire wall.
- Final Touch: Paint the recessed niche a dark matte black. This hides the hardware and the depth behind the TV, making the screen appear as if it is floating in a void of shadows.
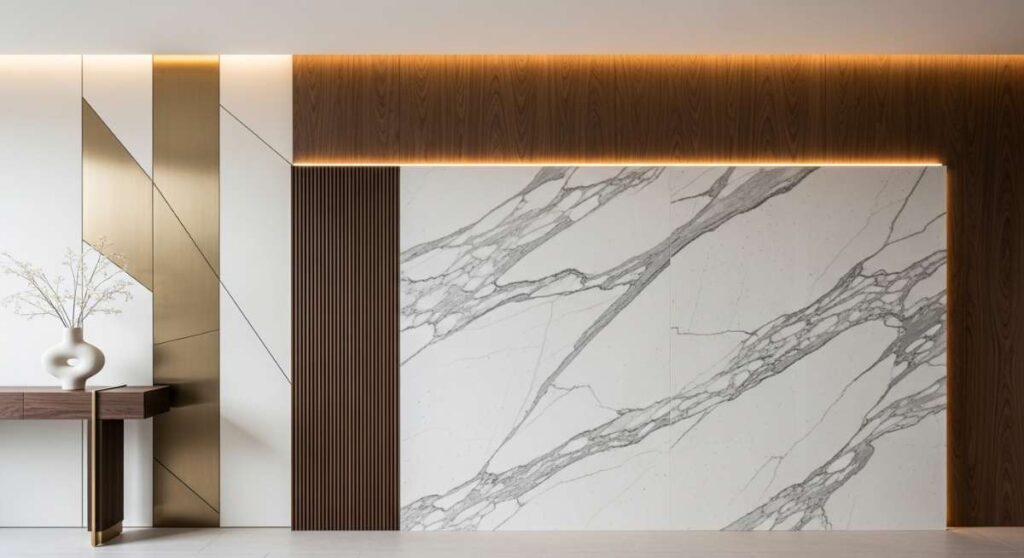
How to Master TV Wall Design Luxury for a High End Living Space
Why we love this
Mastering luxury means choosing materials that speak for themselves. We are obsessed with the cool, heavy elegance of a floor-to-ceiling marble slab or book-matched porcelain. The way high-end materials reflect ambient light creates a sophisticated glow that makes the entire room feel like a five-star hotel suite. It’s a design that says you value craftsmanship and the timeless beauty of natural stone patterns.
Essential Elements:
- Large-format porcelain slabs or natural stone marble.
- Book-matching (mirroring the stone pattern).
- Subtle gold or brass inlay strips.
- Integrated soundbar niche with acoustic fabric.
- Smart home lighting integration.
How to make it
- Material Selection: Visit a stone yard to hand-pick two consecutive slabs of marble or high-quality porcelain. “Book-matching” is the key here—the veins should mirror each other where the slabs meet, creating a stunning Rorschach-like pattern.
- Substrate Reinforcement: Because these slabs are heavy, reinforce the wall with double-layered plywood or cement board. Standard drywall cannot support the weight of full-size stone slabs.
- The Precision Cut: Have a professional fabricator cut the slabs to fit your wall exactly, including a precision cutout for the TV mount and any electrical outlets. High-pressure water jets are used to ensure the edges are perfectly straight.
- Adhesive Application: Use a specialized high-bond thin-set mortar. Apply it to both the wall and the back of the slab (back-buttering) to ensure 100% coverage and a permanent bond.
- Inlay Accents: As you set the slabs, insert thin T-shaped brass or gold metal strips into the joints. This hides the seam and adds a metallic shimmer that defines luxury design.
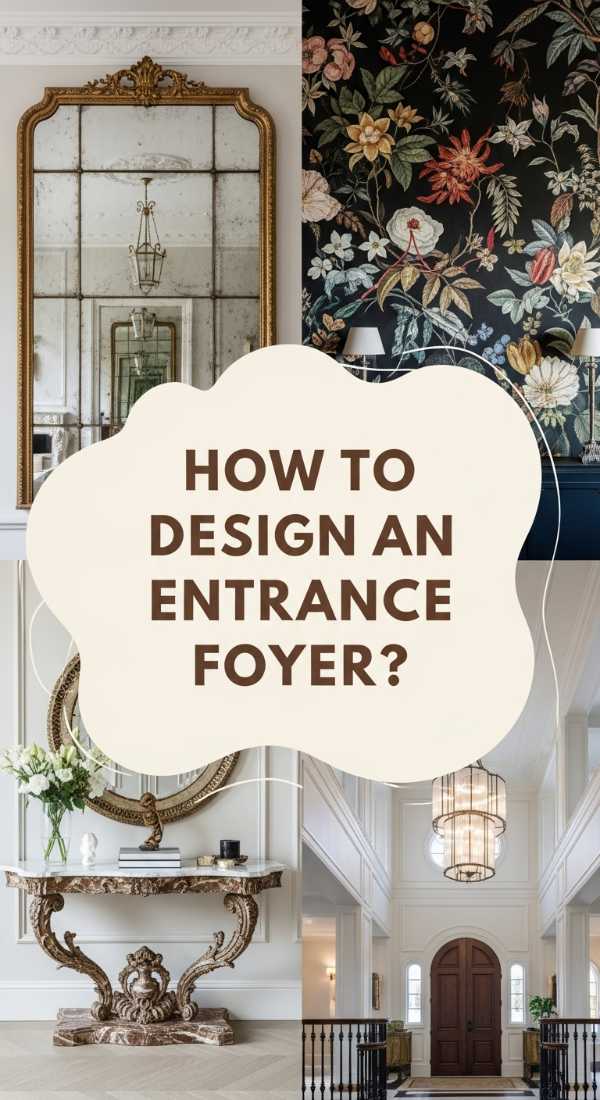
How to Decorate an Entrance Foyer Wall Design for Instant Elegance

Why we love this
The foyer is your home’s first impression, and an elegant wall design here sets the tone for everything that follows. We love the classic, rhythmic feel of picture frame molding—it adds a sense of history and architectural permanence to a home. The soft, satin finish of high-end paint in a foyer creates a luminous quality that welcomes guests with a sense of refined grace and effortless style.
Essential Elements:
- Decorative wall molding (Chair rail and picture frame trim).
- Satin-finish premium paint.
- Large-scale statement mirror or artwork.
- High-quality caulk and wood filler.
- Laser level and miter box.
How to make it
- Design the Layout: Map out your boxes on the wall using painter’s tape. A classic rule is to keep the boxes 3-4 inches apart. Use a laser level to ensure all horizontal lines are perfectly consistent around the entire room.
- Miter the Corners: Cut your molding pieces at a strict 45-degree angle. Precision is vital; even a tiny gap in the corner will ruin the high-end look. Sand the tips of the miters for a snug fit.
- Secure the Trim: Use a pneumatic pin nailer to attach the molding to the wall. Small pins are better than standard nails as they leave nearly invisible holes that are easy to fill later.
- Seamless Finishing: This is the most important step for luxury. Apply a thin bead of paintable caulk to the inside and outside edges of the molding where it meets the wall. Fill the nail holes with wood filler and sand perfectly flush.
- The Paint Job: Apply two coats of a premium satin or eggshell paint over the wall and the trim. Using the same color for both (the monochrome look) creates a modern, architectural feel that oozes elegance.
How to Implement a Vertical Green Wall Design for Better Air Quality
Why we love this
A vertical green wall is more than just a design choice; it’s a lifestyle upgrade. There is an undeniable freshness to the air near a living wall—a cool, crisp quality that makes you want to take deep, revitalizing breaths. The sight of lush foliage climbing toward the ceiling is visually stunning, but the knowledge that these plants are actively filtering toxins and boosting humidity makes this a functional masterpiece for health-conscious luxury.
Essential Elements:
- Automatic recirculating water system.
- Air-purifying plant species (Snake plants, Spider plants, Peace lilies).
- Substrate-free felt layers or rockwool.
- Catch basin at the base to prevent floor leaks.
- Timer-controlled circulation pump.
How to make it
- Install the Catch Basin: Place a waterproof basin at the floor level. This will act as the reservoir for your water system, catching runoff and recirculating it back to the top.
- Frame and Felt: Build a PVC or stainless steel frame and stretch two layers of synthetic horticultural felt over it. This felt will act as the “soil” for the plants, holding moisture while allowing the roots to breathe.
- Plumbing the System: Run a tube from the pump in the reservoir to a perforated pipe at the top of the wall. When the pump turns on, water will slowly saturate the felt, trickling down through gravity to water every plant.
- Plant Insertion: Cut small slits in the outer layer of felt. Gently insert the roots of your air-purifying plants into these slits. The roots will eventually weave into the felt, securing the plants permanently.
- Nutrient Management: Because there is no soil, you must add liquid hydroponic nutrients to the water reservoir once a month. This ensures the leaves remain a deep, healthy emerald green and continue to effectively scrub the air.
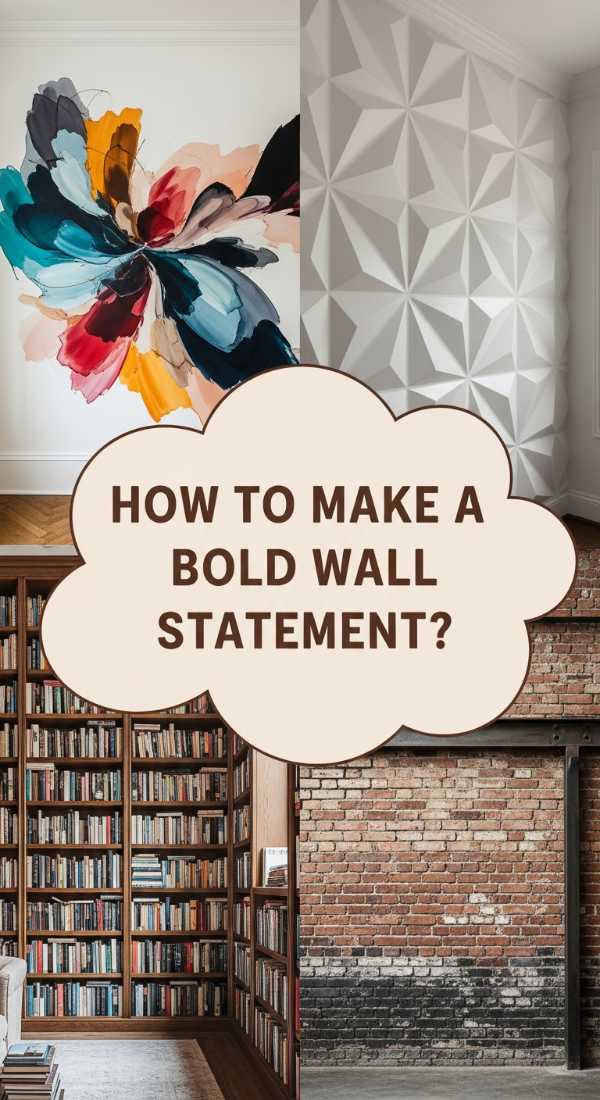
How to Customize Living Room Wall Designs for a Bold Statement
Why we love this
Sometimes, luxury is about being fearlessly unique. We love a bold statement wall because it showcases the homeowner’s personality through deep, saturated pigments and daring textures. Whether it’s a hand-painted mural or an oversized piece of custom-commissioned art, a bold wall acts as the heartbeat of the home, sparking conversation and providing a rich, visual feast that standard designs simply cannot match.
Essential Elements:
- Custom wallpaper murals or large-scale canvas.
- Deep, high-pigment matte paint (Emerald, Navy, or Terracotta).
- Picture lighting (recessed or over-arm sconces).
- Textured plaster or limewash finish.
- Precision-edged painter’s tape.
How to make it
- Define the Focus: Choose the wall that first meets the eye when entering the room. This will be your “anchor” wall. Ensure it is perfectly smooth by sanding away any previous texture or imperfections.
- Apply a Base Texture: For a luxury feel, use a limewash or Venetian plaster technique instead of standard flat paint. Apply the plaster with a trowel in overlapping “X” motions to create a mottled, suede-like finish that changes with the light.
- Scale the Art: If using a mural, ensure the scale is appropriate. Oversized patterns make a room feel larger and more dramatic. Use a plumb line to ensure the first panel of wallpaper is perfectly vertical.
- Install Professional Lighting: A bold wall is nothing without proper lighting. Install a dedicated art light above the center of the wall. This directs the eye and makes the colors appear more vibrant and intentional.
- Balance the Surroundings: Because the wall is bold, keep the adjacent walls in a neutral, complementary tone. This prevents the room from feeling claustrophobic and allows your statement wall to truly shine as the star of the show.
How to Choose a Contemporary Modern TV Wall Design for Small Spaces

Why we love this
Design in small spaces requires a clever mix of functionality and aesthetics. We love how a contemporary TV wall can actually make a small room feel more expansive by using verticality and light colors. The clean, floating elements create an airy feel, while the clever use of mirrors or glass accents can double the visual depth of the room, proving that you don’t need a mansion to enjoy a high-end, designer look.
Essential Elements:
- Floating media consoles to clear floor space.
- Vertical wood or metallic slats to draw the eye upward.
- Mirrored or high-gloss back panels.
- Compact, swivel-arm TV mounts.
- Minimalist floating shelves for styling.
How to make it
- Go Floating: Select a wall-mounted media console. By exposing the floor underneath the furniture, you trick the eye into perceiving more square footage, creating an immediate sense of spaciousness.
- Use Vertical Lines: Install thin vertical trim pieces from floor to ceiling behind the TV. This emphasizes the height of the room, making a low ceiling feel much loftier and more grand.
- Reflective Surfaces: Use a tinted mirror or high-gloss acrylic panel behind the TV. This adds a layer of sophisticated shimmer and reflects light back into the room, brightening the entire space.
- Integrated Tech: Choose a TV that features an “Ambient Mode” or “Art Mode” so that when it’s off, it displays beautiful photography or patterns rather than a large black void that can overwhelm a small room.
- Minimalist Styling: Limit decor to three high-quality pieces on a single floating shelf. Overcrowding the wall with small items will make the space feel cluttered; instead, choose one statement vase or sculpture to maintain the modern aesthetic.
How to Refresh an Entrance Foyer Wall Design for a Modern Look
[IMAGE_10]
Why we love this
Refreshing a foyer is like giving your home a mini-facelift. We love the transformation from a traditional, forgotten entryway to a modern gallery-style space. The mix of sleek metallic sconces and crisp, geometric patterns creates a feeling of organized luxury. It’s about creating a transition zone that feels energized and clean, washing away the stress of the outside world the moment you step through the door.
Essential Elements:
- Geometric stencil or modern peel-and-stick mural.
- Modern black or brass wall sconces.
- A sleek console table with thin legs.
- Architectural hooks or a minimalist coat rack.
- Designer hardware for the front door interior.
How to make it
- The Geometric Base: Apply a subtle geometric pattern to one side of the foyer. If using a stencil, use a dry-brush technique with a metallic paint to create a soft, shimmering effect that isn’t too overpowering.
- Upgrade the Lighting: Replace dated overhead lights with two sleek wall sconces at eye level. This creates a warmer, more intimate “wash” of light that is much more welcoming than harsh top-down illumination.
- Furniture Placement: Choose a console table that is narrow and open-legged. This provides a surface for keys and mail without blocking the visual flow of the hallway.
- Hardware Refresh: Small details matter. Replace your standard door handle and hinges with modern, matte black or brushed gold hardware. This provides a tactile sense of quality every time you enter the home.
- Final Layering: Place a large, round mirror above the console. The circular shape breaks up the straight lines of the foyer and provides a final check-point for you and your guests, while bouncing light into darker corners.
Conclusion
Wall design is the secret ingredient that transforms a house into a curated home. By moving beyond flat paint and embracing texture, nature, and architectural detail, you create an environment that reflects your taste and nurtures your well-being. Whether you choose the living energy of a green wall or the timeless sophistication of marble and wood, remember that your space should be a reflection of the luxury you want to feel every single day. Start small, dream big, and let your walls speak volumes.