
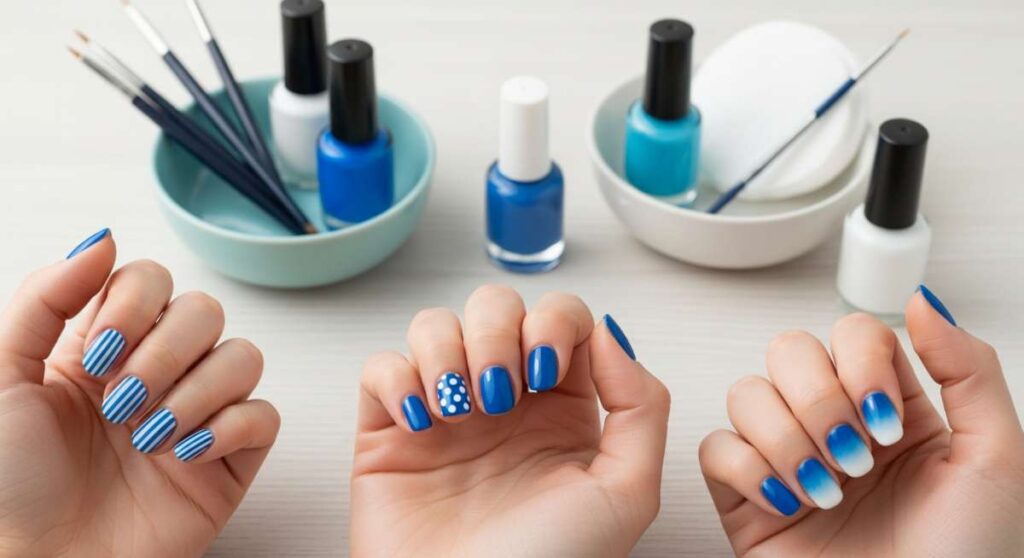
Elevate Your Look: Simple Blue and White Nail Tutorials for Beginners
Hello, my loves! Welcome back to our cozy little corner of the internet. I’ve been sitting here by the window, watching the soft morning light dance across my vanity, and I couldn’t help but feel a sudden pull toward the serene, peaceful vibes of blue and white. There is something so restorative about these colors—like a cloud-soft embrace or the quiet stillness of a lakeside morning. Manicures are more than just a beauty routine; they are a little ritual of self-love that we get to carry with us all week long.
Lately, I’ve been craving simplicity and grace. I know that diving into nail art can feel a bit intimidating if you’re just starting out, but I promise you, we are going to walk through this together. Whether you’re looking for a bold royal blue to ground your spirit or a whisper-soft baby blue to lift your mood, I’ve gathered my favorite beginner-friendly tutorials to help you create something truly magical right at home.
Grab your favorite tea, light a candle, and let’s get into these dreamy designs. I want you to remember that it doesn’t have to be perfect to be beautiful—it just has to be you. Let’s get painting, sweet souls!
5 Easy Steps to Master Royal Blue Marble Nails
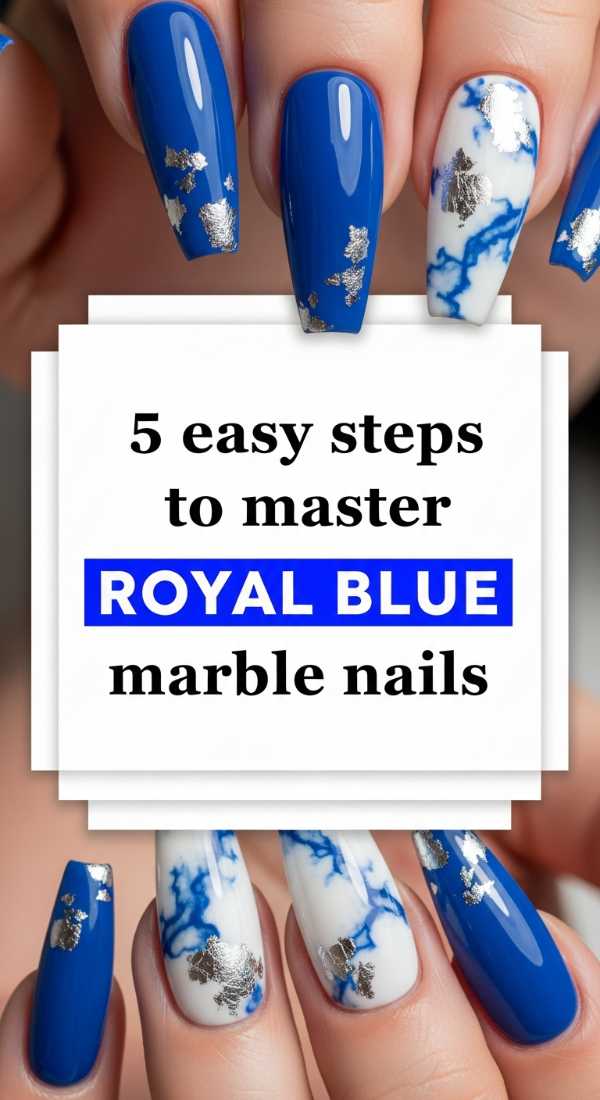
Why to love this Design:
There is a mysterious, deep beauty to marble nails that feels like wearing a piece of the ocean on your fingertips. This design is wonderfully forgiving because no two ‘stones’ are alike; its imperfection is exactly what makes it look so high-end and artistic.
Essential Elements:
- Deep Royal Blue polish
- Opaque White polish
- Clear Top Coat
- A toothpick or a very fine detailing brush
- A small cup of water (optional for the water-drop method)
How to Prepare:
- Apply a clean base coat and two thin layers of your royal blue polish.
- While the second coat is still slightly tacky, place three tiny dots of white polish randomly on the nail.
- Use your toothpick to gently swirl the white into the blue in a ‘figure-eight’ motion.
- Lightly dab a bit of clear top coat over the swirls to blur the edges for a realistic stone effect.
- Seal the whole look with a high-shine top coat to add depth.
Budget Range
- Royal Blue: Sally Hansen Insta-Dri in ‘Midnight Drive’ ($6)
- White: Wet n Wild Wild Shine in ‘French White’ ($2)
- Top Coat: Essie Gel Setter ($10)
3 Easy Tricks for Perfect Blue and White Stripes
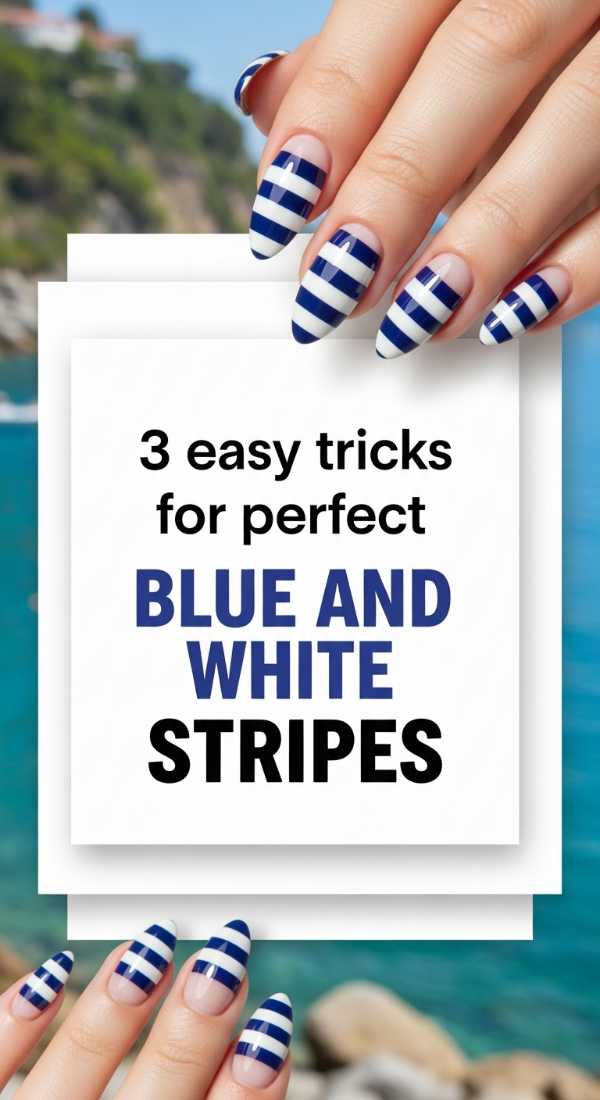
Why to love this Design:
Stripes are the ultimate classic. They feel crisp, clean, and incredibly intentional. If you’ve ever struggled with shaky lines, these tricks will make you feel like a total pro without the stress of a steady hand.
Essential Elements:
- Sky Blue polish
- Crisp White polish
- Striping tape or thin ‘washi’ tape
- Tweezers
How to Prepare:
- Paint your nails white and let them dry *completely* (this is the secret!).
- Lay down three thin strips of tape horizontally or vertically across the nail.
- Paint over the entire nail with your blue polish, then immediately peel the tape away while the polish is still wet.
Budget Range
- Sky Blue: Essie ‘Bikini So Teeny’ ($9)
- Striping Tape: 10-pack from Amazon ($5)
4 Simple Steps for Baby Blue Cloud Nails
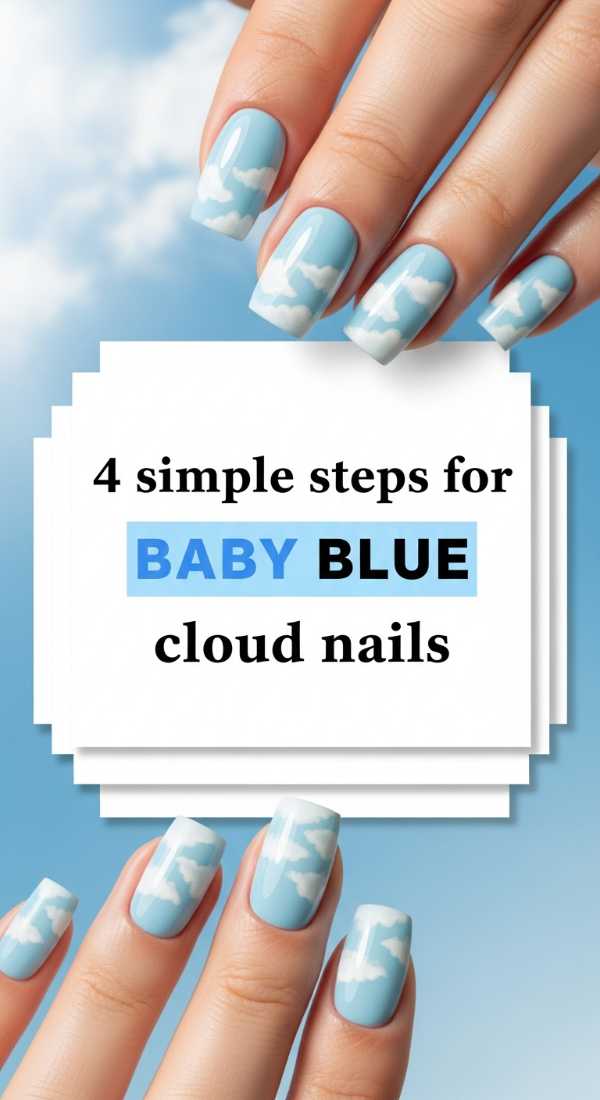
Why to love this Design:
This is like a daydream for your hands. Cloud nails are incredibly popular right now because they look so soft and whimsical. They are the perfect ‘cheer-up’ manicure for those days when you need a little bit of magic.
Essential Elements:
- Pastel Baby Blue polish
- Matte White polish
- A large dotting tool or the end of a bobby pin
How to Prepare:
- Paint your base with two coats of soft baby blue.
- Dip your dotting tool into the white polish and create three overlapping dots in a cluster.
- Drag the bottom of the dots slightly to give the cloud a ‘fluffy’ base.
- Add a tiny silver star or a bit of glitter for a ‘dreamscape’ finish.
Budget Range
- Baby Blue: Zoya ‘Blu’ ($12)
- White: OPI ‘Alpine Snow’ ($11)
7 Steps to Create Porcelain Style Nail Art
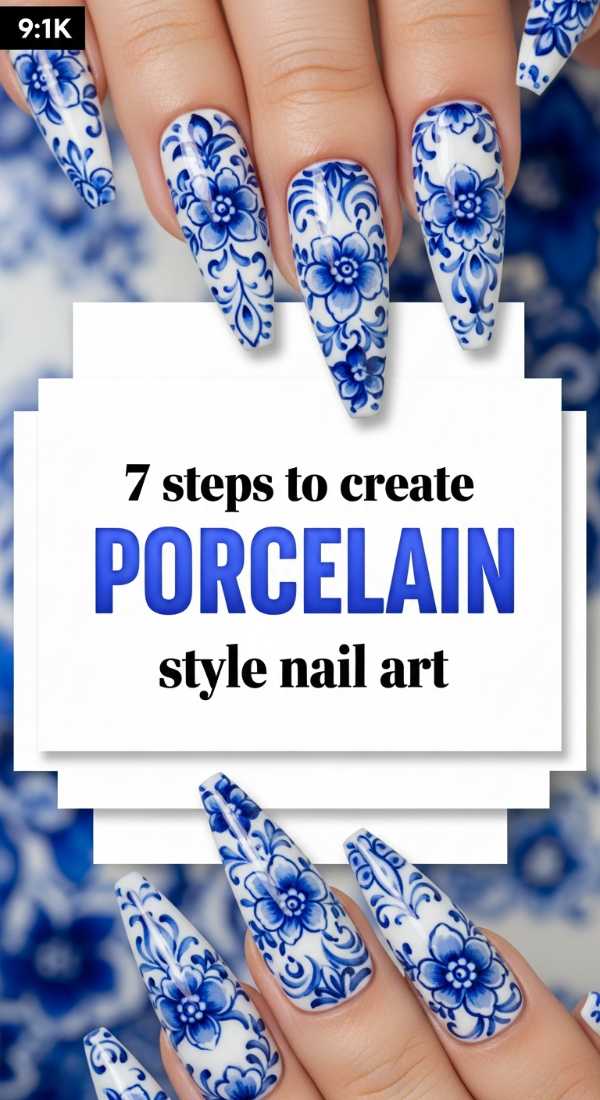
Why to love this Design:
Inspired by vintage Chinoiserie and delicate tea sets, this look is sophisticated and timeless. It makes your hands look elegant and refined, like a piece of living art.
Essential Elements:
- True White base polish
- Cobalt Blue polish
- A very thin liner brush
- Acetone for clean-up
How to Prepare:
- Start with a solid white base.
- Draw a small ‘X’ in cobalt blue.
- Connect the ends of the ‘X’ with tiny curved leaves.
- Add small blue dots around the floral shape.
- Repeat in opposite corners of the nail.
- Add a second ‘leaf’ layer for depth.
- Finish with a glossy top coat.
Budget Range
- Cobalt: Orly ‘Blueberry’ ($10)
- Liner Brush: Basic Art Brush Set ($7)
6 Ways to Style Royal Blue with Silver Charms
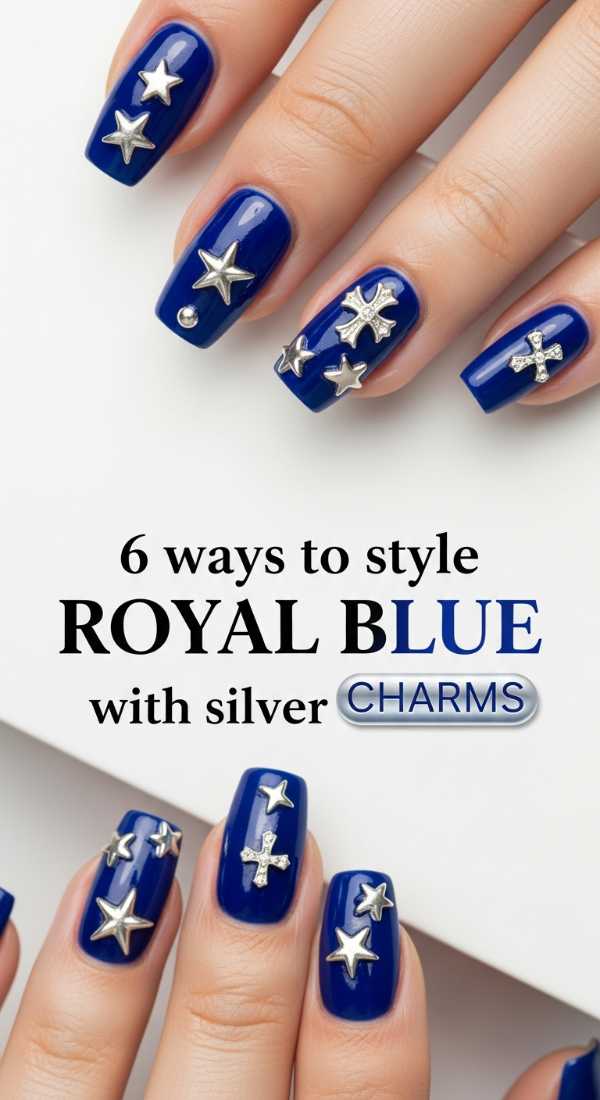
Why to love this Design:
Sometimes we just want a little sparkle, right? Adding silver charms to a royal blue base creates a celestial, regal vibe that is so easy to achieve but looks like you spent hours at the salon.
Essential Elements:
- Royal Blue polish
- Nail glue or a thick top coat
- Silver star or moon charms
- Small tweezers
How to Prepare:
- Paint your nails royal blue.
- Apply a tiny drop of nail glue where you want the charm.
- Place a silver star charm near the cuticle.
- Try a silver ‘moon’ charm on the ring finger.
- Add tiny silver studs to the pinky.
- Seal with a thick gel-style top coat to keep charms in place.
Budget Range
- Charms: Mixed Silver Nail Decals ($6)
- Glue: Kiss Maximum Speed Nail Glue ($4)
5 Quick Steps for Abstract Blue Swirls
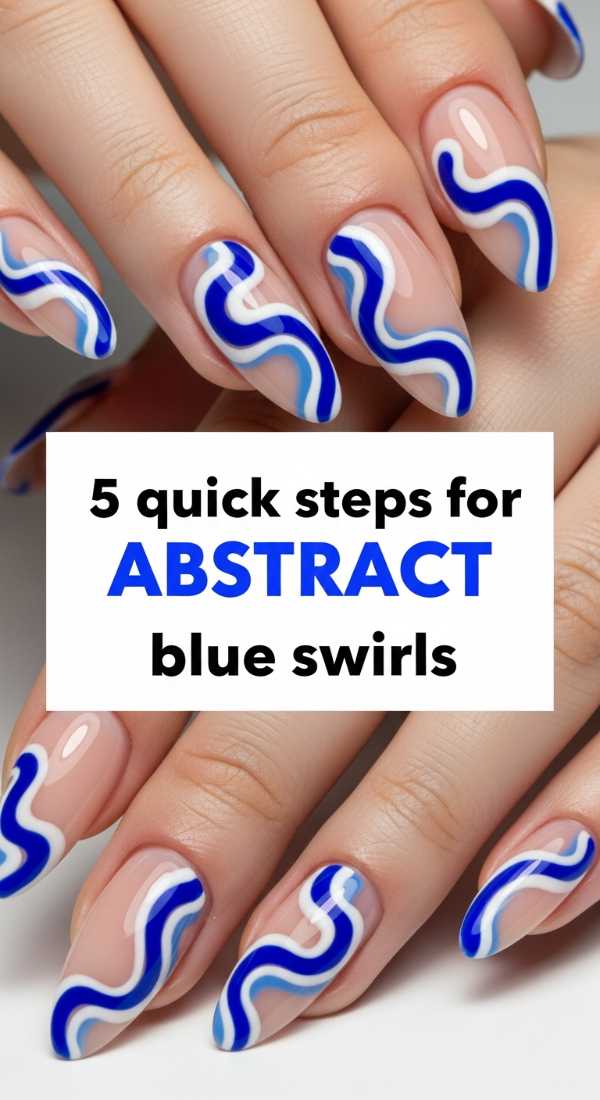
Why to love this Design:
Abstract art is so liberating because there are no rules! These swirls are incredibly trendy and look amazing on both short and long nails. It’s a great way to use multiple shades of blue at once.
Essential Elements:
- Sheer ‘Nude’ base polish
- Navy Blue polish
- Baby Blue polish
- Thin detailing brush
How to Prepare:
- Apply your sheer base coat.
- Draw one long, wavy S-curve with the navy blue.
- Follow the curve with a thinner line of baby blue right next to it.
- Add a small white ‘flick’ at the end of the swirl.
- Fill in some of the negative space with a tiny blue dot.
Budget Range
- Navy: Revlon ‘Wild Card’ ($5)
- Sheer Base: OPI ‘Bubble Bath’ ($11)
4 Methods for Baby Blue Ombre Perfection

Why to love this Design:
Ombre is the ultimate soft-focus look. It creates a gentle gradient that is so soothing to look at. It’s like a sunset, but in the most beautiful shades of a morning sky.
Essential Elements:
- Baby Blue polish
- White polish
- A makeup sponge (latex-free)
- Liquid latex or tape (for skin protection)
How to Prepare:
- Apply liquid latex around your nail beds.
- Paint a white and blue stripe directly onto the makeup sponge.
- Dab the sponge repeatedly onto the nail until the colors blend.
- Peel off the protection and finish with a top coat to smooth the gradient.
Budget Range
- Sponges: 20-piece Wedge Pack ($3)
- Liquid Latex: Pueen Latex Tape ($9)
3 Secrets to Clean Nautical Striped Nails

Why to love this Design:
Perfect for summer or when you’re feeling a bit adventurous! These nautical stripes are bold, bright, and give off a very ‘preppy-chic’ vibe that pairs perfectly with white linen.
Essential Elements:
- Navy Blue polish
- White polish
- A steady flat-edge brush
How to Prepare:
- The first secret: Use a highly pigmented white polish so you only need one coat.
- The second secret: Anchor your pinky finger on the table for stability.
- The third secret: Pull the brush across the nail using your *hand* movement, not your fingers.
Budget Range
- Navy: Essie ‘Infinity Cool’ ($9)
- White: Holo Taco ‘Not Milky White’ ($11)
5 DIY Steps for Royal Blue Galaxy Nails
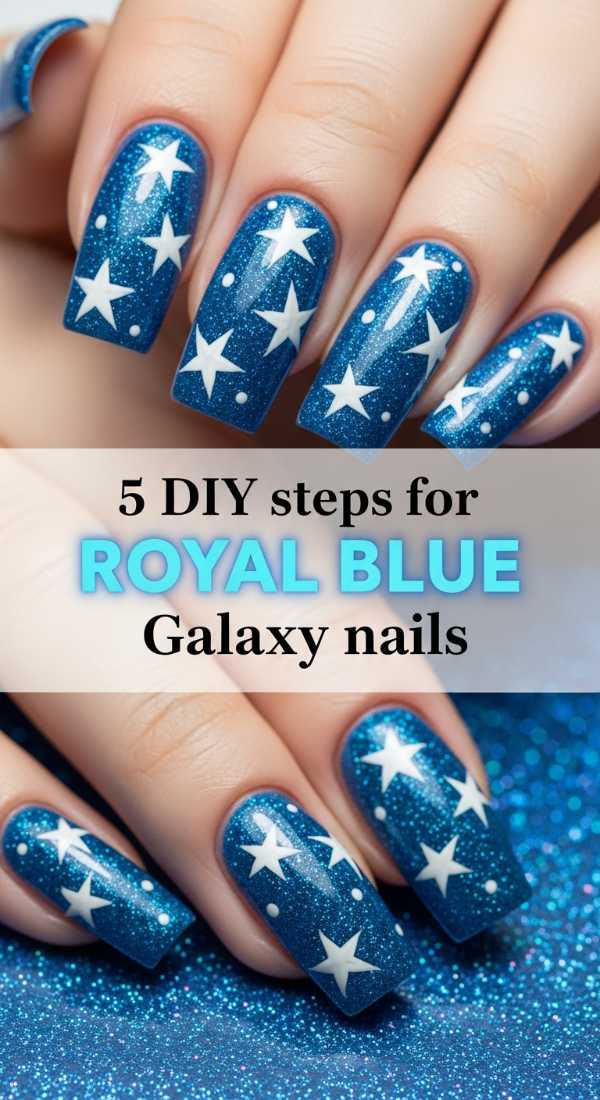
Why to love this Design:
Who doesn’t want the entire universe at their fingertips? This design is dark, moody, and sparkling. It’s surprisingly easy to layer and very fun to experiment with.
Essential Elements:
- Deepest Navy/Black-blue polish
- Silver glitter topper
- White polish
- Small piece of sponge
How to Prepare:
- Paint a dark navy base.
- Sponge on a tiny bit of white in a diagonal ‘nebula’ shape.
- Dab a bit of royal blue over the white.
- Add a light layer of silver glitter topper.
- Use a toothpick to add one or two ‘bright stars’ in white.
Budget Range
- Glitter: ILNP ‘My Private Rainbow’ ($10)
- Navy: Sinful Colors ‘Navy I Do’ ($3)
6 Easy Techniques for Blue French Tips
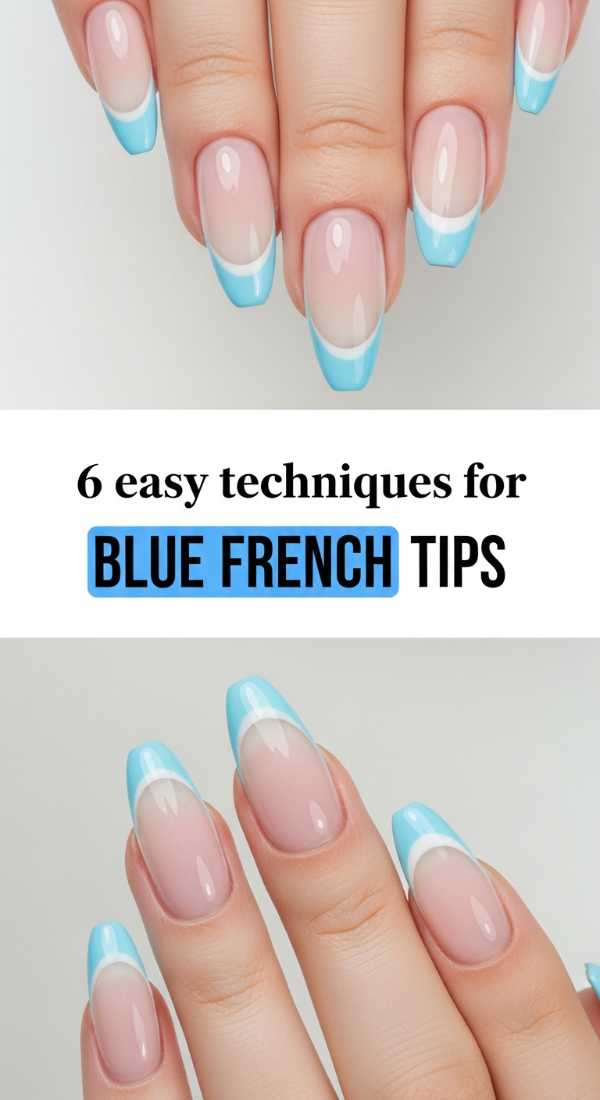
Why to love this Design:
The French manicure is back, but with a colorful twist! Swapping the traditional white tip for a vibrant blue makes the look modern, fresh, and slightly edgy while remaining sophisticated.
Essential Elements:
- Clear or ‘Nude’ base
- Electric Blue or Pastel Blue polish
- French tip guide stickers
How to Prepare:
- Apply your base.
- Place the guide sticker just below the free edge of your nail.
- Paint the tip blue.
- Peel the sticker while wet.
- Clean up the edges with a brush dipped in acetone.
- Seal with top coat.
Budget Range
- Electric Blue: Essie ‘Butler Please’ ($9)
- Guides: Orly French Manicure Guides ($5)
Conclusion
Oh, my loves, I hope these tutorials leave you feeling inspired and ready to treat yourself to a little creative time. Remember, nail art is just another way to express the beautiful colors you hold inside. Don’t worry if your lines aren’t perfectly straight or your clouds look a little more like marshmallows—it’s the act of creation that counts. I can’t wait to see which of these blue and white looks you choose to try first! Take a deep breath, enjoy the process, and let your light shine through your fingertips. Sending you so much love and soft blue vibes!