
Have you ever walked through your home and felt like it was missing that tiny spark of magic? We’ve all been there—scrolling through Pinterest boards filled with sun-drenched patios and perfectly curated entryways, feeling like those dreams are a few thousand dollars out of reach. But here’s a little secret I’ve learned: elegance isn’t about the price tag; it’s about the intention and the handmade touches that tell your story.
This weekend, I decided to stop dreaming and start doing. There is something so deeply therapeutic about getting your hands a little dirty in the garden or feeling the cool weight of wet concrete as you shape something new for your home. It’s about creating a sanctuary that feels expensive but costs less than a fancy brunch out with friends. From the scent of fresh rosemary to the visual rhythm of a perfectly styled wildflower centerpiece, these projects are designed to awaken your senses and elevate your everyday living.
How to Create Garden Labels for the Ultimate Herbal Harvest

Why we love this
There is nothing quite like the sensory explosion of a functional herb garden where the air is thick with the peppery scent of basil and the earthy aroma of thyme. These labels add a touch of rustic sophistication to your garden beds, making the harvest feel like a professional culinary experience. Imagine running your fingers over smooth, hand-carved wood while the morning dew still clings to the leaves, knowing exactly which sprig to snip for your evening meal. It transforms a simple patch of dirt into a curated botanical library that delights the eyes as much as the palate.
Essential Elements:
- Cedar wood shims or smooth flat stones
- Waterproof permanent ink markers or outdoor acrylic paint
- Clear outdoor polyurethane sealer
- Fine-grit sandpaper
- Twine or small copper stakes
How to make it
- Begin by sanding your wood shims or stones until they are buttery smooth to the touch, ensuring no splinters remain to snag your gardening gloves.
- Wipe away all dust with a damp microfiber cloth and let the surface dry completely before applying any ink.
- Carefully hand-letter the names of your herbs; I recommend a mix of serif and cursive fonts for that high-end boutique nursery look.
- Apply a thin, even coat of polyurethane sealer over the entire surface, paying special attention to the edges to prevent water from seeping under the wood grain.
- Once dry, drill a small hole in the top of the wood shims to loop twine through, or glue the stones to copper stakes for an elegant, elevated height in the soil.
How to Build a Cheap Fence for Total Backyard Privacy
Why we love this
True luxury is the ability to enjoy your outdoor space in complete, uninterrupted serenity, away from the prying eyes of the neighborhood. This project creates a soft, organic boundary that feels like a warm embrace, filtering the afternoon sunlight into dancing shadows across your lawn. The texture of natural wood or bamboo against the vibrant green of your garden creates a visual harmony that feels both modern and timeless. It’s about reclaiming your peace and turning a standard backyard into a private oasis where you can truly let your guard down.
Essential Elements:
- Pressure-treated 2×4 lumber for the frame
- Bamboo fencing rolls or reclaimed pallet wood slats
- Outdoor-rated wood screws
- Post hole digger and quick-set concrete
- Level and measuring tape
How to make it
- Measure your perimeter and mark your post locations every 6 to 8 feet, ensuring the line is perfectly straight using a guide string.
- Dig post holes at least 2 feet deep to ensure stability against wind, then set your 4×4 posts in quick-set concrete, checking for vertical level as they cure.
- Attach horizontal 2×4 rails between the posts, placing one near the top and one near the bottom for a sturdy structural skeleton.
- Unroll your bamboo fencing and staple it tightly to the rails, or screw your pallet slats vertically with a 1/2-inch gap for a breathable, designer aesthetic.
- Finish the wood with a transparent cedar stain to enhance the natural grain and protect the fence from the silvering effects of UV rays.
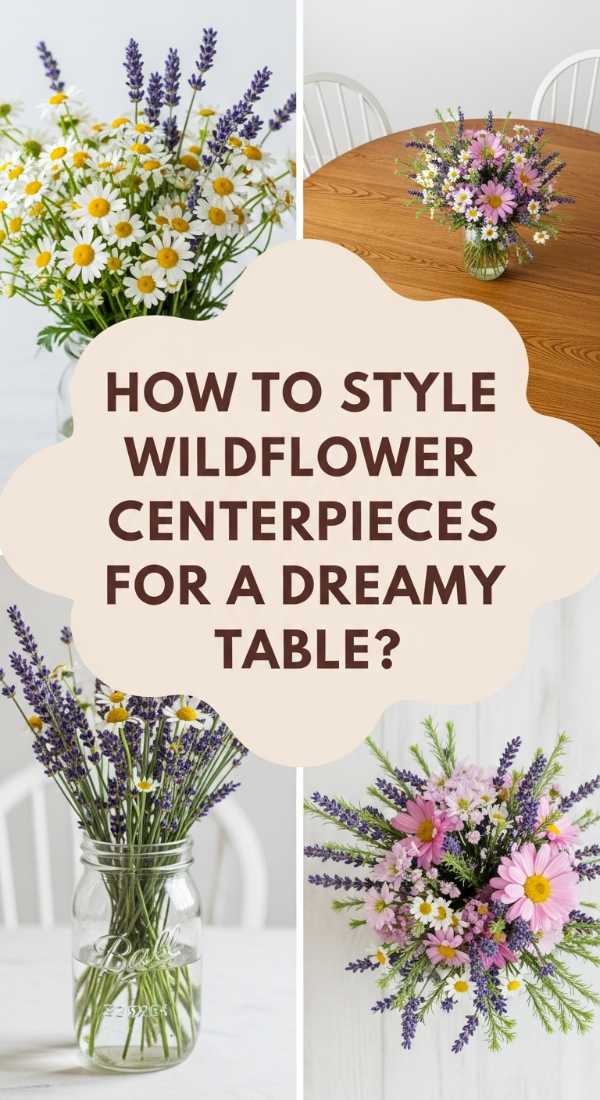
How to Style Wildflower Centerpieces for a Dreamy Round Table Setting

Why we love this
Wildflowers possess an untamed elegance that formal roses simply cannot match; they bring the sprawling beauty of a summer meadow directly to your dining room. A round table centerpiece creates a focal point that encourages conversation, with soft petals and delicate stems reaching out in every direction like a floral crown. The aroma is a complex bouquet of nectar and sun-warmed grass, evoking memories of childhood afternoons spent outdoors. It’s a tactile, breathing piece of art that makes every meal feel like a special occasion under the stars.
Essential Elements:
- A low, wide ceramic bowl or a vintage compote vase
- Chicken wire or a floral frog for structure
- Foraged wildflowers (Queen Anne’s Lace, Cornflowers, Zinnias)
- Trailing greenery like ivy or jasmine vines
- Floral shears and fresh, lukewarm water
How to make it
- Create a ball of chicken wire and fit it snugly into your bowl, securing it with waterproof floral tape to create a sturdy grid for your stems.
- Fill the bowl with water and add a drop of bleach to keep the bacteria at bay and your flowers looking crisp for days.
- Start with your “thrillers”—the tallest, most dramatic blooms—placing them at varying angles to create an asymmetrical, organic shape.
- Incorporate “fillers” like baby’s breath or clover to add density and hide the chicken wire grid from view.
- Finish by tucking in trailing vines around the edges, allowing them to spill onto the table surface for that effortless, “just-picked” romantic vibe.
How to Use Concrete Molds for a High End Patio Path

Why we love this
There is a profound satisfaction in walking upon a path you laid with your own hands, feeling the solid, cool texture of stone-mimicking concrete beneath your feet. A well-designed path guides the eye and the spirit through the garden, creating a sense of mystery and discovery in even the smallest yards. The industrial-chic look of molded concrete contrasts beautifully with soft moss and sprawling groundcover, giving your patio a professional, architectural finish. It looks like expensive flagstone, but it carries the pride of a weekend well-spent in the sun.
Essential Elements:
- Walkmaker or stone-pattern concrete mold
- Quikrete or high-strength concrete mix
- Large mixing tub and a sturdy shovel
- Release agent (or vegetable oil spray)
- Trowel and a stiff-bristled brush
How to make it
- Level the ground where your path will lie, removing all grass and roots, and lay down a 2-inch bed of leveled sand for drainage and stability.
- Mix your concrete in the tub until it reaches the consistency of thick oatmeal; it should hold its shape when squeezed but still be malleable.
- Place your mold on the sand, spray it lightly with a release agent, and shovel the wet concrete into every crevice of the mold.
- Use a trowel to smooth the surface of each “stone,” then wait about 10 minutes for the concrete to begin setting before carefully lifting the mold straight up.
- Once the entire path is cast and cured for 24 hours, brush fine sand or stone dust into the joints to lock the pieces in place and create a seamless look.
How to Arrange a Pink Entry Divider for a Chic First Impression
Why we love this
First impressions are everything, and a soft blush entry divider whispers of warmth, hospitality, and a keen eye for contemporary design. The color pink, in its more muted dusty tones, acts as a sophisticated neutral that brightens a dark hallway and adds a touch of playful elegance. It creates a visual transition from the outside world into your private sanctuary, offering a moment of beauty the second you turn the key. The smooth finish of a painted screen combined with the soft glow of a nearby lamp creates a welcoming ambiance that feels both high-end and deeply personal.
Essential Elements:
- A three-panel folding room divider (wood or metal)
- Dusty rose or “millennial pink” chalk paint
- High-quality synthetic bristle brush
- Gold or brass hardware accents
- Fine sandpaper
How to make it
- Remove all hinges and hardware from the divider to ensure you get a clean, professional paint finish in all the nooks and crannies.
- Lightly sand the surface of the panels to create “tooth” for the paint to adhere to, then wipe clean of all dust.
- Apply the chalk paint in long, even strokes, working from top to bottom; two thin coats are always better than one thick, drippy coat.
- Once the paint is dry, you can lightly distress the edges with sandpaper for a vintage look, or keep it solid and matte for a modern feel.
- Reattach the hardware—consider swapping old hinges for brushed brass ones—and position the divider to create a stylish nook near your front door.
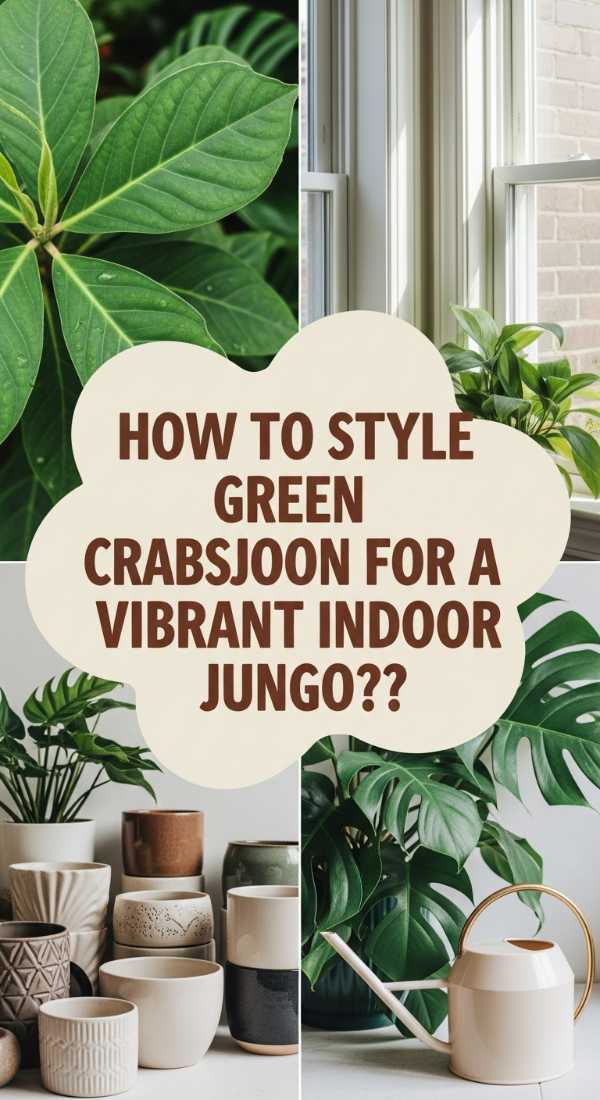
How to Style Green Crabsjoon for a Vibrant Indoor Jungle
Why we love this
Bringing nature indoors is the ultimate way to breathe life into a static room, and the architectural leaves of the Crabsjoon (Crassula) provide a stunning, sculptural element. These plants offer a deep, glossy emerald hue that feels incredibly lush and expensive, especially when grouped together to create a miniature jungle. They purify the air and provide a rhythmic visual texture that calms the mind and centers the soul. There’s a tactile joy in the waxy, cool leaves and the way they catch the morning light, turning a simple corner into a thriving, green masterpiece.
Essential Elements:
- Various sizes of Crabsjoon (Crassula) plants
- Matte terracotta or white ceramic pots
- Well-draining succulent soil mix
- Decorative river stones or pebbles
- A tiered plant stand or floating shelves
How to make it
- Repot your plants into containers that have drainage holes, using a gritty succulent mix to prevent root rot and keep the foliage vibrant.
- Arrange the pots in groups of three, varying the heights by using books or small wooden blocks to create a dynamic, layered look.
- Place the largest, most structural Crabsjoon in the center as your focal point, surrounding it with smaller varieties to create a lush “canopy” effect.
- Top the soil with smooth river stones to create a clean, finished appearance that hides the brown dirt and retains just enough moisture.
- Position your jungle near a bright, indirect light source, and mist the leaves occasionally to keep that high-end, tropical gloss.
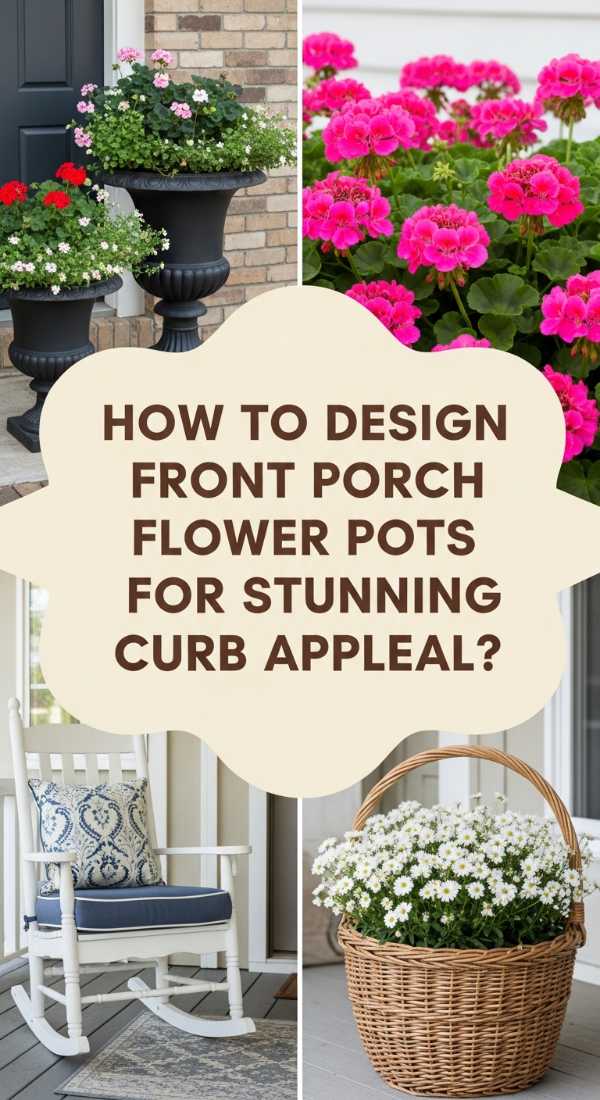
How to Design Front Porch Flower Pots for Stunning Curb Appeal
Why we love this
Your front porch is the smile of your home, and perfectly designed flower pots are the jewelry that completes the look. There is a specific joy in coming home to a vibrant explosion of color and fragrance that greets you before you even reach the door. The contrast between structured, architectural planters and the wild, flowing movement of the flowers creates a balanced aesthetic that feels incredibly polished. It’s a sensory welcome—the smell of petunias and the sight of overflowing greenery—that signals to everyone that this is a home cared for with love.
Essential Elements:
- Two large, oversized matching planters
- Potting soil with slow-release fertilizer
- “Thriller” plants (like Dracaena or Grasses)
- “Filler” plants (like Geraniums or Lantana)
- “Spiller” plants (like Sweet Potato Vine or Bacopa)
How to make it
- Fill your planters with high-quality potting soil, leaving about three inches of space at the top to allow for watering without overflow.
- Plant your “thriller”—the tallest, most eye-catching plant—dead center or toward the back if the pot will be seen from only one side.
- Surround the center plant with your “fillers,” packing them closely enough that the pot looks full immediately, but leaving a little room for growth.
- Tuck your “spillers” around the very edge of the pot, angling them slightly outward so they are encouraged to cascade down the sides.
- Water deeply until the liquid runs out of the drainage holes, and deadhead spent blooms weekly to keep the display looking professional and lush.
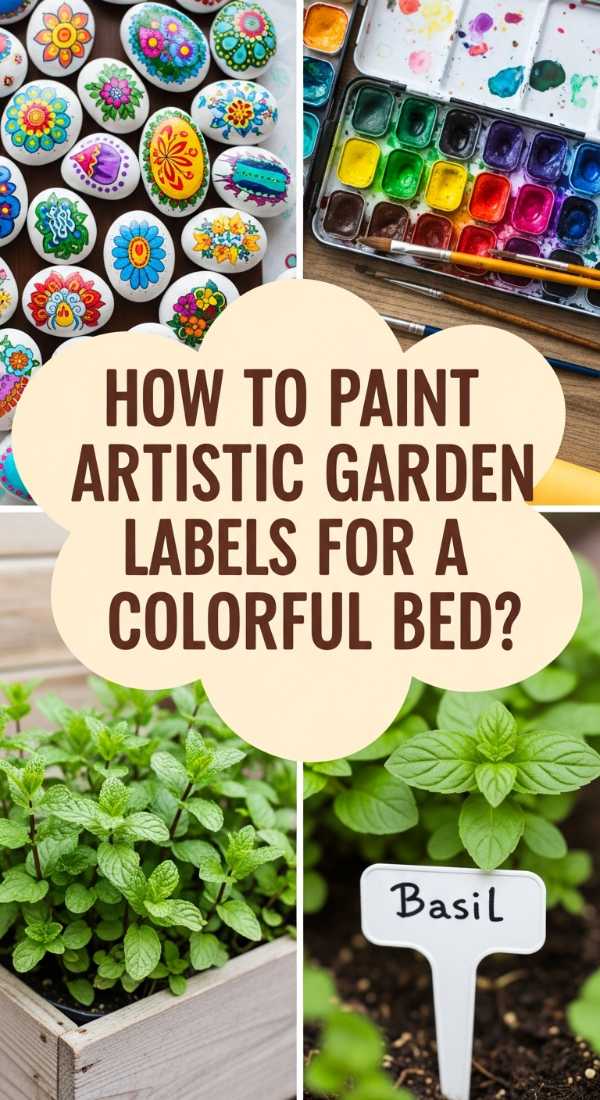
How to Paint Artistic Garden Labels for a Colorful Herb Bed
Why we love this
While natural wood is beautiful, sometimes a garden needs a splash of artistic whimsy to truly reflect your personality. Painting your labels allows you to turn a functional herb bed into a vibrant outdoor gallery where color meets utility. The sight of bright teals, sun-kissed oranges, and deep purples peeking through the green foliage adds a layer of visual excitement that makes gardening feel like a creative adventure. It’s a wonderful way to involve the senses—choosing colors that match the “vibe” of the herb, like a soft lavender hue for the lavender plant itself.
Essential Elements:
- Flat wooden stakes or recycled lath
- Outdoor acrylic craft paints in various colors
- Fine-point detail brushes and wide flat brushes
- UV-resistant clear spray sealer
- Pencil for sketching designs
How to make it
- Apply a solid base coat of outdoor white paint to your stakes; this will make your artistic colors pop and prevent the wood from soaking up all the pigment.
- Once dry, use a pencil to lightly sketch small botanical illustrations of the herb—a tiny leaf shape or a simple flower bud adds so much charm.
- Paint your herb names using a contrasting color, ensuring the letters are bold and easy to read from a standing position.
- Fill in your sketches with vibrant colors, using a fine-point brush for delicate stems and leaf veins.
- Spray both sides of the labels with two coats of UV-resistant sealer to ensure your artwork doesn’t fade under the harsh afternoon sun.
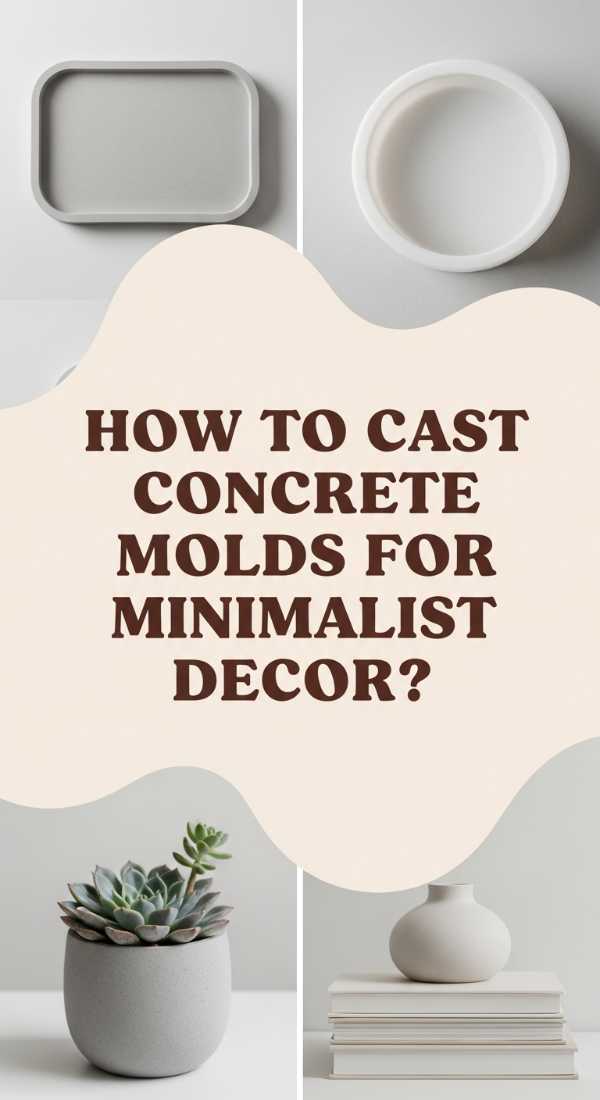
How to Cast Concrete Molds for Minimalist Modern Decor
Why we love this
Modern minimalism is all about the raw beauty of materials, and hand-cast concrete decor brings a sophisticated, industrial edge to any shelf or coffee table. There is a unique weight and coolness to concrete that feels substantial and premium, like something you’d find in a high-end design boutique. The matte, slightly porous finish catches the light softly, creating subtle shadows that highlight its geometric form. It’s a grounding element that brings a sense of permanence and calm to your interior styling, proving that the simplest materials can be the most elegant.
Essential Elements:
- Silicone geometric molds (trays, candle holders, or coasters)
- Fine-finish white or grey concrete mix
- Sifter (to remove large pebbles)
- Sandpaper (400 grit)
- Concrete sealer or beeswax
How to make it
- Sift your dry concrete mix through a fine mesh to remove any large aggregate, ensuring your final piece has a smooth, porcelain-like finish.
- Add water slowly, stirring constantly until the mixture looks like thick pancake batter and is completely free of lumps.
- Pour the concrete into your silicone molds, then tap the sides of the molds vigorously for two minutes to force air bubbles to the surface.
- Let the pieces cure undisturbed for at least 24 to 48 hours; the concrete should feel cold and hard before you attempt to de-mold.
- Once removed, sand any rough edges with high-grit sandpaper under running water for a silky finish, then apply a thin layer of beeswax to give it a soft, luxurious sheen.
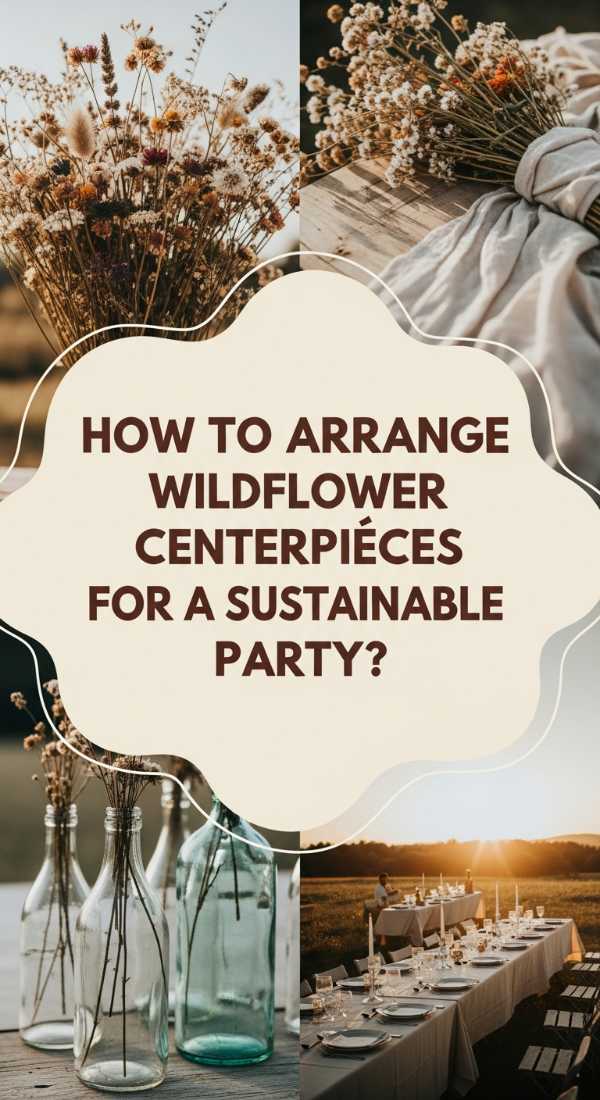
How to Arrange Wildflower Centerpieces for a Sustainable Garden Party
[IMAGE_10]
Why we love this
Sustainability and style go hand-in-hand when you design centerpieces that honor the earth while dazzling your guests. Using foraged flowers and eco-friendly mechanics means your party aesthetic is as kind as it is beautiful. These arrangements have a wild, rhythmic movement that mirrors the breeze, making the table feel alive and connected to the surrounding landscape. The scent of unfiltered nature—pollinated blooms and damp earth—creates an atmosphere of authentic luxury that no store-bought bouquet can replicate. It’s a celebration of the present moment and the beauty of the local season.
Essential Elements:
- Recycled glass jars or vintage milk bottles
- Eco-friendly floral wire or natural twine
- Foraged local flora and “weeds” like Dandelion seed heads or Goldenrod
- Rainwater (for the most natural hydration)
- Sharp garden snips
How to make it
- Gather your flowers early in the morning when their water content is highest, immediately placing the stems into a bucket of cool rainwater.
- Instead of using floral foam (which is plastic), use a “grid” made of twisted willow twigs or natural twine across the mouth of your recycled jars.
- Start by placing your sturdiest stems to create a base, then layer in more delicate blooms like Cosmos or Queen Anne’s Lace for a light, airy feel.
- Group several jars of varying heights in the center of the table rather than one large arrangement; this creates a “meadow” effect that looks more natural.
- Keep the water levels topped up and, after the party, these arrangements can be composted, leaving behind nothing but the memories of a beautiful evening.
Transforming Your Space, One DIY at a Time
Elevating your home doesn’t require a massive renovation or a designer’s budget. It simply requires a weekend of curiosity and a few thoughtful materials. Whether you’re feeling the cool concrete between your fingers or the fragrance of freshly cut herbs, these projects connect you to your living space in a way that purely store-bought items never can. Your home is a canvas—go make it beautiful.