
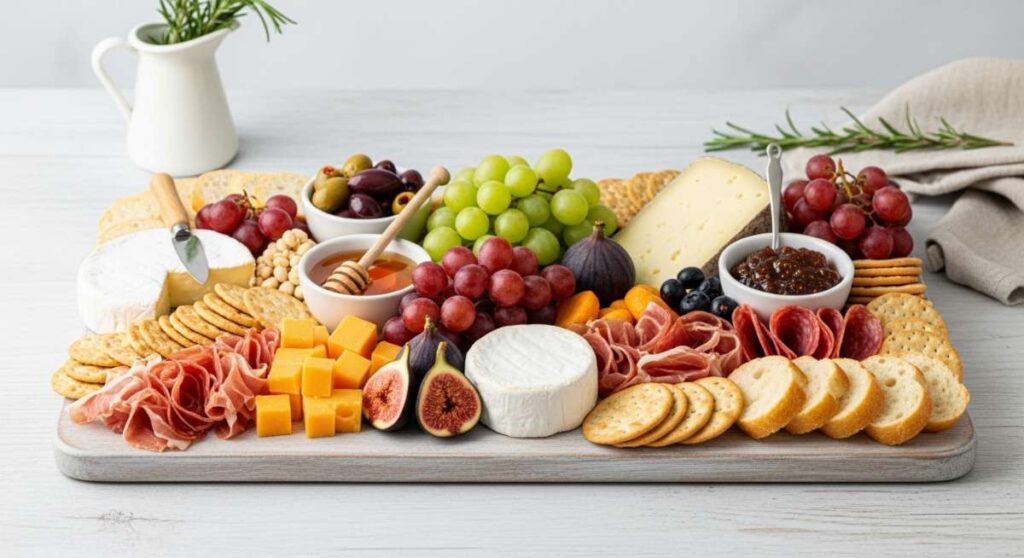
Easy & Elegant: Simple Food Boards for Every Occasion
There is something inherently magical about a shared meal that isn’t confined to a single plate. I remember the first time I set out a sprawling food board for a Sunday brunch; the atmosphere in the room shifted instantly from formal to festive. It wasn’t just about the food—though the colors and textures were stunning—it was about the connection. Seeing my loved ones lean in, reach across the table, and customize their own bites created a ripple of laughter and conversation that lasted long after the last crumb was gone.
In today’s fast-paced world, we often forget that hosting doesn’t have to mean spending eight hours over a hot stove. The viral ‘food board’ trend has saved my sanity and my social life, allowing me to serve elegant, protein-packed, and comforting dishes in a way that feels curated rather than chaotic. Whether you are prepping for a solo self-care night or a neighborhood gathering, these simple, elevated components will turn your table into a masterpiece of flavor and style.
From the sizzle of garlic butter steak bites to the cool, creamy tang of homemade Greek yogurt, we are diving into the ultimate guide for building boards that are as nutritious as they are beautiful. Let’s reclaim the joy of the kitchen and start making memories one board at a time.
How to make protein eggs?

Why we love this
This isn’t just your average scramble; it’s a fluffy, cloud-like experience that packs a serious nutritional punch. The aroma of melting butter hitting the pan combined with the savory richness of high-quality eggs creates a comforting scent that fills the kitchen. As you take your first bite, you’ll notice the silky, custard-like texture that makes these eggs feel incredibly indulgent, while the hidden protein boost keeps you fueled and satisfied for hours. It’s the ultimate morning ritual for anyone who wants to feel both pampered and powerful.
Ingredients
- 4 large pasture-raised eggs
- 1/2 cup low-fat cottage cheese
- 1/2 teaspoon sea salt
- 1/4 teaspoon cracked black pepper
- 1 tablespoon unsalted butter
- Fresh chives, finely chopped
How to make it
- Begin by cracking your eggs into a high-speed blender or a deep bowl. Add the cottage cheese, sea salt, and black pepper. The cottage cheese is the secret to the ‘protein egg’ texture, providing a creamy base without the need for heavy cream.
- Pulse the mixture for 10-15 seconds until it is completely smooth and aerated. You want to see small bubbles forming on the surface, as this ensures the eggs will be light and fluffy rather than dense.
- Place a non-stick skillet over medium-low heat and add the butter. Wait for the butter to melt and just begin to foam—this is your visual cue that the pan is ready. Do not let the butter brown, or it will mask the delicate flavor of the eggs.
- Pour the egg mixture into the center of the pan. Let it sit undisturbed for about 30 seconds until the edges just begin to set.
- Using a silicone spatula, gently push the eggs from the outer edges toward the center. This creates large, soft curds. Continue this slow sweeping motion, keeping the heat low to prevent the eggs from drying out.
- Remove the pan from the heat when the eggs still look slightly ‘wet’ or glossy. The residual heat from the pan will finish the cooking process in about 30-60 seconds. Top with fresh chives and serve immediately on your board.
How to prep salmon bowls?

Why we love this
The salmon bowl is the crown jewel of any vibrant food board, offering a kaleidoscope of colors and a symphony of textures. Imagine the contrast between the warm, flaky salmon with its caramelized glaze and the cool, crisp crunch of cucumbers and radishes. The scent of toasted sesame oil and soy sauce wafts up, promising a meal that is both refreshing and deeply savory. It’s a dish that feels like a spa day on a plate—light, nourishing, and exceptionally elegant for any occasion.
Ingredients
- 1 lb fresh Atlantic salmon, cubed into 1-inch pieces
- 2 cups cooked jasmine or sushi rice
- 2 tablespoons soy sauce or coconut aminos
- 1 tablespoon honey
- 1 teaspoon grated fresh ginger
- 1 cucumber, thinly sliced
- 1 avocado, sliced
- Optional toppings: Nori strips, sesame seeds, and spicy mayo
How to make it
- Start by preparing your marinade. In a small glass bowl, whisk together the soy sauce, honey, and grated ginger until the honey is fully dissolved. This balance of salty, sweet, and zingy ginger is essential for that signature ‘poke’ style flavor.
- Pat your cubed salmon dry with a paper towel. This is a crucial step; moisture on the surface of the fish prevents it from searing properly. Toss the salmon cubes gently in half of the marinade, letting them sit for at least 10 minutes.
- Heat a large cast-iron or stainless steel skillet over medium-high heat with a drizzle of neutral oil. Once the oil shimmers, add the salmon in a single layer. Do not crowd the pan.
- Sear the salmon for 2 minutes on the first side without moving it. You are looking for a golden-brown crust to form. Flip the cubes and cook for another 1-2 minutes until the salmon is opaque but still tender in the middle.
- While the salmon rests, fluff your warm rice and place it in the center of your board or in small individual bowls.
- Arrange the cucumber slices, avocado, and salmon over the rice. Drizzle with the remaining marinade and garnish with sesame seeds and nori for that professional, viral-worthy finish.
How to cook creamy pasta?

Why we love this
There is nothing quite as soul-warming as a bowl of perfectly executed creamy pasta. The way the velvet-smooth sauce clings to every ridge of the noodles, releasing a nutty aroma of aged parmesan and garlic, is pure culinary magic. Each forkful provides a luxurious mouthfeel that is both heavy enough to feel like a treat and light enough to keep you coming back for more. It’s the ultimate comfort food that bridges the gap between a casual weeknight and a sophisticated dinner party.
Ingredients
- 12 oz pasta (penne or rigatoni work best)
- 1 cup heavy cream
- 1/2 cup freshly grated Parmesan cheese
- 2 cloves garlic, minced
- 1 tablespoon butter
- 1/2 cup reserved pasta water
- Salt and pepper to taste
How to make it
- Bring a large pot of heavily salted water to a rolling boil. Add your pasta and cook it for 1-2 minutes less than the package directions specify. This ‘al dente’ texture is vital because the pasta will finish cooking in the sauce.
- Before draining the pasta, carefully ladle out at least 1 cup of the starchy pasta water. This liquid gold is the secret to a professional, emulsified sauce that won’t break or become oily.
- In a separate large skillet, melt the butter over medium heat. Add the minced garlic and sauté for about 60 seconds until fragrant and translucent—be careful not to let it turn brown or bitter.
- Pour in the heavy cream and bring to a gentle simmer. Let it reduce for 2-3 minutes until it slightly thickens.
- Whisk in the grated Parmesan cheese a handful at a time, ensuring each batch melts completely before adding more. This prevents the cheese from clumping.
- Add the cooked pasta directly into the skillet. Pour in 1/4 cup of the reserved pasta water and toss vigorously with tongs. The starch in the water helps the cream and cheese bind to the noodles. If the sauce is too thick, add more water a tablespoon at a time until the pasta is coated in a glossy, silky sheen.
How to air fry chicken?

Why we love this
The air fryer has revolutionized the way we think about crispy chicken, delivering that satisfying ‘crunch’ without the heavy grease of traditional frying. When you bite into a piece of air-fried chicken, you’re met with an explosion of savory spices and a texture so crisp it almost shatters, followed immediately by the tender, succulent juices of the meat. The air is filled with the mouthwatering scent of toasted paprika and garlic, making it nearly impossible to wait for the timer to go off. It’s the perfect, high-protein addition to any gathering board.
Ingredients
- 1 lb chicken breast or tenderloins, cut into bite-sized pieces
- 1/2 cup panko breadcrumbs
- 1 tablespoon olive oil
- 1 teaspoon smoked paprika
- 1 teaspoon garlic powder
- 1/2 teaspoon onion powder
- Salt and pepper to taste
How to make it
- Preheat your air fryer to 400°F (200°C) for at least 5 minutes. Preheating is the most ignored step, but it’s essential for achieving an immediate sear and maximum crispiness.
- In a medium bowl, toss the chicken pieces with olive oil until they are lightly and evenly coated. This acts as the ‘glue’ for your spice rub and breadcrumbs.
- In a separate shallow dish, combine the panko breadcrumbs, smoked paprika, garlic powder, onion powder, salt, and pepper. Mix thoroughly to ensure the seasoning is distributed.
- Press each piece of chicken firmly into the breadcrumb mixture, ensuring all sides are well-covered. Shake off any excess.
- Arrange the chicken in the air fryer basket in a single layer. It is vital that the pieces do not touch; air needs to circulate around all sides of the chicken to create that uniform crunch.
- Cook for 10-12 minutes, flipping the chicken halfway through. You’ll know they are done when the breading is a deep golden brown and the internal temperature reaches 165°F (74°C). Let them rest for 2 minutes before serving to keep the juices locked inside.
How to make chocolate bars?

Why we love this
Hand-crafted chocolate bars are the ultimate expression of edible art. There is a deep, primal satisfaction in snapping a thick piece of dark chocolate and feeling it slowly melt against your tongue, releasing notes of roasted cocoa and sea salt. By making your own, you control the infusion of textures—be it the snap of toasted nuts or the chew of dried fruit. The kitchen smells like a high-end chocolatier, and the result is a sophisticated dessert that adds a touch of luxury to your dessert board.
Ingredients
- 8 oz high-quality dark chocolate (at least 70% cocoa)
- 1 teaspoon coconut oil (for a glossy finish)
- Optional mix-ins: Sea salt flakes, crushed pistachios, dried cranberries, or rose petals
How to make it
- Chop your chocolate into very small, uniform pieces. This ensures that the chocolate melts evenly and prevents burning.
- Using a double boiler (a glass bowl set over a pot of simmering water), melt two-thirds of the chocolate and the coconut oil. Stir constantly with a silicone spatula. Ensure the bottom of the bowl does not touch the water, as direct heat can cause the chocolate to seize.
- Once the chocolate is smooth, remove the bowl from the heat and stir in the remaining one-third of the chopped chocolate. This ‘seeding’ method helps temper the chocolate, giving it a professional snap and a shiny finish when it hardens.
- Line a small baking sheet or a silicone chocolate mold with parchment paper. Pour the melted chocolate onto the surface and spread it with an offset spatula until it is about 1/4 inch thick.
- While the chocolate is still wet, sprinkle your chosen mix-ins across the surface. Press them in very gently with your fingertips.
- Allow the bar to set at room temperature for 2-3 hours, or in the refrigerator for 30 minutes if you’re in a rush. Once firm, snap the bar into rustic, irregular shards for a beautiful, artisan look on your board.
How to bake potato casserole?

Why we love this
Potato casserole is the ultimate ‘hug in a dish.’ Imagine layers of paper-thin potato slices bathed in a bubbling, golden sea of melted cheese and herb-infused cream. As it bakes, the edges become impossibly crispy and caramelized, while the center remains soft and buttery. The aroma of roasted garlic and thyme fills the home, creating an atmosphere of warmth and hospitality. It’s the kind of side dish that people will be talking about long after the party is over.
Ingredients
- 2 lbs Yukon Gold potatoes, peeled and thinly sliced
- 1.5 cups heavy cream
- 2 cups shredded Gruyere or sharp white cheddar
- 3 cloves garlic, smashed
- 2 sprigs fresh thyme
- 2 tablespoons butter
- Salt and nutmeg to taste
How to make it
- Preheat your oven to 375°F (190°C). Grease a deep baking dish generously with butter to prevent sticking and to add a flavorful crust to the bottom layer.
- In a small saucepan over medium heat, combine the heavy cream, smashed garlic, thyme sprigs, salt, and a pinch of nutmeg. Bring it to a bare simmer, then turn off the heat and let it steep for 10 minutes. This infuses the cream with deep, aromatic flavors.
- Using a mandoline or a very sharp knife, slice the potatoes into 1/8-inch thick rounds. This uniformity is key to ensuring every layer cooks through at the same rate.
- Layer one-third of the potatoes in the bottom of the dish, overlapping them slightly like shingles. Sprinkle with a portion of the shredded cheese. Repeat until all potatoes and cheese are used, ending with a heavy layer of cheese on top.
- Strain the garlic and thyme out of the cream and pour the liquid evenly over the potatoes. It should reach about three-quarters of the way up the side of the dish.
- Cover with foil and bake for 45 minutes. Remove the foil and bake for another 15-20 minutes until the top is golden-brown and bubbling, and the potatoes offer no resistance when pierced with a knife.
How to make greek yogurt?

Why we love this
Homemade Greek yogurt is a revelation compared to store-bought versions. It has a thick, velvety consistency and a bright, clean tang that wakes up the palate. There is a quiet, meditative joy in the process of culturing your own food—the gentle heating of the milk and the patient waiting as nature does its work. When served on a board with honey and fresh berries, it looks like a piece of art, offering a refreshing and protein-rich component that balances out heavier savory items.
Ingredients
- 1/2 gallon whole milk (high quality or organic)
- 1/4 cup plain Greek yogurt with ‘live active cultures’ (this is your starter)
- Cheesecloth for straining
How to make it
- Pour the milk into a large, heavy-bottomed pot. Heat it over medium heat, stirring frequently to prevent the bottom from scorching. You want the milk to reach 180°F (82°C). This temperature denatures the proteins, which is what creates a thick final product.
- Remove the milk from the heat and let it cool down to 110°F (43°C). This is the ‘sweet spot’ where the bacteria in your starter can thrive without being killed by the heat.
- In a small bowl, whisk your 1/4 cup of starter yogurt with a splash of the warm milk until smooth. Pour this mixture back into the main pot and stir gently to incorporate.
- Cover the pot and wrap it in a thick towel to insulate it, or place it in an oven with only the pilot light on. Let it incubate undisturbed for 8 to 12 hours. The longer it sits, the tangier it will become.
- Once set, the yogurt will have the consistency of a soft pudding. To turn it into ‘Greek’ yogurt, line a colander with several layers of cheesecloth and set it over a bowl. Pour the yogurt in and let it strain in the fridge for 4-6 hours.
- The liquid that drains out is whey; the thick, creamy mass left in the cloth is your Greek yogurt. Transfer it to a jar and whisk until smooth before serving.
How to prep steak bites?

Why we love this
Steak bites are the ultimate finger food for meat lovers. There is something incredibly satisfying about the intense, beefy flavor and the buttery, melt-in-your-mouth texture of a perfectly seared cube of sirloin. The smell of garlic-infused butter and fresh rosemary hitting a hot pan is enough to draw anyone into the kitchen. These bites bring an air of decadence to your board, providing a high-end steakhouse experience in a communal, easy-to-eat format.
Ingredients
- 1 lb top sirloin or ribeye, cut into 1-inch cubes
- 2 tablespoons unsalted butter
- 3 cloves garlic, minced
- 1 tablespoon olive oil
- 1 sprig fresh rosemary or thyme
- Salt and coarse black pepper
How to make it
- Take your steak cubes out of the refrigerator 20 minutes before cooking. Bringing the meat to room temperature ensures an even cook and a better sear. Pat them extremely dry with paper towels.
- Season the steak generously with salt and coarse black pepper on all sides. Do this just before cooking to prevent the salt from drawing out moisture.
- Heat a large cast-iron skillet over high heat with the olive oil. You want the pan to be smoking slightly before you add the meat.
- Add the steak bites in a single layer. Do not move them for at least 60-90 seconds. You are looking for a dark, caramelized crust (the Maillard reaction).
- Flip the bites and cook for another minute. Reduce the heat to medium and add the butter, minced garlic, and rosemary sprig to the pan.
- As the butter melts and foams, use a spoon to baste the steak bites with the garlic butter for about 30 seconds. This adds an incredible depth of flavor and a glossy finish. Remove from the pan immediately to avoid overcooking; they should be medium-rare to medium for the best texture.
How to make crispy thighs?

Why we love this
Chicken thighs are the unsung heroes of the poultry world, prized for their rich flavor and incredible moisture. The magic happens in the skin—when rendered properly, it becomes a thin, crackling sheet of gold that protects the tender, dark meat underneath. The sound of that first crunch is pure music, and the savory, salty aroma is classic home cooking at its finest. They are robust enough to stand up to bold dips and sauces, making them a staple for any hearty food board.
Ingredients
- 4 bone-in, skin-on chicken thighs
- 1 tablespoon olive oil
- 1 teaspoon sea salt
- 1/2 teaspoon smoked paprika
- 1/2 teaspoon garlic powder
How to make it
- Preheat your oven to 425°F (220°C). High heat is necessary to render the fat and crisp the skin without overcooking the meat.
- Trim any excess overhanging skin from the thighs, but keep the main skin intact. Pat the skin very dry with a paper towel. Moisture is the enemy of crispiness!
- Rub the underside of the thighs with a little olive oil and the spices. For the skin side, use only a tiny bit of oil and a generous amount of salt. Salt helps draw out moisture from the skin during the cooking process.
- Place the thighs, skin-side up, in a cast-iron skillet or on a wire rack set over a baking sheet. Using a wire rack allows hot air to circulate under the chicken, preventing a soggy bottom.
- Bake for 25-30 minutes. If the skin isn’t ‘shatter-crisp’ yet, turn on the broiler for the last 2-3 minutes. Watch them like a hawk during this stage, as the skin can go from golden to burnt very quickly.
- Let the thighs rest for 5-8 minutes before serving. This allows the juices to redistribute so the meat stays succulent when you bite through that perfectly crispy exterior.
How to make peanut bars?

Why we love this
Peanut bars are the perfect sweet-and-salty finale to an elegant board. They offer a dense, fudgy texture that contrasts beautifully with the crunch of whole roasted peanuts and a drizzle of dark chocolate. The aroma of toasted nuts and vanilla is incredibly nostalgic, reminiscent of old-fashioned candy shops but with a modern, wholesome twist. They are easy to slice into small, bite-sized squares, making them the ideal ‘just one more’ treat for guests to nibble on as the evening winds down.
Ingredients
- 1 cup creamy natural peanut butter
- 1/3 cup honey or maple syrup
- 1.5 cups rolled oats (blended slightly)
- 1/2 cup roasted salted peanuts, chopped
- 1/2 cup dark chocolate chips
- 1 teaspoon vanilla extract
How to make it
- In a large microwave-safe bowl, combine the peanut butter and honey. Heat for 30-45 seconds until the mixture is loose and easy to stir. Stir in the vanilla extract until well combined.
- Add the rolled oats (pulse them in a blender a few times first if you prefer a smoother, less chewy bar). Fold the oats into the peanut butter mixture until a thick, stiff dough forms.
- Line an 8×8 inch square baking pan with parchment paper, leaving an overhang on the sides so you can easily lift the bars out later.
- Press the mixture firmly into the bottom of the pan. Use the bottom of a flat glass or a measuring cup to pack it down as tightly as possible. This ensures the bars won’t crumble when cut.
- Melt the chocolate chips in 20-second intervals in the microwave, stirring between each until smooth. Drizzle the chocolate over the top of the bars and sprinkle with the chopped roasted peanuts.
- Place the pan in the refrigerator for at least 2 hours to firm up. Once solid, use the parchment paper to lift the block out of the pan and slice into 16 even squares with a sharp, warm knife.
Conclusion
Creating a viral-worthy food board isn’t about perfection; it’s about the intention behind the ingredients. By focusing on high-quality proteins, varied textures, and simple yet elevated cooking techniques, you turn a meal into an experience. These ten recipes are your building blocks—mix and match them to suit your mood, and don’t be afraid to let your creativity shine. Happy hosting!