
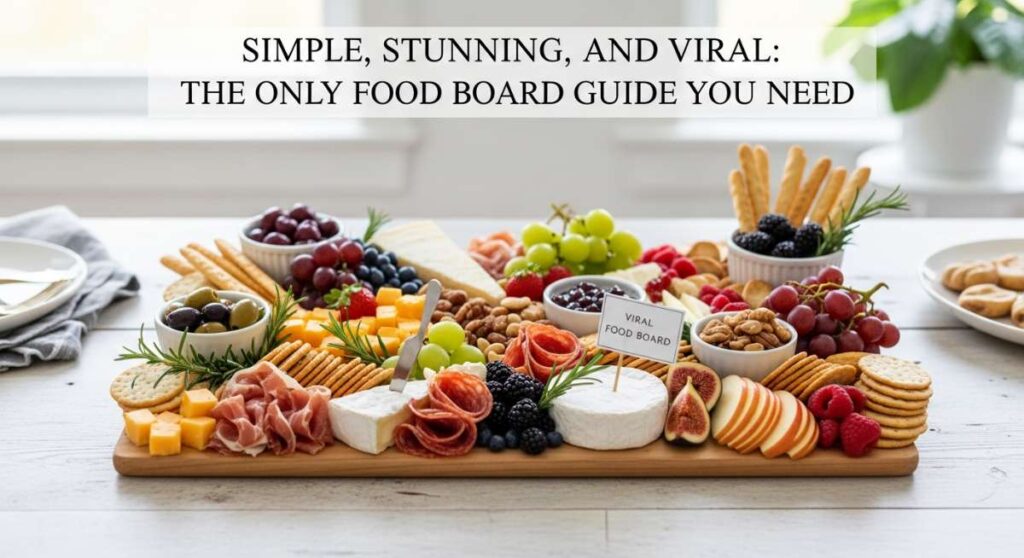
Simple, Stunning, and Viral: The Only Food Board Guide You Need
There is something truly magical about the way food brings us together, especially when the sun is high and the days feel blissfully long. I remember my first summer hosting a backyard gathering where I felt overwhelmed by the individual plating and the frantic pace of the kitchen. That was the day I discovered the power of the ‘Food Board’ mentality—it’s not just about the cheese and crackers anymore, it’s about creating a communal experience where every guest can find something they love. It’s about the art of the assembly and the joy of shared flavors.
In this guide, we are diving deep into the viral sensations that are taking over our social feeds, turning simple ingredients into stunning centerpieces. Whether you’re hosting a quiet afternoon on the porch or a vibrant block party, these ideas are designed to be effortless yet high-impact. We’re moving beyond the basic charcuterie and into a world where everything from morning coffee to hearty grilled kabobs finds a place on your table. Let’s reclaim our time and make every meal feel like a curated celebration.
How to make summer crockpot meals?

Why we love this
There is a specific kind of magic that happens when you come home from a long day at the beach to the intoxicating aroma of a slow-cooked meal that didn’t require you to heat up your entire kitchen. We love this approach because it preserves the cool temperature of your home while delivering flavors that are deep, soulful, and incredibly tender. Imagine succulent pulled pork or zesty citrus chicken that has simmered to perfection, absorbing every spice and herb until it practically melts in your mouth. It is the ultimate life hack for the busy host who wants to spend more time in the sun and less time hovering over a hot stove.
Ingredients
- 3-4 lbs of meat (Pork shoulder, chicken breasts, or beef chuck)
- 1 cup of liquid base (Chicken broth, apple juice, or light beer)
- 2 tablespoons of acidity (Lime juice or apple cider vinegar)
- 4 cloves of minced garlic
- 1 large onion, sliced thinly
- Spice rub (Smoked paprika, cumin, brown sugar, salt, and black pepper)
- Fresh herbs for garnish (Cilantro or parsley)
How to make it
- Begin by patting your meat dry with paper towels to ensure the spice rub adheres perfectly; this is the secret to a deep flavor profile.
- In a small bowl, whisk together your dry spices and rub them generously over every inch of the meat, massaging it in to ensure deep penetration of flavor.
- Place the sliced onions and minced garlic at the bottom of the slow cooker to create a ‘rack’ that prevents the meat from sticking and adds aromatic depth.
- Carefully place the seasoned meat on top of the onions, then pour your liquid base around the sides—not directly over the meat—to avoid washing off the spices.
- Set your crockpot to ‘Low’ and cook for 6 to 8 hours; the low and slow method is critical for breaking down tough connective tissues into a buttery texture.
- Once the meat is fork-tender, remove it to a board, shred it using two forks, and then toss it back into the juices for 15 minutes to reabsorb all that concentrated liquid before serving.
How to make fresh summer salads?

Why we love this
A truly fresh summer salad is like a love letter to the garden, celebrating the peak ripeness of every ingredient. We love this because it offers a crisp, hydrating crunch that acts as a perfect counterpoint to the heat of July. Think of the vibrant contrast between sweet, sun-ripened berries and the salty tang of feta cheese, all tied together by a bright, zingy vinaigrette. The texture is a symphony of soft greens and firm vegetables, creating a sensory experience that feels light on the stomach but incredibly satisfying to the palate. It’s the kind of dish that looks like a painting on your board and tastes like a refreshing breeze.
Ingredients
- 4 cups of mixed greens (Arugula, spinach, and butter lettuce)
- 1 cup of fresh fruit (Strawberries, blueberries, or peach slices)
- 1/2 cup of crumbled cheese (Feta, goat cheese, or gorgonzola)
- 1/4 cup of toasted nuts (Walnuts, pecans, or slivered almonds)
- 1 cucumber, thinly sliced
- 1/2 red onion, shaved into translucent half-moons
- Dressing: Extra virgin olive oil, honey, Dijon mustard, and white balsamic vinegar
How to make it
- Start by washing your greens in ice-cold water and drying them thoroughly with a salad spinner; moisture is the enemy of a crisp salad and prevents dressing from sticking.
- Prepare your dressing by whisking the oil, honey, mustard, and vinegar in a small jar until emulsified; look for a creamy consistency that doesn’t separate.
- Layer your greens on a wide, shallow wooden board rather than a deep bowl to ensure every guest gets a bit of every topping.
- Distribute the sliced cucumbers and red onions evenly, ensuring they are cut thin enough to provide flavor without overpowering the delicate greens.
- Scatter your choice of seasonal fruit and toasted nuts over the top, adding a textural contrast that makes every bite interesting.
- Just before serving, drizzle the dressing in a zig-zag motion and sprinkle the cheese; this prevents the greens from wilting under the weight of the dressing.
How to make summer pasta salad?
Why we love this
Pasta salad is the unsung hero of the summer picnic, offering a hearty base that holds up beautifully even after hours on a sunny table. We love this because it’s a versatile canvas for whatever is freshest at the farmer’s market, from snap peas to heirloom tomatoes. The way the ridges of the pasta catch the herb-infused oil creates little pockets of flavor that explode when you take a bite. It’s a comfort food that doesn’t weigh you down, providing a chewy, al dente texture that pairs perfectly with the snap of raw vegetables. Plus, it actually tastes better the next day as the flavors have time to marry and intensify.
Ingredients
- 1 lb short pasta (Fusilli, farfalle, or rotini)
- 1 cup of cherry tomatoes, halved
- 1 cup of fresh mozzarella pearls
- 1/2 cup of Kalamata olives, pitted
- 1 bell pepper, finely diced
- 1/2 cup of fresh basil leaves, chiffonade
- Dressing: Red wine vinegar, dried oregano, garlic powder, salt, pepper, and olive oil
How to make it
- Boil a large pot of heavily salted water—it should taste like the ocean—and cook your pasta until it is just slightly past al dente.
- Immediately drain the pasta and rinse it under cold running water to stop the cooking process and wash away excess starch, which prevents clumping.
- In a large mixing bowl, combine the cooled pasta with a splash of olive oil to keep the pieces separate while you prep the vegetables.
- Add your halved tomatoes, mozzarella pearls, diced peppers, and olives, tossing gently so you don’t break the delicate pasta shapes.
- Whisk your vinaigrette ingredients together until the dried oregano is well-distributed and the vinegar is sharp and bright.
- Pour the dressing over the salad and toss thoroughly; let it sit in the refrigerator for at least 30 minutes before serving to allow the pasta to absorb the aromatic oils.
How to make creamy rotel dip?

Why we love this
There is a reason this dip goes viral every single summer: it is pure, unadulterated comfort in a bowl. We love this because of its velvety, molten texture and the way it balances the richness of melted cheese with the acidic kick of diced tomatoes and green chilies. When you dip a salty, crunchy tortilla chip into that warm pool of gold, it’s a sensory overload of heat, salt, and creaminess. It’s the ultimate ‘guilty pleasure’ that brings everyone to the center of the table, sparking conversation and laughter. It’s effortless to make but always the first thing to disappear at any party.
Ingredients
- 1 lb of Velveeta or high-quality melting cheese, cubed
- 1 can (10 oz) of Ro-Tel (diced tomatoes and green chilies)
- 1/2 lb of ground sausage or beef (optional)
- 1/2 cup of heavy cream (for extra silkiness)
- 1 teaspoon of chili powder
- Fresh cilantro and sliced jalapeños for garnish
How to make it
- If using meat, brown the ground sausage or beef in a skillet over medium-high heat until fully cooked, then drain the grease thoroughly on a paper towel.
- Cut your melting cheese into uniform 1-inch cubes; this ensures that everything melts at the same rate without burning.
- In a heavy-bottomed saucepan or a small slow cooker, combine the cheese cubes, the entire can of Ro-Tel (do not drain the juices!), and the cooked meat.
- Heat over low heat, stirring constantly with a silicone spatula to prevent the cheese from sticking to the bottom or scorching.
- Slowly stir in the heavy cream and chili powder once the cheese has started to liquefy; this creates a professional, silky finish that stays dip-able even as it cools.
- Once smooth and bubbling gently, transfer to a serving bowl and top with fresh cilantro and jalapeños for a pop of color and heat.
How to make summer coffee drinks?

Why we love this
Summer coffee is all about that transition from the cozy warmth of winter to the refreshing, icy jolt of a morning in the sun. We love these drinks because they feel like a luxury treat you’d find at a high-end cafe, but they are so simple to recreate at home. Imagine the sight of dark, rich espresso swirling into a glass of creamy milk and ice, creating beautiful marble patterns. The aroma is toasted and sweet, often accented by a hint of vanilla or caramel. It’s the perfect ritual to start a slow summer Saturday, providing a crisp caffeine kick that feels light and celebratory rather than heavy and utilitarian.
Ingredients
- 1 cup of strong cold brew coffee or chilled espresso
- 1/2 cup of milk of choice (Oat milk works beautifully for creaminess)
- 1-2 tablespoons of simple syrup or flavored syrup (Vanilla, lavender, or caramel)
- Plenty of large ice cubes
- Optional: Whipped cold foam or a dash of cinnamon
How to make it
- Start with a clean, tall glass and fill it to the brim with large, solid ice cubes; small ice melts too fast and will water down your brew.
- Pour in your chosen syrup first; this allows the coffee to mix with the sweetness as it cascades down the ice.
- Slowly pour your cold brew or chilled espresso over the ice, leaving about two inches of space at the top of the glass.
- If you want a ‘layered’ look, pour your milk over the back of a spoon held just above the coffee line; the milk will gently bleed into the coffee for that viral aesthetic.
- To make cold foam at home, froth a small amount of cold milk with a hand frother for 30 seconds until thick and pillowy, then dollop it on top.
- Give it a quick stir only when you’re ready to sip to maintain the beautiful temperature and flavor gradients.
How to make hummingbird food?

Why we love this
While not a dish for humans, creating a ‘food board’ for your backyard visitors is one of the most rewarding summer projects. We love making hummingbird food because it invites these glittering, tiny wonders into our personal space, turning a backyard into a living sanctuary. There is a quiet peace in watching them hover near a feeder, their wings a blur of motion. This simple nectar is a vital energy source for them, and making it yourself ensures it is free from harmful dyes and preservatives found in store-bought mixes. It’s a way to connect with nature from the comfort of your patio chair.
Ingredients
- 1 cup of plain white granulated sugar
- 4 cups of filtered water
- Note: Never use honey, brown sugar, or red dye as these can be harmful to birds.
How to make it
- Mix the sugar and water in a medium saucepan at a ratio of 1:4; this perfectly mimics the sugar concentration of natural flower nectar.
- Heat the mixture over medium heat, stirring occasionally until the sugar is completely dissolved and the liquid is crystal clear.
- Bring the solution to a brief boil for about 1-2 minutes; this helps remove any impurities in the water and slows down the growth of bacteria.
- Remove from heat and allow the nectar to cool completely to room temperature; never put hot nectar into a plastic feeder as it can warp the container and harm the birds.
- Fill your clean hummingbird feeder and store any extra nectar in a sealed glass jar in the refrigerator for up to two weeks.
- Remember to clean your feeder every 3-5 days—more often in extreme heat—to prevent mold and ensure your tiny guests stay healthy.
How to make summer dessert boxes?

Why we love this
Dessert boxes are the ultimate expression of ‘more is more,’ providing a curated selection of sweets that cater to every craving. We love this because it removes the pressure of baking one perfect cake and replaces it with a playful variety of textures—crunchy cookies, velvety chocolates, and juicy, sugar-dusted fruits. The presentation is visually stunning, a literal treasure chest of treats that encourages guests to pick and choose. The aroma of cocoa mixed with fresh berries and buttery pastry is intoxicating, making the dessert course feel like a grand finale that is as fun to look at as it is to eat.
Ingredients
- Miniature brownies or blondies
- Selection of macarons or sugar cookies
- Fresh berries (Strawberries, raspberries, blackberries)
- Chocolate-covered pretzels or nuts
- Dipping sauces (Salted caramel or dark chocolate ganache)
- Small candies or marshmallows for filling gaps
How to make it
- Select a shallow wooden box or a large platter with a lip to keep all the treats contained.
- Start by placing your largest items first, like the brownies or cookies, in opposite corners to create a balanced visual weight.
- Place small bowls of dipping sauces or soft candies in the center to act as anchors for the smaller items.
- Fill the largest remaining gaps with clusters of fresh berries; the bright reds and blues will provide the necessary color contrast to the brown tones of the baked goods.
- Tuck in smaller items like chocolate-covered pretzels or individual chocolates to fill every single empty space; a ‘viral’ box should look overflowing and abundant.
- Garnish with a few edible flowers or sprigs of mint for a professional, lifestyle-blogger finish that makes the whole box pop.
How to make cucumber onion salad?

Why we love this
This salad is the definition of ‘vintage summer,’ reminding us of grandmas’ kitchens and backyard barbecues of the past. We love it for its sharp, vinegary punch and the incredible snap of a perfectly chilled cucumber. It is the ultimate palate cleanser—light, acidic, and incredibly hydrating. The way the red onion mellows out in the pickling liquid, turning a soft pink and losing its bite, creates a flavor profile that is both sophisticated and nostalgic. It’s the perfect side dish for heavy grilled meats, providing a bright spark of acidity that cuts through richness and keeps you coming back for more.
Ingredients
- 2 large English cucumbers, thinly sliced
- 1 medium red onion, halved and thinly sliced
- 1/2 cup of white vinegar or apple cider vinegar
- 1/4 cup of water
- 2 tablespoons of sugar (adjust to taste)
- 1 teaspoon of salt and 1/2 teaspoon of black pepper
- 2 tablespoons of fresh dill, chopped
How to make it
- Slice your cucumbers as thinly as possible; using a mandoline on a thin setting is the best way to achieve those translucent, professional-looking slices.
- Place the cucumber slices in a colander, sprinkle with a little salt, and let them sit for 10 minutes to draw out excess moisture; this ensures your salad stays crunchy rather than watery.
- In a small bowl, whisk together the vinegar, water, sugar, salt, and pepper until the sugar is completely dissolved.
- In a large glass bowl, layer the cucumbers and sliced red onions, tossing them gently to mix.
- Pour the vinegar mixture over the vegetables and add the fresh dill, stirring to ensure every slice is coated in the brine.
- Cover and refrigerate for at least one hour; the cold temperature is vital for the ‘snap’ and allows the quick-pickling process to work its magic.
How to make grilled kabobs?

Why we love this
Kabobs are summer on a stick, offering a charred, smoky flavor that only a grill can produce. We love them because they are inherently portion-controlled and customizable, making them perfect for a food board presentation. The sensory experience of a kabob is unmatched—the hiss of the meat hitting the grate, the smell of caramelizing onions, and the vibrant colors of peppers and zucchini. Each bite is a mix of textures: the exterior crunch of the char and the juicy, tender interior of the meat or vegetable. They are fun to eat and even more fun to assemble, making them a interactive centerpiece for any gathering.
Ingredients
- 1.5 lbs of protein (Steak tips, chicken breast, or jumbo shrimp)
- Assorted vegetables (Bell peppers, red onion, zucchini, and button mushrooms)
- Marinade: Olive oil, soy sauce, lemon juice, minced garlic, and dried oregano
- Wooden or metal skewers
How to make it
- If using wooden skewers, soak them in water for at least 30 minutes before grilling to prevent them from catching fire on the grate.
- Cut your protein and vegetables into uniform 1-inch pieces; uniformity is the key to ensuring everything cooks at the same rate.
- Marinate your protein in a sealed bag for at least 2 hours (or overnight for steak) to break down fibers and infuse deep flavor.
- Thread the skewers, alternating between meat and vegetables; don’t pack them too tightly, as air needs to circulate around each piece to ensure even charring.
- Preheat your grill to medium-high heat (about 400°F) and lightly oil the grates to prevent sticking.
- Grill the kabobs for 10-12 minutes, turning a quarter-turn every 3 minutes, until the meat reaches the desired internal temperature and the vegetables have beautiful grill marks.
How to make picnic sandwiches?
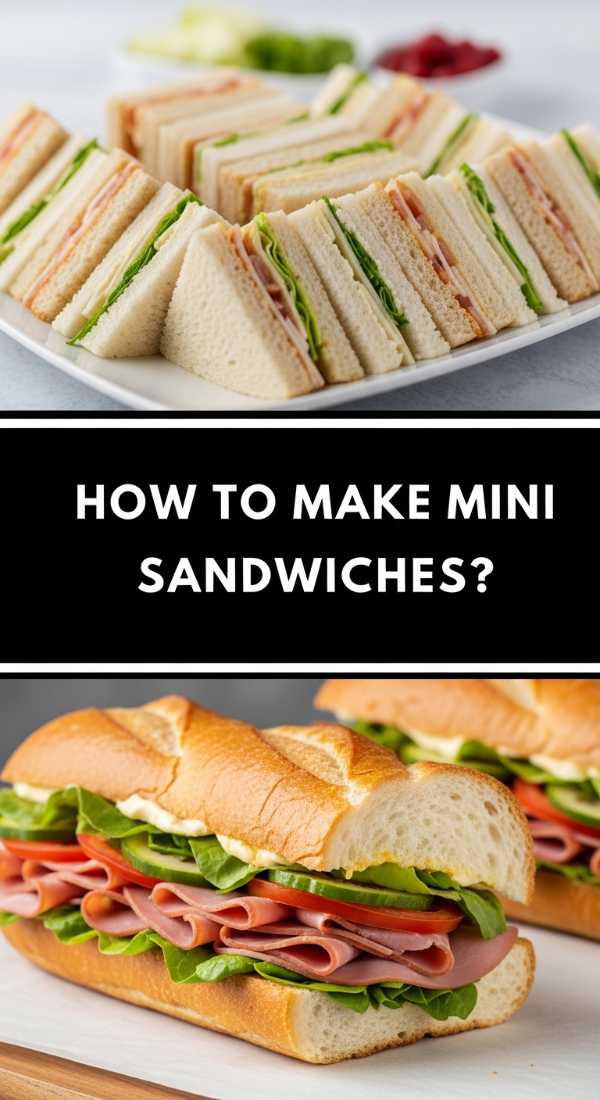
Why we love this
The perfect picnic sandwich is an architectural marvel that manages to stay fresh and delicious even after a trek to the park. We love this because it represents the ultimate portable feast—a compact bundle of flavors that feels more substantial than a snack but easier than a full meal. Think of crusty baguettes filled with salty meats, creamy cheeses, and a layer of greens that provide a fresh crunch. The way the bread slightly absorbs the oils and vinegars from the fillings over time makes the sandwich even more flavorful. It’s the centerpiece of a summer food board that promises adventure and satisfaction in every bite.
Ingredients
- 1 large baguette or focaccia loaf
- Selection of deli meats (Prosciutto, turkey, or salami)
- Cheese slices (Provolone, havarti, or fresh mozzarella)
- Arugula or leaf lettuce
- Spreads: Pesto, aioli, or honey mustard
- Thinly sliced tomatoes or roasted red peppers
How to make it
- Slice your bread lengthwise, but avoid cutting all the way through if using a baguette; this creates a ‘pocket’ that keeps the fillings from sliding out.
- Apply a generous layer of your chosen spread to both the top and bottom interior of the bread; this acts as a moisture barrier to prevent the bread from getting soggy.
- Layer your heaviest ingredients first, usually the meats, followed by the cheese slices to provide a sturdy base.
- Add your ‘wet’ ingredients, like tomatoes or peppers, in the middle so they are cushioned by the drier ingredients.
- Top with a handful of greens for crunch, then press the sandwich down firmly with your hands to compress the layers.
- Wrap the entire loaf tightly in parchment paper or foil and let it sit for 20 minutes before slicing into individual portions; this compression step is the secret to a sandwich that stays together beautifully.
The Art of the Summer Gathering
As we wrap up this guide, remember that the most important ingredient in any of these recipes is the spirit in which they are served. Food boards are designed to take the stress out of hosting by encouraging a relaxed, ‘help yourself’ atmosphere. Don’t worry about perfection; focus on the colors, the freshness, and the joy of having your favorite people around the table. Summer is fleeting, but the memories of a shared meal and a beautiful spread will last long after the sun sets. Go ahead, build that board, snap a photo, and enjoy every bite!