
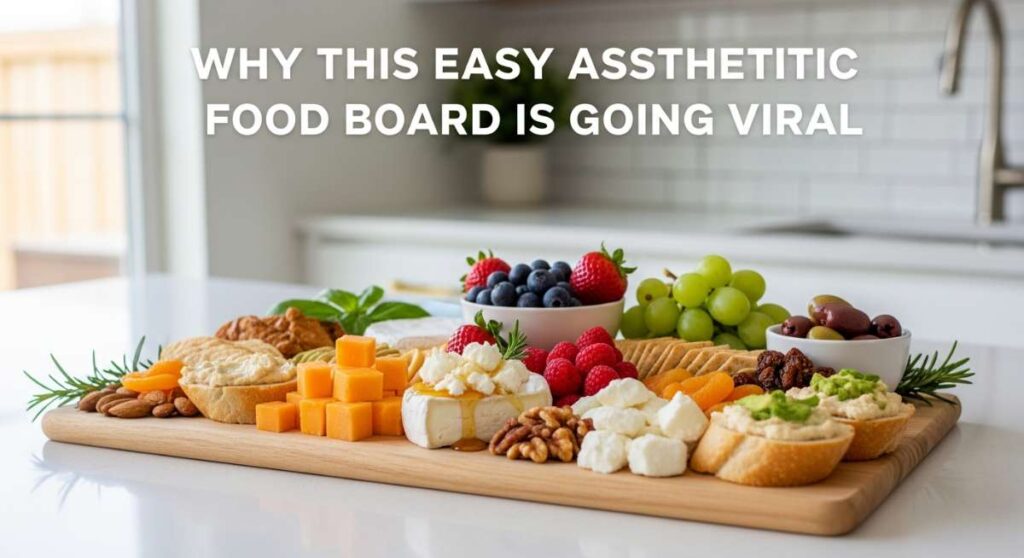
Why This Easy Aesthetic Food Board Is Going Viral
There’s something truly magical about the golden hour of a midsummer evening, when the light turns soft and honey-colored, and the air is thick with the scent of blooming jasmine and charcoal smoke. I remember hosting my first real summer gathering; I was so nervous about everything being perfect, but I soon realized that the most memorable moments happen when the food is laid out beautifully and everyone can just graze and laugh. That sense of effortless connection is exactly why this viral aesthetic food board has taken over our feeds—it’s not just about eating; it’s about creating a centerpiece for memories.
The beauty of the ‘Viral Simple Food Board’ lies in its versatility. It’s a tapestry of flavors that transitions perfectly from a lazy Sunday afternoon by the pool to a chic sunset dinner on the patio. By combining warm, indulgent dips with crisp, refreshing produce and zesty drinks, you create a sensory experience that feels luxurious without requiring you to spend all day in a hot kitchen. It’s about celebrating the bounty of the season and the joy of being together.
In this post, I’m breaking down every single element you need to build the ultimate summer board that will have your guests reaching for their phones to snap a photo before they even take a bite. From the creamiest dips to the most refreshing sips, let’s dive into the secrets of making your summer hosting completely viral-worthy.
How to make the creamiest rotel dip
Why we love this
This dip is the ultimate comfort food with a sophisticated summer twist, offering a velvety, molten texture that clings perfectly to every chip. The aroma of browned savory sausage mingled with the sharp, tangy scent of diced tomatoes and green chilies creates an immediate mouth-watering response from anyone in the room. As you take that first warm bite, the creamy cheese melts across your palate, followed by a gentle, spicy kick that keeps you coming back for more, making it the undeniable heart of any festive board.
Ingredients
- 1 lb high-quality ground breakfast sausage or lean ground beef
- 32 oz block of processed cheese (like Velveeta), cubed
- 2 cans (10 oz each) Ro-Tel diced tomatoes and green chilies, undrained
- 1/2 cup heavy cream (for extra silkiness)
- 1 teaspoon smoked paprika
- Fresh cilantro and sliced jalapeños for garnish
How to make it
- Begin by placing a large, heavy-bottomed skillet or Dutch oven over medium-high heat. Add your ground meat, breaking it apart with a wooden spoon or spatula into small, uniform crumbles. Cook until the meat is thoroughly browned and no pink remains, which usually takes about 7-10 minutes.
- Once the meat is cooked, carefully drain the excess grease from the pan. This is a crucial step to ensure your dip isn’t oily. Return the skillet to the stove and turn the heat down to low.
- Add the cubed cheese to the skillet. The low heat is vital here; if the heat is too high, the cheese can scorch or become grainy. Stir frequently as the cheese begins to soften and lose its shape.
- Pour in both cans of Ro-Tel tomatoes and chilies, including the liquid from the cans, which adds essential flavor and moisture. Continue to stir until the mixture is about 80% melted.
- Slowly whisk in the heavy cream and smoked paprika. This technique emulsifies the dip, creating that signature viral silkiness. Continue stirring until the mixture is completely smooth and bubbling gently.
- Transfer the dip to a pre-warmed serving bowl or a small slow cooker set to ‘warm’ to maintain that perfect gooey consistency throughout your party. Garnish with fresh cilantro and jalapeños just before serving.
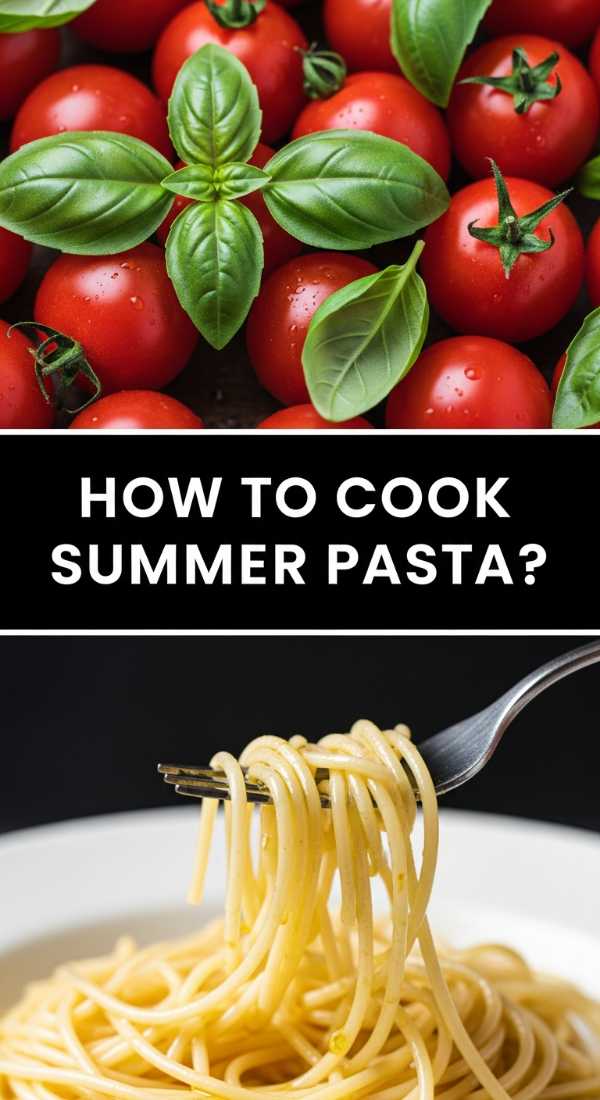
How to cook refreshing summer pasta
Why we love this
Nothing says summer like a pasta dish that feels light enough to enjoy in the heat while still being deeply satisfying. We love this because it captures the essence of a Mediterranean garden, with the bright, citrusy notes of lemon zest dancing through strands of al dente noodles. The aroma is a fragrant blend of fresh basil and toasted garlic that fills the kitchen with warmth, while the texture of blistered cherry tomatoes provides a sweet, juicy burst in every mouthful that feels like sunshine on a plate.
Ingredients
- 1 lb linguine or spaghetti
- 1/2 cup extra virgin olive oil
- 4 cloves garlic, thinly sliced
- 2 cups cherry tomatoes, halved
- Zest and juice of 2 organic lemons
- 1 cup fresh basil leaves, torn
- 1/2 cup grated Parmesan cheese
- Red pepper flakes to taste
How to make it
- Bring a large pot of heavily salted water to a rolling boil. Add the pasta and cook according to the package instructions until it reaches ‘al dente’—firm to the bite. Before draining, reserve at least 1 cup of the starchy pasta water; this is the secret to a glossy sauce.
- While the pasta cooks, heat the olive oil in a large skillet over medium-low heat. Add the sliced garlic and a pinch of red pepper flakes. Sauté slowly for about 3-4 minutes until the garlic is fragrant and translucent, but be careful not to let it brown or turn bitter.
- Increase the heat to medium and add the cherry tomatoes. Sauté them for about 5 minutes, stirring occasionally, until they begin to soften and release their juices, creating a natural sauce base.
- Add the drained pasta directly into the skillet with the tomatoes and garlic. Pour in the lemon juice and half of the reserved pasta water.
- Toss the pasta vigorously using tongs, allowing the oil and water to emulsify into a light, shimmering sauce that coats every strand. If it looks too dry, add more pasta water a tablespoon at a time.
- Remove from heat and fold in the fresh lemon zest, torn basil, and Parmesan cheese. The residual heat will slightly wilt the basil and melt the cheese into the sauce. Serve immediately with an extra drizzle of olive oil.
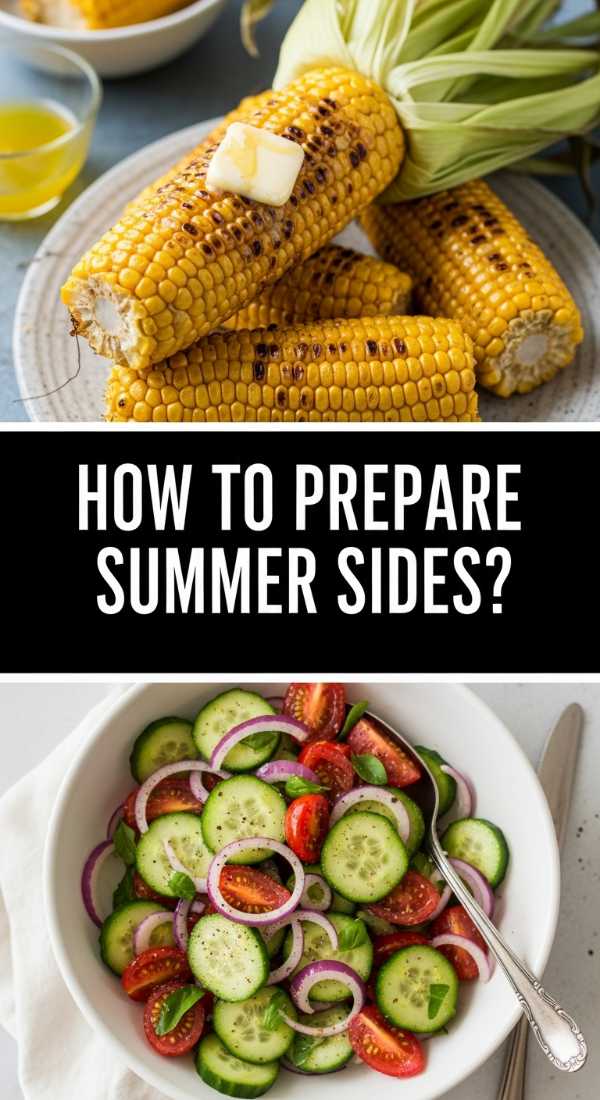
How to prepare the best summer sides

Why we love this
The perfect summer side dish, like a classic Mexican Street Corn salad, offers a complex profile of smoky, salty, and sweet flavors that complement any main dish. We love the contrast between the charred, toothsome kernels of corn and the creamy, tangy dressing that binds everything together. It smells of lime and toasted spices, providing a refreshing crunch that cleanses the palate between heavier bites, making it an essential, vibrant addition to your viral food board.
Ingredients
- 4 cups grilled corn kernels (about 4-5 ears)
- 1/4 cup mayonnaise
- 2 tablespoons sour cream or Mexican crema
- 1/2 cup crumbled cotija cheese
- 1/4 cup chopped fresh cilantro
- 1 teaspoon chili powder
- 1 lime, cut into wedges
How to make it
- To get that authentic smoky flavor, start by grilling the ears of corn over medium-high heat. Rotate them frequently for about 10-12 minutes until the kernels are tender and charred in spots. Let them cool slightly before cutting the kernels off the cob.
- In a large mixing bowl, whisk together the mayonnaise, sour cream, and the juice from half a lime until the mixture is smooth and aerated.
- Add the charred corn kernels to the bowl and toss thoroughly to ensure every kernel is coated in the creamy base.
- Gently fold in the crumbled cotija cheese and the chopped cilantro. The cotija provides a salty punch that balances the sweetness of the summer corn perfectly.
- Dust the top of the salad with chili powder for a hint of warmth and visual pop. Taste and add more lime juice if you prefer a zingier finish.
- Let the salad sit in the refrigerator for at least 20 minutes before serving to allow the flavors to meld together. Serve chilled or at room temperature.
How to mix fun summer drinks

Why we love this
Summer drinks should be as much about the visual appeal as they are about the hydration, and a sparkling berry mocktail or cocktail is the ultimate crowd-pleaser. We love the sound of ice clinking against glass and the sight of vibrant red and purple berries swirling in a sea of bubbles. The aroma is purely fruit-forward and crisp, offering a cooling sensation that instantly lowers your temperature on a humid afternoon, providing a sophisticated, alcohol-free (or spiked!) option for everyone.
Ingredients
- 1 cup fresh raspberries or blackberries
- 1/4 cup honey or agave syrup
- 1/4 cup fresh lime juice
- Fresh mint sprigs
- Liter of sparkling mineral water or club soda
- Ice cubes (extra points for floral ice cubes)
How to make it
- In a large pitcher or individual sturdy glasses, combine the fresh berries and the honey or agave syrup. Use a muddler or the back of a wooden spoon to firmly crush the berries until they release all their juices and create a thick syrup.
- Add the fresh lime juice to the berry mixture and stir well. This acidity will brighten the flavors and prevent the honey from clumping when the cold water is added.
- Clap a handful of mint leaves between your palms to release the essential oils, then drop them into the base of the pitcher.
- Fill your glasses or pitcher to the brim with ice. For a viral look, use large clear cubes or ice frozen with edible flowers inside.
- Slowly pour the sparkling mineral water over the ice. Stir gently with a long spoon to incorporate the berry syrup from the bottom without losing all the carbonation.
- Garnish with extra whole berries and a fresh sprig of mint on top. Serve immediately while the bubbles are at their peak.
How to bake sweet summer desserts

Why we love this
A rustic peach galette is the epitome of summer baking because it celebrates imperfection and the peak of stone fruit season. We love the way the buttery, flaky crust shatters upon impact, revealing a soft, jammy center of spiced peaches that have caramelized in their own juices. The kitchen fills with the scent of cinnamon and baking pastry, creating a nostalgic atmosphere that reminds us of childhood summers, while the warm fruit paired with cold cream is a texture sensation that never fails to impress.
Ingredients
- 1 pie crust (homemade or store-bought)
- 4 large ripe peaches, sliced
- 1/4 cup granulated sugar
- 1 tablespoon cornstarch
- 1 teaspoon vanilla extract
- 1/2 teaspoon cinnamon
- 1 egg (for egg wash)
- Turbinado sugar for topping
How to make it
- Preheat your oven to 400°F (200°C) and line a large baking sheet with parchment paper. This high temperature is necessary to puff the pastry and brown the bottom of the crust quickly.
- In a medium bowl, toss the sliced peaches with the granulated sugar, cornstarch, vanilla, and cinnamon. The cornstarch is vital because it thickens the peach juices into a sauce rather than letting them run out and make the crust soggy.
- Roll out your pie dough on the parchment paper until it is about 12 inches in diameter. Don’t worry about perfectly round edges; the rustic look is part of the charm.
- Arrange the peach slices in the center of the dough, leaving a 2-inch border all the way around. You can spiral them for a professional look or pile them high for a homey feel.
- Fold the edges of the dough up and over the outer peaches, pleating the dough as you go around to create a crust.
- Whisk the egg with a teaspoon of water and brush the exposed dough lightly. Sprinkle the entire crust with turbinado sugar for a crunchy, glittery finish.
- Bake for 30-35 minutes until the crust is a deep golden brown and the peach juices are bubbling thick. Let it cool for at least 15 minutes before slicing to let the filling set.
How to grill perfect summer kabobs

Why we love this
Kabobs bring a playful, interactive element to the food board that guests always gravitate toward. We love the charred, smoky edges of the grilled vegetables paired with the tender, juicy interior of marinated protein that pulls effortlessly off the skewer. The visual of bright peppers, purple onions, and golden meat creates a rainbow of colors that screams summer, while the aroma of caramelized marinade on an open flame is the quintessential scent of a backyard party.
Ingredients
- 1.5 lbs chicken breast or top sirloin, cubed
- 2 bell peppers (different colors), cut into chunks
- 1 large red onion, cut into wedges
- 1 cup zucchini rounds
- Marinade: 1/4 cup soy sauce, 2 tbsp olive oil, 2 tbsp honey, 1 tbsp minced garlic, 1 tsp ginger
How to make it
- If you are using wooden skewers, soak them in water for at least 30 minutes prior to grilling to prevent them from catching fire.
- Whisk all marinade ingredients in a bowl. Add the cubed meat and let it marinate in the refrigerator for at least 1 hour, though 4 hours is ideal for the most tender results.
- Thread the meat and vegetables onto the skewers, alternating colors and textures. Ensure you don’t pack them too tightly; a small amount of space between pieces allows the heat to circulate and cook everything evenly.
- Preheat your grill to medium-high heat (about 400°F). Lightly oil the grates to prevent sticking.
- Place the kabobs on the grill. Cook for 10-12 minutes total, turning them 90 degrees every 3 minutes. This ensures a consistent char on all four sides.
- Use a meat thermometer to check the internal temperature of the meat (165°F for chicken, 145°F for beef). Once done, remove from the grill and let them rest for 5 minutes under a piece of foil to lock in the juices before serving.
How to make homemade hummingbird food
Why we love this
While not for the human guests, having a hummingbird feeder near your outdoor food board adds a whimsical, nature-filled ambiance to your gathering. We love the simple purity of this recipe, which avoids the harmful red dyes found in store-bought versions. Watching the tiny, iridescent birds dart back and forth adds a layer of serene entertainment to your lifestyle setup, making your patio feel like a true sanctuary for all living things.
Ingredients
- 1 cup refined white granulated sugar
- 4 cups filtered water
How to make it
- In a small saucepan, combine the sugar and water. Use only white granulated sugar, as honey can promote fungal growth and brown sugar contains iron which can be toxic to hummingbirds.
- Heat the mixture over medium heat, stirring constantly until the sugar is completely dissolved. Bringing it to a low boil for 1-2 minutes is recommended to help remove any impurities in the water or sugar.
- Remove the pan from the heat and allow the nectar to cool completely to room temperature. This is vital; hot liquid can crack a glass feeder or harm the birds.
- Once cooled, fill your clean bird feeder with the nectar. Store any extra in a sealed container in the refrigerator for up to one week.
- Hang your feeder in a shaded area to prevent the sugar from fermenting too quickly in the summer heat.
- Remember to clean your feeder every 3-5 days with hot water and a brush to keep your feathered friends safe and healthy.
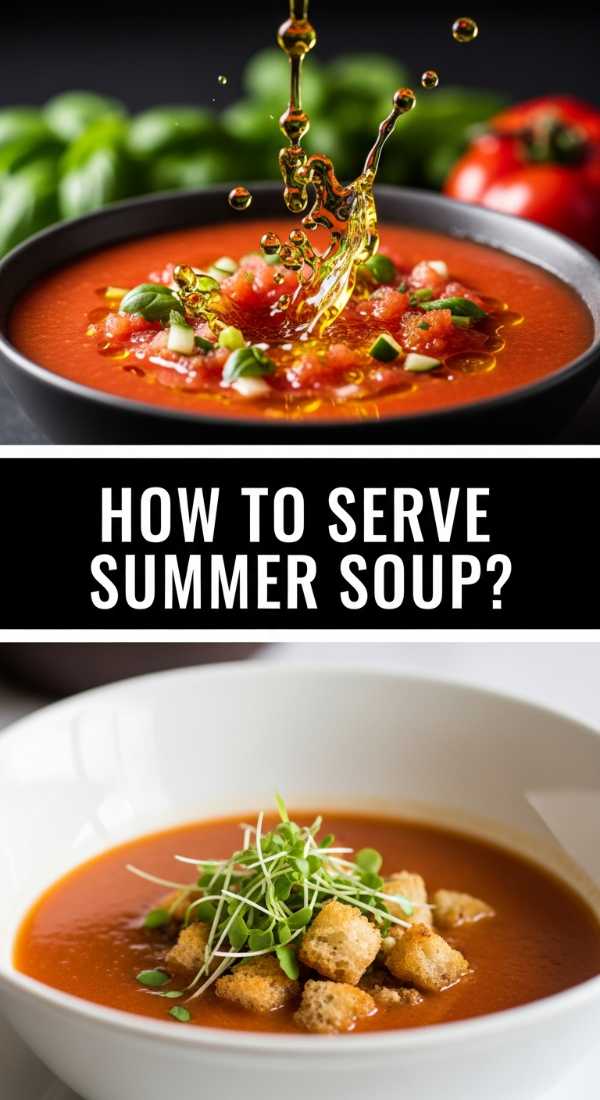
How to serve chilled summer soup

Why we love this
When the temperature soars, a chilled cucumber and dill soup is the ultimate refreshing starter. We love this dish for its elegant, pale green hue and its incredibly silky, cooling texture that feels like a spa day for your taste buds. The fragrance is incredibly fresh, dominated by the scent of garden-picked dill and crisp cucumber, providing a sophisticated and healthy alternative to heavier appetizers that leaves you feeling light and energized.
Ingredients
- 2 large English cucumbers, peeled and chopped
- 1.5 cups plain Greek yogurt
- 1/4 cup fresh dill, chopped
- 2 tablespoons lemon juice
- 1 clove garlic, minced
- Salt and white pepper to taste
- Olive oil for drizzling
How to make it
- Place the chopped cucumbers, Greek yogurt, fresh dill, lemon juice, and minced garlic into a high-speed blender.
- Blend on high until the mixture is completely smooth and aerated. If the soup feels too thick, you can add a tablespoon of cold water or vegetable broth at a time until it reaches your desired consistency.
- Taste the soup and season with salt and white pepper. White pepper is used to keep the appearance of the soup pristine and fleck-free.
- Pour the soup into a glass container and refrigerate for at least 2 hours. Chilling is essential as it allows the garlic and dill to infuse into the yogurt base.
- To serve, pour the soup into chilled small bowls or even decorative shot glasses for a board-friendly presentation.
- Garnish each serving with a thin slice of cucumber, a tiny sprig of dill, and a delicate drizzle of high-quality olive oil for a professional, viral-ready finish.
How to prep healthy summer meals
Why we love this
A vibrant grain salad is the backbone of a healthy summer lifestyle, offering a powerhouse of nutrients without sacrificing flavor. We love the variety of textures here—from the fluffy quinoa to the creamy avocado and the crunch of toasted chickpeas. It smells of earthy grains and zesty vinaigrette, providing a colorful and nourishing base that keeps you full and fueled for all your summer adventures while looking stunning as the centerpiece of a healthy food display.
Ingredients
- 2 cups cooked quinoa (chilled)
- 1 cup canned chickpeas, rinsed and patted dry
- 1 cup chopped kale or massaged spinach
- 1/2 cup cherry tomatoes, halved
- 1 avocado, diced
- Dressing: 3 tbsp olive oil, 1 tbsp apple cider vinegar, 1 tsp Dijon mustard, 1 tsp honey
How to make it
- Start by prepping your chickpeas. Toss them with a drizzle of oil and a pinch of salt, then roast them in an oven at 400°F for 20 minutes until they are crunchy. This adds a necessary texture contrast to the soft grains.
- In a large mixing bowl, combine the chilled quinoa and the chopped greens. If using kale, spend a minute ‘massaging’ the leaves with a tiny bit of olive oil to break down the fibrous texture and make them tender.
- In a small jar, combine all the dressing ingredients. Shake vigorously until the mustard has emulsified the oil and vinegar into a thick, golden liquid.
- Pour the dressing over the quinoa and greens, tossing well to ensure everything is evenly seasoned.
- Gently fold in the cherry tomatoes, the roasted chickpeas, and the diced avocado. Adding the avocado last prevents it from mashing into the grains, keeping the dish looking clean.
- Serve the salad in a wide, shallow bowl on your board, garnishing with extra seeds or sprouts for an added health boost.
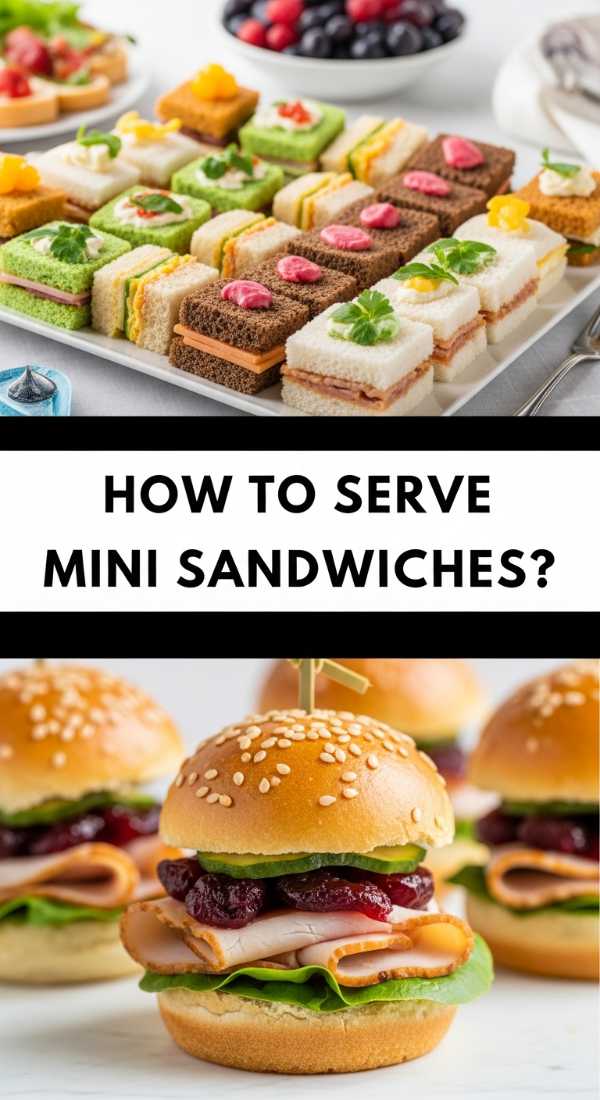
How to build party sandwich displays
[IMAGE_10]
Why we love this
The party sandwich display is the crown jewel of any viral food board because it offers endless variety in a compact, beautiful format. We love the sight of perfectly layered meats, cheeses, and bright microgreens peeking out from between slices of artisanal bread. The aroma of freshly baked sourdough and savory deli meats is incredibly inviting, and the bite-sized nature of the display encourages guests to try different combinations, making the dining experience interactive and fun.
Ingredients
- 1 loaf of sourdough or focaccia, sliced into bite-sized squares
- Assorted deli meats (prosciutto, turkey, roast beef)
- Sliced cheeses (provolone, sharp cheddar, brie)
- Spreads: Pesto, honey mustard, and roasted garlic aioli
- Toppings: Microgreens, thinly sliced radishes, and cornichons
How to make it
- Layout your bread slices on a clean workspace. Consistency is key for a viral display, so ensure all your bread bases are roughly the same size.
- Apply a thin, even layer of spread to each slice. Using different spreads for different meats (e.g., pesto with turkey, honey mustard with roast beef) creates a more curated flavor profile.
- Fold your meats into ‘ribbons’ or ‘roses’ rather than laying them flat. This adds height and visual interest to the board, making the sandwiches look much more appetizing.
- Top the meat with a small slice of cheese and a selection of garnishes. A single radish slice or a pinch of microgreens adds a pop of color that makes the display stand out.
- Secure each sandwich with a decorative bamboo pick or a small sprig of rosemary to keep the layers in place.
- Arrange the sandwiches on your board in a shingled pattern or a circular sunburst design, filling the gaps with small piles of cornichons or olives for a professional, abundant look.
Conclusion
Building a viral-worthy food board is truly an art form, but one that is accessible to anyone with a love for fresh ingredients and a bit of creativity. By focusing on a mix of textures, colors, and flavors—from the spicy warmth of a Rotel dip to the cooling crunch of a summer pasta—you create more than just a meal; you create a destination for your guests. The key is to keep things simple, focus on the quality of the ingredients, and always add a little bit of your own heart to the presentation. Now, grab your biggest wooden board and let’s get styling!
Frequently Asked Questions
How do I keep my food board fresh if hosting outdoors?
To keep your board fresh, place it in a shaded area and consider setting the bowls of dip or chilled soup inside larger bowls filled with ice. Only bring out highly perishable items right as guests arrive.
Can I make these components ahead of time?
Absolutely! Most of the salads and dips can be prepared 24 hours in advance. In fact, the chilled soup and grain salad often taste better the next day as the flavors have more time to develop.
What is the best type of board to use?
A large wooden or marble board is best for that ‘viral’ aesthetic. Ensure it is food-safe and has been treated with mineral oil if it’s wood to prevent staining from juicy fruits or oily meats.