
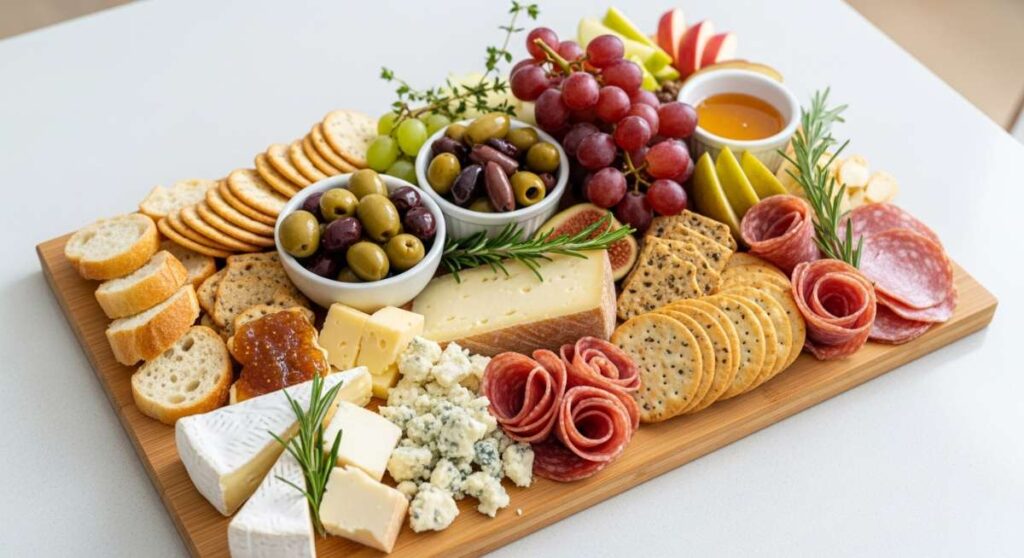
Why This Simple Food Board Is the Only Appetizer You Need
There is a specific kind of magic that happens when you set a beautifully curated board in the center of a table. It’s the sound of wine glasses clinking, the immediate lean-in from your favorite people, and that collective sigh of relief when everyone realizes they can just graze and relax. For years, I stressed over complex hors d’oeuvres that required me to stay tethered to the oven, missing the very laughter I’d invited people over to hear. But then, I discovered the art of the simple food board—a vibrant, tactile spread that turns eating into an interactive experience.
This isn’t just about food; it’s about the atmosphere. It’s the way the afternoon sun hits a bowl of ripe berries, the smell of fresh basil wafting from a pasta salad, and the effortless transition from a light lunch to a long evening of conversation. This summer, I’ve mastered the art of the ‘Simple Food Board’ lifestyle, and I’m sharing every secret with you. From the dips that disappear in minutes to the refreshing sips that keep everyone hydrated, these recipes are designed to keep you out of the kitchen and in the moment.
How to cook healthy summer meals

Why we love this
Summer calls for a departure from heavy, slow-cooked stews and a return to the vibrant, crisp flavors of the garden. Healthy summer cooking is about celebrating the natural sweetness of peak-season produce and the light, clean profile of grilled proteins. When you bite into a perfectly seared piece of fish or a crunchy, vibrant vegetable medley, you feel energized rather than weighed down. The aroma of citrus zest and fresh herbs creates an olfactory experience that is as refreshing as a coastal breeze, making every meal feel like a restorative ritual.
Ingredients
- 4 wild-caught salmon fillets or chicken breasts
- 3 cups fresh asparagus spears, trimmed
- 2 cups cherry tomatoes
- 3 tablespoons extra-virgin olive oil
- 2 cloves garlic, minced
- 1 organic lemon, sliced into rounds
- 1 teaspoon sea salt and cracked black pepper
- Fresh dill and parsley for garnish
How to make it
- Begin by preheating your oven to 400°F (200°C) or prepping your grill to medium-high heat. If using an oven, line a large sheet pan with parchment paper to ensure easy cleanup and prevent sticking.
- In a small glass bowl, whisk together the olive oil, minced garlic, sea salt, and black pepper until the aromatics are well-distributed throughout the oil.
- Place your protein (salmon or chicken) and the vegetables on the prepared pan. If using chicken, ensure the pieces are of uniform thickness; you may need to pound them slightly so they cook evenly with the vegetables.
- Drizzle the garlic-oil mixture over everything, using your hands or a pastry brush to ensure every inch of the food is lightly coated. Place lemon slices directly on top of the protein to infuse it with bright acidity during the cooking process.
- Roast in the oven for 12-15 minutes for salmon or 18-22 minutes for chicken. You are looking for an internal temperature of 145°F for fish (it should flake easily with a fork) or 165°F for chicken. The asparagus should be tender-crisp and the tomatoes just beginning to burst their skins.
- Remove from heat and let rest for 5 minutes. This allows the juices to redistribute, ensuring every bite is moist and flavorful. Garnish generously with fresh herbs before serving.
How to make creamy rotel dip

Why we love this
There is a nostalgic, irresistible comfort found in a bowl of creamy, melted cheese flecked with the spicy kick of green chilies. This dip is the undisputed king of game nights and backyard hangouts because it strikes that perfect balance between rich, velvety textures and a bright, zesty finish. As the heat from the Rotel tomatoes cuts through the creamy base, you get a savory explosion that pairs perfectly with a salty, crunchy tortilla chip. It’s the kind of dish that draws a crowd, staying warm and gooey as the center of your food board.
Ingredients
- 16 oz Velveeta or high-quality processed melting cheese, cubed
- 1 can (10 oz) Ro-Tel Diced Tomatoes and Green Chilies (do not drain)
- 1/2 cup sharp cheddar cheese, shredded
- 1/4 cup whole milk or heavy cream
- 1/2 lb ground sausage or beef (optional)
- Fresh cilantro and sliced jalapeños for topping
How to make it
- If you are including meat, start by browning the ground sausage or beef in a skillet over medium heat. Break it into very small crumbles as it cooks until it is fully browned and slightly crispy. Drain the excess fat thoroughly on a paper towel-lined plate.
- In a medium saucepan or a small slow cooker, combine the cubed melting cheese and the entire can of Ro-Tel (including the flavorful juice). If using a saucepan, keep the heat on low to medium-low; high heat will cause the cheese to grain or burn on the bottom.
- Stir constantly with a silicone spatula as the cheese begins to melt. Once the base is smooth, stir in the milk or cream to achieve a silkier, more pourable consistency.
- Add the shredded sharp cheddar cheese and the cooked meat. Continue to stir until the cheddar is fully melted and integrated, which adds a complex depth of flavor to the mild base.
- Keep the dip over very low heat to maintain its liquid state. If it begins to thicken too much, whisk in an extra tablespoon of milk.
- Transfer to a serving bowl and garnish with fresh cilantro and jalapeños. Serve immediately while the steam is still rising and the texture is at its peak creaminess.
How to make hummingbird food

Why we love this
Creating your own hummingbird nectar is a beautiful way to invite the vibrant energy of nature right to your window. Watching these tiny, iridescent creatures dart back and forth is a meditative experience that complements a slow summer afternoon on the porch. Homemade nectar is superior to store-bought versions because it lacks unnecessary dyes and preservatives, providing a clean, high-energy fuel source for these hardworking birds. It’s a simple act of stewardship that rewards you with the whirring sound of wings and a front-row seat to one of nature’s most delicate ballets.
Ingredients
- 1 cup white granulated sugar
- 4 cups filtered water
- Clean hummingbird feeder
How to make it
- Mix the sugar and water in a medium saucepan. It is crucial to use only white granulated sugar; honey can promote fungal growth, and brown sugar contains iron levels that can be toxic to hummingbirds.
- Place the pan over medium-high heat and bring the mixture to a low boil. Stirring constantly will help the sugar crystals dissolve completely into the water, creating a clear, uniform syrup.
- Boil the mixture for approximately 2 minutes. This brief boiling period helps to remove any impurities in the water and ensures the sugar is fully integrated, which prevents the feeder from clogging.
- Remove the pan from the heat and allow the nectar to cool completely to room temperature. Never put hot nectar into a plastic feeder, as it can warp the material and potentially harm the birds.
- Once cooled, pour the nectar into a thoroughly cleaned hummingbird feeder. Store any leftover nectar in a sealed glass jar in the refrigerator for up to two weeks.
- Hang your feeder in a shaded area to prevent the nectar from fermenting too quickly in the summer sun. Clean the feeder and replace the nectar every 3-5 days to keep your feathered friends healthy and coming back for more.
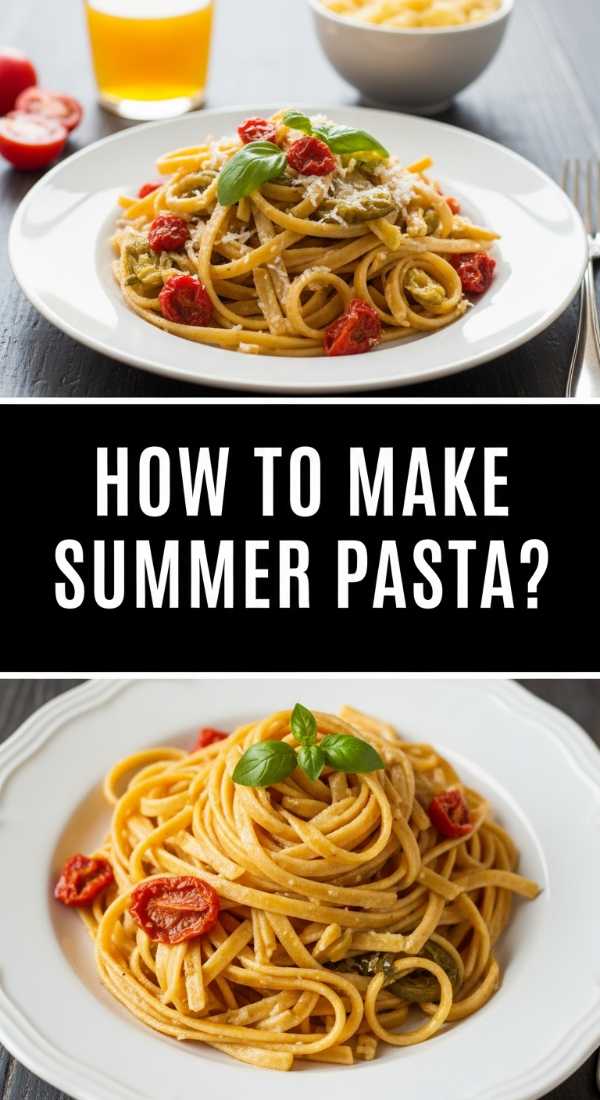
How to make summer pasta
Why we love this
Summer pasta is the antithesis of the heavy, sauce-laden dishes of winter; it is a celebration of freshness and agility. Imagine al dente strands of pasta tossed in a light, shimmering coat of olive oil, punctuated by the burst of sweet cherry tomatoes and the aromatic punch of hand-torn basil. The heat of the pasta gently wilts the greens and softens the garlic, creating a delicate, fragrant steam that fills the kitchen. It’s a dish that tastes like a garden in July—bright, earthy, and infinitely satisfying when eaten al fresco with a chilled glass of white wine.
Ingredients
- 1 lb spaghetti or linguine
- 1/2 cup high-quality extra virgin olive oil
- 4 cloves garlic, very thinly sliced
- 2 cups cherry tomatoes, halved
- 1/2 cup fresh basil leaves, torn
- 1/4 teaspoon red pepper flakes
- 1/2 cup freshly grated Parmesan cheese
- Sea salt to taste
How to make it
- Bring a large pot of heavily salted water to a rolling boil. Use about one tablespoon of salt per four quarts of water; the water should taste like the sea to properly season the pasta from the inside out.
- Add the pasta to the water and cook according to the package directions, but aim for ‘al dente’—usually 1-2 minutes less than the full cooking time. The pasta should have a slight resistance when bitten.
- While the pasta cooks, heat the olive oil in a very large skillet over low-medium heat. Add the sliced garlic and red pepper flakes. Sauté gently for 2-3 minutes until the garlic is golden and fragrant, but be careful not to let it brown or turn bitter.
- Add the halved cherry tomatoes to the oil and increase the heat slightly. Cook for about 4 minutes, stirring occasionally, until the tomatoes soften and begin to release their juices into the oil, creating a natural sauce.
- Before draining the pasta, reserve 1 cup of the starchy pasta water. This is the ‘liquid gold’ that will help bind the sauce to the noodles.
- Transfer the drained pasta directly into the skillet with the tomatoes. Toss vigorously, adding the reserved pasta water a few tablespoons at a time until the sauce becomes glossy and coats every strand.
- Turn off the heat and fold in the fresh basil and Parmesan cheese. Serve immediately with an extra drizzle of olive oil on top.
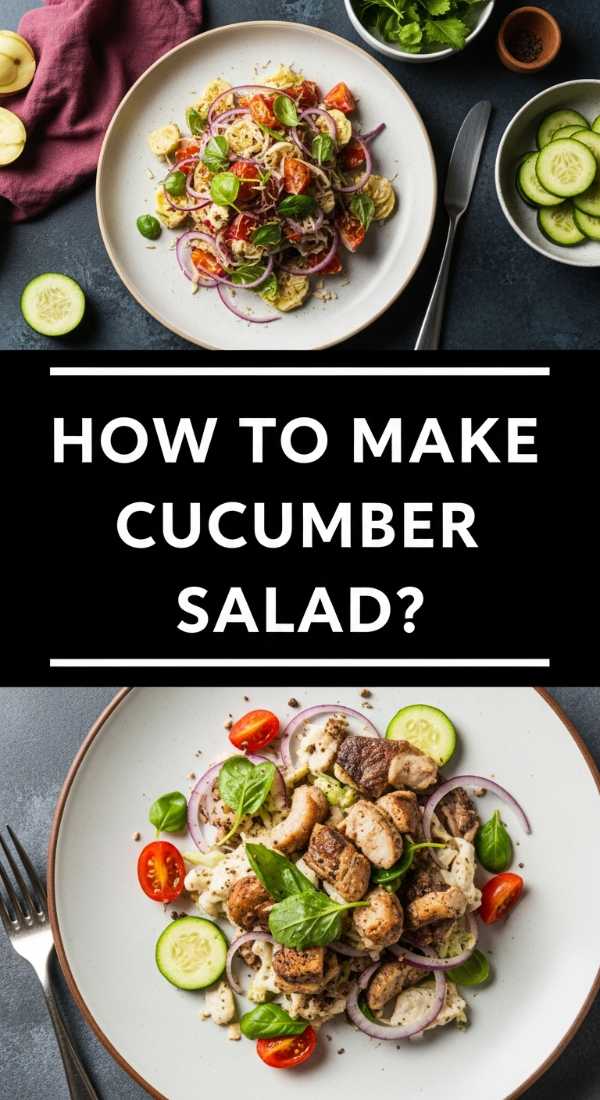
How to make cucumber salad
Why we love this
There is nothing quite as refreshing on a sweltering July day as the cool, crisp snap of a cucumber salad. This dish is a masterclass in balance: the hydrating crunch of the cucumbers meets the sharp tang of vinegar and the mellow sweetness of red onion. The addition of fresh dill provides a feathery, herbal finish that lifts the entire palate. As the salad sits, the vegetables slightly marinate, creating a flavorful brine that makes this the perfect chilled side dish for any grilled meat or heavy food board component.
Ingredients
- 2 large English cucumbers, thinly sliced
- 1/2 small red onion, very thinly sliced into half-moons
- 1/2 cup white wine vinegar or apple cider vinegar
- 2 tablespoons sugar
- 1 teaspoon sea salt
- 1/4 cup fresh dill, chopped
- 1/2 teaspoon black pepper
How to make it
- Start by preparing your cucumbers. English cucumbers are preferred because of their thin skin and lack of large seeds. Use a mandoline or a very sharp chef’s knife to create uniform, paper-thin slices.
- Place the sliced cucumbers and red onions in a large glass or ceramic bowl. Using a non-reactive bowl is important when working with vinegar to prevent any metallic aftertaste.
- In a separate small jar or bowl, whisk together the vinegar, sugar, salt, and pepper. Continue whisking until the sugar and salt have completely dissolved into the liquid.
- Pour the dressing over the cucumbers and onions. Toss the mixture thoroughly with tongs or large spoons to ensure every slice is submerged or coated in the vinaigrette.
- Add the chopped fresh dill and toss once more. The dill should be evenly distributed to provide that signature summer aroma in every bite.
- Cover the bowl with plastic wrap and refrigerate for at least 30 minutes before serving. This chilling time is essential, as it allows the cucumbers to release some moisture and the flavors to meld into a cohesive, refreshing salad. Serve cold.
How to grill perfect kabobs

Why we love this
Kabobs are the ultimate interactive summer food, offering a smoky, charred variety of flavors on a single stick. The beauty lies in the contrast: the juicy, tender interior of the meat paired with the caramelization on the edges of the vegetables. As the skewers sizzle over the open flame, the aroma of seared protein and roasted peppers creates an irresistible backyard atmosphere. They are visually stunning on a food board, providing vertical interest and easy, portion-controlled grazing for your guests.
Ingredients
- 1.5 lbs steak (sirloin) or chicken thigh, cut into 1-inch cubes
- 2 large bell peppers (multi-colored), cut into squares
- 1 large red onion, cut into chunks
- 1 cup whole button mushrooms
- 1/2 cup balsamic vinaigrette or teriyaki sauce for marinating
- Wooden or metal skewers
How to make it
- If using wooden skewers, soak them in water for at least 30 minutes prior to grilling. This prevents the wood from catching fire or splintering while over the high heat of the grill.
- Place your cubed meat in a resealable plastic bag with half of the marinade. Let it sit in the refrigerator for at least 1 hour (for chicken) or 2-4 hours (for steak) to tenderize the fibers and infuse deep flavor.
- Thread the meat and vegetables onto the skewers, alternating colors and textures. Tip: Don’t pack the items too tightly together; leaving a tiny bit of space between each piece allows the heat to circulate and cook everything evenly.
- Preheat your grill to medium-high heat (about 400°F). Lightly oil the grill grates using a folded paper towel dipped in vegetable oil and held with tongs.
- Place the kabobs on the grill. Cook for about 8-12 minutes, turning them every 3 minutes. You are looking for distinct grill marks and an internal meat temperature of 145°F for steak (medium-rare) or 165°F for chicken.
- During the last 2 minutes of cooking, brush the remaining fresh marinade over the kabobs to create a sticky, flavorful glaze. Remove from heat and let rest for 5 minutes before serving.
How to make summer desserts

Why we love this
Summer desserts should feel like a reward for a day spent in the sun—light, fruity, and elegantly simple. Whether it’s a berry-topped galette or a simple macerated fruit bowl, the goal is to highlight the natural sugars of the season without over-complicating things with heavy fats. The texture of a perfectly ripe peach or a tart raspberry, perhaps paired with a dollop of cold whipped cream, offers a sensory finale that is both cooling and indulgent. These desserts bring a pop of color to your board and a sweet, lingering memory to your guests.
Ingredients
- 2 cups fresh strawberries, hulled and sliced
- 1 cup blueberries
- 2 tablespoons honey or maple syrup
- 1 tablespoon fresh lemon juice
- 1 teaspoon vanilla extract
- Shortcake biscuits or angel food cake slices
- Fresh whipped cream
How to make it
- In a large mixing bowl, combine the sliced strawberries and whole blueberries. Using peak-season berries is key, as they provide the best natural flavor and structural integrity.
- Drizzle the honey, lemon juice, and vanilla extract over the fruit. Gently toss with a rubber spatula, being careful not to crush the delicate berries.
- Let the fruit mixture sit at room temperature for about 20-30 minutes. This process, called macerating, draws out the natural juices of the fruit to create a sweet, ruby-red syrup.
- While the fruit macerates, prepare your base. Slice your angel food cake or warm your shortcake biscuits in a low oven (300°F) for just a few minutes until they are slightly crisp on the outside.
- To assemble, place a piece of cake or a biscuit on a plate, spoon a generous amount of the macerated berries and their syrup over the top, and finish with a large dollop of cold whipped cream.
- Garnish with a sprig of fresh mint for a professional, cooling touch. Serve immediately while the cake is still warm and the cream is cold.
How to make summer soup

Why we love this
While we often associate soup with winter warmth, summer soups—like a chilled Gazpacho or a light corn chowder—are the hidden gems of the season. A chilled soup is incredibly revitalizing; it’s like a savory smoothie that bursts with the concentrated essence of garden-fresh tomatoes and peppers. The smooth, velvety texture followed by a garnishing crunch of cucumber or croutons creates a sophisticated mouthfeel. It’s an unexpected and cooling addition to a food board, often served in small shot glasses for a touch of elegance.
Ingredients
- 2 lbs ripe Roma tomatoes, roughly chopped
- 1 cucumber, peeled and chopped
- 1 red bell pepper, seeded and chopped
- 1/2 red onion, chopped
- 1 clove garlic
- 2 tablespoons sherry vinegar
- 1/4 cup extra-virgin olive oil
- Salt and pepper to taste
How to make it
- Place the chopped tomatoes, cucumber, bell pepper, red onion, and garlic into a high-powered blender. This ‘raw’ method ensures the flavors remain bright and the vitamins stay intact.
- Pulse the vegetables until the mixture is broken down, then blend on high for 1-2 minutes until completely smooth and emulsified.
- With the blender running on low, slowly stream in the extra-virgin olive oil and the sherry vinegar. This creates a creamy, stable emulsion and adds a necessary acidic brightness to the soup.
- Season with a generous pinch of sea salt and freshly cracked black pepper. Taste and adjust the vinegar if you prefer a sharper tang.
- Pour the soup through a fine-mesh sieve if you prefer a completely silky texture, though many enjoy the slight rustic body of an unfiltered Gazpacho.
- Transfer the soup to a glass pitcher and refrigerate for at least 4 hours, or ideally overnight. Chilling is non-negotiable for summer soup, as the cold temperature allows the flavors of the raw vegetables to harmonize. Serve in chilled bowls or glasses.
How to make summer drinks

Why we love this
Hydration is the backbone of summer hosting, and a beautifully crafted summer drink is as much a decoration as it is a beverage. Imagine a tall glass filled with ice, sparkling water, and the gentle bleed of color from crushed blackberries or sliced citrus. These drinks are light, effervescent, and designed to cleanse the palate between bites of savory board items. The sound of ice rattling against glass and the sight of condensation on a warm day evoke an immediate sense of refreshment and relaxation.
Ingredients
- 1 liter sparkling water or club soda
- 1 cup fresh raspberries or blackberries
- 1 large cucumber, sliced into ribbons
- 2 limes, sliced into rounds
- Fresh mint sprigs
- Optional: 1 oz elderflower syrup or honey per glass
How to make it
- Start by preparing your garnishes. Use a vegetable peeler to create long, elegant ribbons from the cucumber. This provides a large surface area for the cucumber’s cooling flavor to infuse the water.
- In the bottom of a large glass or a serving pitcher, lightly muddle the berries and a few mint leaves. You don’t want to pulverize them; just press enough to release their natural oils and juices.
- Fill the glasses or pitcher to the brim with large ice cubes. Large cubes melt slower than crushed ice, preventing your drink from becoming watered down too quickly.
- Tuck the cucumber ribbons and lime rounds down into the sides of the glass between the ice for a stunning visual effect.
- Slowly pour the sparkling water over the ice. If using elderflower syrup or honey, stir it in gently with a long spoon to ensure it doesn’t just sink to the bottom.
- Top with a fresh sprig of mint. Slap the mint against your hand before garnishing; this ‘wakes up’ the aromatic oils for a better sensory experience as you sip.
How to make picnic sides

Why we love this
Picnic sides are the sturdy, reliable workhorses of the summer food board. They are designed to travel well and actually taste better as they sit, making them perfect for long afternoons. A classic potato or pasta salad, when done with fresh herbs and a light dressing, offers a satisfying, starchy contrast to the light fruits and veggies on the board. The creamy-yet-tangy flavor profiles are deeply comforting, evoking memories of family reunions and sun-drenched park benches.
Ingredients
- 1.5 lbs baby Yukon Gold potatoes
- 1/4 cup mayonnaise
- 1 tablespoon Dijon mustard
- 2 celery stalks, finely diced
- 3 green onions, sliced
- 1 tablespoon fresh dill
- Salt and pepper to taste
How to make it
- Place the whole baby potatoes in a large pot and cover with cold water. Add a generous pinch of salt. Starting with cold water ensures the potatoes cook evenly from the center out.
- Bring to a boil, then reduce heat and simmer for 10-15 minutes, or until the potatoes are easily pierced with a fork but not falling apart. Drain and let them cool until they are just warm to the touch.
- While the potatoes cool, whisk together the mayonnaise, Dijon mustard, salt, and pepper in a large bowl. Creating the dressing first ensures even distribution.
- Cut the warm potatoes into halves or quarters. Adding them to the dressing while still slightly warm allows them to absorb the flavors more effectively than if they were completely cold.
- Fold in the diced celery, green onions, and fresh dill. Be gentle to avoid mashing the potatoes into a paste; you want distinct, tender chunks.
- Cover and refrigerate for at least 2 hours. This rest period allows the starch in the potatoes to bind with the dressing, resulting in a creamy, cohesive side dish. Serve chilled.
Conclusion
In the end, the ‘Simple Food Board’ isn’t just about the recipes—it’s about the permission to enjoy your own party. By focusing on fresh ingredients, minimal prep, and beautiful presentation, you transform a simple meal into a viral-worthy lifestyle moment. Whether you’re attracting hummingbirds to your garden or serving up a zesty rotel dip, the goal is the same: connection. So, grab a board, gather your friends, and let the flavors of summer do the talking.