
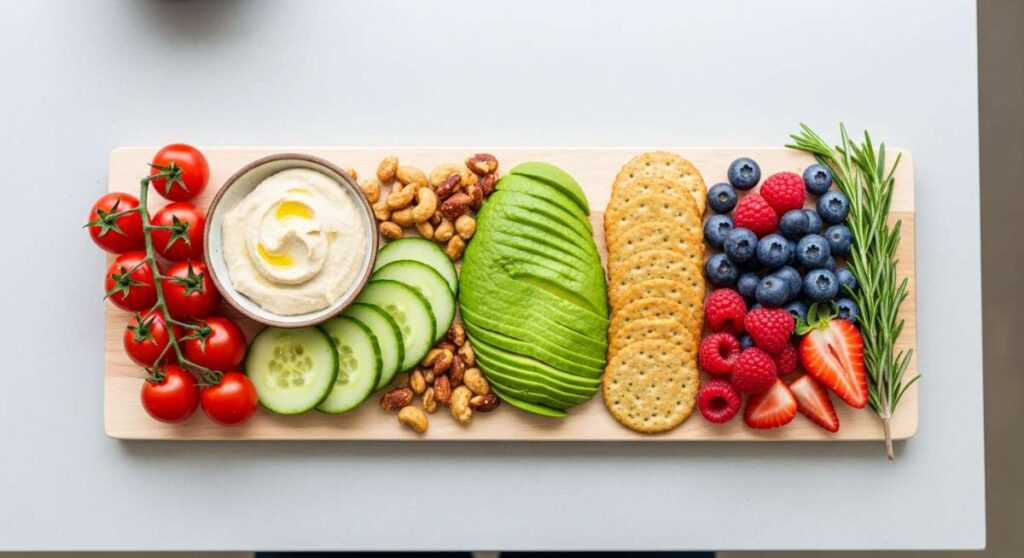
There is something inherently soul-soothing about a beautifully curated food board. It’s more than just a meal; it’s an invitation to linger, a visual feast that sets the tone for meaningful conversation and shared laughter. In a world that often feels rushed, the viral food board trend encourages us to slow down and appreciate the artistry in the everyday, turning simple ingredients into a stunning centerpiece that feels both luxurious and approachable.
I’ve always believed that the best gatherings aren’t the ones where the host is stuck in the kitchen for hours, but the ones where everyone can graze at their own pace. This aesthetic isn’t about perfection; it’s about the warm, tactile experience of reaching for a flaky scone or dipping a piece of soft dough. Whether you are hosting a cozy brunch or a late-night dessert party, mastering these simple, high-impact components will make your board the talk of the town without the stress of a five-course meal.
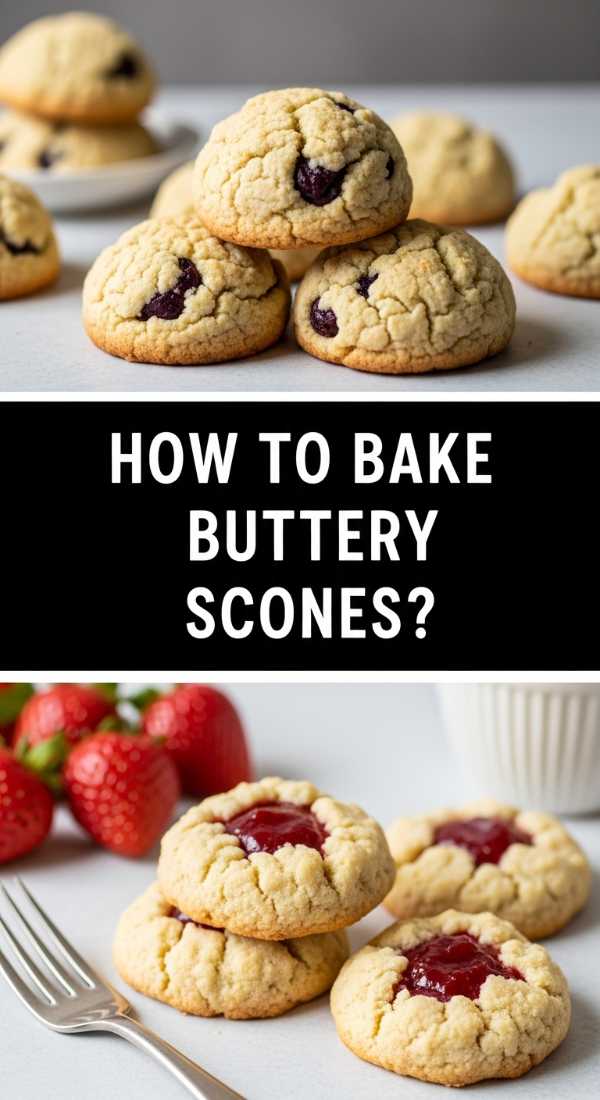
How to bake buttery scones?
Why we love this
There is nothing quite like the scent of cold, high-quality butter melting into flour as it hits the heat of a preheated oven. These scones are the crown jewel of any breakfast board, offering a delicate, crumbly texture that yields to a rich, moist center. When you pull them apart, you should see those beautiful, flaky layers created by the steam from the butter. The subtle crunch of coarse sugar on top provides a perfect contrast to the velvety interior, making every bite a sensory delight that pairs perfectly with a dollop of clotted cream or tart jam.
Ingredients
- 2 cups all-purpose flour
- 1/3 cup granulated sugar
- 1 tablespoon baking powder
- 1/2 teaspoon salt
- 1/2 cup unsalted butter, cubed and chilled
- 1/2 cup heavy cream (plus extra for brushing)
- 1 large egg
- 1 teaspoon vanilla extract
- Coarse sugar for topping
How to make it
- Begin by whisking your dry ingredients—flour, sugar, baking powder, and salt—in a large chilled bowl to ensure everything is evenly distributed.
- Take your cold, cubed butter and use a pastry cutter or two knives to “cut” it into the flour. You are looking for a texture that resembles coarse crumbs with some pea-sized chunks of butter remaining; these chunks are vital for creating steam and flaky layers.
- In a separate small bowl, whisk together the heavy cream, egg, and vanilla until smooth.
- Create a well in the center of the flour mixture and pour in the liquid. Use a fork to gently fold the mixture together just until a shaggy dough forms. Do not overmix, as this will develop gluten and make the scones tough.
- Turn the dough out onto a lightly floured surface and pat it into an 8-inch disc about 1 inch thick. Cut the disc into 8 wedges.
- Place the wedges on a parchment-lined baking sheet, brush the tops lightly with extra cream, and sprinkle with coarse sugar.
- Bake at 400°F (200°C) for 18-22 minutes. You’ll know they are ready when the tops are golden brown and the bottoms feel firm to the touch. Let them cool slightly on the pan to set their structure.
How to make edible dough?

Why we love this
Edible cookie dough is the ultimate nostalgic indulgence, reimagined for a sophisticated food board. It has that unmistakable grainy-sweet texture that we all remember from childhood, but it’s crafted safely so you can enjoy it without worry. The aroma is pure vanilla and caramelized brown sugar, and the mouthfeel is incredibly dense and satisfying. When served in small scoops alongside fruit or pretzels, it adds a playful, interactive element to your spread that guests find absolutely irresistible.
Ingredients
- 1 cup all-purpose flour (heat-treated)
- 1/2 cup unsalted butter, softened
- 3/4 cup brown sugar, packed
- 2 tablespoons granulated sugar
- 1/2 teaspoon salt
- 2 tablespoons milk or cream
- 1 teaspoon vanilla extract
- 1/2 cup mini chocolate chips
How to make it
- First, you must heat-treat the flour to kill any bacteria. Spread the flour on a baking sheet and bake at 350°F (175°C) for about 5-7 minutes until it reaches 160°F. Let it cool completely before using.
- In a medium bowl, cream together the softened butter, brown sugar, and granulated sugar using a hand mixer. Beat on medium speed for 2-3 minutes until the mixture is light, fluffy, and pale.
- Add the salt, milk, and vanilla extract. Mix again until fully incorporated and the texture is smooth.
- Sift the cooled, heat-treated flour into the butter mixture. Fold it in using a spatula until no white streaks remain. The dough should be thick but pliable.
- Fold in the mini chocolate chips evenly.
- If the dough is too soft, refrigerate it for 30 minutes to firm up. Scoop into small spheres or serve in a decorative bowl with crackers and fruit for dipping.
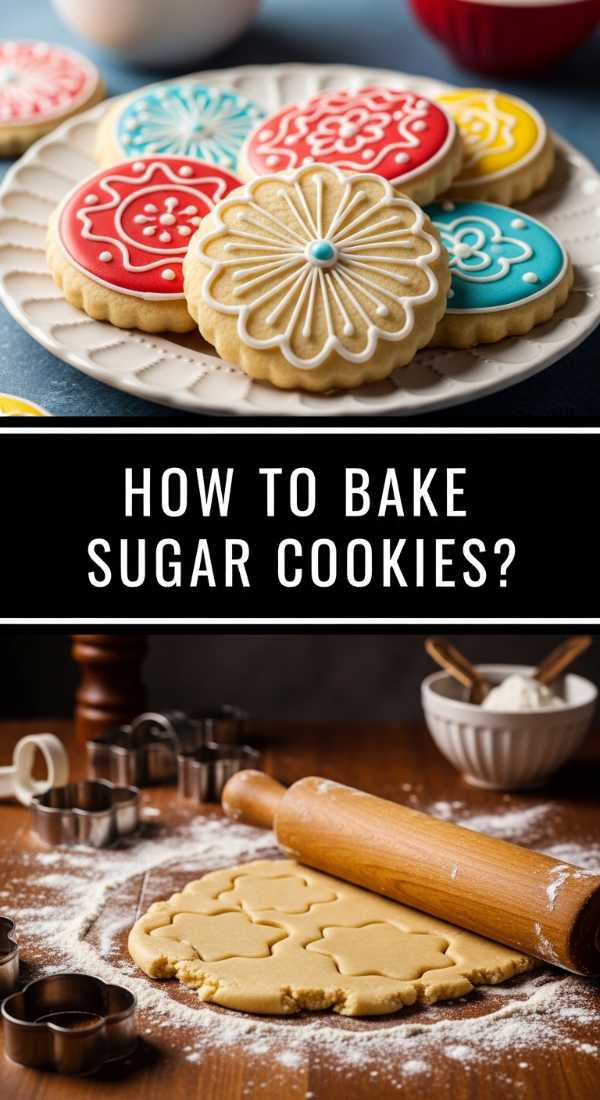
How to bake sugar cookies?
Why we love this
A classic sugar cookie is a masterpiece of simplicity, providing a crisp edge and a tender, buttery snap that melts away on the tongue. These are the perfect “filler” for a board because their neutral, sweet profile complements everything from sharp cheeses to bitter chocolate. The visual appeal lies in their uniform, golden-pale hue and the fine shimmer of sugar crystals on the surface. They feel light and airy, yet provide enough structural integrity to be used as a vessel for spreads or jams.
Ingredients
- 2 3/4 cups all-purpose flour
- 1 teaspoon baking soda
- 1/2 teaspoon baking powder
- 1 cup unsalted butter, softened
- 1 1/2 cups white sugar
- 1 egg
- 1 teaspoon vanilla extract
- Extra sugar for rolling
How to make it
- Preheat your oven to 375°F (190°C). In a small bowl, stir together the flour, baking soda, and baking powder. Set this dry mix aside.
- In a large bowl, cream the softened butter and 1 1/2 cups of sugar together. Use a high speed on your mixer to whip air into the butter until it is voluminous and smooth.
- Beat in the egg and the vanilla extract. Scrape down the sides of the bowl to ensure a uniform batter.
- Gradually add the dry ingredients to the wet ingredients. Mix on low speed just until the flour is incorporated; over-mixing at this stage will result in a hard cookie.
- Roll rounded teaspoons of dough into balls, then roll them in the extra sugar to coat them thoroughly.
- Place them on ungreased cookie sheets about 2 inches apart. Bake for 8 to 10 minutes.
- Watch for the visual cue: the edges should be just starting to turn a very light golden brown, while the centers still look slightly soft. Let them rest on the sheet for 2 minutes before moving to a wire rack.
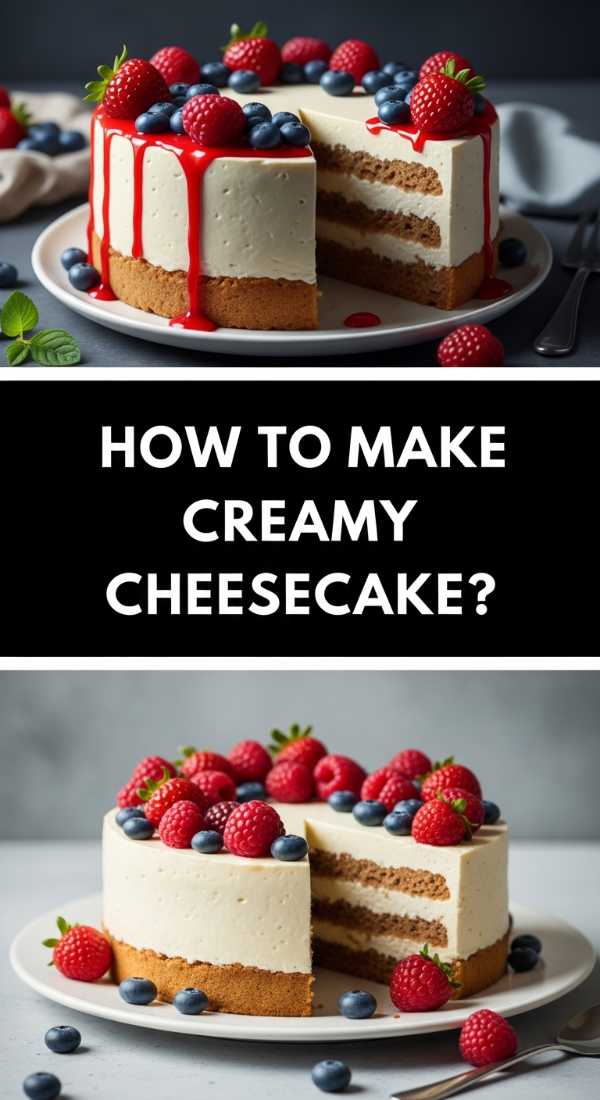
How to make creamy cheesecake?
Why we love this
The hallmark of a truly great cheesecake is its luxurious, silk-like consistency that coats the palate with a rich, tangy sweetness. It is dense without being heavy, and the contrast between the buttery graham cracker crust and the airy cream cheese filling is pure culinary harmony. When served as bite-sized squares on a board, its creamy white aesthetic provides a beautiful backdrop for colorful berry compotes or drizzled honey. The subtle aroma of vanilla and lemon zest makes it feel incredibly fresh and elegant.
Ingredients
- 1 1/2 cups graham cracker crumbs
- 1/4 cup melted butter
- 24 oz cream cheese, softened to room temperature
- 1 cup granulated sugar
- 1 cup sour cream
- 1 teaspoon vanilla extract
- 3 large eggs
How to make it
- Preheat your oven to 325°F (160°C). Mix graham cracker crumbs with melted butter and press firmly into the bottom of a 9-inch springform pan. Bake for 10 minutes, then cool.
- In a large bowl, beat the softened cream cheese and sugar until completely smooth. It is vital that there are no lumps at this stage, so use room-temperature ingredients.
- Blend in the sour cream and vanilla extract. The sour cream adds a necessary tang and contributes to the creamy texture.
- Add the eggs one at a time, mixing on the lowest speed possible just until incorporated. Do not over-beat the eggs, as this incorporates air which can cause the cheesecake to crack.
- Pour the batter over the crust. Wrap the outside of the pan in foil and place it in a larger roasting pan filled with 1 inch of hot water (a water bath).
- Bake for 60-70 minutes until the edges are set but the center still has a slight jiggle. Turn off the oven and let it cool inside with the door cracked for one hour to prevent cracking.
- Refrigerate for at least 6 hours before slicing into neat cubes for your board.
How to frost perfect cupcakes?
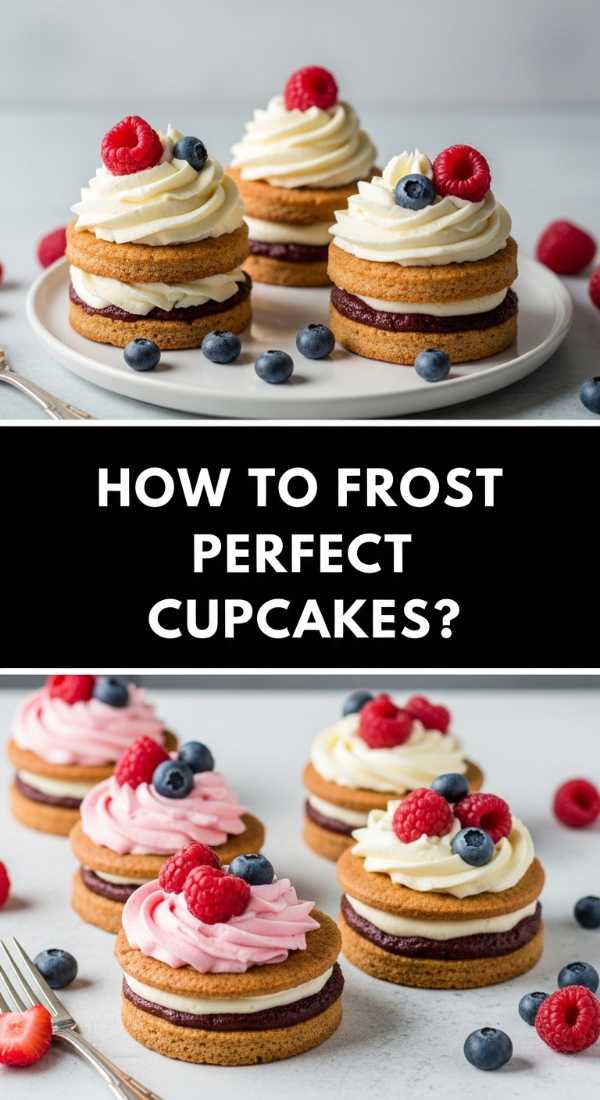
Why we love this
Perfectly frosted cupcakes are the exclamation point of a dessert board. The frosting should be thick, glossy, and hold its shape with architectural precision, yet feel like a cloud when you bite into it. There is a deep satisfaction in the way a well-piped swirl catches the light, creating shadows and highlights that make the board look professional. The taste is a balance of sweet buttercream and the slight saltiness of the butter, providing a decadent finish to any meal.
Ingredients
- 1 cup unsalted butter, softened but cool
- 3-4 cups powdered sugar, sifted
- 2-3 tablespoons heavy cream
- 1 teaspoon vanilla extract
- Pinch of salt
How to make it
- In a large bowl, beat the butter for a full 5 minutes on medium-high speed. The butter should change from yellow to a very pale cream color and become extremely fluffy.
- Add 2 cups of powdered sugar and the salt. Mix on low until combined, then increase the speed to medium for 2 minutes.
- Add the vanilla and 2 tablespoons of heavy cream. Gradually add the remaining powdered sugar until you reach your desired stiffness.
- The “Goldilocks” texture: If it’s too soft, add more sugar; if it’s too stiff to pipe, add a teaspoon of cream at a time.
- Fit a piping bag with a large star tip (like a 1M). Squeeze the bag to remove air pockets.
- Hold the bag vertically over the center of the cupcake. Starting from the outside edge, pipe in a circular motion moving inward and upward. End by releasing pressure and lifting the tip quickly for a sharp peak.
How to make fluffy pancakes?

Why we love this
Mini pancakes are the ultimate comfort food for a brunch board. Their texture is light, springy, and porous—perfect for soaking up maple syrup or fruit juices. There is a gentle, malty aroma that comes from the griddle, and the golden-brown “lace” on the surface provides a hint of caramelized flavor. Arranged in overlapping rows on a board, they create a sense of abundance and warmth that instantly makes guests feel at home.
Ingredients
- 1 1/2 cups all-purpose flour
- 3 1/2 teaspoons baking powder
- 1 teaspoon salt
- 1 tablespoon white sugar
- 1 1/4 cups milk
- 1 egg
- 3 tablespoons butter, melted and cooled
How to make it
- In a large bowl, sift together the flour, baking powder, salt, and sugar. Sifting is essential for removing lumps and ensuring a fluffy lift.
- Make a well in the center and pour in the milk, egg, and melted butter. Use a whisk to mix just until the large lumps are gone. Small lumps are okay; over-mixing will lead to rubbery pancakes.
- Let the batter rest for 5-10 minutes. This allows the baking powder to activate and the gluten to relax, resulting in a taller rise.
- Heat a lightly oiled griddle or non-stick frying pan over medium-high heat (about 375°F).
- Pour approximately 2 tablespoons of batter for each mini pancake.
- The visual cue: Wait until bubbles form on the surface and the edges look matte and set. This usually takes about 2-3 minutes.
- Flip once and cook until the other side is golden brown. Keep them warm in a low oven until you are ready to assemble your board.
How to make potato gnocchi?

Why we love this
Gnocchi are like tiny, savory clouds that melt in your mouth. They have a delicate, earthy potato flavor and a soft, pillowy texture that is incredibly comforting. When served on a board, they can be tossed in a vibrant pesto or a simple brown butter sage sauce, providing a hearty, sophisticated element to a savory spread. The slight ridges from a gnocchi board or fork aren’t just for looks—they are perfect for catching and holding onto delicious sauces.
Ingredients
- 2 lbs starchy potatoes (like Russets)
- 1 1/2 to 2 cups all-purpose flour
- 1 egg, lightly beaten
- 1 teaspoon salt
How to make it
- Boil the whole, unpeeled potatoes until tender. Peeling them after boiling keeps the interior dry, which is the secret to light gnocchi.
- While still warm, peel the potatoes and pass them through a potato ricer onto a clean work surface. Let the steam escape so they aren’t too wet.
- Sprinkle the salt and 1 cup of flour over the potatoes. Drizzle the beaten egg over the top.
- Gently fold the mixture together. Add more flour gradually as needed. You want a dough that is soft and slightly tacky but doesn’t stick to your hands. Stop as soon as it comes together; do not knead like bread.
- Divide the dough and roll into long ropes about 1/2 inch thick. Cut into 3/4 inch pieces.
- Optional: Roll each piece over the tines of a fork to create ridges.
- Drop the gnocchi into boiling salted water. The cooking cue: They will sink at first, but once they float to the surface (usually within 2-3 minutes), they are done. Remove immediately with a slotted spoon.
How to make juicy dumplings?

Why we love this
Dumplings are the ultimate interactive food. Each little parcel is a burst of savory juices and tender meat or vegetables, encased in a silky, thin dough. The aroma of ginger, garlic, and toasted sesame oil is intoxicating. When placed on a board, they offer a variety of textures—from the soft, steamed tops to the potential for a crispy, pan-fried bottom. They bring a global flair to your aesthetic and are perfect for dipping into spicy soy sauces.
Ingredients
- 1 lb ground pork or finely chopped mushrooms
- 2 cups shredded cabbage (salted and squeezed dry)
- 2 cloves garlic, minced
- 1 tablespoon grated ginger
- 2 tablespoons soy sauce
- 1 tablespoon sesame oil
- 1 pack of round dumpling wrappers
How to make it
- In a large bowl, combine your filling: the protein/mushrooms, cabbage, garlic, ginger, soy sauce, and sesame oil. Mix vigorously in one direction until the mixture becomes slightly sticky and emulsified; this ensures the filling stays juicy.
- Place a dumpling wrapper in the palm of your hand and put a teaspoon of filling in the center.
- Moisten the edges of the wrapper with water. Fold the wrapper in half and pinch the center top together.
- Create small pleats along one side of the wrapper, pressing them into the flat back side to seal. Ensure there are no air pockets inside.
- To cook (potsticker style): Heat a tablespoon of oil in a non-stick skillet over medium-high heat. Place dumplings in the pan and fry for 2 minutes until the bottoms are golden brown.
- Pour in 1/4 cup of water and immediately cover with a lid. Let them steam for 5-6 minutes until the water has evaporated and the wrappers are translucent.
- Remove the lid and let the bottoms crisp up for one more minute before serving.
How to bake soft scones?

Why we love this
Unlike their buttery, flaky cousins, soft scones have a cake-like, tender crumb that feels incredibly indulgent and sophisticated. They are less about the crunch and more about a uniform, pillowy softness that pairs beautifully with lemon curd or mascarpone. They have a subtle, milky sweetness and a pale, elegant appearance that brightens up any food board. Each bite feels light and airy, making them a perfect companion for a morning tea or a light afternoon snack.
Ingredients
- 2 cups all-purpose flour
- 1/4 cup granulated sugar
- 2 teaspoons baking powder
- 1/2 teaspoon salt
- 1/4 cup cold butter, grated
- 1 cup heavy cream (plus extra for brushing)
- 1 teaspoon vanilla extract
How to make it
- Whisk the flour, sugar, baking powder, and salt together in a large bowl.
- Grate the cold butter using a cheese grater directly into the flour. This ensures the butter is distributed in tiny flakes, contributing to the soft, even rise. Toss gently to coat.
- In a measuring cup, combine the heavy cream and vanilla.
- Slowly pour the cream into the dry ingredients, stirring with a wooden spoon until just combined. The dough will be quite soft and sticky.
- Turn the dough onto a well-floured surface. Instead of kneading, gently fold the dough over itself 3 or 4 times to create very soft layers.
- Pat into a circle and cut into rounds using a floured biscuit cutter. Press straight down without twisting to ensure a clean rise.
- Place on a baking sheet, brush with cream, and bake at 375°F (190°C) for 15 minutes. They should be just barely golden; over-baking will ruin the soft texture.
How to make vanilla cupcakes?
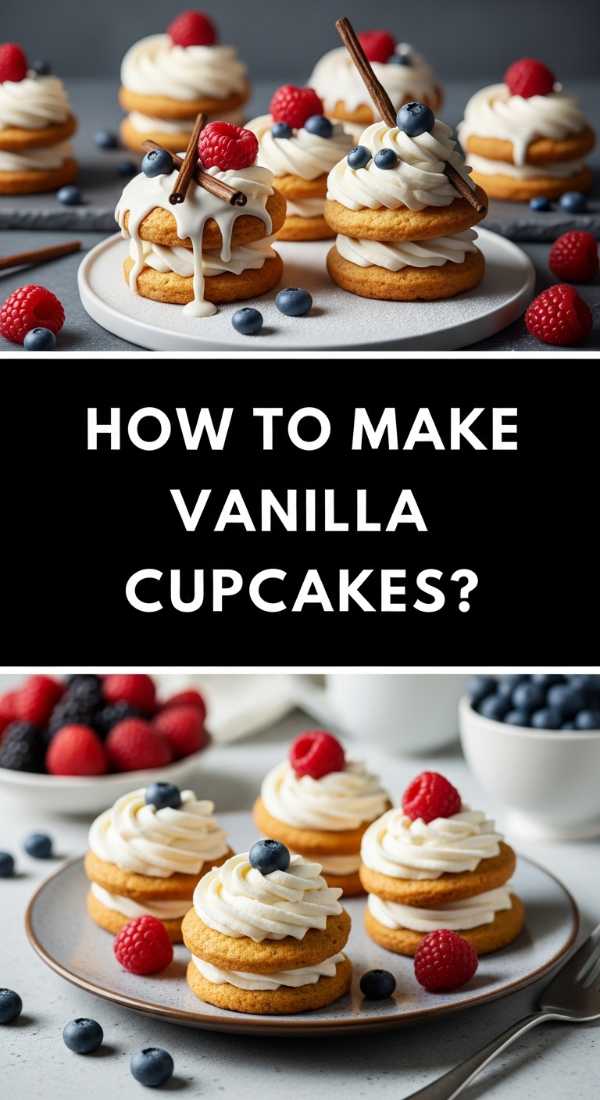
Why we love this
A perfect vanilla cupcake is the backbone of any dessert board. It should be light, with a fine, even crumb and a distinct flavor of real vanilla bean. We love them because they are the ultimate canvas; they smell like a professional bakery and feel like a treat. The texture is moist and bouncy, providing a satisfying base for any frosting. When arranged on a board, their simple elegance allows the toppings and surrounding fruits to pop, creating a balanced and inviting aesthetic.
Ingredients
- 1 1/2 cups all-purpose flour
- 1 cup granulated sugar
- 1 1/2 teaspoons baking powder
- 1/2 teaspoon salt
- 1/2 cup unsalted butter, softened
- 1 large egg
- 1/2 cup whole milk
- 2 teaspoons pure vanilla extract
How to make it
- Preheat your oven to 350°F (175°C) and line a cupcake tin with paper liners.
- In a large bowl, cream the softened butter and sugar together for at least 3 minutes until the mixture is light and airy.
- Add the egg and vanilla extract, beating well to ensure the egg is fully emulsified into the fats.
- In a separate bowl, whisk the flour, baking powder, and salt.
- Alternate adding the dry ingredients and the milk to the butter mixture, starting and ending with the dry ingredients. Mix on low speed just until the last streaks of flour disappear.
- Fill each cupcake liner about 2/3 full. Do not overfill, or they will spill over and lose their shape.
- Bake for 18-20 minutes. The visual cue: The tops should spring back when lightly touched and a toothpick inserted into the center should come out clean.
- Cool completely on a wire rack before frosting to prevent the icing from melting.
The Art of the Board
Mastering the viral food board trend is really about mastering the joy of sharing. By focusing on these individual components—from the flaky layers of a scone to the juicy interior of a dumpling—you create a tapestry of flavors and textures that invite people to connect. Remember, the most important ingredient is your own personal touch. Don’t be afraid to mix sweet and savory, or to arrange things in a way that feels natural and bountiful. Your board is a reflection of your hospitality, and with these recipes, you have everything you need to create something truly memorable.