
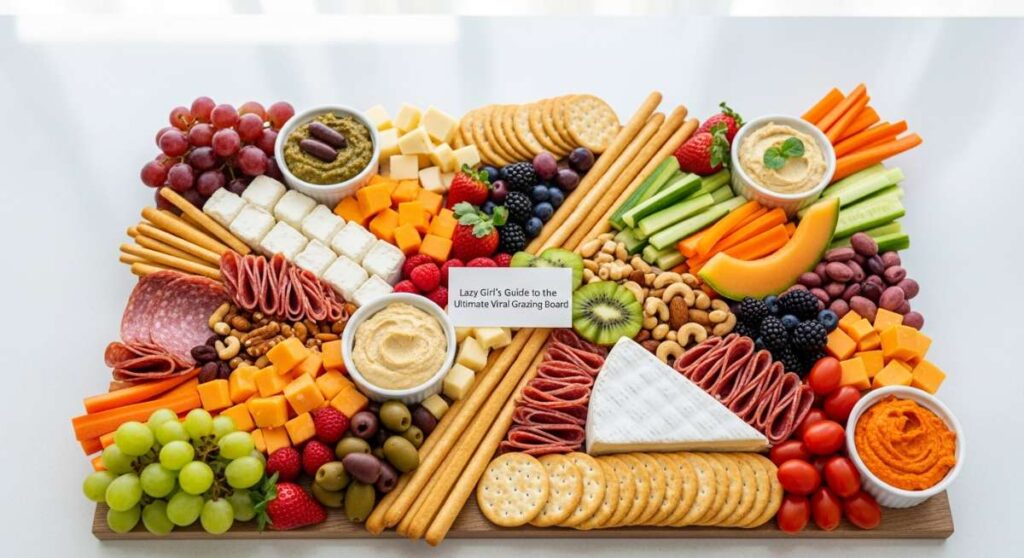
Let’s be real—life is way too short to spend four hours sweating over a stove when your friends are already pouring the rosé in the living room. We’ve all seen those gorgeous, over-the-top grazing boards on social media that look like a Renaissance painting made of cheese and carbs. The secret to a viral board isn’t about being a professional chef; it’s about “lazy girl” assembly—picking the most delicious, crowd-pleasing bites and arranging them like a pro without the breakdown.
My philosophy for the ultimate viral grazing board is simple: high-impact textures and flavors that feel homemade but don’t require a culinary degree. Whether you are hosting a cozy movie night or a frantic holiday brunch, these components are designed to be prepared ahead of time or whipped up in minutes. It’s about creating an experience that looks effortless, tastes expensive, and keeps you out of the kitchen and in the conversation where you belong.
How to bake fluffy scones?

Why we love this
Imagine pulling a tray of these golden-brown beauties from the oven, the air filling with the scent of toasted butter and sweet vanilla. There is something profoundly comforting about the way the exterior shatters with a delicate crunch, revealing a soft, cloud-like interior that practically begs for a thick dollop of clotted cream and tart raspberry jam. It’s the ultimate centerpiece for a grazing board, offering a rustic elegance that makes any brunch feel like a high-tea event at a posh London hotel.
Ingredients
- 2 cups all-purpose flour
- 1/2 cup granulated sugar
- 1 tbsp baking powder
- 1/2 cup cold unsalted butter, cubed
- 1/2 cup heavy cream
- 1 large egg
- 1 tsp vanilla extract
How to make it
- Whisk the dry ingredients: In a large chilled bowl, combine the flour, sugar, and baking powder. This ensure the leavening agent is evenly distributed for a consistent rise.
- Incorporate cold butter: Use a pastry cutter or your fingertips to rub the cold, cubed butter into the flour mixture until it resembles coarse crumbs with some pea-sized chunks remaining. Keeping the butter cold is vital; these tiny pockets of fat create steam in the oven, which is the secret to a flaky, layered texture.
- Mix liquids: In a separate measuring cup, whisk together the heavy cream, egg, and vanilla extract until smooth.
- Combine: Create a well in the center of your dry ingredients and pour in the liquid. Stir gently with a fork just until a shaggy dough forms—do not overwork it, or the scones will become tough and bread-like.
- Shape and chill: Turn the dough onto a floured surface, pat it into a 1-inch thick circle, and cut into 8 wedges. Place them on a baking sheet and chill in the freezer for 15 minutes to firm up the fat.
- Bake: Brush the tops with a little extra cream and bake at 400°F (200°C) for 18-22 minutes. You are looking for a deep golden-brown bottom and a light golden top; when tapped, they should feel firm but light.
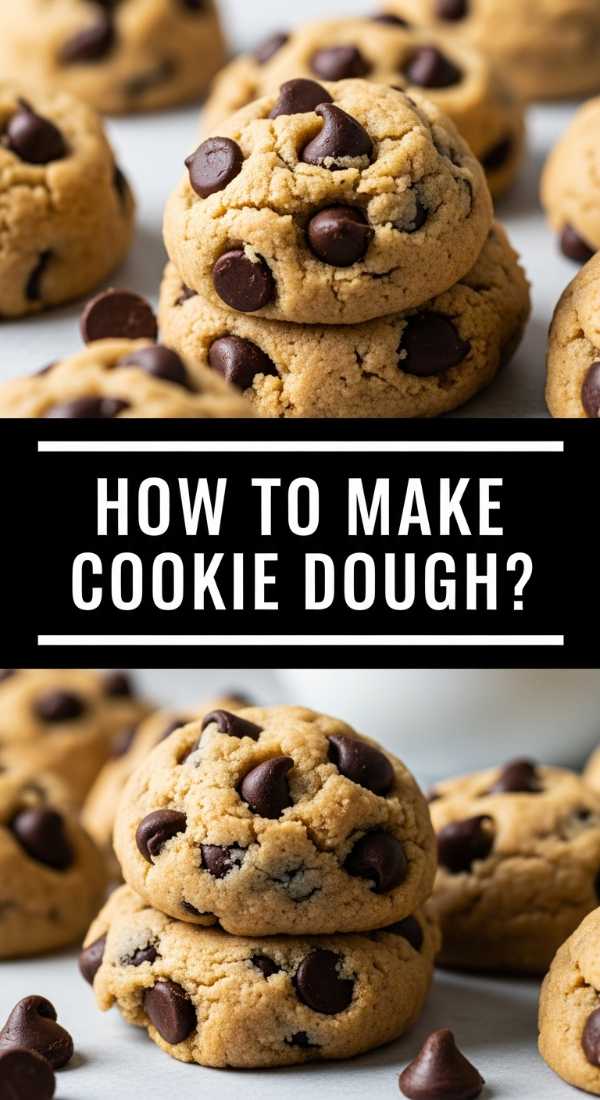
How to make cookie dough?
Why we love this
There is an undeniable, nostalgic magic in a bowl of raw-style cookie dough that takes us straight back to childhood kitchens and licking the spoon. This version is safe to eat, incredibly creamy, and studded with chocolate chips that provide a satisfying snap against the sugary, buttery base. It adds a playful, interactive element to your grazing board, especially when paired with pretzels or apple slices for that perfect salty-sweet balance that everyone craves.
Ingredients
- 1 cup all-purpose flour (heat-treated)
- 1/2 cup softened unsalted butter
- 3/4 cup brown sugar
- 2 tbsp milk
- 1 tsp vanilla extract
- 1/2 cup mini chocolate chips
- 1/4 tsp sea salt
How to make it
- Heat-treat the flour: Spread the raw flour on a baking sheet and bake at 350°F for 5-7 minutes. Use a thermometer to ensure it reaches 160°F to kill any bacteria. Let it cool completely before using to avoid melting your butter.
- Cream the base: In a medium bowl, beat the softened butter and brown sugar together for at least 3 minutes using a hand mixer. You want the mixture to look pale and fluffy, which indicates the sugar has partially dissolved and air has been incorporated.
- Add flavor and liquid: Mix in the vanilla extract, sea salt, and milk. The milk provides the moisture needed to bring the dough together since we are omitting eggs.
- Fold in dry ingredients: Gradually add the cooled, heat-treated flour. Mix on low speed just until no white streaks remain.
- The finish: Use a spatula to fold in the mini chocolate chips by hand, ensuring they are evenly distributed throughout the dough.
- Serving: Scoop into small balls or one large bowl for the board. If the dough feels too soft, refrigerate for 20 minutes to achieve a scoopable, fudge-like consistency.
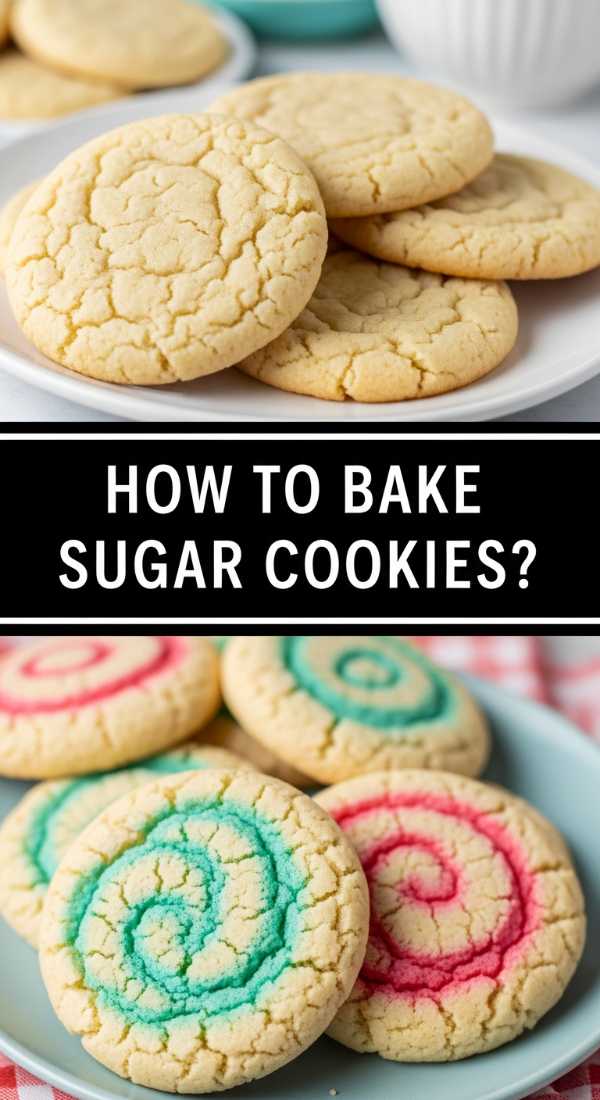
How to bake sugar cookies?
Why we love this
A classic sugar cookie is the ultimate blank canvas for creativity, offering a clean, buttery flavor that pairs beautifully with any dip or fruit on your board. We love the contrast between the crisp, defined edges and the soft, slightly chewy center that melts in your mouth with every bite. Their simple, pale golden aesthetic brings a sense of brightness to your food arrangement, making the entire board look cleaner and more inviting to your guests.
Ingredients
- 2 3/4 cups all-purpose flour
- 1 tsp baking soda
- 1/2 tsp baking powder
- 1 cup softened butter
- 1 1/2 cups white sugar
- 1 egg
- 1 tsp vanilla extract
How to make it
- Prep dry ingredients: Sift the flour, baking soda, and baking powder together. Sifting is crucial here to prevent any lumps and to ensure the cookies rise evenly without air bubbles.
- Cream butter and sugar: In a large bowl, cream the butter and sugar until the mixture is light and airy. This should take about 3-5 minutes on medium-high speed.
- Emulsify: Beat in the egg and vanilla extract. Ensure the egg is at room temperature so it incorporates seamlessly into the fat of the butter without curdling.
- Combine: Slowly blend in the dry ingredients. Stop as soon as the flour disappears; over-mixing will develop gluten and make the cookies hard instead of tender.
- Chill the dough: Wrap the dough in plastic and chill for at least 1 hour. This prevents the cookies from spreading too much in the oven, keeping them thick and soft.
- Bake: Roll into small balls and flatten slightly on a lined tray. Bake at 375°F (190°C) for 8-10 minutes. Watch for the edges to turn a very light golden brown while the centers still look slightly underbaked—they will firm up as they cool on the tray.
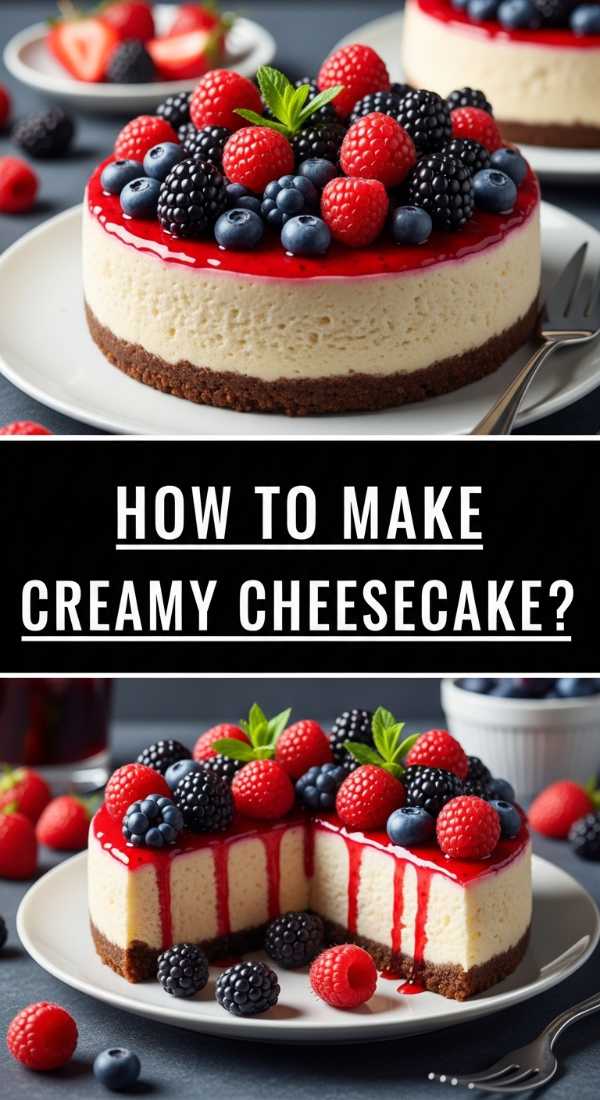
How to make creamy cheesecake?
Why we love this
Cheesecake is the crown jewel of any dessert-focused grazing board, offering a dense, velvety texture that feels incredibly indulgent and sophisticated. The tanginess of the cream cheese balances the sweetness of the surrounding fruits and chocolates, creating a complex flavor profile that lingers on the palate. When served in bite-sized squares or as a center dip, its ivory-smooth surface provides a stunning visual contrast to the vibrant colors of berries and nuts.
Ingredients
- 16 oz cream cheese (room temperature)
- 1/2 cup granulated sugar
- 1/2 cup sour cream
- 2 large eggs
- 1 tsp vanilla extract
- 1 cup graham cracker crumbs
- 3 tbsp melted butter
How to make it
- Create the base: Mix graham cracker crumbs with melted butter and press firmly into the bottom of a lined pan. Bake at 325°F for 10 minutes to set the crust and prevent sogginess.
- Smooth the cheese: Beat the room-temperature cream cheese and sugar on medium-low speed. It is vital to use low speed to avoid whipping too much air into the batter, which causes cracking during baking.
- Add richness: Mix in the sour cream and vanilla extract. The sour cream adds a necessary tang and contributes to the ultra-creamy mouthfeel.
- Incorporate eggs: Add the eggs one at a time, mixing only until just combined. Over-beating at this stage is the number one cause of cheesecake failure.
- The Water Bath: Place the pan inside a larger roasting pan filled with an inch of hot water. This creates a humid environment that cooks the cheesecake gently and evenly.
- Bake and Cool: Bake at 325°F (160°C) for 45-50 minutes until the edges are set but the center still has a slight wobble like Jell-O. Turn off the oven and let it sit inside with the door cracked for an hour to prevent sudden temperature changes that cause cracks. Chill for 4 hours before slicing.
How to frost perfect cupcakes?
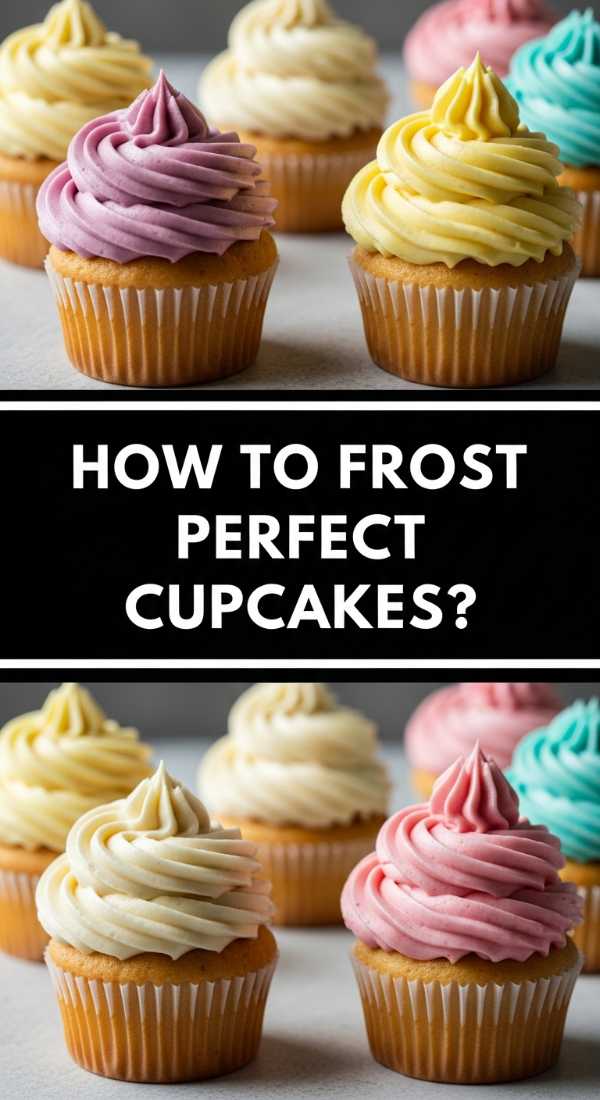
Why we love this
Perfectly frosted cupcakes are like edible jewelry for your grazing board, adding height, color, and a sense of celebration to the layout. There is a deep sensory satisfaction in biting through a towering swirl of silky, buttery frosting that holds its shape while remaining feather-light. Whether you go for a classic vanilla bean or a rich chocolate, the visual appeal of a perfectly piped swirl makes the entire spread look like it was curated by a professional pastry chef.
Ingredients
- 1 cup unsalted butter (slightly cool)
- 3-4 cups powdered sugar
- 2 tbsp heavy cream
- 1 tsp vanilla bean paste
- Pinch of salt
How to make it
- Beat the butter: Use a stand mixer with the paddle attachment to beat the butter on medium speed for at least 5 minutes. The butter should change from yellow to a very pale cream color and become incredibly smooth.
- Gradual sugar addition: Add the powdered sugar one cup at a time on low speed to avoid a sugar cloud. Once incorporated, increase the speed to medium-high to build structure.
- Liquid and flavor: Add the heavy cream, vanilla, and salt. The heavy cream acts as an emulsifier to make the frosting extra spreadable and glossy.
- The “Air Bubble” trick: After the frosting is whipped, turn the mixer to the lowest setting and let it run for 2 minutes. This knocks out the large air bubbles, ensuring your piped swirls are perfectly smooth.
- Piping technique: Fit a piping bag with a large star tip. Hold the bag vertically, starting in the center of the cupcake. Move in a spiral toward the edge and then back up toward the center, releasing pressure as you pull away to create a sharp peak.
- Visual Cue: The frosting should be stiff enough to hold a peak when the spatula is lifted but soft enough to spread without tearing the cake.
How to flip fluffy pancakes?
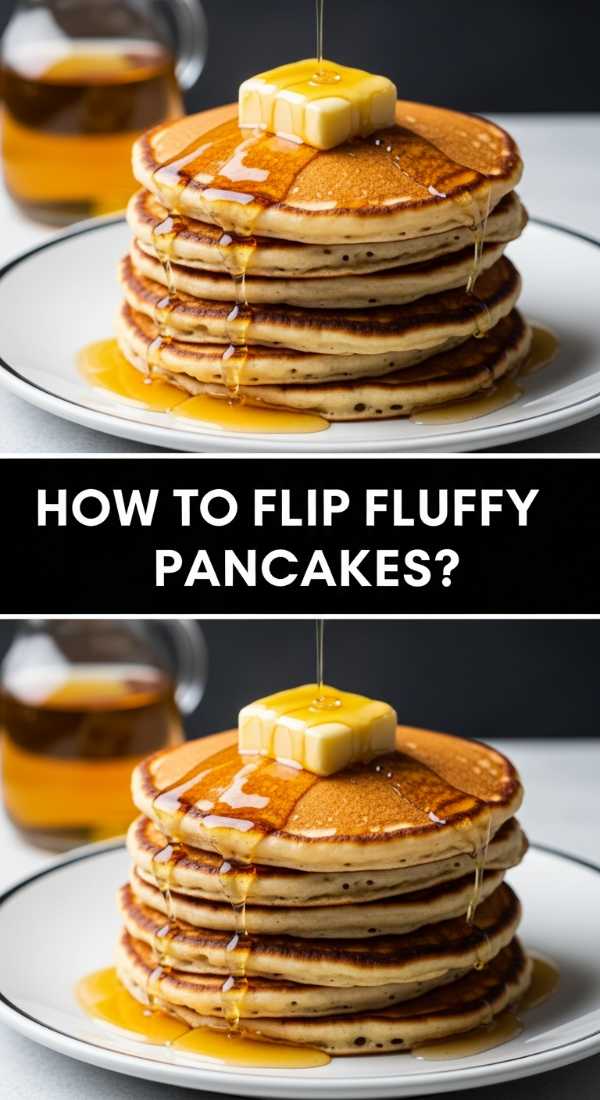
Why we love this
Nothing says “lazy weekend” like a stack of pancakes, and including them on a grazing board turns breakfast into a social event. We love the way the golden-brown exterior gives way to a soft, aerated center that soaks up maple syrup like a delicious sponge. The aroma of sizzling batter and vanilla is enough to draw anyone into the kitchen, making these the ultimate warm addition to a board filled with fresh fruit and bacon.
Ingredients
- 1 1/2 cups all-purpose flour
- 3 1/2 tsp baking powder
- 1 tbsp sugar
- 1 1/4 cups milk
- 1 egg
- 3 tbsp melted butter
How to make it
- The Dry Mix: Whisk the flour, baking powder, and sugar. Ensure the baking powder is fresh; this is what creates the chemical reaction for the “fluff” factor.
- The Wet Mix: Make a well in the center and pour in the milk, egg, and melted butter. Mix with a whisk just until the large lumps are gone—small lumps are perfectly fine and actually help the pancakes stay light.
- The Heat: Preheat a non-stick griddle or pan over medium-low heat. Test the heat by dropping a bead of water on the surface; it should dance and sizzle without evaporating instantly.
- The Pour: Use a 1/4 cup measure to pour batter onto the pan. This ensures uniform size for your board.
- The Flip Cue: Wait until bubbles form on the surface and the edges look set and matte rather than wet. This usually takes 2-3 minutes. If you flip too early, the center will collapse.
- The Final Sear: Flip gently in one confident motion. Cook for only 1-2 more minutes until the second side is golden. Never press down on the pancake with your spatula, as this squashes the air pockets you worked so hard to create.
How to make soft gnocchi?

Why we love this
Gnocchi are essentially little clouds of potato heaven, offering a savory, comforting bite that feels much more impressive than it actually is. When pan-seared with a bit of butter, the exterior develops a delicate crust that contrasts beautifully with the meltingly soft interior. They are the perfect “savory” anchor for a grazing board, especially when served on skewers with a sage leaf or a drizzle of balsamic glaze for a sophisticated touch.
Ingredients
- 2 lbs starchy potatoes (Russet or Yukon Gold)
- 1 1/2 cups all-purpose flour
- 1 egg, lightly beaten
- 1 tsp salt
How to make it
- Bake the potatoes: Instead of boiling, bake your potatoes on a bed of salt. This draws out moisture, ensuring your gnocchi are light and fluffy rather than gummy.
- Ricing: While still warm, peel and pass the potatoes through a potato ricer. This creates fine, aerated strands that incorporate flour easily. Never use a blender or food processor, which releases too much starch.
- The “No-Knead” dough: Sprinkle the flour over the potato mounds and add the egg. Use a bench scraper or your hands to gently fold the mixture together. Stop the moment a dough forms. The more you work it, the tougher the gnocchi will be.
- Rolling: Cut the dough into sections and roll into long ropes about 1/2 inch thick. Cut into 1-inch nuggets.
- Boiling cue: Drop the gnocchi into boiling salted water. They are done the moment they float to the surface (usually about 60-90 seconds).
- The Golden Finish: For the best grazing board experience, toss the boiled gnocchi in a hot pan with butter and sage until the edges are crispy and golden brown.
How to fold Chinese dumplings?

Why we love this
Dumplings are the ultimate interactive food, and their intricate folds make them look like tiny, edible pieces of art. We love the explosion of savory juices and the chewy, tender texture of the wrapper that holds a perfectly seasoned filling. Placing a pile of these on your board with various dipping sauces creates a focal point that is both visually stunning and incredibly satisfying to eat, offering a global flair to your simple spread.
Ingredients
- 1 pack round dumpling wrappers
- 1 lb ground pork or finely chopped mushrooms
- 2 cups shredded cabbage
- 1 tbsp ginger, grated
- 2 tbsp soy sauce
- 1 tbsp sesame oil
How to make it
- Filling Prep: Mix the meat (or mushrooms), cabbage, ginger, soy sauce, and sesame oil in a bowl. Mix in one direction with chopsticks or a fork until the mixture becomes sticky and emulsified—this helps the filling stay together in a tight ball.
- The Setup: Place a wrapper on your palm and put 1 teaspoon of filling in the center. Lightly wet the entire edge of the wrapper with water.
- The Pleat: Fold the wrapper in half but only touch the edges at the very top. Starting from one side, make small overlapping pleats with the front side of the wrapper, pressing each one against the flat back side. You should aim for 3-5 pleats per dumpling.
- Seal: Press the edges firmly to ensure there are no air pockets, which could cause the dumpling to burst during cooking.
- Cooking (Pan-Sear): Place dumplings in a flat pan with a tablespoon of oil. Fry until the bottoms are golden brown and crispy.
- The Steam: Pour 1/4 cup of water into the pan and immediately cover with a lid. Let them steam for 5 minutes until the water has evaporated and the wrappers look translucent and firm.
How to roast crispy potatoes?

Why we love this
There is nothing quite like the crunch of a perfectly roasted potato—it’s a sensory experience that hits every mark. The exterior is a craggy, salty landscape of golden-brown goodness, while the inside remains as soft and fluffy as mashed potatoes. They provide the necessary “crunch” factor for your board, serving as a hearty companion to cheeses and dips that will have your guests reaching back for “just one more” until the tray is empty.
Ingredients
- 3 lbs Yukon Gold potatoes
- 1/2 cup olive oil or duck fat
- 1 tbsp flaky sea salt
- 2 sprigs rosemary, chopped
- 4 cloves garlic, smashed
How to make it
- The Parboil: Peel and chop potatoes into 2-inch chunks. Boil in heavily salted water for 8-10 minutes. You want them soft on the outside but firm in the middle.
- The Scuff: Drain the water and let the potatoes steam-dry in the pot for 2 minutes. Close the lid and shake the pot vigorously. This creates a starchy “mash” on the surface of the chunks which will crisp up in the oven.
- The Hot Fat: Pour your oil or fat onto a large baking sheet and place it in a 425°F (220°C) oven for 5 minutes. The oil must be shimmering hot before the potatoes hit the pan.
- The Sizzle: Carefully add the potatoes to the hot oil. You should hear a loud sizzle instantly. Spread them out so they aren’t touching; overcrowding leads to steaming rather than roasting.
- The Roast: Bake for 45-55 minutes. Every 20 minutes, turn them with a spatula to ensure every side gets contact with the hot metal and oil.
- The Visual: They are done when they are a deep, mahogany brown and sound hollow and crunchy when tapped with a fork. Toss with fresh rosemary and salt while still piping hot.
How to cook creamy pasta?
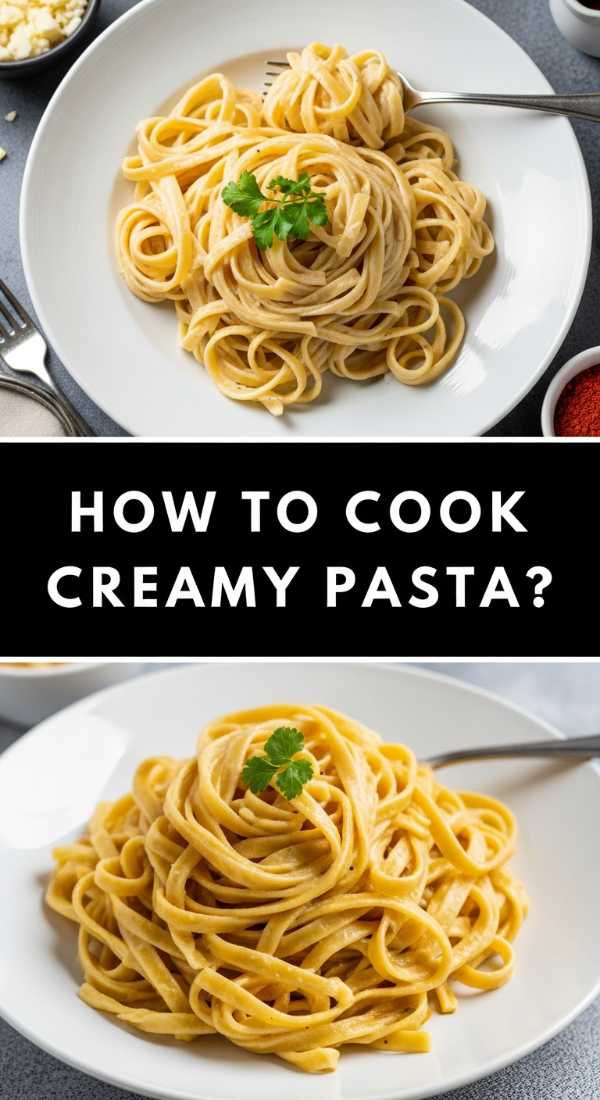
Why we love this
A small bowl of creamy pasta tucked into a grazing board adds a level of decadence that feels truly special. We love the silky, glossy sauce that coats every strand, delivering a rich, garlic-infused flavor that is pure comfort. It transforms the board from a snack tray into a full-fledged meal, providing a warm, filling element that pairs beautifully with a crisp white wine and crusty bread.
Ingredients
- 1 lb fettuccine or rigatoni
- 1 cup heavy cream
- 1/2 cup grated Parmesan cheese
- 2 tbsp butter
- 3 cloves garlic, minced
- 1/2 cup reserved pasta water
How to make it
- The Pasta Boil: Cook your pasta in a large pot of salted water. Aim for “al dente” (about 2 minutes less than the box instructions) because the pasta will finish cooking in the sauce.
- Reserve Water: Before draining, scoop out a cup of the starchy pasta water. This is the secret ingredient for a smooth, cohesive sauce.
- Infuse the Fat: In a large skillet, melt butter over medium heat. Sauté the minced garlic just until fragrant and pale gold—do not brown it, or the flavor will turn bitter.
- The Base: Pour in the heavy cream and bring to a gentle simmer. Let it reduce for 3-4 minutes until it slightly thickens and can coat the back of a spoon.
- The Emulsion: Add the cooked pasta and half of the pasta water to the pan. Sprinkle in the Parmesan cheese. Toss constantly over low heat. The starch in the water and the fat in the cheese and cream will emulsify into a glossy, clingy sauce.
- The Texture Check: If the sauce looks too thick or “clumpy,” add more pasta water a tablespoon at a time until it is silky and smooth. Serve immediately in small bowls for the board.
Conclusion: Your Board, Your Rules
The beauty of the viral grazing board is that it’s a reflection of your own tastes. Don’t be afraid to mix these gourmet elements with store-bought favorites. The “lazy girl” way is all about balance—spending your energy on the few things that matter (like those crispy potatoes!) and letting the rest just fall into place. Arrange it all with a little bit of flair, dim the lights, and enjoy being the hostess who actually had time to have fun.
Frequently Asked Questions
Can I make these components ahead of time? Absolutely! Most of these items, like the cookie dough and the cheesecake, are better when made a day in advance. The hot items like potatoes and pasta are best served fresh, but you can do all the prep work (like parboiling) hours before your guests arrive.
How do I keep the hot food warm on a grazing board? Use small ceramic bowls that hold heat well, or place the hot items on the board last. You can also use a warming mat hidden under a linen cloth if you’re planning on a long grazing session!
What if I don’t have all these ingredients? The “Lazy Girl” rule is to substitute! No heavy cream? Use whole milk and a bit more butter. No pork for dumplings? Use chicken or even a hearty vegetable mix. The board is meant to be flexible.