
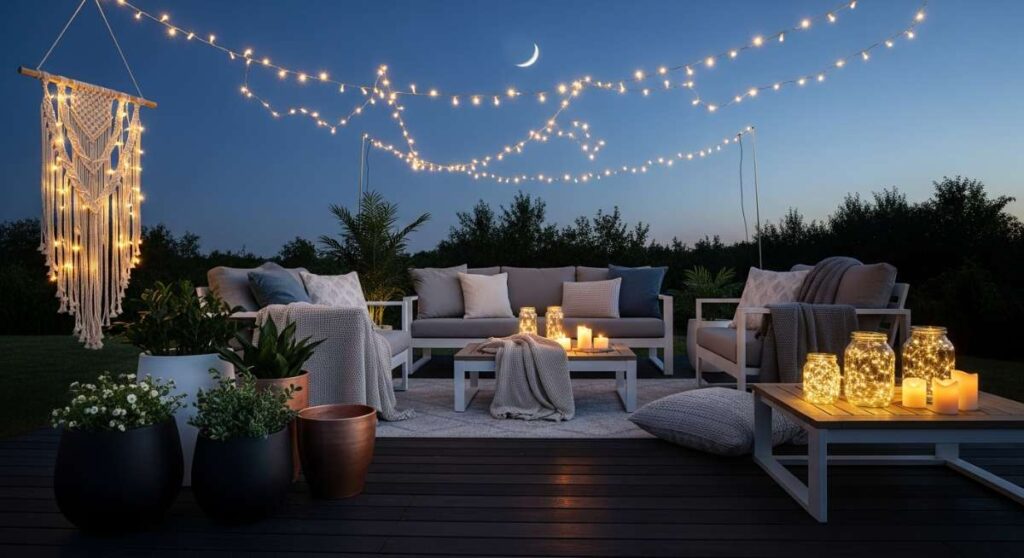
There is something truly magical about that golden hour transition, when the sun dips low and the air begins to hum with the quiet cooling of the earth. We often think of our homes as the four walls we live within, but I truly believe the soul of a home extends far beyond the back door. There is a specific kind of peace found in an outdoor space that has been curated with love, a place where the scent of damp earth meets the soft glow of fairy lights, inviting you to linger just a little bit longer under the emerging stars.
Creating your own sanctuary doesn’t require a landscape architect or a massive budget; it simply requires a bit of imagination and a willingness to get your hands a little dirty. Whether you are dreaming of a serene corner to soak away the day’s stress or a vibrant, messy playground where your children’s laughter can ring out, your backyard is a blank canvas. Over the years, I’ve found that the most memorable spaces are those built piece by piece, filled with DIY projects that carry stories of weekend afternoons spent building, planting, and perfecting.
Today, I’m sharing my ultimate guide to transforming your outdoor living space into a dreamy retreat. From the tactile joy of a vertical herb garden to the sustainable charm of upcycled pallet furniture, these projects are designed to evoke the senses and bring a touch of magic to your everyday life. Let’s roll up our sleeves and create something beautiful together!
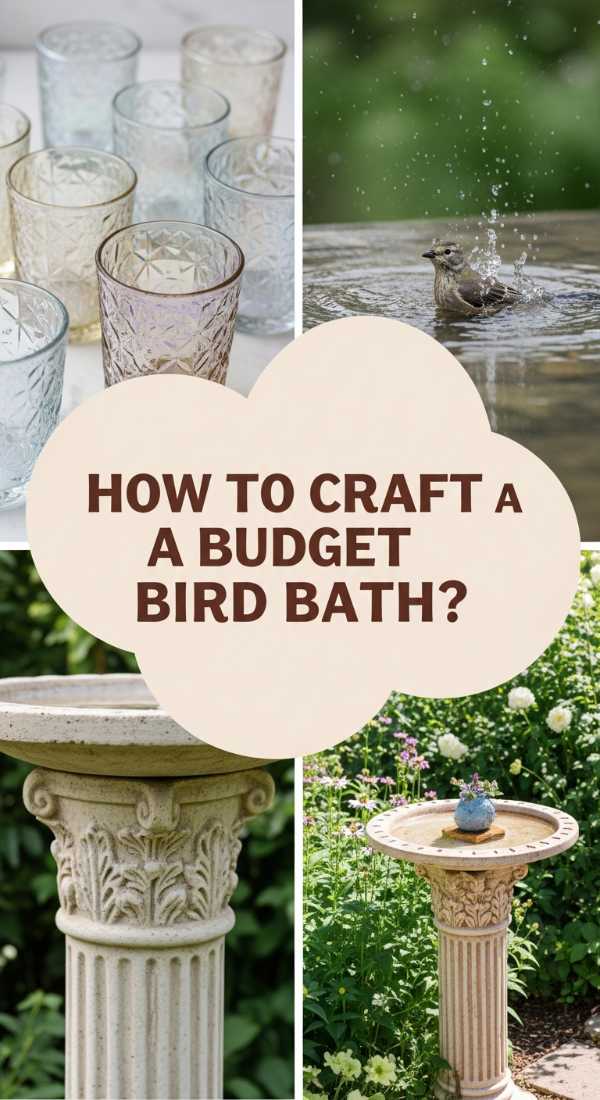
How to Craft a Budget Bird Bath for Garden Charm
Why we love this
There is nothing quite as serene as the sight of a robin splashing in cool water or the gentle sound of droplets hitting a ceramic surface on a quiet afternoon. This budget bird bath adds an instant focal point to your garden, combining the earthy, textured warmth of terracotta with the shimmering reflection of the sky. As the sun hits the water, it casts dancing light onto nearby leaves, creating a multi-sensory experience that invites nature right to your doorstep. It feels like a small, intentional gift to the local wildlife that rewards you with song and beauty throughout the seasons.
Essential Elements:
- 3-4 Terracotta pots in graduating sizes
- 1 Large terracotta saucer
- Industrial-strength waterproof adhesive (like E6000)
- Outdoor acrylic paint or terracotta sealer
- Decorative stones or river rocks
- Level tool
How to make it
- Begin by cleaning your terracotta pots thoroughly with a damp cloth to remove any dust or debris, which ensures the adhesive bonds perfectly.
- Invert the largest pot on a flat, level surface in your garden where you want the bird bath to reside; use your level tool to ensure the base is perfectly even so the water doesn’t spill over one side later.
- Apply a generous, continuous bead of industrial-strength adhesive to the bottom rim of the second-largest pot and center it firmly on top of the first inverted pot.
- Repeat this stacking process with your remaining pots, allowing each layer to set for at least 30 minutes to prevent shifting.
- Once the tower is stable, apply adhesive to the bottom of the large saucer and press it firmly onto the top pot of the stack, ensuring it is perfectly centered.
- Allow the entire structure to cure for a full 24 hours in a dry environment to reach maximum bond strength.
- For a decorative touch, paint the exterior with weather-resistant patterns or leave the natural clay for a rustic look, then seal with a clear outdoor spray.
- Fill the saucer with fresh water and place a few river rocks inside; these provide safe landing spots for smaller birds and insects like honeybees to drink without risk of drowning.
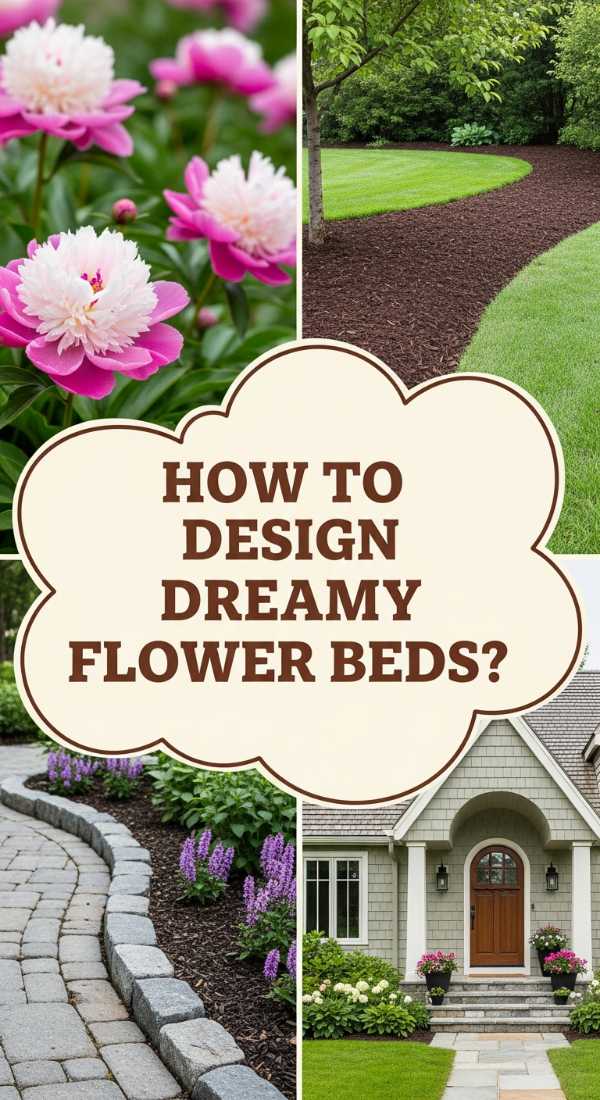
How to Design Front Yard Flower Beds for Instant Curb Appeal
Why we love this
A well-designed front yard flower bed is like a warm, floral hug for everyone who visits your home. We love the way layers of different heights and textures create a visual symphony, from the soft, feathery fronds of ornamental grasses to the bold, velvety petals of blooming perennials. The aroma of jasmine or lavender wafting toward the sidewalk creates an immediate sense of arrival and hospitality. It’s about more than just aesthetics; it’s about creating a living tapestry that changes with the light, making your home feel cared for and deeply connected to the rhythm of the seasons.
Essential Elements:
- Bags of high-quality organic mulch (dark hardwood or cedar)
- Selection of perennials (Hostas, Coneflowers, Salvia)
- Annuals for seasonal color (Petunias, Marigolds)
- Landscaping edger or spade
- Gardening gloves and a hand trowel
- Slow-release fertilizer pellets
How to make it
- Start by sketching the shape of your bed using a garden hose or spray paint on the grass; curved, organic lines generally look more professional and inviting than sharp angles.
- Use a sharp spade or a mechanical edger to cut a clean, 3-inch deep trench along your marked line, removing any grass or weeds within the designated area.
- Amend the soil by tilling in two inches of organic compost, which improves drainage and provides the essential nutrients your new plants will crave.
- Arrange your plants while they are still in their nursery pots; place taller species in the back (closest to the house) and shorter, spreading varieties in the front to create a tiered effect.
- Dig holes that are twice as wide as the root ball but no deeper; tease the roots gently if they are pot-bound before placing them in the ground.
- Backfill the holes with soil, tamping down firmly with your hands to remove air pockets that can dry out the roots.
- Apply a 2-to-3-inch layer of mulch across the entire bed, keeping it an inch away from the stems of the plants to prevent rot.
- Water the entire bed deeply immediately after planting, ensuring the moisture reaches the bottom of the root zones to help the plants settle into their new home.
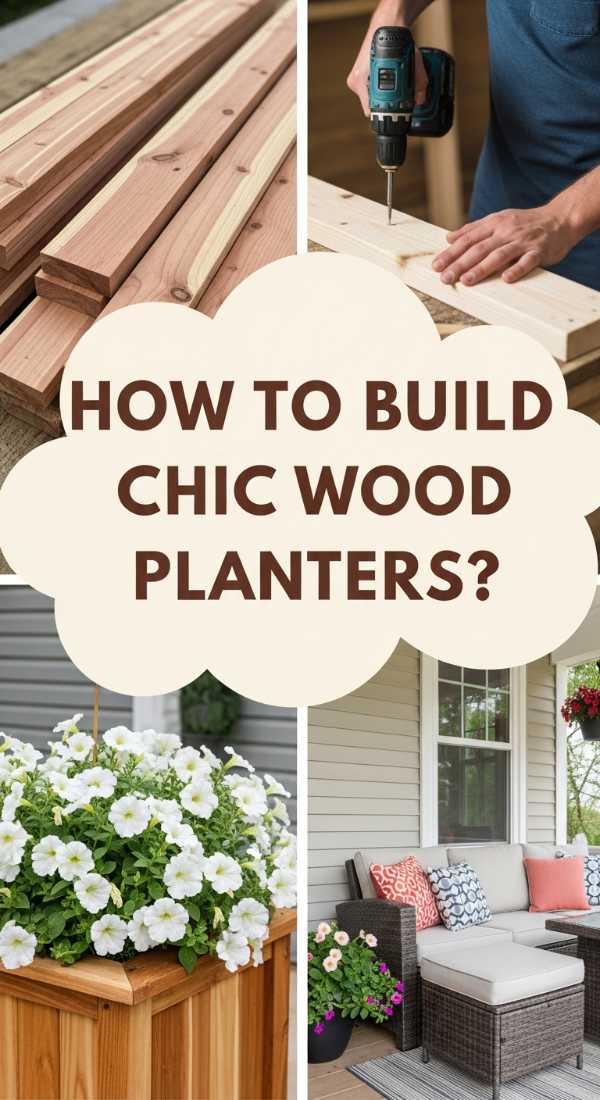
How to Build Custom Wood Planter Boxes for a Lush Porch
Why we love this
Custom wood planter boxes bring a sense of architectural structure and rustic elegance to any porch or patio. There is a deep satisfaction in the scent of freshly cut cedar and the sturdy, tactile weight of a handmade box that you simply can’t get from plastic alternatives. These boxes allow you to control the soil quality perfectly, creating a thriving environment for lush ferns or vibrant hydrangeas that frame your entryway. They act as beautiful wooden anchors that soften the transition between your home’s siding and the natural world, adding height and dimension to your outdoor styling.
Essential Elements:
- Cedar or redwood planks (naturally rot-resistant)
- Exterior-grade wood screws
- Power drill and drill bits
- Wood glue (exterior rated)
- Landscape fabric for lining
- Coarse gravel for drainage
- Corner brackets (optional for style)
How to make it
- Measure and cut your cedar planks into four equal side pieces and one bottom piece that fits snugly inside the frame; for a standard square box, 18-inch lengths are ideal.
- Apply a thin line of exterior wood glue to the vertical edges of your side panels and press them together to form a square.
- While the glue is tacky, pre-drill pilot holes at the top, middle, and bottom of each corner to prevent the cedar from splitting when you drive in the screws.
- Drive the exterior-grade screws into the pilot holes until the heads are flush with the wood surface.
- Insert the bottom panel, pre-drill through the sides into the bottom board, and secure it with screws every 4 inches for maximum weight support.
- Flip the box over and drill five to six 1/2-inch drainage holes through the bottom panel to ensure your plants’ roots don’t sit in stagnant water.
- Cut a piece of landscape fabric to fit the interior and staple it to the upper inside rim; this keeps the soil inside while allowing excess water to escape through the holes.
- Fill the bottom 2 inches with coarse gravel for enhanced drainage, then top with high-quality potting mix and your favorite blooms.
How to Create an Outdoor Play Area for Endless Summer Fun
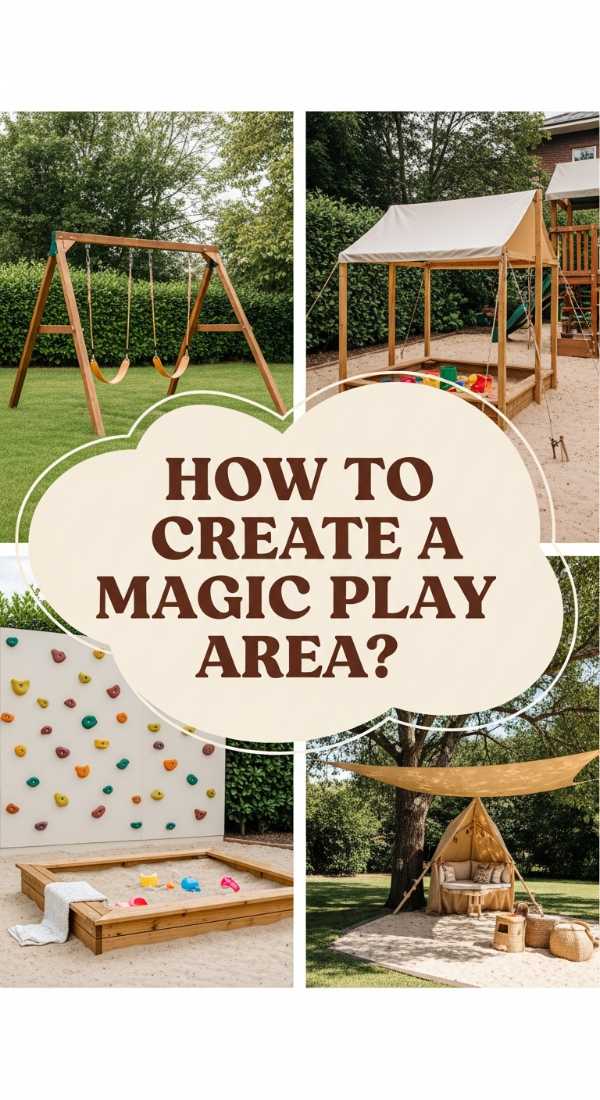
Why we love this
An outdoor play area is a sanctuary for imagination, where the soft rustle of leaves becomes a jungle adventure and a simple wooden frame becomes a castle. We love the way a dedicated play space encourages children to engage with the natural world, feeling the texture of sand between their toes and the cool breeze on their faces. It’s a place that smells of sunshine and cut grass, offering a screen-free haven where kids can develop their motor skills and creativity simultaneously. Designing this space with aesthetics in mind means it can blend beautifully with your landscaping while remaining a hub of joy.
Essential Elements:
- Pressure-treated timber for borders
- Play-grade sand or rubber mulch
- Weather-resistant outdoor rug
- Sturdy wooden swing or climbing structure
- Storage bins for outdoor toys
- Shade sail or large umbrella
How to make it
- Select a level area in your yard that is visible from the house but far enough away from delicate flower beds or hard stone paths.
- Mark out the perimeter and remove any large rocks, debris, or prickly weeds; if using grass as the base, ensure it is mowed short and treated for pests.
- Install a border using pressure-treated 4×4 timbers secured with long rebar stakes driven into the ground to keep the play surface contained.
- Lay down a heavy-duty weed barrier fabric over the entire internal area, overlapping the seams by 6 inches to prevent unwanted growth.
- Fill the area with at least 4 to 6 inches of play-grade sand or certified rubber mulch to provide a soft, impact-absorbing landing zone for jumps and tumbles.
- Assemble and anchor any large equipment, such as a swing set or playhouse, following the manufacturer’s safety guidelines strictly to ensure stability.
- Install a shade sail overhead by securing it to sturdy posts or the side of the house, protecting little ones from harsh UV rays during peak afternoon hours.
- Add a weather-resistant storage bench nearby to keep toys organized and protected from the elements when playtime is over.
How to Style Mud Kitchen Accessories for Creative Play
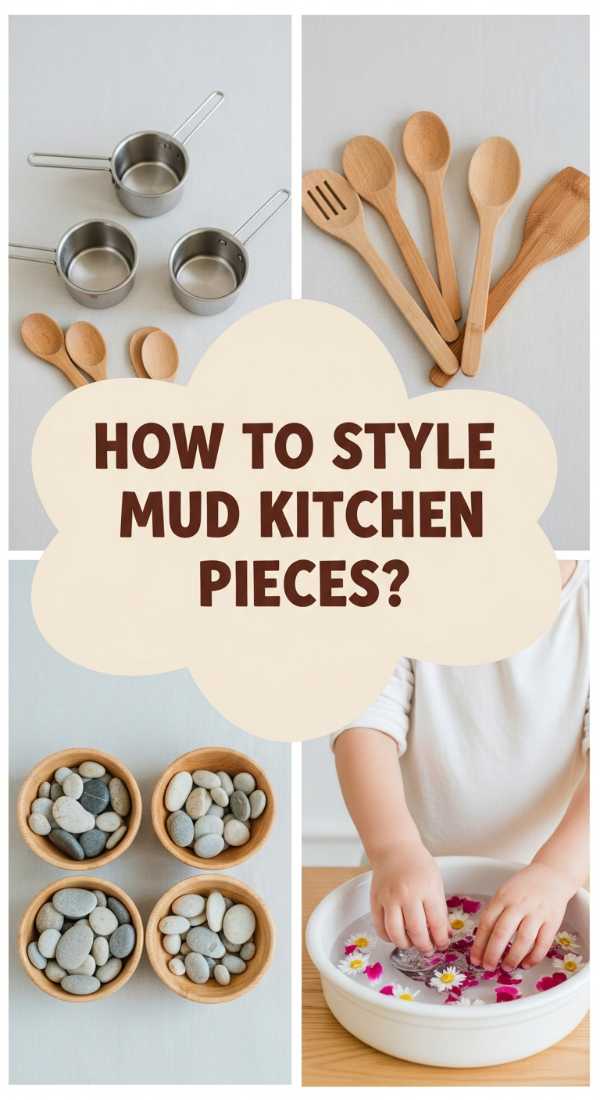
Why we love this
The charm of a mud kitchen lies in its delightful messiness and the way it turns simple backyard elements into “gourmet” creations. We love styling these spaces with vintage-inspired accessories that feel substantial and real in a child’s hands—think the clink of metal whisks against tin bowls and the earthy aroma of wet soil mixed with fallen flower petals. It’s a sensory-rich environment that celebrates the tactile joy of childhood. By choosing the right accessories, you transform a simple wooden stand into a magical laboratory for creative chemistry and culinary play.
Essential Elements:
- Stainless steel bowls and measuring cups
- Old wooden spoons and spatulas
- Clear plastic jars for “spices” (dried leaves, petals, acorns)
- Metal hooks for hanging utensils
- A chalkboard for the “Daily Menu”
- Small watering can for “broth”
How to make it
- Begin by installing a series of small metal S-hooks or screw-in hooks along the backboard of the mud kitchen to keep utensils within easy reach and off the ground.
- Organize your “ingredients” into clear, shatterproof jars; fill them with different natural textures like pinecones, colorful pebbles, and dried lavender to stimulate visual and olfactory senses.
- Place a large stainless steel bowl in the center of the workstation to act as the main mixing vessel; metal is better than plastic as it provides a satisfying auditory experience during play.
- Mount a small chalkboard at eye level and use chalk markers to write fun recipes like “Dandelion Soup” or “Mud Cupcakes,” encouraging literacy and role-play.
- Attach a small, functional spice rack to the side to hold the ingredient jars, ensuring they are easy for small hands to grab and return.
- Set up a dedicated water station using a beverage dispenser or a small watering can, allowing children to control the consistency of their mud creations.
- Add a few old pots and pans on a lower shelf to provide extra “cooking” surfaces for multiple children to play together simultaneously.
- Hang a miniature apron and a few tea towels on the side to complete the look and encourage clean-up habits after the “cooking” is done.
How to Style a Hot Tub Area for the Ultimate Backyard Escape

Why we love this
Transforming a hot tub area into a private escape is all about layering comfort and atmosphere to create a true spa-at-home feel. Imagine the contrast of the crisp night air against the rising steam, the soft glow of amber string lights reflecting off the bubbling water, and the scent of cedar or eucalyptus lingering in the air. We love how strategic styling can turn a functional appliance into a romantic and restorative retreat. It’s about creating a cocoon of privacy where the stresses of the world melt away under the rhythmic hum of the jets and the canopy of the stars.
Essential Elements:
- Waterproof outdoor rug
- Privacy screens or tall potted plants (like Bamboo or Arborvitae)
- Solar-powered warm-white string lights
- All-weather towel rack or decorative ladder
- Small side table for drinks and candles
- Outdoor speakers for ambient sound
How to make it
- Position your hot tub on a reinforced, level pad, then surround the perimeter with tall, leafy potted plants or wooden lattice screens to create an immediate sense of seclusion.
- Lay a soft, waterproof outdoor rug leading up to the steps; this prevents grass from entering the tub and provides a comfortable surface for bare feet.
- String warm-white Edison bulbs overhead or along the privacy fence, ensuring they are plugged into a GFCI outlet for safety in wet environments.
- Place a sturdy, weather-resistant side table within arm’s reach of the tub to hold refreshments, waterproof books, or flameless LED candles.
- Install a wall-mounted towel rack or lean a decorative wooden ladder nearby, stocked with plush, oversized towels that are easy to grab the moment you exit the water.
- Incorporate a small essential oil diffuser nearby (away from water contact) with scents like lavender or lemongrass to enhance the sensory relaxation experience.
- Add a few comfortable outdoor floor cushions or a small bench nearby for cooling off or chatting with those who aren’t in the water.
- Use low-voltage path lighting to illuminate the walkway leading to the hot tub, ensuring safe access during late-night soak sessions.
How to Upcycle a Pallet Mud Kitchen for Sustainable Fun
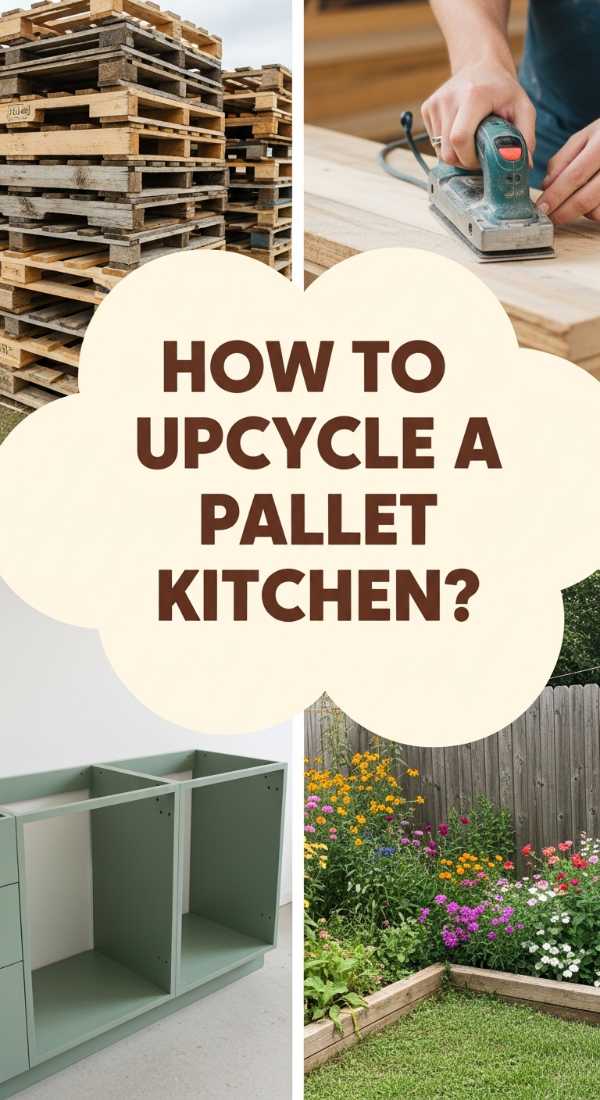
Why we love this
There is a rugged, rustic beauty in upcycling pallets into something as joyful as a mud kitchen. We love the sustainability of this project—taking discarded wood and breathing new life into it with just a bit of sanding and a splash of paint. The natural grain of the wood, combined with the slightly weathered aesthetic, fits perfectly into any garden corner. It feels grounded and authentic, providing a sturdy, eco-friendly base for years of messy, creative play. It’s a project that teaches children the value of repurposing while giving them a dedicated space to explore the wonders of the earth.
Essential Elements:
- 2-3 Heat-treated (HT) wood pallets
- Reciprocating saw or crowbar
- Power sander and 80-grit sandpaper
- Exterior wood stain or paint
- Stainless steel mixing bowl (for the sink)
- Jigsaw
How to make it
- Ensure your pallets are marked with “HT” (Heat Treated) rather than “MB” (Methyl Bromide) to ensure they are safe for children to touch and play with.
- Use a reciprocating saw to disassemble one pallet for extra slats, while keeping the second pallet mostly intact to serve as the main frame and backboard.
- Sand every square inch of the wood thoroughly using 80-grit sandpaper to remove any splinters or rough patches, focusing especially on the edges and corners.
- Build a simple rectangular frame for the base using the disassembled slats, then screw the main pallet on top to create the countertop and backsplash.
- Trace the rim of your stainless steel bowl onto the countertop and use a jigsaw to cut a hole slightly smaller than the rim so the bowl can drop in securely.
- Apply two coats of weather-resistant exterior stain or a fun, bright paint to protect the wood from the rain and mud.
- Attach the backboard slats to the frame and install small shelves or hooks for storing “cooking” utensils and natural ingredients.
- Once dry, drop the sink bowl into place and consider adding a non-functional vintage faucet for an extra touch of realism and charm.
How to Make a DIY Water Table for Hours of Cool Play
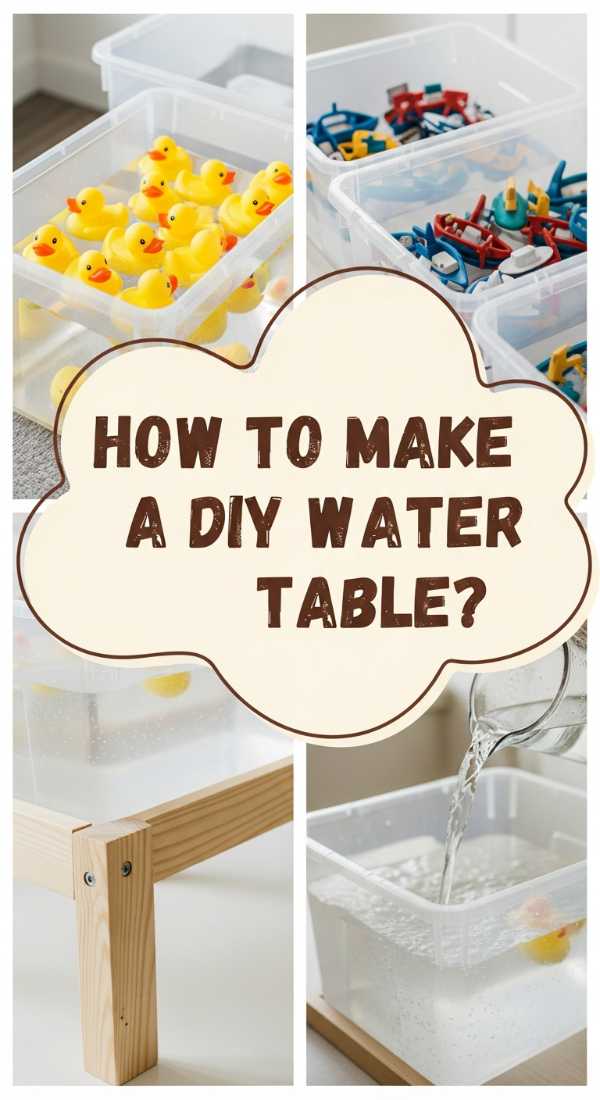
Why we love this
On a sweltering July afternoon, nothing beats the cool, splashing joy of a water table. We love how this DIY version can be customized to the perfect height for your toddlers, preventing the back strain of leaning over ground-level tubs. The sound of pouring water and the sight of floating toys create an instant sensory oasis that keeps children engaged for hours. It’s a clean, refreshing way to play that encourages exploration of physics—watching how water flows, pours, and displaces objects—all while staying perfectly chilled in the summer heat.
Essential Elements:
- Large, shallow plastic storage bin with lid
- PVC pipes and connectors (or a pressure-treated wood frame)
- PVC cement (if using pipes)
- Waterproof silicone sealant
- Assorted plastic funnels and tubes
- Submersible small water pump (optional for a fountain effect)
How to make it
- Determine the ideal height for your child (usually hip-height) and cut your PVC pipes or wooden legs to that specific measurement.
- Assemble the base frame to match the dimensions of the plastic bin’s upper lip; if using PVC, use connectors to create a sturdy rectangular support system.
- Apply PVC cement to the joints for a permanent hold, or use exterior wood screws if building a wooden stand.
- Place the bin into the frame, ensuring it sits level and doesn’t wobble when filled with heavy water.
- For an advanced version, use a drill to create a hole in the bottom of the bin and install a standard PVC drain plug with silicone sealant to make emptying easy.
- Attach funnels, cut hoses, and plastic scoops to the sides of the bin using zip ties or waterproof adhesive to create different water “stations.”
- Fill the table with clean water and add a few drops of blue food coloring or some floating rubber ducks to make it visually inviting.
- Place the table in a shaded spot on your patio to keep the water temperature cool and prevent the plastic from becoming brittle in the sun.
How to Arrange Perennial Flower Beds for Year Round Beauty
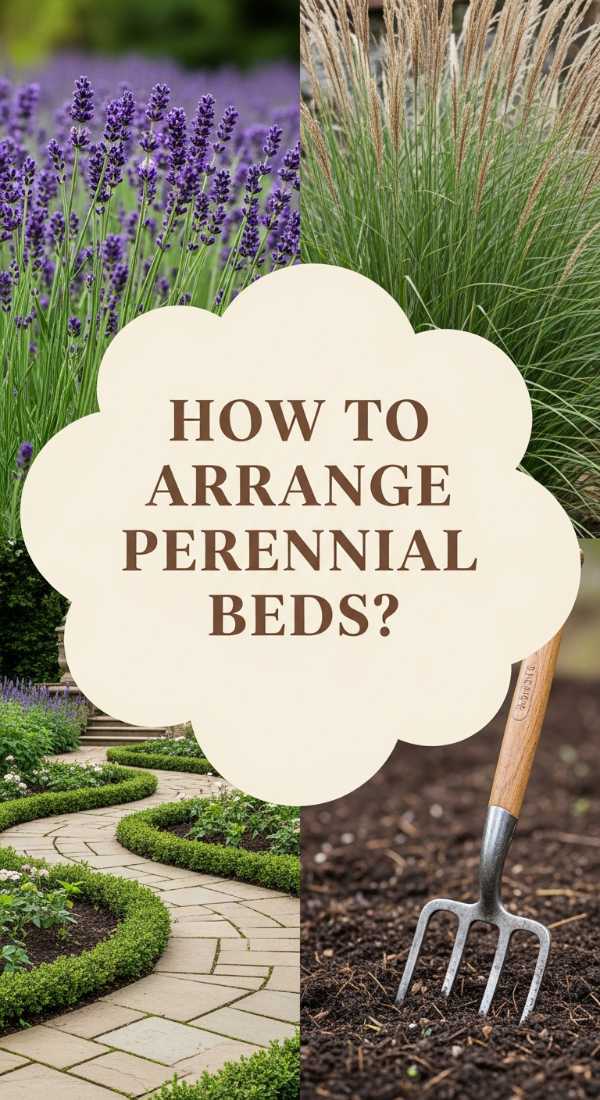
Why we love this
Perennial beds are the gift that keeps on giving, offering a reliable return of color and life year after year. We love the way they develop a deep, complex root system that anchors the garden, creating a lush ecosystem for bees and butterflies. There is a quiet magic in watching the first green shoots of Peonies or Bleeding Hearts push through the cold spring soil, followed by the midsummer vibrance of Daylilies. It creates a garden with a memory, where the earthy scent of mulch and the sight of familiar blooms bring a sense of continuity and peace to your outdoor living space.
Essential Elements:
- Mix of early, mid, and late-season bloomers
- Organic compost and bone meal
- Garden rake and spade
- Plant markers/labels
- Evergreen shrubs for winter structure
- Soaker hose for efficient watering
How to make it
- Start with a plan that prioritizes “succession planting”; choose species that bloom at different times so there is never a dull month in your garden.
- Incorporate evergreen shrubs like Boxwoods or Yews to provide a “backbone” of green that remains even when the perennials go dormant in the winter.
- Prepare the soil by digging in several inches of organic compost and a handful of bone meal to encourage strong root development for these long-term residents.
- Place your tallest perennials, like Delphiniums or Joe Pye Weed, at the back of the border to create a dramatic backdrop.
- Stagger mid-height plants like Echinacea and Rudbeckia in the center, planting them in groups of three or five for a more natural, drift-like appearance.
- Finish the front edge with low-growing groundcovers like Creeping Phlox or Heuchera, which hide the “legs” of the taller plants and keep the soil cool.
- Install a soaker hose beneath the mulch layer; this delivers water directly to the roots and keeps the foliage dry, which prevents fungal diseases.
- Label your plants clearly with metal markers so you remember what is buried where during the dormant winter months.
How to Grow a Vertical Herb Garden for Fresh Kitchen Flavors
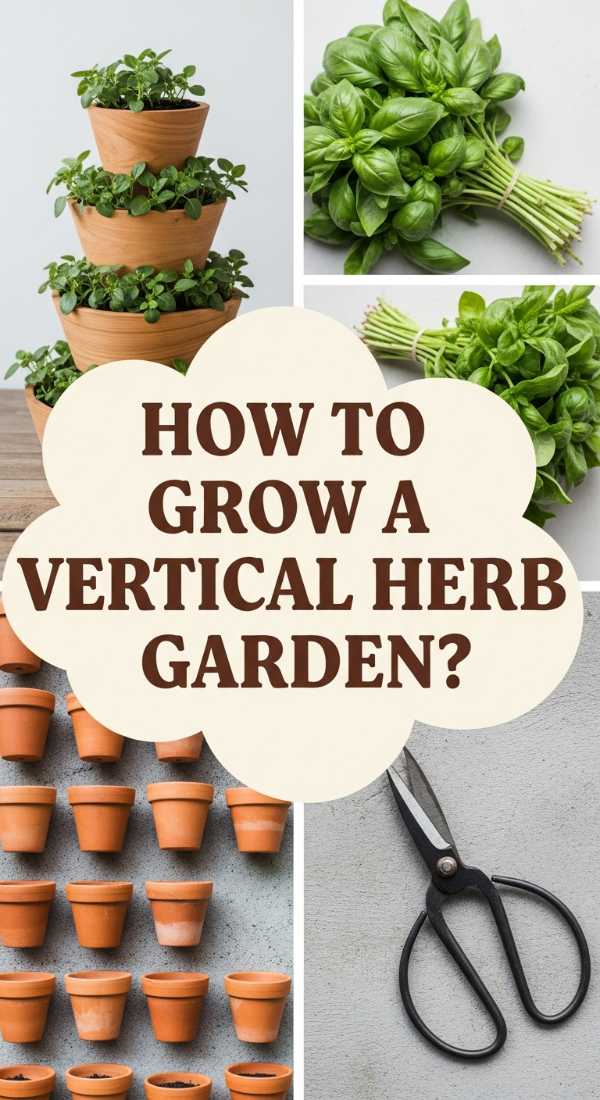
Why we love this
A vertical herb garden is a feast for the senses, bringing the kitchen’s most vibrant flavors right to your eye level. We love the way the air fills with the peppery scent of basil and the sharp, clean aroma of mint every time you brush past. It’s a space-saving masterpiece that turns a plain wall into a living, edible work of art. The tactile experience of snipping fresh rosemary for a Sunday roast or plucking mint for a summer mojito makes you feel deeply connected to your food. Plus, the lush wall of greenery provides a soft, organic texture that can transform a sterile balcony or patio into a cozy bistro.
Essential Elements:
- Wall-mounted planters or a vertical felt pocket system
- High-quality potting mix formulated for containers
- Herb starts (Basil, Mint, Rosemary, Thyme, Parsley)
- Hand trowel
- Watering can with a long spout
- Liquid seaweed fertilizer
How to make it
- Choose a wall that receives at least 6 to 8 hours of sunlight per day; most culinary herbs are sun-worshippers that need warmth to develop their essential oils.
- Secure your vertical planters or pockets to the wall using heavy-duty anchors and screws, ensuring the structure can handle the weight of wet soil.
- Fill each pocket or container with a lightweight potting mix; avoid heavy garden soil, which can compact and prevent drainage in a vertical setup.
- Arrange your herbs based on their water needs; place drought-tolerant herbs like Rosemary and Thyme at the top, and moisture-loving herbs like Mint and Parsley at the bottom where excess water drains.
- Tease the roots of your herb starts gently before planting them into the soil, ensuring they are buried at the same depth they were in their original pots.
- Firm the soil around each plant with your fingers and water immediately using a long-spouted watering can to reach the higher levels without splashing.
- Prune your herbs regularly by pinching off the tips; this encourages the plants to grow bushier rather than leggy and provides you with constant harvests.
- Feed your vertical garden every two weeks with a diluted liquid seaweed fertilizer to keep the foliage vibrant and the flavors intense throughout the growing season.
Wrapping Up the Magic
Your outdoor space is an extension of your heart, a place where memories are made under the open sky. By taking the time to build these DIY elements—from the soothing bird bath to the vibrant perennial beds—you are creating a sanctuary that nourishes both your family and the nature around you. I hope these projects inspire you to step outside, breathe in the fresh air, and start crafting your own version of magic under the stars. Remember, the beauty isn’t just in the finished result, but in the joy of the process itself. Happy decorating!